Chapter 8
Removing and Replacing the Motherboard and Related Components
8-3
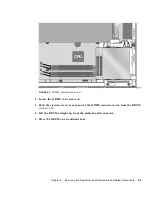
FIGURE 8-1
Removing and Replacing the CPU
8.1.2
Replacing the CPU
Note –
If you are replacing an old CPU, the CPU will be permanently bonded to the
heatsink. However, if you are installing a new CPU, the heatsink and CPU will be
separate.
1. Position the CPU over the motherboard CPU socket (
FIGURE 8-1
).
Caution –
The CPU will be damaged if you replace it incorrectly. Ensure that the
CPU key is correctly positioned before you attempt to press the CPU into the socket.
Viewed from the front of the system chassis, the key is at the left rear corner of CPU.
The key is the diagonal corner cut on the CPU (
FIGURE 8-1
).
Heatsink retaining clip
Heatsink
Heatsink key
CPU socket
CPU Key
CPU locking lever
Summary of Contents for Sun Blade 100
Page 6: ...vi Sun Blade 1000 Service Manual September 2000...
Page 8: ...viii Sun Blade 100 Service Manual October 2000...
Page 26: ...xxvi Sun Blade 100 Service Manual October 2000...
Page 30: ...xxx Sun Blade 100 Service Manual October 2000...
Page 38: ...xxxviii Sun Blade 100 Service Manual October 2000...
Page 40: ...1 2 Sun Blade 100 Service Manual October 2000 FIGURE 1 1 Sun Blade 100 System...
Page 48: ...1 10 Sun Blade 100 Service Manual October 2000...
Page 52: ...2 4 Sun Blade 100 Service Manual October 2000...
Page 94: ...4 26 Sun Blade 100 Service Manual October 2000...
Page 102: ...5 8 Sun Blade 100 Service Manual October 2000...
Page 120: ...6 18 Sun Blade 100 Service Manual October 2000...
Page 154: ...8 22 Sun Blade 100 Service Manual October 2000...
Page 158: ...9 4 Sun Blade 100 Service Manual October 2000...
Page 162: ...10 8 Sun Blade 100 Service Manual October 2000...
Page 170: ...A 8 Sun Grover Service Manual October 2000...


