Chapter 6
Removing and Replacing Major Subassemblies
6-15
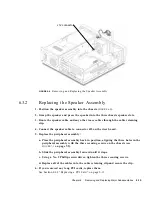
FIGURE 6-9
Removing and Replacing the Speaker Assembly
6.3.2
Replacing the Speaker Assembly
1. Position the speaker assembly into the chassis (
FIGURE 6-9
).
2. Grasp the speaker and press the speaker into the three chassis speaker slots.
3. Route the speaker cable and any other loose cables through the cable retaining
clip.
4. Connect the speaker cable to connector J12 on the riser board.
5. Replace the peripheral assembly:
a. Place the peripheral assembly back in position, aligning the three holes in the
peripheral assembly with the three securing screws on the chassis (see
FIGURE 7-1
on page 7-2).
b. Slide the peripheral assembly forward until it stops.
c. Using a No. 2 Phillips screwdriver, tighten the three securing screws.
d. Replace all of the cables into the cable retaining clip and secure the clip.
6. If you removed any long PCI cards, replace them.
See Section 8.4.2 “Replacing a PCI Card” on page 8-13.
J12 connector
Summary of Contents for Sun Blade 100
Page 6: ...vi Sun Blade 1000 Service Manual September 2000...
Page 8: ...viii Sun Blade 100 Service Manual October 2000...
Page 26: ...xxvi Sun Blade 100 Service Manual October 2000...
Page 30: ...xxx Sun Blade 100 Service Manual October 2000...
Page 38: ...xxxviii Sun Blade 100 Service Manual October 2000...
Page 40: ...1 2 Sun Blade 100 Service Manual October 2000 FIGURE 1 1 Sun Blade 100 System...
Page 48: ...1 10 Sun Blade 100 Service Manual October 2000...
Page 52: ...2 4 Sun Blade 100 Service Manual October 2000...
Page 94: ...4 26 Sun Blade 100 Service Manual October 2000...
Page 102: ...5 8 Sun Blade 100 Service Manual October 2000...
Page 120: ...6 18 Sun Blade 100 Service Manual October 2000...
Page 154: ...8 22 Sun Blade 100 Service Manual October 2000...
Page 158: ...9 4 Sun Blade 100 Service Manual October 2000...
Page 162: ...10 8 Sun Blade 100 Service Manual October 2000...
Page 170: ...A 8 Sun Grover Service Manual October 2000...


