Chapter 8
Removing and Replacing the Motherboard and Related Components
8-11
Caution –
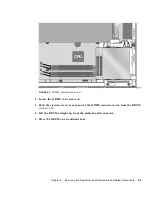
If the DIMM is not seated into its slot evenly, it can cause electrical short
circuits that will damage the system. Ensure that all contacts engage at the same
time by pressing evenly on both ends of the DIMM—do not rock the DIMM into
place. When the DIMM is properly seated, you should hear a click.
3. Press firmly on the top ends of the DIMM at the same time until the DIMM is
properly seated.
4. Verify that the ejection levers are closed toward the DIMM.
5. Detach the wrist strap, replace the system cover, and power on the system as
described in Chapter 9 “Finishing Component Replacement.”
Summary of Contents for Sun Blade 100
Page 6: ...vi Sun Blade 1000 Service Manual September 2000...
Page 8: ...viii Sun Blade 100 Service Manual October 2000...
Page 26: ...xxvi Sun Blade 100 Service Manual October 2000...
Page 30: ...xxx Sun Blade 100 Service Manual October 2000...
Page 38: ...xxxviii Sun Blade 100 Service Manual October 2000...
Page 40: ...1 2 Sun Blade 100 Service Manual October 2000 FIGURE 1 1 Sun Blade 100 System...
Page 48: ...1 10 Sun Blade 100 Service Manual October 2000...
Page 52: ...2 4 Sun Blade 100 Service Manual October 2000...
Page 94: ...4 26 Sun Blade 100 Service Manual October 2000...
Page 102: ...5 8 Sun Blade 100 Service Manual October 2000...
Page 120: ...6 18 Sun Blade 100 Service Manual October 2000...
Page 154: ...8 22 Sun Blade 100 Service Manual October 2000...
Page 158: ...9 4 Sun Blade 100 Service Manual October 2000...
Page 162: ...10 8 Sun Blade 100 Service Manual October 2000...
Page 170: ...A 8 Sun Grover Service Manual October 2000...

