L3214 Laser Cutter
User’s Manual
Maintenance
40
6.
Apply IPA to the surface of the lens, allow the IPA to work into the dirt and gently wipe in
one direction, then again at 90 degrees. Repeat this for both sides of the lens.
7.
Clean the surface or lip where the lens sits inside the barrel, any dust on this surface will
cause the lens to seat incorrectly and may affect the alignment of the laser.
8.
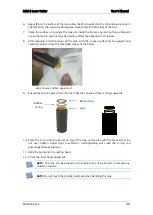
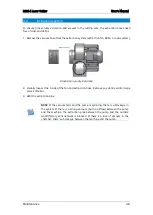
After cleaning, hold the edges of the lens, with the convex surface facing upward and
carefully replace it into the machined recess of the barrel.
Lens convex surface uppermost
9.
Ensure the lens is seated correctly such that the convex surface is facing upwards.
10.
Place the O-ring into the barrel, on top of the lens, and secure with the brass screw. Do
not over tighten, finger tight is sufficient. Overtightening will crush the O-ring and
potentially damage the lens.
11.
Refit the barrel into the cutting head.
12.
Check the laser beam alignment.
NOTE
:
The lens can be soaked in the solution for a few seconds to remove any
stubborn residue.
NOTE
:
Do not touch the polished surfaces when handling the lens.
Brass screw
Lens
Rubber
O-ring

