background image

Live View Introduction 


NVR User Manual 


19 


5.2.2 Quick Sequence View 

You can start quick sequence view if the scheme has not been created. If the scheme has been created, please refer to 5.2.4 Scheme View in Sequence 

for details.   


Go to the live view interface and then click 

  to pop up a little window. Set the dwell time in the window and then click 

  to view the live 

group by group according to the camera number of the current screen mode. Double click the sequence view interface to pause the view; double 
click again to restore the view. Click 

  to stop the view. 


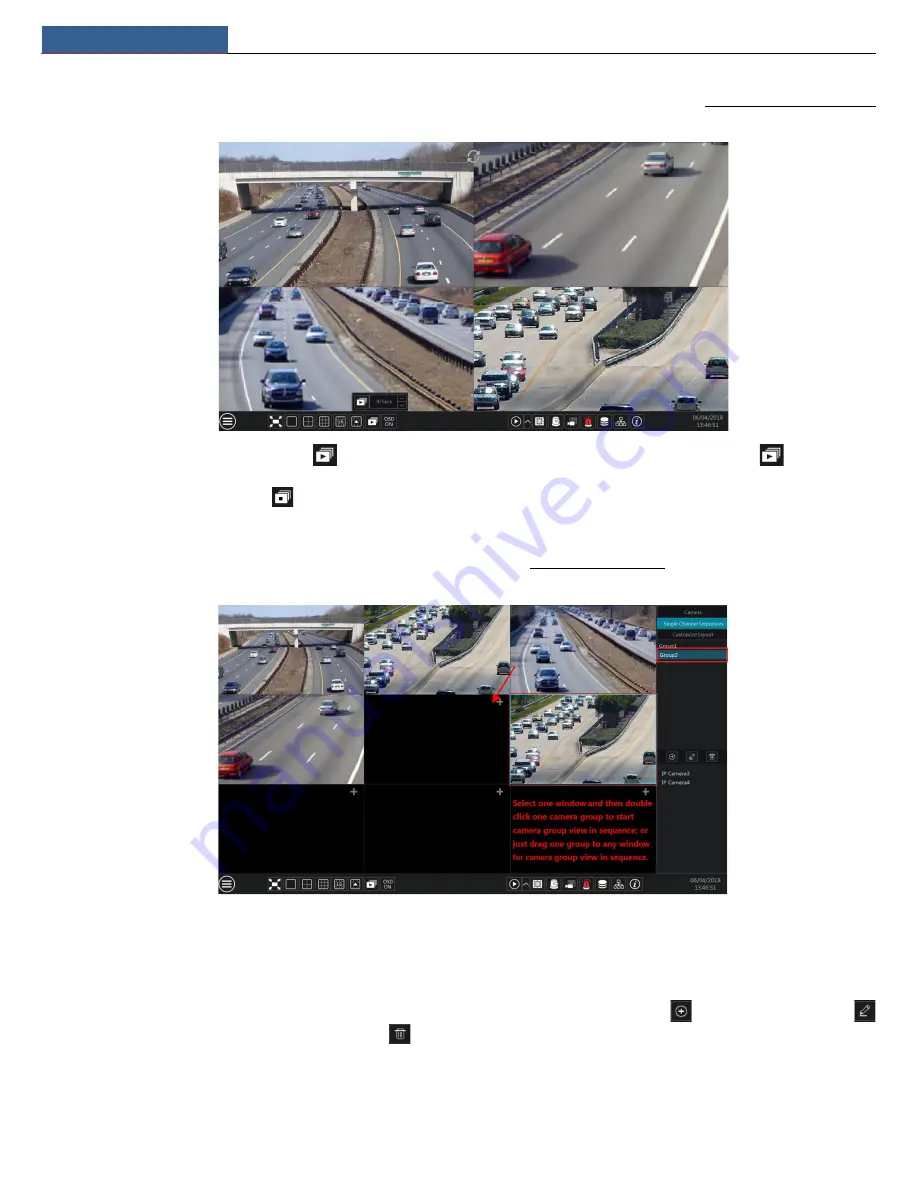
5.2.3   Camera Group View In Sequence 

You can start camera group view in sequence if camera group has been created (see 4.2.1 Add Camera Group for details).   


Go to the live view interface and then select a camera window.   


Double click one camera group on the right side of the interface. The cameras in the group will start camera group view one by one in the 

selected camera window. 

You can also drag the group directly to any preview window. Right click on the group view window and then click “Close Dwell” button to stop the 

view. 

 
You can also add camera group in the live view interface. Select “Single Channel Sequences” and then click 

  to add camera group. Click 


to modify the group name and sequence interval. Click 

  to delete the group. 


5.2.4   Scheme View In Sequence 

Click Start

Settings

System

Basic

Output Settings to go to the interface as shown below.   

Area ① displays all the dwell schemes; area ② shows the detailed information of the scheme; area ③ displays all the cameras and groups; area 

Summary of Contents for N4NRL

Page 1: ...1 NRL 4 and 8 Channel User Manual N4NRL N8NRL Version 1 0 Features and specifications are subject to change please check www specotech com for firmware updates ...

Page 2: ...hine in rain or moist environment In case any solid or liquid get inside the machine s case please turn off the device immediately and get it checked by a qualified technician Do not try to repair the device by yourself without technical aid or approval Contents 1 Introduction 1 1 1 Welcome 1 1 2 Features 1 1 3 Front Panel Descriptions 3 1 4 Rear Panel Descriptions 3 1 5 Connections 3 2 Basic Oper...

Page 3: ... 1 Instant Playback 35 8 2 Playback Interface Introduction 35 8 3 Record Search Playback Export 37 8 3 1 EZ Search 37 8 3 2 Museum Search 38 8 3 3 Time Search 39 8 3 4 Event Search 39 8 3 5 Bookmark Search 40 8 3 6 Snapshots 40 8 3 7 View Export Status 41 9 Alarm Management 42 9 1 Sensor Alarm 42 9 2 Motion Alarm 42 9 2 1 Motion Configuration 42 9 2 2 Motion Alarm Handling Configuration 43 9 3 Int...

Page 4: ...1 7 NAT Configuration 58 11 1 8 View Network Status 58 11 2 Basic Configuration 58 11 2 1 General Configuration 58 11 2 2 Date and Time Configuration 58 11 3 Factory Default 59 11 4 Device Software Upgrade 59 11 5 Backup and Restore 60 11 6 Restart Automatically 60 11 7 View Log 60 11 8 View System Information 61 12 Remote Surveillance 62 12 1 Mobile Client Surveillance 62 12 2 Web LAN Access 62 1...

Page 5: ...Supports quick tool bar operation of the preview window Supports camera group view and scheme view in sequence quick sequence view and dwell time setting Supports motion detection and video mask Supports multiple popular P T Z control protocol and setup of the preset and cruise Supports direct mouse control of the IP dome including rotating zoom focusing and so on Supports single camera image to b...

Page 6: ...nd so on Supports allow and block list function and the allow and block IP address IP segment address can be set Supports multiple browsers including IE8 9 10 11 Firefox Opera Chrome available only for the versions lower than 45 and Safari in MAC system Supports remote achievement configuration import and export of the NVR parameters and other system maintenance operations including remote upgradi...

Page 7: ...the PoE ports of the recorder 2 Connect a monitor to the recorder via VGA or HDMI cable not included 3 Connect the included optical mouse into any USB port of the recorder 4 Connect the power adapter to the recorder and plug power cord into a 120VAC 50 60Hz outlet 5 Connect recorder to network optional 6 Turn on power switch and allow recorder to boot up 1 5 Connections Video Connections Video Out...

Page 8: ...ton Disconnect the power 2 2 Remote Control It uses two AAA size batteries Open the battery cover of the remote control Place batteries Please take care the polarity and Replace the battery cover Key points to check in case the remote doesn t work 1 Check batteries polarity 2 Check the remaining charge in the batteries 3 Check IR controller sensor for any masking If it still doesn t work please ch...

Page 9: ... box and then click the box The input keyboard will pop up automatically 2 4 Text input Instruction The system includes two input boxes Refer to the above pictures The left box is the number input box and the right box is the input box which provides inputs of numbers letters and punctuation characters The introductions of keys on the input boxes are shown below Button Meaning Button Meaning Backs...

Page 10: ...et your own password when you use the wizard for the first time the default username of the system is admin select the login username and enter the password you set by yourself Click Edit Security Question to set questions and answers for password security of admin If you forget the password please refer to Q4 in Appendix A FAQ for details Click Next to continue or click Cancel to exit the wizard ...

Page 11: ...o Valid UPnP Refer to the following picture You can view the external IP address of the NVR Enter the external IP address plus port in the address bar of your browser to access the NVR please see 11 1 6 UPnP Configuration for details DDNS Settings Check Enable and then select the DDNS type Enter the server address domain name username and password according to the selected DDNS type And then click...

Page 12: ...work segments for being in the same network segment with the NVR Click OK to save the settings Click to edit the added camera as shown on the above right Enter the new camera name IP address port username and the password of the camera You can click Test to test the effectiveness of the input information Click OK to save the settings You can change the IP camera name only when the added camera is ...

Page 13: ...ble below Button Meaning Start button Click it to pop up area Full screen button Click it to show full screen click it again to exit the full screen Screen mode button Dwell button see 5 2 2 Quick Sequence View and 5 2 4 Scheme View In Sequence for details Click it to enable OSD click to disable OSD Click to set the default playback time before starting instant playback 8 1 Instant Playback or goi...

Page 14: ... list to preview the cameras images one by one in the selected window Click Customize Layout to view all the display modes in the display mode list refer to 5 2 1 Display Mode for detail configuration of the display mode Double click one display mode in the list to switch to the display mode for viewing Introduction of area Icon Button Meaning It shows the current login user Click it to go to reco...

Page 15: ...t interface to go to corresponding interfaces Refer to the picture below For instance you can go to the system setup interface by clicking System tag 3 2 3 Main Functions Camera The module covers the functions such as Camera Management see Chapter 4 Camera Management for details Image Settings see 5 3 Preview Image Configuration for details Motion see 9 2 1 Motion Configuration for details and PTZ...

Page 16: ...Configuration for details Account and Authority The module covers the functions such as Account Management see 10 1 Account Management for details and Permission Management see 10 3 Permission Management for details and so on System The module covers the functions such as Basic Configuration see 11 2 Basic Configuration for details Device Information see 11 8 View System Information for details Lo...

Page 17: ... below You can quickly add or add the IP camera manually Quickly Add Check the cameras and then click Add to add cameras Click to edit the camera s IP address username and password and so on Click Default Password to set the default username and password of each camera Add Manually Enter the IP address or domain name click in the IP address column to pop up the domain name input window enter the d...

Page 18: ...ut information Then click OK button to return to the previous interface Note Only the local NVR has unoccupied channels may the IPC of other NVR DVR in the same local network be added And the added IPC supports previewing and recording 4 1 2 Edit Camera Click Edit Camera in the setup panel to go to the interface as shown below Click to view the live image of the camera in the popup window Click to...

Page 19: ... list One of the two conditions must be met if the IP camera which directly connects to the PoE port of the NVR through ONVIF protocol should be shown automatically in the camera list The IP camera which directly connects to the PoE port is in the same network segment with the internal ethernet port The DHCP obtain an IP address automatically of the IP camera which directly connects to the PoE por...

Page 20: ...terface as shown below This function supports searching other NVRs DVRs that is in the same local network as the local NVR The user may add camera channels of other NVRs DVRs into the unoccupied channels of the local NVR Click to edit the IP address user name or password and other information of the NVRs Click behind Add button to add the camera channel selected and the user may edit the IP addres...

Page 21: ... Move tool Click it to move the tool bar anywhere Manually Record On Click it to start recording Instant Playback Click to playback the record click Instant Playback to select or self define the instant playback time See 8 1 Instant Playback for details Enable Audio Click it to enable audio You can listen to the camera audio by enabling audio Snap Click it to pop up the snap window Click Save in t...

Page 22: ...ck under the display mode list and then enter the display mode name in the popup window click OK button to save the current display mode Method Two Click Start Settings System Basic Output Settings to go to the interface and then set the screen mode Double click the camera or camera group in the list to add them to the selected window Click to save the current display mode refer to 5 2 4 Scheme Vi...

Page 23: ...ated see 4 2 1 Add Camera Group for details Go to the live view interface and then select a camera window Double click one camera group on the right side of the interface The cameras in the group will start camera group view one by one in the selected camera window You can also drag the group directly to any preview window Right click on the group view window and then click Close Dwell button to s...

Page 24: ...ck the right click menu Clear in area to remove a single camera or click to remove all the cameras c Click Apply to save the settings Start Sequence View Go to the live view interface and then click to open a window Set the dwell time in the window and then click to start scheme view in sequence Double click the sequence view interface to pause the view double click again to restore the view Click...

Page 25: ...ese items You can click Default button to restore the image settings to the default factory settings 5 3 3 Mask Settings Some areas of the image can be masked for privacy Up to four mask areas can be set for each camera Click Start Settings Camera Image Mask Settings to go to the interface as shown below Select the camera and enable the mask Click Draw button and then drag the mouse on the image a...

Page 26: ...e and the sharpness level of the image edge Wide Dynamic The wide dynamic range WDR function helps the camera provide clear images even under back light circumstances When there are both very bright and very dark areas simultaneously in the field of view WDR balances the brightness level of the whole image and provide clear images with details Denoise Adopt the noise reduction technology to decrea...

Page 27: ...f auto mode is selected the time interval setup will be available Click to increase decrease the focal length Click it to focus instantly Day night mode switch autofocus If checked the lens will focus automatically when the camera is switching day night mode Time Interval It is the time interval when camera lens is auto focusing The interval can be set in the drop down list PTZ Note This function ...

Page 28: ... Click to increase decrease the iris of the dome Drag the slider to adjust the rotating speed of the dome Click to start stop recording Click to hide show the analog joystick Click it to return to the live view interface Analog Joystick Control The analog joystick on the left side of the interface provides quick PTZ control The dome or PTZ will rotate when you drag the analog joystick The farther ...

Page 29: ...t button to zoom out the image Move the cursor of the mouse to the camera image and then slide the scroll wheel of the mouse forward to zoom in the image slide the scroll wheel of the mouse backward to zoom out the image Preset Setting Click Preset to go to preset operation tab and then click Add button to pop up a window as shown below Select the preset and then enter the preset name in the windo...

Page 30: ...d and then click OK button In the Add Cruise window you can click to reselect the preset then change the preset time and speed Click to delete the preset Click Add button to save the cruise Click to start the cruise and click to stop the cruise in the cruise list of the cruise operation tab click Delete button to delete the selected cruise You can also go to cruise setting interface for cruise set...

Page 31: ...ck to add cruise The operations of the Add Cruise window are similar to that of the PTZ control interface please see 6 1 PTZ Control Interface Introduction for details Edit Cruise Select the camera and cruise in the Cruise interface Enter the new cruise name and then click to save the cruise name Click Add Preset to add preset to the cruise Click to edit the preset Click to delete the preset from ...

Page 32: ...ecord Normal record is enabled all the time sensor alarm record will be started when sensor alarm happens Continuous Record Motion Record Sensor Record Normal record is enabled all the time motion sensor alarm record will be enabled when motion sensor alarm happens Continuous Record Motion Record Sensor Record Analytics Record Normal record is enabled all the time motion sensor analytics alarm rec...

Page 33: ...code parameters and record schedules of each camera See 7 2 Encode Parameters Setting and 7 3 Schedule Setting for details 7 1 2 Advanced Configuration Click Start Settings Record Advanced to go to the following interface Enable or disable cycle record cycle record the earliest record data will be replaced by the latest when the disks are full Set the pre alarm record time post alarm record time a...

Page 34: ...elow 24ⅹ7 24ⅹ5 and 24ⅹ2 are the default schedules you cannot edit or delete 24ⅹ7 while 24ⅹ5 and 24ⅹ2 can be edited and deleted Click the schedule name to display the detailed schedule information on the left side of the interface The seven rows stand for the seven days in a week and each row stands for 24 hours in a day Blue stands for the selected time and gray stands for unselected time Click to...

Page 35: ...f the day to other days Refer to the picture below Check the days in the window and then click OK to save the settings Set Week Schedule Click or and then click Manual beside to set the week schedule Refer to the picture below Set the start and end time check the days in the window and then click OK to save the settings Click All to set all week recording click Reverse to swap the selected and uns...

Page 36: ...n and set the motion area of each camera See 9 2 1 Motion Configuration for details The camera will start motion based recording once you finish the above settings 7 4 4 Sensor Based Recording Set the sensor based recording schedule of each camera See 7 3 Schedule Setting for details Set the NO NC type of the sensor enable the sensor alarm and then check and configure the Record See 9 1 Sensor Ala...

Page 37: ...hen click on the top right corner of the added disk or camera to delete it from the group The deleted disks and cameras will be moved into group one automatically Each group can add the disks and cameras from other groups Each disk and camera can only be added into one group Select a disk group and then click in the disk or camera row to pop up a window Check the disks or cameras in the window and...

Page 38: ...Record Disk Management NVR User Manual 34 ...

Page 39: ...the live view interface to set the default playback time On panel on the right will show you re the channel number and their recorded data coded by color The bar that runs across them represents the playback time being viewed You can move this bar around To export highlight a section of the desired recording click export and follow the prompts You can export single or multiple channels at the same...

Page 40: ...arch the record in this quadrilateral after drawing it Smart playback settings Click it to set smart playback Introduction of area Button Meaning Click it to go to record search and export interface see 8 3 Record Search Playback Export for details Click it to Go to the live view interface see Chapter 5 Live View Introduction for details Click on the playback window to show the tool bar as shown i...

Page 41: ...ck stands for intelligence record Click the record block to set the time and then the playback camera will play the record from the time you set Drag the color block on the time scale to select the backup area and then right click the area or click to pop up a export information window Click button in the window to pop up the export window Select the device export path and format and then click Ex...

Page 42: ... left top corner of the interface to select the time slice mode Method Three Right click the mouse on any area of the time sliced interface to go back to the upper interface 8 3 2 Museum Search Click Start Search and Export Museum Search to go to the following tab as shown below Behavior Detection when you select the smart playback mode the system will analyze the video containing the object detec...

Page 43: ...the interface You can set the date on the top left of the interface check the event type as required and click the time scale or click under the time scale to set the time The camera window will play the record according to the time and event type you set Drag the color blocks on the time scale to select the record data or click Set Backup Time button on the bottom left corner of the interface to ...

Page 44: ... add the tags can you play the record by tag search Click Start Playback to go to the playback interface and then click on the bottom of the camera window to add bookmarks when you want to mark the playback time point of the selected camera Click Start Search and Export Bookmarks to go to Bookmarks tab Click in the interface to play the record Click to edit the tag name Click to delete the tag 8 3...

Page 45: ...Playback Backup NVR User Manual 41 8 3 7 View Export Status Click Start Search and Export Export Status or click on the tool bar at the bottom of the playback interface to view the export status ...

Page 46: ...he trigger cameras will snap automatically when the sensor alarm is triggered Push check it and choose NO or OFF If it is ON the system will send messages when the sensor alarm is triggered Alarm out check it and then the Trigger Alarm out window will pop up automatically Configure the trigger alarm out in the window The system will trigger the alarm out automatically when the sensor alarm is trig...

Page 47: ...nfiguration Click Start Settings Alarm Motion Alarm to go to the following interface Enable or disable Record Snapshot Push Alarm out Preset Buzzer Pop up Video and E mail The alarm handling settings of motion alarm the same as the sensor alarm see 9 1 Sensor Alarm for details Click Apply to save the settings You can click Motion Settings to go to the motion configuration interface 9 3 Intelligenc...

Page 48: ... interface Enable or disable Snapshot Push Alarm out Preset Buzzer Pop up Video and E mail The alarm handling setting of object detection alarm is similar to that of the sensor alarm see 9 1 Sensor Alarm for details Click Apply to save the settings You can click Object Config to go to the object detection configuration interface 9 3 2 Exception Exception Configuration Click Start Settings Camera I...

Page 49: ...eption detection Exception Alarm Handling Configuration Click Start Settings Alarm Intelligence Alarm Exception to go to the interface Enable or disable Snapshot Push Alarm out Preset Buzzer Pop up Video and E mail The alarm handling setting of exception detection alarm is similar to that of the sensor alarm see 9 1 Sensor Alarm for details Click Apply to save the settings You can click Exception ...

Page 50: ...ion Click Start Settings Alarm Intelligence Alarm Tripwire to go to the following interface Enable or disable Snapshot Push Alarm out Preset Buzzer Pop up Video and E mail The alarm handling setting of line crossing alarm is similar to that of the sensor alarm see 9 1 Sensor Alarm for details Click Apply to save the settings You can click Crossing Config to go to the line crossing configuration in...

Page 51: ... setting of intrusion detection alarm is similar to that of the sensor alarm see 9 1 Sensor Alarm for details Click Apply to save the settings You can click Intrusion Config to go to the intrusion detection configuration interface 9 4 Exception Alarm 9 4 1 IPC Offline Settings Click Start Settings Alarm Exception IPC Offline Settings to go to the interface as shown below Enable or disable Snapshot...

Page 52: ... Settings Alarm Event Notification to go to the following interface Set the delay time and the schedule of each alarm out You can click Edit Schedules to edit the schedules see 7 3 1 Add Schedule for details Click Apply to save the settings You can click Test to test the alarm output 9 5 2 E mail Click Start Settings Alarm Event Notification E mail to go to the e mail configuration interface Set t...

Page 53: ...e Click Start Settings Alarm Event Notification Push Message to go to the interface as shown below Check Enable and then click Apply button to save the settings If Push Server is online it will push messages to the mobile clients 9 6 Manual Alarm Click on the tool bar at the bottom of the live view interface to pop up a window Click Trigger to start alarm Click Clear to stop alarm 9 7 View Alarm S...

Page 54: ...m happens Click to view the detail information as shown below If the exception information is more than one page you can enter the number in the box and then click to jump to the specified page Click to view the exception alarm information in the previous next page Click to play the alarm record ...

Page 55: ...ave the Account and Authority permission can manage the system s accounts Group Administrator owns all the permissions displayed in area except Account and Authority and its permissions cannot be changed while the permissions of Advanced and Common can be changed 10 1 1 Add User Click Start Settings Account and Authority Account Add User or click beside the search box to pop up the window as shown...

Page 56: ...p a window Enter current password and then check Enable to input pattern lock Recover Password Click Recover Password to reset the password to 123456 Edit User Click Edit User to pop up the window as shown below The admin is enabled its permission control is closed and permission group cannot be changed by default You can enable or disable other users if disabled the user will be invalid open or c...

Page 57: ...dd to save the settings 10 3 2 Edit Permission Group Go to Edit Permission Group interface and then click in the group list to edit the permission group the operations of the Edit Permission Group are similar to that of the Add Permission Group please see 10 3 1 Add Permission Group for details Click to save the group as another group Click to delete the permission group The three default permissi...

Page 58: ...delete it Click Apply to save the settings 10 5 Preview On Logout Click Start Settings Account and Authority Security Preview On Logout to go to the following interface Set a camera and then enable or disable the preview permission on logout as required If a camera s preview permission on logout is ON you can view the live image of the camera when the system is logged out or the live image of the ...

Page 59: ...thernet port is broken The network addresses of the internal ethernet port can be changed to make the port in the same network segment with the IP cameras which directly connect to the PoE ports of the NVR it is not recommended to change the network addresses of the internal ethernet port 11 1 2 Port Configuration Click Start Settings Network Port to go to the interface as shown below Enter the HT...

Page 60: ...lick on test to check if ok If so you may now go to your domain name specoddns net with Internet Explorer and access your recorder remotely 11 1 5 E mail Configuration Click Start Settings Network E mail to go to the following interface Enter the sender s name e mail address SMTP server and SMTP port you can click Default to reset the SMTP port to the default value and then enable or disable the S...

Page 61: ...e NVR through the web client which is in WAN via router without port mapping Click Start Settings Network UPnP to go to the following interface Make sure the router supports UPnP function and the UPnP is enabled in the router Set the NVR s IP address subnet mask and gateway and so on corresponding to the router Check Enable in the interface as shown below and then click Apply button Click Refresh ...

Page 62: ...interface Set the device name device No language video format and main output Enable or disable wizard Log In Automatically Log Out Automatically if checked you can set the wait time App Live Self Adaption and Dwell Automatically if checked you can set the wait time Click Apply to save the settings Device Name The name of the device It may display on the client end or CMS that help user to recogni...

Page 63: ...he NVR Click Start Settings System Maintenance Upgrade to go to Upgrade interface Select the USB device in Device Name option and go to the path where the upgrade software exists Select the upgrade software and then click Upgrade The system may automatically restart during upgrading Please wait for a while and do not power off the NVR during upgrading Flash Upgrade The upgrade steps are as follows...

Page 64: ...nally click OK button in the popup window Recover Select the USB device in Device Name option find the configuration backup file and then click Recover button finally click OK button in the popup window 11 6 Restart Automatically You can set the automatic restart time for the NVR to maintain it regularly Click Start Settings System Maintenance Auto Maintenance to go to the interface as shown below...

Page 65: ...pop up a menu list Check contents in the menu list and then the log list will show the checked log contents only Click to play the video log 11 8 View System Information Click Start Settings System Information and then click the corresponding menu to view the Basic Camera Status Alarm Status Record Status Network Status and Disk information of the system ...

Page 66: ...en the web browser on your computer enter the IP address of the NVR in the address bar and then press enter to go to the login interface as shown below You can change the display language on the top right corner of the login interface Enter the username and password of the NVR in the interface and then click Login to go to the live view interface 12 3 Web WAN Access NAT Access Set the network of t...

Page 67: ...nter the WAN IP address plus HTTP port like http 116 30 18 215 100 in the address bar and then press enter to go to the login interface Enter the username and password of the NVR in the interface and then click Login to go to the live view interface 12 4 Web Remote Control The supported browsers of the remote surveillance are IE8 9 10 11 Firefox Opera and Chrome available only for the versions low...

Page 68: ... and all cameras in the group can be shown in the left panel View Scheme Click to view the scheme or planning All schemes can be shown in the left panel Double click the scheme name to invoke it quickly Tool Bar Introduction Button Meaning Screen mode button Click it to disable OSD Click to enable OSD Click it to show full screen Right click on the full screen to exit full screen Click All Main St...

Page 69: ...a image to view the hidden area Click it to zoom out the image of the camera The 3D zoom in function is designed for P T Z Click the button and then drag the image to zoom in or zoom out the image click the image on different areas to view the image of the dome omni directionally Click it to start record to the NVR Click it to close the preview camera Click it to enable audio and then drag the sli...

Page 70: ...ime scale and then click it to set the backup end time Export button Backup tasks button Click it to view the backup status Event list button Click it to view the event record of manual schedule sensor motion 12 4 3 Remote Export Click Export in the remote interface to go to the export interface You can export the record by event search or by time search Event Search Check the record type on the l...

Page 71: ...FAQ NVR User Manual 67 ...

Page 72: ...er of the selected question in the popup window the password for admin will be reset to 1234 by default If you forget the answer of the question this way will be invalid please contact your dealer for help b The passwords of other users can be reset by admin please refer to 10 1 2 Edit User for details Q5 The NVR cannot add up to the maximum number of IP cameras Take the 16 CH NVR as an example So...

Page 73: ...us you will fail to add the IP camera Q7 The IP camera which directly connects to the PoE port of the NVR through ONVIF protocol is shown in the camera list but there is no image output why Please make sure the username and password of the IP camera are correct The IP camera s username and password can be modified through the two ways mentioned as below Click Edit Camera in the Camera module of th...

Page 74: ...ormat and AVI format by NVR If you select the private format when backing up record by NVR an RPAS Recording Player Application Software compression package will be backed up to the USB device automatically along with the record data Uncompress the RPAS zip and then click RPAS exe to set up RPAS After the setup is completed open RPAS player and then click Open Folder button in the middle of the in...

Page 75: ...nual 71 format b Record backed up through web The record can only be backed up with AVI format through web The record can be backed up to PC and played by the video player which supports this format Fig 11 1 Fig 11 2 ...

Page 76: ...50 10800 768 337 5 8100 512 225 5400 384 168 75 4050 256 112 5 2700 The table below shows the recording capacity requirements for record storage in 30 days Record Bitrate Kbps Recording Capacity TB 1CH 4CH 8CH 16CH 32CH 64CH 10240 3 09 12 36 24 72 49 44 98 88 197 76 8192 2 48 9 89 19 78 39 56 79 11 158 21 6144 1 86 7 42 14 84 29 67 59 33 118 66 4096 1 24 4 95 9 89 19 78 39 56 79 11 3072 0 93 3 71 ...

Page 77: ...ch Highlighted color to display camera records in a certain period of time different colors refer to different record events Function Play pause FF FB etc Alarm Mode Manual sensor motion exception intelligence Input Support IPC alarm input Output Support IPC alarm output Linkage Record snapshot preset e mail pop up window etc Network Interface RJ45 10M 100Mbps 1 PoE Port RJ45 8 RJ45 4 Protocol TCP...

Reviews: