background image

Using the Key

 Pad


114 

RB6741-Z Touchscreen Security System User Manual 

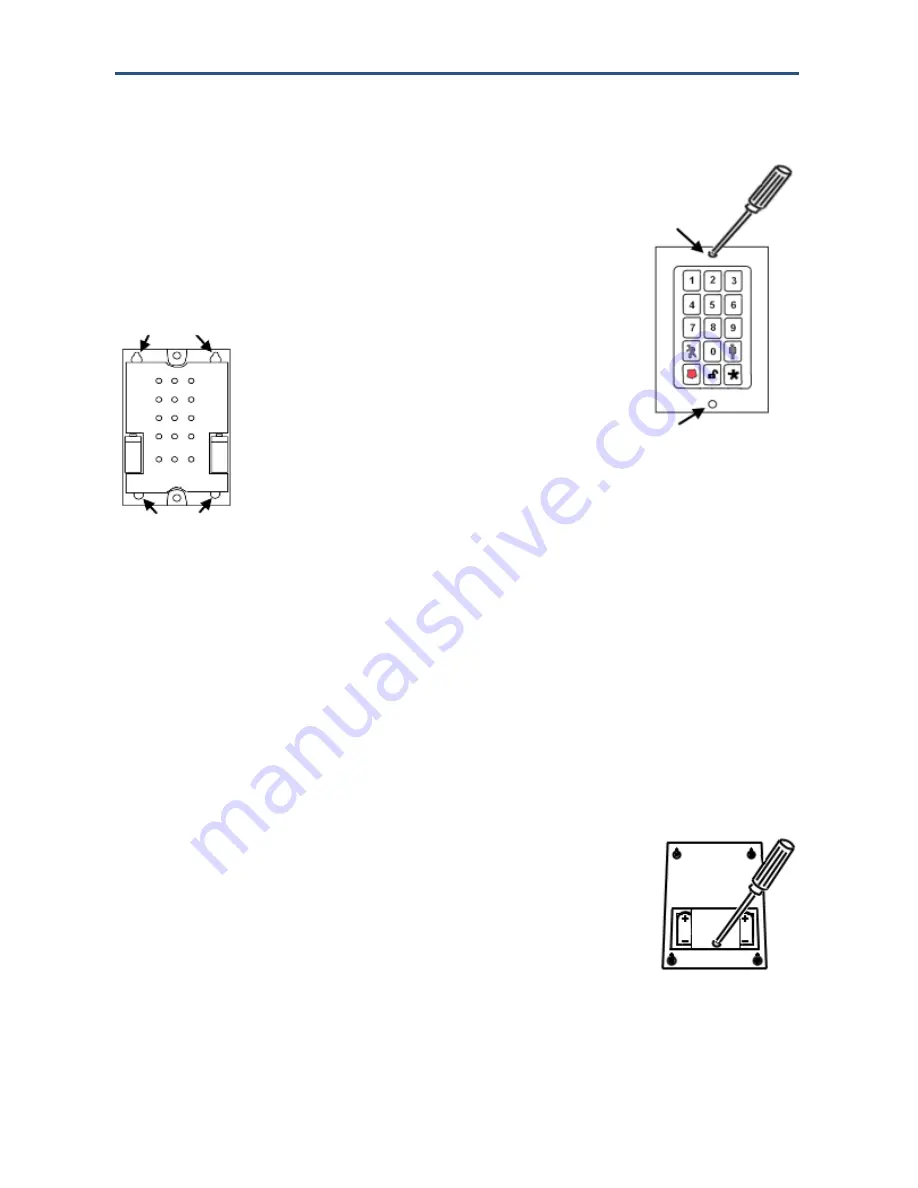
Mounting the Key Pad 

To mount a key pad to the wall:  

1.  Use a Phillips screwdriver to remove the faceplate from the front 

of the key pad (remove the faceplate). 
 
Behind the circuit board, four holes are visible at the back of the 
device. 


Remove the Faceplate


2.  Place the key pad on the wall where you want it located and use a pen to mark the 

location of the four holes. 
 

3.  Install four screws in the locations marked on the wall. Do not screw them in all the 

way. 
 

4.  Affix the key pad to the installed screws. 


5.  Replace the faceplate to the front of the key pad. 

Replacing Key Pad Batteries 

To replace the batteries in the key pad:  

1.  With a Phillips screwdriver, remove the screw from the battery 

cover in the back of the key pad and remove the cover. 
 

2.  Find the two supplied CR2 3-volt lithium batteries and install them 

positive end up. 
 

3.  Replace the battery cover. 


Summary of Contents for Oaziss Aegis RB6741-Z

Page 1: ...Z Touchscreen Security System FastFind Links Welcome to the Touchscreen Using the Touchscreen Managing Your Security System Managing Environmental Devices Managing Wi Fi Repeaters Managing and Configuring the Touchscreen ...

Page 2: ...ermission of SMC Microsoft and Windows are registered trademarks of Microsoft Corporation Apple and Macintosh are registered trademarks of Apple Inc All other brands product names trademarks or service marks are property of their respective owners This product Model RB6741 Z includes software code developed by third parties including software code subject to the GNU General Public License GPL or G...

Page 3: ...ents 14 Understanding Security Zone Types 16 Understanding Alarms 17 Configuring the Touchscreen 18 Subscriber Portal 20 2 Using the Touchscreen 21 Understanding the Touchscreen Controls 22 Understanding the Screen 23 Security Status Header 23 System Zone Trouble Header 25 Content Area 29 Home Screen 29 Managing Touchscreen Apps 31 Installing Touchscreen Apps 32 Reordering Apps on the Home Screen ...

Page 4: ...erstanding the Duress Keypad Code 56 Managing Your Secret Word 57 Managing Connectivity between Your Home Devices and the Internet 58 Viewing Your Security Account Information 62 Managing Sensors 62 Disabling a Sensor 62 Viewing Your Zone Event History 63 Reordering Security Zones in the Touchscreen 65 Managing Cameras 65 Modifying Camera Details 66 Assigning a Camera to a Security Zone 68 Modifyi...

Page 5: ...tions for Sensor Installation and Placement 108 Door Window Sensors and Glass Break Detectors 108 Glass Break Detectors 108 Motion Detectors 108 Evacuation Plan 109 Additional Emergency Preparations 109 Smoke Detector Installation Recommendations 110 Camera Installation Recommendations 111 Appendix B Using the Key Pad 112 Checking System Status 112 Arming the System 112 Arm Away Mode 113 Arm Stay ...

Page 6: ...is document you learn how to Use your RB6741 Z security system features and functions Understand System and Zone Trouble Header Messages Arm and disarm your security system Send emergency alarms and test the system Manage passcodes Manage security zones Managing Connectivity between your RB6741 Z and the Internet Manage emergency dispatch contact information Manage different sensors and devices in...

Page 7: ... how to manage your security system Chapter 4 describes technician operations for managing the physical devices in the home Chapter 5 describes how to manage Wi Fi repeaters Chapter 6 describes how to manage and configure the Touchscreen Appendix A describes sensor placement guidelines Appendix B describes key pad installation instructions Appendix C describes Wi Fi repeater placement guidelines A...

Page 8: ...hazardous areas of the equipment could result in injury or death Typographic Conventions This document also uses the following typographic conventions Convention Description Bold Indicates text on a window other than the window title including menus menu options buttons fields and labels Italic Indicates a variable which is a placeholder for actual text provided by the user or system Angled bracke...

Page 9: ...nces when disposing of or recycling used batteries To avoid the risk of electrocution keep the product away from water including wet basements bathtubs sinks and swimming pools Never expose the Touchscreen to spray cleaners and aerosols Clean the product using only a lint free cloth Never use solvents or cleaning agents Keep the equipment at least 6 feet 1 9 m from a flame or ignition source such ...

Page 10: ...d to try to correct the interference by one of the following measures Reorient or relocate the receiving antenna Increase the separation between the equipment and receiver Connect the equipment into an outlet on a circuit different from that to which the receiver is connected Consult the dealer or an experienced radio TV technician for help FCC Caution Changes or modifications not expressly approv...

Page 11: ...ion est autorisée aux deux conditions suivantes 1 l appareil ne doit pas produire de brouillage et 2 l utilisateur de l appareil doit accepter tout brouillage radioélectrique subi même si le brouillage est susceptible d en compromettre le fonctionnement Cet appareil et son antenne s ne doit pas être co localisés ou fonctionnement en association avec une autre antenne ou transmetteur Le terme IC av...

Page 12: ...roperly AN ALARM SYSTEM IS NOT A SUBSTITUTE FOR INSURANCE Conditions Resulting In False Alarms Any installation of the RB6741 Z not in accordance to this manual may result in the occurrence of false alarms Conditions Resulting In Impaired Operation Any installation of the RB6741 Z not in accordance to the National Electric Code NFPA70 may result in improper operation as described in this manual Pr...

Page 13: ...erge system Understand and operate the Touchscreen device Arm and disarm your security system Send a panic alarm View system status and arm disarm the system Manage connectivity between the Touchscreen and the central monitoring stations Manage pass codes Manage security zones Manage emergency dispatch contact information View history logs View account information ...

Page 14: ...vices Thermostat Panel Interface devices Key pads Key fobs The Touchscreen communicates with sensors by radio frequency Optional cameras communicate with the security network router wirelessly The Touchscreen maintains communication with the system servers through the Internet and by cellular Figure 1 1 shows how the network is set up Table 1 1 describes the equipment that may be included with you...

Page 15: ...iggers if water comes in contact with the sensor Smoke triggers when smoke is detected Cameras Up to six cameras can be installed in your security system Cameras can be configured to take a series of pictures if a particular sensor is faulted Panel interface This device connects to a traditional home security system and allows you to control its components from the Touchscreen Thermostats This dev...

Page 16: ...Armed Stay mode Motion detector Interior with Delay Provides an entry delay if the motion sensor is tripped when the Touchscreen is armed Entry Delay begins whenever the motion sensor detects motion regardless of whether an entry exit delay zone was tripped first Motion detector Interior Follower Arm Night Allows the use of a motion detector in Arm Night mode The alarm trips immediately if motion ...

Page 17: ...ore information The central monitoring station will attempt to contact the persons listed on the account When they reach a person listed on the account they will ask for the Secret Word to affirm whether a genuine emergency is occurring If no one on the list can be contacted or if the person contacted gives the wrong Secret Word the central monitoring station immediately dispatches police or other...

Page 18: ...pp to access a variety of operations to configure and maintain your security system Note You cannot access the Security app if the security system is armed To access the Settings app 1 From the Home screen see page 29 tap the Settings app The Keypad screen appears 2 Tap the numbers to enter your keypad code The Settings menu appears ...

Page 19: ...ur Alarms on page 48 View and test the Touchscreen s connectivity to the central monitoring stations see Testing Your Connectivity on page 53 Manage your keypad codes and secret word see Managing your Keypad Codes on page 54 View your account information see Viewing Your Security Account Information on page 62 Manage your Touchscreen device settings see Managing and Configuring the Touchscreen on ...

Page 20: ...the Subscriber Portal from a PC or mobile Internet device Many operations that can be done from the Touchscreen can also be performed from the Subscriber Portal Some operations such as managing which apps are accessible from your Touchscreen can only be performed from the Subscriber Portal Your installer has provided you with the URL address of the Subscriber Portal as well as a username and passw...

Page 21: ...nding emergency alarms WARNING The rechargeable battery that comes with your Touchscreen is only available through your service operator If your battery needs to be replaced contact your service operator to arrange for replacement This chapter describes how to use the Touchscreen The following topics are covered in this chapter Understanding the Touchscreen Controls page 22 Understanding the Scree...

Page 22: ...onfiguration menu Back Return to the previous screen Emergency Display icons for fire medical or police service Tap one of these icons to immediately send an alarm to the appropriate call center The button is located at the bottom right in front of the device When A C power is available this button is lit For more information see Sending an Emergency Alarm on page 47 Volume Switch Adjust the volum...

Page 23: ...s to navigate through menus to access the function you desire If the screen is black showing nothing it means the system is not receiving A C power or the display is powered off to conserve battery life The screen is organized into the following operational sections Security Status Header see Security Status Header on page 23 System Zone Trouble Header see System Zone Trouble Header on page 25 Con...

Page 24: ...oor or window being opened an announcement replaces the Arm Disarm status If you tap this header at that time the Touchscreen presents the Arm System tab of the Security app Exit Delay During the Exit Delay the header announces the number of seconds until the system is armed Entry Delay During the Entry Delay the header announces the number of seconds before the alarm sounds ...

Page 25: ...roadband and so on Power problems with the Touchscreen When a sensor goes down such as due to a battery failure When a sensor is being tampered with such as the cover being opened When the system reports a trouble it sounds an audible alert regularly to ensure that you are aware of the problem When a System Zone header appears tap it to show the Troubles list which displays all the current trouble...

Page 26: ...ader Table 2 2 System and Zone Trouble Header Messages Message Cause Resolution AC Power Disconnected Touchscreen is not receiving A C power The system is in Low Power Mode see page 35 Confirm that the power adapter is plugged into the Touchscreen Confirm that the power adapter is plugged into an un switched outlet Confirm that the un switched outlet has power Plug the power adapter into another o...

Page 27: ...his alert is not connected Only applicable to devices that require external power Restore power to the sensor or device as soon as possible to avoid draining the battery Low Battery Detected Battery for the identified sensor is low Replace the battery as soon as possible Needs Cleaning Sensor named in this alert is dirty or dusty Clean the identified sensor Network Connection Lost No broadband or ...

Page 28: ...ost A C power and is on battery backup The battery has about 5 remaining power Complete loss of power to the Touchscreen is imminent Check the A C adapter Restore A C power to the Touchscreen as soon as possible System not ready to Arm Door or window is open Open the Security app and check the security zones door or window might be open System Power Lost Touchscreen has lost A C power and is on ba...

Page 29: ... for your system Content Area The Content area contains the interactive functionality of your Touchscreen The Touchscreen apps are displayed here When you use or modify an app this is where the menus and tools appear Figure 2 2 Content Area Home Screen The Home screen is the default interface when the user accesses the Touchscreen Return to this screen at any time by pressing the Home button on th...

Page 30: ...creen has two screens to accommodate its installed apps Figure 2 3 Available App Screens Think of the multiple screens as residing next to each other in a line The indicator represents the screen currently displayed To access another screen of Touchscreen apps 1 Swipe your finger across the Touchscreen from right to left ...

Page 31: ...e Settings app Select the Security app to view options related to arming disarming the system enabling disabling security zones viewing history logs and recent security zone events Select the Thermostats app to view the current state of all your thermostats Select the Settings app to access tools to modify the Touchscreen configurations Select the Lights app to view the current state of all your l...

Page 32: ...reen on page 18 tap Apps Add App A list of apps available to be installed appears 2 Tap the Up and Down arrows on the scrollbar to reveal additional apps 3 Tap the app to install and then tap Next The app to be added appears along with a view of the initial screen of the app 4 Tap Next The Touchscreen displays the following confirmation The name app was installed successfully 5 Tap Next to again d...

Page 33: ...rder of the apps displayed in the Home screen 1 From the Settings app see Configuring the Touchscreen on page 18 tap Apps Reorder Apps A list of installed apps appears 2 Tap the Up and Down arrows on the scrollbar to reveal additional apps 3 Tap Up to move the app higher in the sequence of displayed apps or Down to move it lower If you tap To Top the app appears first in the list of sortable apps ...

Page 34: ...e Up and Down arrows on the scrollbar to reveal additional apps Tap the app to uninstall and then tap Next The app being removed appears 3 Tap Next The Touchscreen displays the following confirmation The name app has been removed 4 Tap Next to display the list of installed apps again ...

Page 35: ...hscreen reports an AC Power Loss trouble in the Trouble Header 5 The Touchscreen tries to send an AC Power Loss message to the system servers over cellular if connectivity is available If the system servers receive the message the Subscriber Portal and other mobile devices report an AC Power Loss trouble and will never report a Connectivity Loss trouble messages for as long as Low Power Mode conti...

Page 36: ...he required operational levels the following occurs The screen does not wake up when it is tapped There is no broadband or cellular connectivity Otherwise the Touchscreen is still operational It continues to communicate with sensors and peripherals so it might produce sounds based on security zone events When the Touchscreen is in this state 90 seconds after A C power is restored the device is reb...

Page 37: ...5 for information about how to Modify the video quality displayed by a camera Change the name label on the camera Associate the camera with a zone so that it takes a series of pictures when the zone initiates an alarm Turn the camera LED on or off To display the images or live video from your cameras 1 From the Home screen tap the Camera app Images of all the camera views are displayed updated eve...

Page 38: ...loses connectivity with the camera while displaying live video from it the following message appears 4 The system is having trouble connecting to your camera Press OK to try to reconnect If the issue persists check that the camera is powered on and in range of your router 5 When power and network connection is restored tap OK to close the message ...

Page 39: ...page 41 Arming and Disarming the System see page 42 Sending an Emergency Alarm see page 47 Testing Your Alarms see page 48 Managing Connectivity Between the Touchscreen and the Central Monitoring Stations see page 52 Managing the Passcodes in your Security System see page 54 Managing Connectivity between Your Home Devices and the Internet see page 58 Viewing Your Security Account Information see p...

Page 40: ...er a valid keypad code within the Entry delay period to avoid sounding an alarm Consult with your installer or Customer Care representative to customize the Entry and Exit delays on your system Note After the alarm is faulted the Alarm Transmission Delay period starts see page 44 If the central system loses all connectivity with your Touchscreen in the Armed state and during the Entry Delay period...

Page 41: ... Understanding Your Protection Against Smash and Grab Attacks Your security system communicates continuously via broadband and cellular with the monitoring servers There is always the possibility that an intruder will attempt to defeat your security system by breaking in to the premises and destroying the Touchscreen But this is the most futile method they could use Central monitoring contacts the...

Page 42: ...disarm the system Arming the System from the Touchscreen To arm the system from the Touchscreen 1 Tap the Security Status header when it is in Disarmed state The Security Options screen appears with a keypad and the Arm System tab open 2 Tap an arming mode Arm Stay Arm Away or Arm Night and enter your security code The Security Status header changes to display a countdown message The text of the m...

Page 43: ...if the system is not disarmed an alarm sounds Bypassing Zones To arm the system the Touchscreen requires that a sensor zone be turned off bypassed if it has any of the following troubles Sensor Tamper Detected Tamper Detected Sensor Communication Failure It is NOT necessary to bypass for any other troubles Instead you must acknowledge the trouble before arming the system Note Fire smoke and carbon...

Page 44: ...ad code is not entered by the end of the Entry Delay period an alarm sounds From the time an alarm sounds or starts silently for most reasons you have 30 seconds default to enter a valid keypad code to disarm the system and prevent an alarm being sent to the central monitoring station This is called the Alarm Transmission delay or the Abort Window The Alarm Transmission Delay is a required period ...

Page 45: ...e procedures determined by your service provider the monitoring operator might attempt to contact you through the Touchscreen device itself In this case there will be a series of ring tones and then you will hear the voice of a monitoring operator through the Touchscreen device A dialog alerts you that an open call is active on your Touchscreen To disarm the system from the Touchscreen see the pro...

Page 46: ...Managing Your Security System 46 RB6741 Z Touchscreen Security System User Manual 2 Enter your security code If the alarm was triggered the camera view and alarm history are displayed ...

Page 47: ...nt of the Touchscreen The Emergency screen appears 2 Perform one of the following steps Tap Fire to send an alarm for emergency fire assistance The Touchscreen sounds a repeating high pitched chime Tap Medical to send an alarm for emergency medical assistance The Touchscreen sounds an audible repeating triple beep signal Tap Police to send an alarm for police assistance The Touchscreen displays a ...

Page 48: ...Test your connectivity to the Internet and cellular servers see Testing Your Connectivity on page 53 When testing your alarms you can choose to report your alarms to central monitoring to ensure end to end integrity By default the system lets you test the reliability of your alarms without sending a signal to central monitoring To test your alarms 1 From the Settings app see Configuring the Touchs...

Page 49: ...larm Test Checklist appears 4 Ensure all the security zones are unfaulted that is doors and windows are closed motion detectors are not showing motion and so on When the security zones are ready for testing Ready to Arm appears under the Arm button 5 Tap Arm Your security system is armed in the special Test mode The Exit Delay is only 10 seconds long Motion sensors are turned off not tripping alar...

Page 50: ...onds of the Entry Delay period The motion detectors are turned on Note To mute the siren tap Mute Siren This is not recommended Ensuring that your siren is in working order is an important part of the test After the end of the Entry Delay period ends the siren sounds unless you muted it and the Entry Exit zone you faulted is marked with an alarm tag 8 Fault each additional alarm and ensure that it...

Page 51: ...tor s view for three minutes after arming the system then walk in front of it Smoke Detector Press and hold the sensor s Test button until the siren sounds approximately 10 seconds Glass Break Detector Use a glass break simulator Key Fob Arm and disarm system with the key fob Key Pad Arm and disarm system with the key pad The Touchscreen notes that each sensor communicated an event to the Touchscr...

Page 52: ...wing Signal Strength To view the current signal strength of the Touchscreen s Wi Fi connection to your service provider s modem 1 From the Settings app see Configuring the Touchscreen on page 18 tap Advanced Settings Connectivity Wi Fi Cellular Signal Strength The Wi Fi and Cellular Signal Strength screen appears graphically displaying the detected signal strength of the Wi Fi connection to the ro...

Page 53: ...nnectivity to the Internet and cellular networks To test the Touchscreen connectivity 1 From the Settings app see Configuring the Touchscreen on page 18 tap Advanced Settings Connectivity The Connectivity menu appears 2 Tap Test Connectivity The Connectivity Test screen appears 3 Tap Next to start the test This can take up to four minutes ...

Page 54: ...ode on page 56 The Master keypad code allows you to add modify and delete codes See Table 3 2 on page 55 Managing your Keypad Codes To manage your keypad code 1 From the Settings menu see Configuring the Touchscreen on page 18 tap Security Manage Keypad Codes The Manage Keypad Codes screen appears From this screen you can modify your keypad codes or add new ones To add a new keypad code 1 From the...

Page 55: ...vel for this keypad code The following table describes each permission level Table 3 2 Keypad Code Permission Levels Arming Level Description Guest User can arm and disarm the system Arm Only User can only arm the system Standard User can create edit and delete keypad codes as well as arm and disarm the system This level is provided with the system and cannot be added Duress User is granted full a...

Page 56: ...r system or access your security settings Rather than entering your keypad code enter the Duress keypad code When you do this you will be granted full access to your Touchscreen but a silent alarm is immediately sent to the central monitoring station and police are dispatched By default the Duress Code is disabled To enable and manage your Duress keypad code 1 From the Settings menu see Configurin...

Page 57: ...en you answer they will ask for your secret word as an additional verification To view and modify your secret word 1 From the Settings menu see Configuring the Touchscreen on page 18 tap Advanced Settings Security Secret Word The Get Security Secret Word screen appears 2 Tap Next The secret word appears for editing 3 To change the secret word tap the Secret Word field square area A keyboard appear...

Page 58: ...ternet Your home network accesses the Internet through your security network router DMZ The router s DMZ selectively exposes your home network to the Internet By default your home network can access the Internet but entities in the Internet cannot access computers and devices in your home network This can be a problem for certain types of computing and when using entertainment systems to watch mov...

Page 59: ... not change your security network s protection from outside entities If your home network is exposed to Internet entities you can choose to hide it see page 61 Figure 3 2 Security Network Router Can Permit Access to Your Home Network from the Internet To permit access to your home network router from the Internet 1 From the Settings app see Configuring the Touchscreen on page 18 tap Advanced Setti...

Page 60: ... Next The Personal Router Setup screen appears 3 Tap Next The Search for Devices screen appears When an available router is located that is connected to the security network router by an Ethernet cable the Located Devices screen appears Note The available routers are listed by MAC address ...

Page 61: ...outer to expose the selected router and the home network devices connected to it to the Internet To hide access to your home network router from the Internet perform the following procedure and see Figure 3 1 on page 59 1 From the Settings app see Configuring the Touchscreen on page 18 tap Advanced Settings Connectivity Hide Personal Router from Internet The Hide Personal Router from Internet scre...

Page 62: ...s 2 Go to the Subscriber Portal to view your account information or contact Customer Care to modify it 3 Tap Return to Menu to return to the Settings menu Managing Sensors You cannot add or delete the sensors in your security system but you can control how they appear in reports your Touchscreen and the Subscriber Portal You can Have a sensor not monitored when the system is armed see Disabling a ...

Page 63: ...y see Viewing Your Zone Event History on page 63 To turn zones off 1 Disarm the system see Arming and Disarming the System on page 42 2 Tap the Security icon on the Home screen see Content Area on page 29 The Arm System tab appears 3 Tap the Turn Zone Off button for the zone to turn off the zone 4 Tap the Turn Zone On button for the zone to be monitored for alarms The buttons are toggled between T...

Page 64: ...l When something occurs at a zone whether or not the system is armed or the zone is turned off the security system logs an event To view the Zone Event History 1 Tap the Security app on the Home screen The Arm System tab appears 2 Tap the History tab The Zone Event History appears ...

Page 65: ... listed first To change the order that zones are listed in the Touchscreen screens 1 From the Settings app see Configuring the Touchscreen on page 18 tap Sensors Zones Change Zone Order The Change Zone List Order screen appears 2 From this screen you can move items up and down in all lists that display order For example if you tap To Top in the zone Window that zone moves from the bottom of the li...

Page 66: ...amera as it appears in reports on the Touchscreen and in the Subscriber Portal see page 66 Assign reassign and unassign a camera to a sensor so that it takes a series of pictures when an alarm is tripped by the sensor see page 68 Modify the image quality displayed by the Touchscreen see page 69 Determine whether the camera LED is lit see page 69 Modifying Camera Details To modify the details of a ...

Page 67: ...y the camera Yes Enable LED On Off If set to ON the camera LED light is ON or blinks to show whether the camera is communicating with the router If set to OFF the camera LED does not light Yes for some brands of cameras This field is not displayed if this value cannot be modified 4 Tap the Camera Name fields to display a keyboard screen and rename the Camera zone Tap Done to accept your changes 5 ...

Page 68: ... to modify additional cameras or tap the Home icon to return the main screen Assigning a Camera to a Security Zone To assign a camera to a security zone so that it takes a series of pictures whenever an alarm is tripped by the security zone 1 Access the details of a camera for editing as described under Modifying Camera Details on page 66 The Edit a Camera screen shows a label and a captured image...

Page 69: ... as described under Modifying Camera Details on page 66 The Edit a Camera screen shows a label and a captured image of all the camera views 2 Tap the Video Quality field to determine the ideal level of video detail to be captured by the device The Adjust Camera Video Quality screen appears 3 Tap High Medium or Low to select the video quality of the camera Select an option in which the network uplo...

Page 70: ...red location If your home requires a Wi Fi repeater the camera must be connected to the router first and then moved to the desired location on the far side of the repeater For more information about Wi Fi repeaters see Chapter 5 Note The camera images are accessible to the Touchscreen device the Subscriber Portal and mobile apps The Service Provider does not have access to these images If you need...

Page 71: ...hscreen uploads a binary file multiple times to the system servers to determine the security system s upload speed The screen displays the current calculated upload speed The Upload Speed is used by the system to set the default video quality for the camera 3 Tap Next The Hardware Setup screen appears ...

Page 72: ...steps to properly add the camera to your Touchscreen Connect an Ethernet cable to the iCam Connect the iCam Y connector to the other end of the iCam Ethernet cable Connect the other Ethernet connector of the iCam Y connector to an open port in the security network router Connect the iCam s A C power cable to the iCam Y connector and plug it into a home power outlet Reset the iCam to factory defaul...

Page 73: ... to the Touchscreen The Locating Camera screen appears The system locates the camera that is connected to the Touchscreen s router with an Ethernet cable and displays its details 5 Tap Accept to pair the camera with the Touchscreen After the system finishes the Configuring Camera field is marked Done During the Configuring Camera step the system upgrades the camera firmware if needed This can take...

Page 74: ...e Name previously assigned to the camera device Yes Associated Zone A camera can be assigned to zones for the following types of sensors door window sensor motion detector glass break detector smoke detector Yes Video Quality Level of video detail captured by the camera Yes 7 Tap the Camera Name fields to display a keyboard screen and rename the Camera zone to something that clearly differentiates...

Page 75: ...to Zone This camera is not associated with another sensor and it is not the Default camera Security Zone Name This camera is associated with the selected zone It takes a series of pictures automatically when the zone trips an alarm whether or not the alarm is ultimately sent to the central monitoring station 9 Tap the Video Quality field to modify the level of video detail captured by the device T...

Page 76: ...riate video quality based on the measured speed and tap Next 10 Tap Next The Camera Wi Fi Connection Test screen appears 11 To have the camera connected to the Touchscreen wirelessly follow the instructions in the Camera Wi Fi Connection Test screen including disconnecting the camera from the Touchscreen router and rebooting the camera and tap Locate Camera ...

Page 77: ... Adjust Camera screen appears 13 Point the camera as needed 14 Tap Next The Add Additional Camera screen appears 15 Tap Add Another to add an additional camera Repeat the steps as directed 16 Tap Next to return to the Install Zones and Home Devices screen appears with the Cameras marked Done Table 3 7 Troubleshooting the Camera Installation Issue Description ...

Page 78: ...grading camera in the camera widget produces an error dialog The camera images are halted while the camera is upgraded When the upgrade is finished the images become available The camera image is replaced by an icon In the camera widget on the Touchscreen an upgrade icon appears in place of the thumbnail image while a camera is upgraded Adding Key Fobs to the Security System A key fob is a mobile ...

Page 79: ...ble to be added defaulted and in Search mode 3 Default a key fob and place it in Search mode When a key fob is found an icon is displayed for it 4 Press the star button to pair the found key fob The key fob is paired with the Touchscreen 5 Repeat this procedure for each key fob with the Touchscreen When all the key fobs have been found and paired tap Stop The Wireless Key Fobs Located screen notes...

Page 80: ...y System User Manual 6 Tap Next The Configure Wireless Key Fobs screen appears 7 Tap each key fob icon to configure the name that is used for it in the Touchscreen and Subscriber Portal The Edit Key fob screen appears 8 Tap the Key Fob Label to display a keyboard ...

Page 81: ...Enter a name for the key fob Tap Done 10 Tap the arrow to enable or disable the panic button 11 Tap Done to return to the Configure Wireless Key Fobs screen 12 After all the key fobs are configured tap Next The Install Zones and Home Devices screen appears with the Key Pads marked Done ...

Page 82: ...System User Manual Editing Key Fobs To edit a key fob 1 From the Settings app tap Home Devices Key Fobs 2 Tap Edit Key Fob to display the key fob settings From this screen you can change the name of the key fob and you can enable or disable the key fob panic button ...

Page 83: ...naging Environmental Devices The chapter describes key concepts and management operations for your security system The topics covered in this chapter are Managing Lights page 84 Managing Thermostats page 87 Adding a Thermostat to the Security System page 89 ...

Page 84: ... is added and is designated as dimmable or not To dim or turn off a light 1 From the Home Screen tap the Lights app The Lighting screen displays controls for each of your installed lights 2 Tap the light icon to turn the light on or off Tap to turn on the light Tap to turn off the light Note If you turn on a lighting device that is Energy Management enabled the Touchscreen displays a leaf icon and...

Page 85: ...s see Adding a Lighting Device on page 86 Delete lighting devices see Deleting Lighting Devices on page 87 Use the following method to Change the name of a lighting device as it appears in reports on the Touchscreen and in the Subscriber Portal Set the light to be dimmable or not dimmable Modifying Light Details To modify the details of your lights 1 From the Settings app see Configuring the Touch...

Page 86: ...date the firmware on any sensor before adding it to the security system you must reset the sensor to factory defaults before adding it to the OpenHome Converge system This is essential so that it can receive the necessary changes to communicate with the Touchscreen 1 From the Settings app see Configuring the Touchscreen on page 18 tap Home Devices The Home Devices menu appears 2 Tap Lighting Add L...

Page 87: ...t Details on page 85 Deleting Lighting Devices To remove a lighting device from the Touchscreen 1 From the Settings app see Configuring the Touchscreen on page 18 tap Home Devices The Home Devices menu appears 2 Tap Lighting Delete Lights The Settings screen shows an icon for each connected lighting device 3 Tap the icon of the lighting device you want to remove The following confirmation message ...

Page 88: ... User Manual 2 Toggle the Hold button to maintain the mode you set and ignore any other programming configured on the thermostat device Note Rules for a thermostat on Hold do not run 3 Toggle the Fan button to turn the blower either on or off Figure 4 1 Thermostat Display ...

Page 89: ...ostats Add Thermostat The Locating Thermostat Devices screen appears 2 Tap Next The Locating Thermostat Devices screen appears 3 Tap Next Reset the device to factory default to place it in Search mode Remove the cover at the top of the thermostat device A circuit board appears with a black Reset button on the left and right sides 4 Press the Reset button The device resets to factory default 5 Pres...

Page 90: ...at were found and paired 8 Tap Next The Configure Thermostats screen shows all the paired thermostat devices 9 Tap a device icon to configure it as described under Managing Thermostats on page 87 10 After all the thermostats are configured tap Return to Menu The Install Zones and Home Devices screen appears with Thermostats marked Done ...

Page 91: ...screen and other SMC Wi Fi peripheral devices Currently cameras are the only supported Wi Fi devices Use a RF range extender to increase the range of ZigBee sensors lights and other devices This chapter describes how to manage Wi Fi repeaters The topics covered in this chapter are Adding a Wi Fi Repeater to the Security System page 92 Deleting a Security Wi Fi Repeater page 94 ...

Page 92: ...t from the router If the repeater broadcasts stronger signals and is placed too close to the router the repeater could cause the router to stop transmitting signals As a result the customer would need to restart the security router often The optimal distance will differ in each home Some experimentation may be required to determine placement If the customer has a home Wi Fi repeater avoid placing ...

Page 93: ... as the security router Note If the system cannot find the repeater reset the repeater to its factory settings then restart it Tap Back then try again when the status indicator on the repeater is green 3 When the configuration is complete tap Next The repeater has been added successfully Note Immediately disconnect the repeater from the security router and power off the repeater Then determine whe...

Page 94: ...ecurity router directly if they are within range 1 To delete the repeater from the security system tap Home Devices Wifi Repeater Delete a Wifi Repeater The Delete Wi Fi Repeater screen appears 2 Tap Next The Touchscreen deletes the repeater from the security system To add this router back to the security system you must reset factory settings as directed by the repeater s documentation ...

Page 95: ...anage the Touchscreen The topics covered in this chapter are Rebooting the Touchscreen page 96 Configuring Screen Brightness and Screen Dimming page 97 Configuring the Screensaver page 100 Configuring Tones and Volume Levels page 101 Cleaning the Touchscreen Screen page 103 Viewing Touchscreen Technical Specifications page 103 ...

Page 96: ...ally a problem might arise that could be solved by rebooting the Touchscreen To turn the Touchscreen off and on 1 From the Settings menu see Configuring the Touchscreen on page 18 tap Advanced Settings Reboot Touchscreen The Reboot Touchscreen screen appears 2 Tap Reboot Touchscreen The Touchscreen turns itself OFF and back ON ...

Page 97: ...riod of inactivity see Configuring the Screen Brightness Settings on page 97 3 Have the screen and the Touchscreen LEDs dim completely automatically each day at a set time and then brighten at a set time see page 99 This is called Night Mode Note The Night Mode screen brightness setting is not the same as Arm Night Mode as described under Arm Night Mode on page 41 Configuring the Screen Brightness...

Page 98: ...ed Night Mode see page 99 During this time the buttons on the front of the Touchscreen darken completely The Touchscreen will not enter Night Mode when it is Armed Note The Night Mode brightness setting is not the same as Arm Night Mode described on page 41 The following procedure describes how to configure the screen to dim after a period of inactivity When a user touches the screen it brightens ...

Page 99: ... at night setting is No The following procedure describes how to configure the screen to dim completely during a set time period Night Mode When a user touches the screen it brightens to its default brightness level At the set time range the screen dims to its lowest setting 1 1 From the Settings menu see Configuring the Touchscreen on page 18 tap Touchscreen Screen Configuration The Screen Config...

Page 100: ... after the device has been inactive for some period of minutes See also Configuring Screen Brightness and Screen Dimming on page 97 for information about how to dim the screen to a configured level after a period of inactivity This can be used instead of a screensaver or along with a screensaver To configure the Touchscreen screensaver 1 From the Settings menu see Configuring the Touchscreen on pa...

Page 101: ...otos from your Flickr account Configuring Tones and Volume Levels You can configure the sounds the Touchscreen plays when a security zone is faulted or cleared You can also configure the volume at which the Touchscreen sounds are played To set the tones that the Touchscreen uses when zone events occur 1 From the Settings menu see Configuring the Touchscreen on page 18 tap Touchscreen Sound Configu...

Page 102: ...play a tone when the associated security zone is faulted To set the volume of a tone 1 From the Settings menu see Configuring the Touchscreen on page 18 tap Touchscreen Sound Configuration Volume Configuration The Volume Settings Configuration screen appears 2 Tap the right and left arrow keys until you reach the appropriate volume level ...

Page 103: ...hscreen Clean Screen The Clean Screen appears 2 Tap Clean Screen to display the Cleaning screen for 30 seconds You have 30 seconds to clean the Touchscreen without fear of pressing buttons At the end of 30 seconds you can choose to finish or have more time to continue cleaning Viewing Touchscreen Technical Specifications To view the technical specifications for the Touchscreen 1 From the Settings ...

Page 104: ... directly not wirelessly Note This value might change if you reset your modem to factory defaults CPE ID Unique identification code for your Touchscreen Wi Fi MAC Address Media Access Control address of the adapter your Touchscreen uses to wirelessly connect to your Internet Service Provider Ethernet MAC Address Media Access Control address of the adapter your Touchscreen uses to connect directly ...

Page 105: ...nd wall mount by gently pushing the stand wall mound bracket into the Touchscreen and then sliding the stand wall mount off in a vertical direction Use a P1 Phillips screwdriver to remove the screw attaching the stand wall mount bracket to the Touchscreen if this was previously screwed in 3 Detach the batter cover A P1 Phillips screwdriver can be used remove or add a screw to the battery cover of ...

Page 106: ...ne screw 6 Connect the A C adapter cable to the round D C input port on the back of the Touchscreen 7 Re attach the wall mount bracket stand to the Touchscreen and fasten the screw in 8 Position the Touchscreen near an un switched wall outlet not controlled by a light switch 9 If the installation plan requires a wired network connection connect an Ethernet cable between the LAN ports of the Touchs...

Page 107: ... with use of the bracket is for non Canadian use The Home Menu Back and Emergency LEDs are lit when the Touchscreen has A C power After a few seconds the Installation Welcome screen appears on the Touchscreen Note If the Touchscreen does not display the Installation Welcome screen reset it to the factory default see Rebooting the Touchscreen on page 96 Replacing the Touchscreen Battery To replace ...

Page 108: ... present Avoid mounting the detector in the following locations In a corner On free standing post or pillars In rooms with noisy equipment such as air compressors bells door bell and power tools In bathrooms a slamming toilet seat will easily fault a glass break detector Motion Detectors When placing motion detectors anticipate traffic patterns The lanes of traffic most used by people in your home...

Page 109: ... emergency Sketch a map of your home that shows all the doors and windows Discuss the plan with everyone in your home so that everyone knows what to do Have at least two ways to exit each room Make sure that windows and doors open easily Discuss with your family and agree on a single meeting location outside your home In the event of fire get out and stay out Don t go back inside for people pets o...

Page 110: ...ment High on a wall or on a ceiling because smoke rises If a smoke detector is placed on a ceiling position at least 4 inches 10 2 cm from the wall Be careful about placing smoke detectors within 20 feet of a cooking appliance Smoke alarms are an important part of a home fire escape plan For maintaining your smoke detector Test alarms at least monthly by pushing the test button Replace batteries i...

Page 111: ...ioning vents fans and fresh air intakes can drive smoke away from smoke detectors Remember that dead air spaces may prevent smoke from reaching a smoke detector Camera Installation Recommendations Camera views are accessible to Touchscreen users and family members who log into the Subscriber Portal When placing cameras consider whether what they are monitoring poses any privacy issues ...

Page 112: ...isarmed or not ready Arm the system in Arm Away mode see page 40 or Arm Stay mode see page 41 Disarm the system Send a Panic alarm for police assistance Checking System Status Press the button to light the LED to show the current status of the security system The button lights to show the current status of the security system Green for three seconds if the system is disarmed Red for three seconds ...

Page 113: ...ng mode see page 41 The button turns red for 3 seconds to indicate that the Exit Delay has started twice as long as the period configured for Arm Away up to 120 seconds with no beeping from the Touchscreen If the system is not ready because for example a door or window is opened the button flashes orange seven times Disarming the System Enter a valid keypad code followed by the button to disarm th...

Page 114: ... you want it located and use a pen to mark the location of the four holes 3 Install four screws in the locations marked on the wall Do not screw them in all the way 4 Affix the key pad to the installed screws 5 Replace the faceplate to the front of the key pad Replacing Key Pad Batteries To replace the batteries in the key pad 1 With a Phillips screwdriver remove the screw from the battery cover i...

Page 115: ...ouchscreen with which it can pair To reset a key pad that has already been added to a Touchscreen and place it in Search mode delete it from the Touchscreen then press the button In the rare event that you need to reset a key pad to factory default that is not paired to a nearby Touchscreen 1 Remove the batteries 2 Press the 2 and 8 buttons and hold them as you insert a battery The LED lights gree...

Page 116: ...urity router and the camera that is furthest from the router If the repeater broadcasts stronger signals and is placed too close to the router the repeater could cause the router to stop transmitting signals As a result you would need to restart the security router often The optimal distance will differ in each home Some experimentation may be required to determine placement If you have a home Wi ...

Page 117: ... faulted restored and then faulted again prior to the end of the exit delay then Exit Delay restarts One time only This feature is not configurable Exit Error If an Entry Exit door is left open at the end of Exit Delay the Entry Delay starts and if the system is not disarmed an alarm sounds This feature is not configurable Unvacated Premises During Arm Away if no Entry Exit Zone opens and closes d...

Page 118: ...fault Duress Code is disabled Initiating Emergency Alarms aka manual alarms This is a two step action from the Touchscreen Not configurable Cross Zoning Two security zones that only trip an alarm if they are both faulted within a configured period of time Can only be created after the security zones have been added in a separate step Default 10 seconds Range 1 second to 999 seconds Swinger Shutdow...

Page 119: ...ff at night Default No Range Yes or No Backlight off time Default 12 00 A M Backlight on time Default 12 00 A M Screensaver Configuration Minutes Inactive before screensaver becomes active Default 30 minutes Range 5 minutes to 30 minutes in 5 minute increments Sound Configuration Volume control Default 13 loudest Range 0 mute to 13 Advanced Settings Range and Defaults Feature Comments Default Expo...

Page 120: ...ons 69 Cancelling the arming process 37 Cleaning the Touchscreen 97 Components 9 Configuring Touchscreen 12 Connectivity between Touchscreen and central monitoring stations 46 testing 47 Content area 23 Controls on Touchscreen 16 D Default setting for key pad 109 Dimming lights 78 screen 92 Touchscreen 91 Disabling sensors 57 Disarming the system 38 from the keypad 107 from the Touchscreen 39 Disa...

Page 121: ...ter hide access 55 permit access 53 Night mode dimming 92 P Placing sensors 102 smoke alarms 104 Wi Fi repeater 110 Q Quick reference tables 111 R Rebooting Touchscreen 90 Reordering security zones 59 Touchscreen apps 27 Replacing key pad battery 108 Reset key pad to default 109 Router hide access 55 permit access 53 S Screen brightness 91 dimming 91 92 Screensaver 94 Secret word 51 Security accou...

Page 122: ...01 cleaning 97 components 9 configuring 12 controls 16 disarming the system 39 rebooting 90 reordering security zones 59 screen brightness 91 screen dimming 91 screensaver 94 specifications 97 tones and volume levels 95 understanding 17 using 15 Touchscreen apps 25 installing 26 reordering 27 uninstalling 27 Troubleshooting camera 71 U Uninstalling Touchscreen apps 27 V Video live 31 quality 63 Vi...

Page 123: ...20 Mason Irvine CA 92618 U S A http www smc com Document number RB6741 Z Touchscreen Security System User Manual Version 1 0 ...

Reviews: