E_MH_Instalation_instructions_Skylux_Climax_Panorama
20/11/2020
40/60
Ridge for saddle roof
PREPARATION
The ridge of the saddle roof must be attached to at least one wall. Check all dimensions. These can be found in pages 12 and 13 of this
manual. The assembly of the ridge profiles is identical for a thermal and a non-thermal saddle roof. The ridge can be created using
two sets of wall profiles (MB-MT-Y16P) that are assembled back-to-back using adaptor profiles (Y10). The number of thermal bridges
(Y16P) between the bottom wall profile (MB) and the top wall profile (MT) depends on the glazing thickness and the roof pitch (see
the table on page 14).
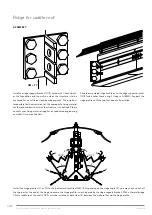
Cut 5 mm from the bottom wall profiles for the ridge support bracket (NCZ). Connect the wall profiles at the bottom and at the top
using the adaptor profiles (Y10).
MT
C1CX
NCZ
MT
Y10
C1CX
Y16P
Y16P
C11CX
C11CX
S1/S2
S1/S2
Y10
MB
MB
5 mm
16 mm
5 mm
MT
MT
Y10
Y10
Y16P
Y16P
MB
MB


