background image

Operating manual - English

REKORD AY

Copyright Silca 2019

17

8.2

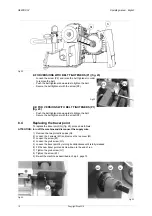
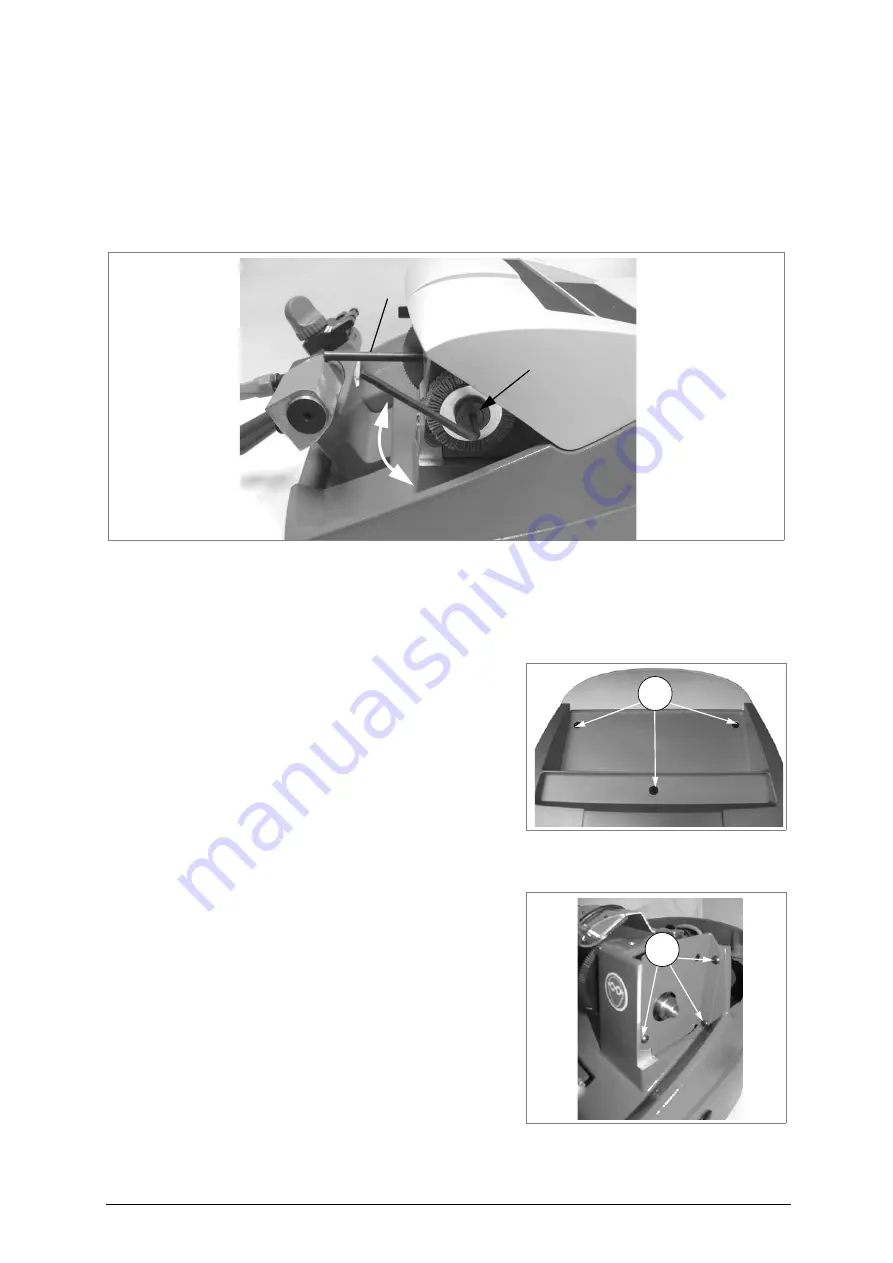
Replacing the brush

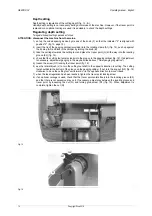
When the brush no longer cleans off the burrs it must be replaced as follows:

ATTENTION: turn off the machine and disconnect the supply wire.

1) Place the locking rod (provided) in position on the motor shaft.
2) Use the Allen wrench (provided) to loosen the screw holding the brush in place (fig. 19).
3) Replace the brush and tighten the screw with the Allen wrench.
4) Remove the spanner from the motor shaft.

Fig. 19

8.3

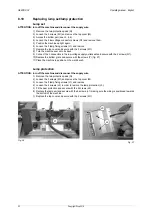
Replacing and/or tightening the belt

Worn or loose belts must be replaced or adjusted so as to ensure safe and proper operation of the
cutting tool/ brush.

Tension:

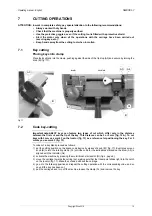
ATTENTION: turn off the machine and disconnect the supply wire.

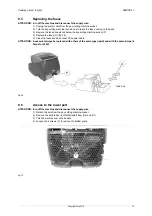
1) Remove the two protective pads (Q) (fig.4, page 6).
2) Loosen the 3 screws (M1) and remove the top cover

(M).

3) Loosen the 4 screws (S1) of the plate motor (fig. 22).
4)



Push the motor down until the proper belt tension is

obtained.

5) Tighten the four screws.

Fig. 20

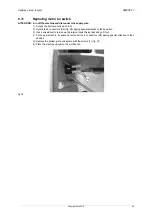
Replacement:

ATTENTION: turn off the machine and disconnect the supply wire.

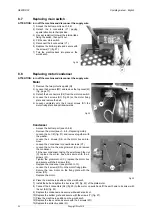
1) Remove the two protective pads (Q).
2) Loosen the 3 screws (M1) and remove the top cover

(M).

3) Remove the brush (fig. 19).
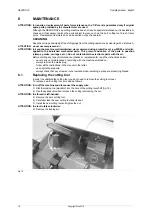
4) Remove the 3 screw (M2) (fig. 19) to remove the

protective cover (fig. 21)

5)


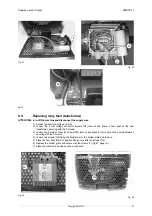
Loosen the 4 screws (S1) of the plate motor (fig. 22)

6) Raise the motor and remove the worn belt.
7) Fit the new belt.
8)




Replace the motor in its previous position.

9) Tighten the 4 screws.
10) Replace the belt cover
11) Replace the brush
12) Replace the top cover

Fig. 21

locking rod

brush holding

screw

tighten

loosen

M1

M2

Summary of Contents for Rekord AY

Page 1: ...D434249XA vers 4 0 Operating manual Translation of the original instructions...

Page 2: ...ted in Vittorio Veneto by SILCA S p A via Podgora 20 Z I 31029 VITTORIO VENETO TV Italy IMPORTANT NOTE in compliance with current regulations relating to industrial property we hereby state that the t...

Page 3: ...on to the mains 12 5 8 Graphics 12 6 MACHINE REGULATION AND UTILIZATION 13 6 1 Checking and setting 13 6 2 Gauging 13 7 CUTTING OPERATIONS 15 7 1 Key cutting 15 7 2 Code key cutting 15 8 MAINTENANCE 1...

Page 4: ......

Page 5: ...d efficiently Consultation The contents of the manual are divided into sections relating to Transport and handling Ch 1 Description of machine and safety devices Ch 2 3 4 5 Proper use of machine Ch 6...

Page 6: ...ator to observe the instructions given in this manual are not covered by the guarantee and the manufacturer declines all responsibility in such cases It is therefore indispensable to read the operatin...

Page 7: ...den movements or rough handling from damaging the machine persons or things 1 3 Unpacking To remove the machine from the packing box 1 cut the straps with scissors and remove 2 prise off the staples 3...

Page 8: ...clamp carriage C1 chippings tray C2 tool tray D carriage lever handle E coded spacing device E1 axis regulation grub screw E2 axis regulation locking screw F coded spacing device knob G tracer point...

Page 9: ...age C which holds a code space setting device and a clamp for securing the keys with a code device for adjusting inclination fig 4 page 6 The carriage C is fitted to the translation shaft and is moved...

Page 10: ...TING TOOL HSS Super Rapid Steel MOTOR One speed single phase 230V 50 60Hz 1350 1620 rpm 0 18 Kw MOVEMENTS manual CLAMP rotating DIMENSIONS width 330mm depth 430mm height 270mm SONOROUS PRESSURE Leq 83...

Page 11: ...x containing tools cutting tools brushes belts and small replacement parts REKORD AY is supplied with a full range of accessories The accessories provided by Silca are all that is necessary to carry o...

Page 12: ...ne certain parameters must be borne in mind damp badly ventilated sites should be avoided The ideal conditions for the machine are temperature da 0 a 40 C relative humidity 60 circa 5 3 Removing the b...

Page 13: ...ver handle Screw the handle D onto the carriage lever fig 10 Fig 10 5 6 Description of work station The key cutting machine needs only one operator who has the following controls at his her disposal S...

Page 14: ...mains For the safety of the operator and the machine it is important to ensure that the machine is connected to the proper mains voltage by means of an earthed differential switch 5 8 Graphics THE USE...

Page 15: ...ial gauging proceed as follows ATTENTION disconnect the machine from the mains 1 set up the coded spacing device fig 13 by means of the knob F so that the indicator 5 is aligned with position 2 2 plac...

Page 16: ...way into the locating groove E3 fig 15 4 check that the cutting tool enters clearly into the groove in the gauging calliper fig 15 If adjustment is necessary adjust axial gauging in the way described...

Page 17: ...e first cut and the tip of the key This distance can be 3 or 5 mm fig 12 A To cut keys with 3 mm use mark 3 on the locator fig 13 as a reference for positioning the key For 5 mm keys use mark 5 fig 13...

Page 18: ...Do not contaminate the electronic parts with the oil Before starting any type of maintenance checks or replacements read the instructions below never carry out maintenance or servicing with the machi...

Page 19: ...off the machine and disconnect the supply wire 1 Remove the two protective pads Q fig 4 page 6 2 Loosen the 3 screws M1 and remove the top cover M 3 Loosen the 4 screws S1 of the plate motor fig 22 4...

Page 20: ...he belt tightener with the screw P2 8 4 Replacing the tracer point To replace the tracer point G fig 25 proceed as follows ATTENTION turn off the machine and disconnect the supply wire 1 Remove the tw...

Page 21: ...ting machine socket P 4 Replace the fuses U fig 26 5 Close the fuses box and connect the power cable ATTENTION fuses must always be replaced with others of the same type rapid and with the same Amps 4...

Page 22: ...e bottom part see ch 8 6 Remove the motor see ch 8 8 Replacing motor Loosen the nut Z fig 31 and remove together with the washer Loosen the 4 screws S4 on the motor box and re move Loosen the 2 conden...

Page 23: ...ir seat on the new transformer securing with the 2 screws 3 Loosen the 2 mains connector screws Q3 remove and place in their seat on the new transformer securing with the 2 screws 4 Loosen the screws...

Page 24: ...the 2 connectors in the low voltage supply outlet seat and secure with the 2 screws Q1 10 Replace the bottom grate and secure with the screws Y fig 27 11 Place the machine in position on the work benc...

Page 25: ...2 Detach the 4 connectors S2 fig 38 paying special attention to their position 3 Use a screwdriver to turn down the internal switch fixing tabs and pull it out 4 Fit the new switch in its seat and rec...

Page 26: ...the manufacturer that is to say the subject which was the first to introduce and market new equip ment that replaces previous equipment when the user decides to eliminate equipment placed on the marke...

Page 27: ...ufacturer or in the special Service Centres recommended by Silca On the back cover of this manual is a list of the manufacturer s addresses listed below are the addresses of specialised Service Centre...

Page 28: ...C Machines European Union DIRECTIVE 2014 30 EU Electromagnetic Compatibility European Union DIRECTIVE 2014 35 EU Low Voltage European Union DIRECTIVE 2011 65 EU RoHS2 European Union DIRECTIVE 2012 19...

Reviews: