28
Coding Basics - shiftOut
use the equal to operator (==). If this is true,
the code withing the
if
statement’s brackets
will execute.
We have 4 modes to cycle through. So we
need the value to increment 3 times, from
1 to 2 to 3 to 4, then reset to its original
value of 1.
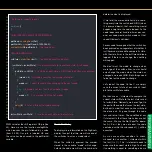
At the beginning of our sketch we set mode
to equal 1. We will now add 1 to mode but
only if it is less than 4. We will use an
if
state-
ment (
line 53
) to do this. If mode is less than
(<) 4 the statement will be true. If it is true it
will add 1 to mode. We add 1 to a variable by
writing the name of the variable followed by
the increment operator (++). If we wanted it
to decrement then we would use the decre-
ment operator (--).
If it’s false (it has already reached 4) we need
to reset it to 1. To do this we follow our last
if
statement with an
else
statement (
line 57
).
If mode is less than 4 add 1 to mode, else,
mode equals 1 (
line 59
). We only use one =
when we are replacing a value with another.
After we have closed the if statement and
the else statement’s brackets (
lines 60-61
),
we can add a short delay (
line 62
) to stop
any “bouncing”. As the microcontroller is
looping through
void
loop
() so quickly, the
code could sense minute disconnects and
reconnects when you push the button. A
short delay will avoid these being read as a
press of the switch.
We can now close the first
if
statement (
line
63
) and set the lastswState variable to equal
the current one (
line 65
), ready for the next
time around the loop.
We can now send data to our shift registers
depending on which number is stored in the
mode variable. We can simply use an
if
state-
ment to hold the code for each mode (
lines
69, 76, 83, 90
). If mode equals 1 then do this.
If mode equals 2 then do this other thing etc.
Shifting Out
Shifting data to the shift registers is pretty
simple. First we need to set the Latch pin
low so the register can accept data (
line 71
).
We learned how to set a pin high or low in the
Motherboard manual, so this should be easy.
We then use the function ShiftOut which is a
function written into the Arduino IDE to help
us interface with shift registers. The code is
actually pretty simple. It shifts out a byte of
data, one bit at a time. Each bit is shifted into
the register through SER after each clock
67
68
69
70
71
72
73
74
75
76
77
78
79
80
81
82
83
84
85
86
87
88
89
90
91
92
93
94
95
96
97
98
99
100
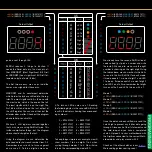
//Shift Out Digits
if (mode == 1)
{
digitalWrite
(LAT,
LOW
);
shiftOut
(SER,CLK,
LSBFIRST
,B11101011);
shiftOut
(SER,CLK,
LSBFIRST
,B10001110);
digitalWrite
(LAT,
HIGH
);
}
if (mode == 2)
{
digitalWrite
(LAT,
LOW
);
shiftOut
(SER,CLK,
LSBFIRST
,B01001100);
shiftOut
(SER,CLK,
LSBFIRST
,B01001101);
digitalWrite
(LAT,
HIGH
);
}
if (mode == 3)
{
digitalWrite
(LAT,
LOW
);
shiftOut
(SER,CLK,
LSBFIRST
,B01001001);
shiftOut
(SER,CLK,
LSBFIRST
,B00101011);
digitalWrite
(LAT,
HIGH
);
}
if (mode == 4)
{
digitalWrite
(LAT,
LOW
);
shiftOut
(SER,CLK,
LSBFIRST
,B00101011);
shiftOut
(SER,CLK,
LSBFIRST
,B00010111);
digitalWrite
(LAT,
HIGH
);
}
}


