background image

This manual was written and designed by Martyn Evans.

The circuit designs are inspired by many different sources with hands on testing and experimentation.

If you recognise anything as your own, and think you deserve a mention, 

please feel free to contact [email protected] and let Martyn know.

© 2021 Short Circuits™ Some Rights Reserved

What is allowed?

All circuits and schematics can be freely shared and modified as open source

All code can be freely shared and modified as open source

What is not allowed?

The manual cannot be modified or redistributed

Summary of Contents for DIGITISER

Page 1: ...I N S T R U C T I O N M A N U A L DIGITISER ...

Page 2: ...t This is the mask A different colour is then applied This is the silkscreen layer which is where the footprints designations and oth er information are found Short Circuit PCBs have the traces drawn on this layer to help you follow the circuit Components The kit comes with a veriety of components They make the circuit function Designing cir cuits can be incredibly complicated Our kits are designe...

Page 3: ...straight to building your kit then check back later to learn how it works Or you can go head first into the how and why then start building It s up to you Assembly Instructions This is where you can learn how to solder your components to the PCB The tips at the start are very useful They may prevent you from getting frustrated The soldering iron can be hard to tame Make sure to keep that tip tinne...

Page 4: ...en text Powering all 28 segments would take more IO pins than the MOTHERBOARD has For this reason we have used 2 x 595 shift registers These shift registers are able to control 8 outputs each and they only use 3 4 microcontroller pins For inputs we have added 2 switches and a potentiometer The switches can be used to select the mode increment a counter start a stopwatch etc The potentiometer can b...

Page 5: ...ED 1 x Red LED 2 x Tactile Switches 1 x 10K Potentiometer 11 x Screw Terminals 4 x 6mm Hex Screws 4 x Male Female Standoffs 1 x Printed Circuit Board Soldering Iron Solder Side Cutters 0 3 0 5mm 2mm 2mm 104 J1 Q1 4 U2 U1 U3 U4 SW1 R1 4 R5 RV1 R6 R7 14 SW2 U5 D1 C1 R15 R16 R17 R18 D2 D3 D4 74HC595 U6 74HC595 C2 R19 SW2 POT SW1 SW2 POT SW1 LAT CLK SER OE LAT CLK SER Qh LAT CLK SER Qh GND VCC VCC GND...

Page 6: ...mount solder pads Resistor Ceramic capacitor LED Momentary Switch Potentiometer 7 Segment Display 74HC595 Shift Register PNP Transistor Mechanical hole J Screw terminal Connected to GND plane GND Connected to VCC 5V PCB SCHEMATIC DESIGNATION A B C D E F G DP 7 6 4 2 1 9 10 5 3 8 CC CC 3 2 1 QA QB QC QD QE QF QG QH QH SER SRCLK SRCLR RCLK OE VCC GND 3 1 2 ...

Page 7: ... GND Copper Area On Back of PCB J1 Q1 4 U2 U1 U3 U4 SW1 R1 4 R5 RV1 R6 R7 14 SW2 U5 D1 C1 R15 R16 R17 R18 D2 D3 D4 74HC595 U6 74HC595 C2 R19 SW2 POT SW1 SW2 POT SW1 LAT CLK SER OE LAT CLK SER Qh LAT CLK SER Qh GND VCC VCC GND DIGITISER ...

Page 8: ... 7 9 8 16 14 11 10 12 13 SER SRCLK SRCLR RCLK OE VCC GND SER CLK LAT OE 5V 5V GND LED 1 LED 2 LED 3 LED 4 DIG 4 DIG 3 DIG 2 DIG 1 5V GND C1 100nF 15 1 2 3 4 5 6 7 9 14 11 10 12 13 5V U6 74HC595 QH QA QB QC QD QE QF QG QH QH R7 14 560Ω SER SRCLK SRCLR RCLK OE VCC GND SER OUT CLK LAT OE 5V GND SEG G SEG F SEG A SEG B SEG DP SEG C SEG D SEG E 5V GND C2 100nF R19 10K GND 8 16 Shift Registers ...

Page 9: ...A B C D E F G DP 7 6 4 2 1 9 10 5 3 8 CA CA U2 DIGIT 2 SEG A SEG B SEG C SEG D SEG E SEG F SEG G SEG DP DIGIT_2 A B C D E F G DP 7 6 4 2 1 9 10 5 3 8 CA CA U3 DIGIT 3 SEG A SEG B SEG C SEG D SEG E SEG F SEG G SEG DP DIGIT_3 A B C D E F G DP 7 6 4 2 1 9 10 5 3 8 CA CA U4 DIGIT 4 SEG A SEG B SEG C SEG D SEG E SEG F SEG G SEG DP DIGIT_4 7 Segment Displays R15 2K R16 10K R17 1 5K R18 D1 D2 D3 D4 1 2K ...

Page 10: ... 1 4W 10K Potentiometer 12mm SPST 4pin Common Anode Red 74HC595 Name Ceramic Capacitor LED LED LED LED Screw Terminals PNP Transistor Resistor THT Resistor THT Resistor THT Resistor THT Resistor THT Resistor THT Potentiometer THT Switch 7 Segment Display Shift Register Footprint Pitch 2 54mm 5mm 5mm 5mm 5mm 3 5mm TO 92 7mm 7mm 7mm 7mm R15 2K 1 4W Resistor THT 7mm 7mm 7mm 12mm DIP16 U5 U6 DIP16 IC ...

Page 11: ...be pulled low To turn them all off OE must be pulled high There is a pull down resistor connected to OE which means it is on until it is pulled high by the microcontroller If connected to a PWM en abled microcontroller pin OE can be used to dim the display Use analogWrite 0 to turn the display on analogWrite 255 to turn them off You can use any number in between to dim the display 5V VCC The 74HC5...

Page 12: ... for each LED found in their respective datasheets Circuit Mode LEDs Shift Register Outputs In our circuit the LED s anodes are connected to the Shift Registers outputs through a current limiting resistor and their cathodes are connected to ground To turn an LED on the corresponding Shift Register output must be set to High This will create a potential difference of 5V between the output and the c...

Page 13: ...NP E Emitter B Base C Collector GND fig 1 5V 5V 1 E B PNP C Emitter Base Collector GND fig 2 If none of the segments in the display are pulled low nothing will happen either as there will be no potential difference between the 5V coming from the Transistor and the cathodes of the display Switching To use a Transistor as a switch we need to make sure the Transistor is in Saturation Mode For this we...

Page 14: ... nately this is avoided when cycling digits Current Limiting Resistors To calculate the current limiting resistor s value we will need to consider the voltage drop CE across the Transistor This can be found by looking at the CE Voltage drop vs Collector Current graph in the transistor s datasheet The segments are bright enough at 5mA and only one digit will be on at a time so we can use 5mA as our...

Page 15: ...ments The one we are using has 8 the eighth being the decimal point in the corner Here is a diagram that shows the segments and their reference letters By turning on A B and C we can display the number 7 By turning on C D E F and G we can display the number 6 Tips for Coding The first thing to note is that the segment reference letters don t match up to the Shift Register output letters So we need...

Page 16: ...0K pull down resistor When our 10K potentiometer s knob is turned anticlockwise all the way the re sistance between pin 2 connected to the microcontroller and pin 1 GND would be close to 0Ω The resistance between pin 2 and pin 3 VCC would be around 10 000Ω This would give a reading of near 0V at pin 2 which would give an analogRead of 0 When the switch is not pressed the data line will read 0V as ...

Page 17: ...en other circuit traces need to be routed along the back to avoid other traces on the front This is done as little as possible Care is taken to make sure that no parts of the ground plane are completely cut off from another Also it is important to consider the electrical current s return path Make sure that the paths from each GND connection back to the Power IO are as unobstructed as possible Shi...

Page 18: ...re control You will have to feed more into the solder joint but you have more control when there are other pins close by that you want to avoid This is essential when soldering surface mount components and Integrated Circuits 5 SAFETY 350oC is obviously very hot Stuff catches fire at this temperature Skin fries Please be careful Remember to turn it off when you are finished This will prevent a pot...

Page 19: ...BLY J1 Q1 4 U2 U1 U3 U4 SW1 R1 4 R5 RV1 R6 R7 14 SW2 U5 D1 C1 R15 R16 R17 R18 D2 D3 D4 74HC595 U6 74HC595 C2 R19 SW2 POT SW1 SW2 POT SW1 LAT CLK SER OE LAT CLK SER Qh LAT CLK SER Qh GND VCC VCC GND DIGITISER ...

Page 20: ... the board Note an error on v1 of the board means the semi circles have accidentally been omitted Take note that the pad for pin 1 of the IC is square The semi circle should be at the same end as the square pad Now stick it in place with sticky tack and solder 1 corner pin then the diagonally opposite corner Now check alignment and whether its flush with the board If one corner is too high add pre...

Page 21: ...BLY J1 Q1 4 U2 U1 U3 U4 SW1 R1 4 R5 RV1 R6 R7 14 SW2 U5 D1 C1 R15 R16 R17 R18 D2 D3 D4 74HC595 U6 74HC595 C2 R19 SW2 POT SW1 SW2 POT SW1 LAT CLK SER OE LAT CLK SER Qh LAT CLK SER Qh GND VCC VCC GND DIGITISER ...

Page 22: ...turn them on Be careful Do not connect them directly to GND and VCC they will likely blow To check the colour follow the code guide in this manual to turn the LED circuits on Now you can insert the LEDs into any posi tion to find out what colour they are LEDs are polarity sensitive The short lead is neg ative and the long lead is positive You can also tell by finding the flat edge on the rim of th...

Page 23: ...SSEMBLY J1 Q1 4 U2 U1 U3 U4 SW1 R1 4 R5 RV1 R6 R7 14 SW2 U5 D1 C1 R15 R16 R17 R18 D2 D3 D4 74HC595 U6 74HC595 C2 R19 SW2 POT SW1 SW2 POT SW1 LAT CLK SER OE LAT CLK SER Qh LAT CLK SER Qh GND VCC VCC GND DIGITISER ...

Page 24: ...ould damage something So to check for shorts get your multimeter and put it in continuity mode Make sure the black cable is plugged into the common socket and the red cable into the red socket that also has the Ω symbol on it Touch the probes together and make sure it makes a sound Now press the black probe on one of the green circles indicated in the diagram These are all connected to the large g...

Page 25: ...If a whole digit is not working check the transistor it is connected to for solder bridg es and follow the circuit back to the shift registers output pin If the same segment on each of the digits is not working then check the resistor and the shift register output pin it is connected to If an LED isn t working check its connection with its shift register output and try swap ping LEDs to check the ...

Page 26: ...croprocessor which pins to address when the code ex ecutes The other variables will handle the numbers we need to make everything work If you need clarification on this section of the code please refer to the Coding Basics sec tion of the Motherboard s Manual To help you understand the code comments have been added When the Arduino IDE compiles the code ready to transfer it to the micro controller...

Page 27: ... told the microcontroller to do some thing every time the switch read HIGH when it is pressed down that something would happen every time the code looped As the code loops several hundred times per sec ond our code would switch modes at that speed Obviously not ideal For our code to recognise that the switch has been pressed once regardless of whether it is still pressed we need to compare its sta...

Page 28: ...tatement line 63 and set the lastswState variable to equal the current one line 65 ready for the next time around the loop We can now send data to our shift registers depending on which number is stored in the mode variable We can simply use an if state ment to hold the code for each mode lines 69 76 83 90 If mode equals 1 then do this If mode equals 2 then do this other thing etc Shifting Out Shi...

Page 29: ... U6 shiftOut SER CLK LSBFIRST B00101011 shiftOut SER CLK LSBFIRST B10000111 shiftOut SER CLK MSBFIRST B00101011 shiftOut SER CLK MSBFIRST B10000111 Actual Output Actual Output 0 To turn an LED on we use a 1 Sending the following bytes in the second ShifOut will result in the display showing the correspond ing numbers 0 B10001000 5 B00011001 1 B11101011 6 B00111000 2 B01001100 7 B11001011 3 B010010...

Page 30: ...ible A good way to manage this is to insert a wire into one of the screw ter minals on the lower board then stack the boards using the provided standoffs Cut the wire to length while offering it up to the screw terminal directly above it Now re move the sheathing from the tip of the wire and push it firmly into the screw terminal Make sure none of the strands of wire are hanging out the edges Remo...

Page 31: ...D2 R2 D3 D1 F1 J1 J2 J3 J4 RESET PWR ATMEGA328P U1 U2 D13 A0 A1 A2 A3 A4 A5 D2 D3 D4 D5 D6 D7 D8 D9 D10 D11 D12 D13 Bluetooth FTDI Y1 Y2 DS1307 1 1 GND Vout Vin GND MOTHERBOARD 16 000 J1 Q1 4 U2 U1 U3 U4 SW1 R1 4 R5 RV1 R6 R7 14 SW2 U5 D1 C1 R15 R16 R17 R18 D2 D3 D4 74HC595 U6 74HC595 C2 R19 SW2 POT SW1 SW2 POT SW1 LAT CLK SER OE LAT CLK SER Qh LAT CLK SER Qh GND VCC VCC GND DIGITISER ning of the ...

Page 32: ...und in datasheets to help you design circuits around them We have also outlined what happens when these components go pop and how to diagnose and replace them This information can be used to fix your household appliances rather than throwing them away Make do and mend as they used to say Capacitor Ceramic 31 Diode LED 34 Resistor 35 Resistor Potentiometer 39 Switch Momentary SPST 40 Shift Register...

Page 33: ... one side and positive on the other by an electric field In this case the dielectric material is ceramic A dielectric substance increases the amount of electrical energy that can be stored compared to non dielectric sub stances like air Physical Construction Quick Reference Common Varieties Important Ratings Check Polarity Positions 2 Type Schematic Symbol PCB Symbol Designator passive C Single La...

Page 34: ...next to any integrated circuit IC The capacitor acts as a storage reserve If the voltage drops below the re quired voltage the capacitor will use it s stored energy to make up the difference If the voltage increases above the required voltage the capacitor absorbs the excess voltage The microcontroller or other sensi tive device will see a much more even volt age because of this Decoupling capacit...

Page 35: ... to a voltage source and to deplete that store when the voltage source is removed This can be used to create a time delay between turning on a voltage supply and a component receiving the voltage it needs to turn on or read a logic level high for on a microcontroller for example We can use a simple equation to work out how much time it will take the ca pacitor to reach approximately 63 of the supp...

Page 36: ...If the polarity is correct the voltage is sufficient the series resistor is the correct value and it doesn t light up it s most probably toast Here s how to calculate the value for the series resistor with an example Quick Reference Common Varieties Important Ratings Physical Construction Vsource VF IF 5 3 0 02 R 100Ω R R epoxy casing wire bond flat edge anode long cathode short semiconductor refl...

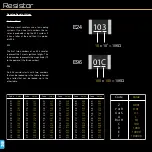
Page 37: ...n as you exceed the resistors power rating it s going to get hot Fortunately they are cheap and easy to replace and easy to troubleshoot Keep in mind that resis tance cannot be measured in an operating circuit Voltage and Current can however So you could use Ohms law to calculate the resistance 1 Remove one lead from the circuit 2 Turn your multimeter to its resis tance setting 3 Set your multimet...

Page 38: ...8 09 10 11 12 13 14 15 16 Value 100 102 105 107 110 113 115 118 121 124 127 130 133 137 140 143 Code 17 18 19 20 21 22 23 24 25 26 27 28 29 30 31 32 Value 147 150 154 158 162 165 169 174 178 182 187 191 196 200 205 210 Code 49 50 51 52 53 54 55 56 57 58 59 60 61 62 63 64 Value 316 324 332 340 348 357 365 374 383 392 402 412 422 432 442 453 Code 65 66 67 68 69 70 71 72 73 74 75 76 77 78 79 80 Value...

Page 39: ...gram to work out the re sistors value 4 Bands 5 Bands 6 Bands 22Ω 1 220Ω 1 220Ω 1 100ppm 0 1 2 3 4 5 6 7 8 9 0 1 2 3 4 5 6 7 8 9 0 1 2 3 4 5 6 7 1 10 0 01 0 1 100 1K 10K 100 50 15 25 100K 1M 10M Black Brown Silver Gold Red Orange Yellow Green Blue Violet Gray White 1 10 5 2 digit 1 digit 2 digit 3 multiplier temp coefficient tolerance 0 5 0 25 0 1 10M 8 9 COMPONENTS ...

Page 40: ...s the current flowing through a circuit the supply volt age and the resistance across a compo nent although some components like an LED do not have a fixed resistance value This can be useful when diagnosing prob lems in circuits If the current is too high maybe the resistance has dropped across a component for example V I R V I x R V I R V I R V I R I V R Finding the voltage drop across an LED su...

Page 41: ...ther a potentiometer is working correctly we can measure the resistance between the pins First measure the re sistance between pin 1 and 3 this should have a value close to the components stat ed value and within its stated tolerance In our case this would be 10K ohms The po tentiometer used in the Digitiser and Sen sor Array kits have a tolerance of 10 so a value anywhere from 9K to 11K would be ...

Page 42: ... Type Schematic Symbol PCB Symbol Designator passive R connector non conducting plunger conductor connector Parameter Typical Values Contact Current Rating 5mA 1A Operating Force 0 5N 6 5N Min Operating Temp C 55 20 C Max Operating Temp C 70 160 C Troubleshooting Most tactile switches have a dome shaped contact that will spring back after you let go of the switch This can wear out over time and lo...

Page 43: ... a simple circuit to test its func tionality on a breadboard Hook it up to a microcontroller programmed to send all 1 s to the shift register then test each output s voltage in respect to GND If they all read around Vcc then they are OK Now set the outputs to all 0 s Test them again They should now all read 0V If nothing chang es then there may be something wrong with the input lines or the code I...

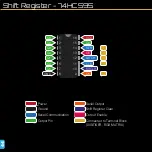
Page 44: ...r Ground Serial Communication Output Pin Serial Output Shift Register Clear Connected to Terminal Block DIGITISER RGB MATRIX Output Enable 1 2 3 4 5 6 7 8 16 15 14 13 12 11 10 9 Qf Qg Qh Qb Qc Qd Qe LATCH CLK SRCLR Qh VCC Qa SER OE GND ...

Page 45: ... the Arduino IDE so you don t have to write it in your sketch You can just call the function For reference the code it uses is something like the code opposite A for loop runs 8 times once for each bit It checks whether you are using LSBFIRST or MSBFIRST then sets the Serial pin to the first bit of the byte depending on the order It then sets the clock pin high then low to shift the bit in Clock S...

Page 46: ...ibu tion The LEDs are connected to conduc tors which are then connected to either the common anode or cathode or a segments individual cathode or anode respectively Quick Reference Important Ratings Troubleshooting 7 segment displays are like any other LED when it comes the troubleshooting Make sure you use a current limiting resistor see the LED section for the calculations involved Attach this t...

Page 47: ...COMPONENTS Seven Segment Display Common Anode Segment Cathode 1 2 3 4 5 10 9 8 7 6 G G F F A A B B E E D D C C DP DP Common Cathode Segment Cathode 1 2 3 4 5 10 9 8 7 6 G G F F A A B B E E D D C C DP DP ...

Page 48: ...re occupying electron holes An atom with a free electron is still considered neutrally charged as the number of electrons and the number of protons in the atom are equal When a free electron occupies an electron hole a negatively charged atom is formed This repels the free electrons in the N zones preventing conductivity In this state the transistor is off Transistor BJT Overview Transistors are a...

Page 49: ...connect the black lead Obviously you need to know which lead is which so check the Internet for a datasheet by typing the number that s printed on the transistor The table will tell you what value to expect depending on what your leads are con nected to For example If you put your black lead on the Emitter and the red lead on the Base of an NPN transistor a value between 0 4 and 0 9V will indicate...

Page 50: ...ing as your own and think you deserve a mention please feel free to contact admin shortcircuits cc and let Martyn know 2021 Short Circuits Some Rights Reserved What is allowed All circuits and schematics can be freely shared and modified as open source All code can be freely shared and modified as open source What is not allowed The manual cannot be modified or redistributed ...

Reviews: