


36
(2) List printing stopping procedure
1) Press the “PRINT” key.
2) Use the “PRINT” key to display “
”, and press the “ENT” key.
3) Use the “PRINT” key to select “
” . Pressing the “ENT” key stops list printing.
However, printing continues until the line is completely printed. Then list printing is stopped, and
the display returns to the status prior to starting list printing.
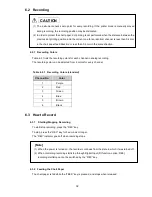
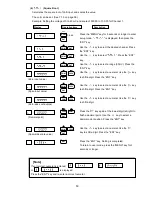
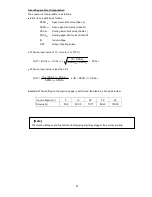
Fig. 6.4.2 List Printing
Dec.01.99 06:00
CHART SPEED
(1)50mm/h
(2)100mm/h
CH
RANGE LEFT END
SCALE LEFT
TAG NO.
RIGHT END
SCALE RIGHT
1
10V
-10.000V
10.000
2
10V
-10.000V
ABCD
10.000
3
10V
-10.000V
10.000
4
10V
-10.000V
10.000
5
TYPE K
-200.00
100.00
*
6
10V
-10.000V
10.000
CH ALARM1
RLY
ALARM2
RLY
ALARM3
RLY
ALARM4
RLY
UNIT
1 H
8.000
L -5.000
V
CH DIGITAL
ZONE(mm)
PARTIAL
1
ON
0-100
2
OFF
0- 50
80%
0.000V
3
OFF
0-100
4
OFF
0-100
5
ON
50-100
6
OFF
0-100
COMMENT 1 = OPEN
2 =
3 =
Digital printing ON/OFF, zone recording,
and partial compression/expansion set
value for each channel.
Prints Input range, Tag,
Measurement range, and
Scaling value for each
channel. If skipped, the
channel
number
is
prefixed by “ ”.
Comment printing
values.
Effective for the DI
function (optional).
Prints alarm set values,
relays and unit.
Date and Time
for List Printing
Chart feed Speed Set value.
The 2nd Chart Speed (2) is
effective for DI function
(optional).


