


13
3.2 Panel Mounting
3.2.1 Procedure for Panel Mounting
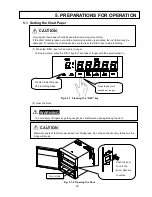
1) Assemble the mounting bracket, referring to Fig.3.2.1-1.
2) Insert this instrument through the front of the panel.
3) Hook the claws of the mounting bracket at the square holes on the top and bottom surfaces of
the case.
4) Tighten the screw of the mounting bracket with a screwdriver to attach it to the panel. When
the mounting unit does not move back and forth any more, tighten the screw by 180 .
Fig. 3.2.1-1 Mounting Bracket
[Note]
If it is tightened with excessive force, the case may be distorted and the mounting bracket may be
damaged. An adequate tightening torque is 0.2 to 0.3 N
・
m (2 to 3 k
g
f
・
cm).
WARNING
Do not install this instrument in a place exposed to combustible, explosive, or corrosive gas (SO
2
,
H
2
S, etc.).
CAUTION
Install the instrument only in the following conditions.
• A place without rapid humidity change.
• A place of normal temperature (around 25 ).
• A place exposed to as few mechanical vibrations as possible.
• A place with as little dust as possible.
• A place affected by electromagnetic fields as little as possible.
• A place not directly exposed to high radiant heat.
• A place of altitude below 2000 m.
• Humidity has an effect on the chart paper and ink. Use the instrument in a humidity range of
20 to 80 %RH (60 %RH is the optimum).
• This instrument needs to be installed indoors.
Panel Mounting
• A steel plate not thinner than 1.2 mm is recommended as a mounting panel.
• The maximum thickness of the mounting panel is 7 mm.
Inclination
• Install the instrument horizontally.
• The instrument should be installed so that its inclination should be 0 at the front and within 30
at the rear.
Assemble in such a manner
that the screw nose will be
almost aligned with the plate
surface.
Mounting Claw
Body
Mounting Claw


