6 - 6
KEY OPERATOR PROGRAMS
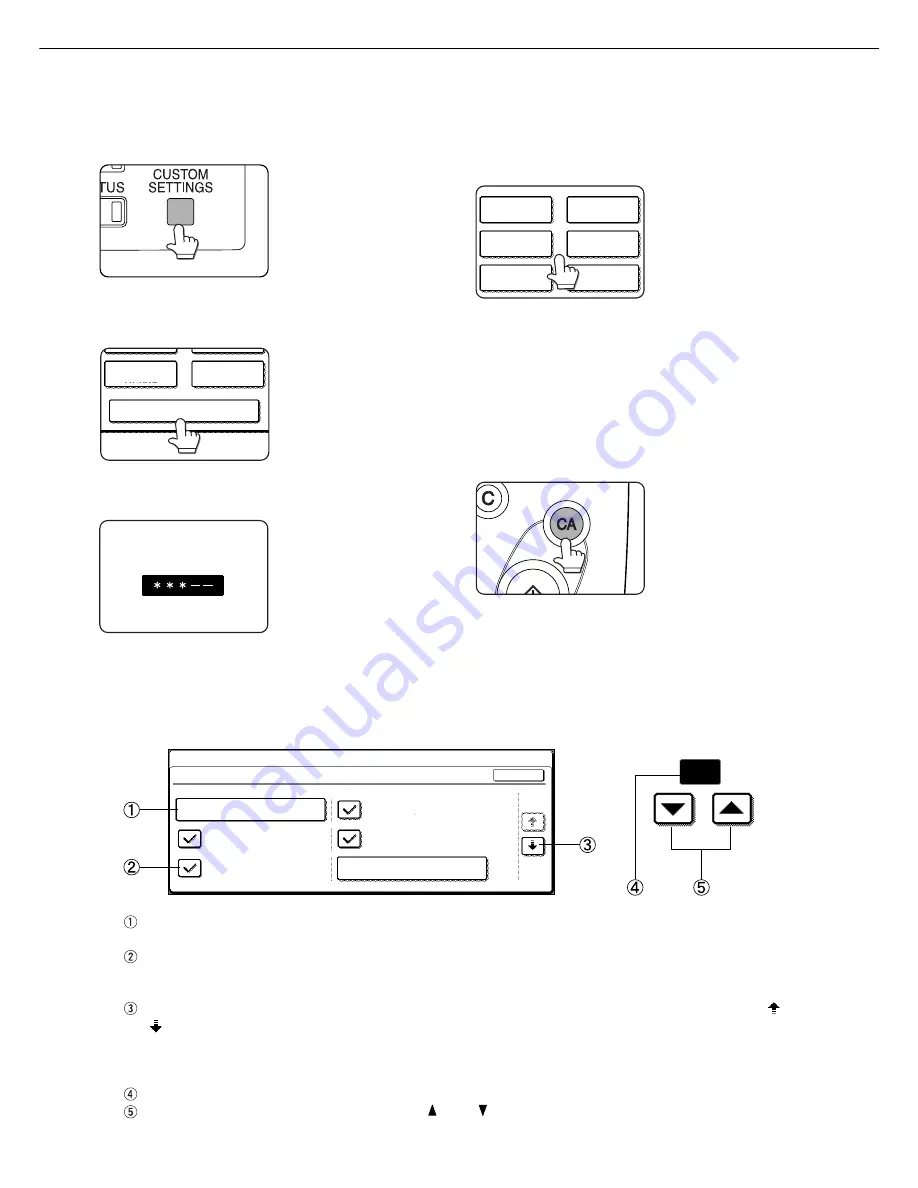
When the machine is being operated from the touch panel on a scanner module:
1
Press the [CUSTOM SETTINGS] key.
2
Touch the KEY OPERATOR PROGRAMS
key.
KEY OPERATOR PROGRAMS
ADDRESS
CONTROL
RECEIVE MODE
3
Use the numeric keys to enter the five-digit
key operater code number.
KEY OPERATOR CODE
Each time a number is
entered, the dashes (-) in
the display will change to
asterisks (
*
). For the
factory default setting of
the key operator code
number, see page 7-11.
4
Touch the key to select the desired major
category of the key operator programs.
ACCOUNT
CONTROL
PRINT SETTINGS
KEY OPERATOR CODE
CHANGE
ENERGY SAVE
COPY SETTINGS
PRODUCT KEY
<Example>
For registration of the key
operator code number,
touch
“
KEY OPERATOR
CODE CHANGE
”
.
5
Make desired settings for the selected
program.
Detailed descriptions for program settings start on
the next page.
6
Press the [CA] key to exit the program.
Supplementary explanation of key operation for key operator programs
(When the machine is being operated from the touch panel on a scanner module:)
20
(1-999)
SEC.
These keys and indicator are
available on setting screens that
require the entry of numerical values.
KEY OPERATOR PROGRAMS
NETWORK SETTING
IP ADDRESS SETTING
1/2
ENABLE NetWare
ENABLE TCP/IP
OK
ENABLE EtherTalk
(TokenTalk)
ENABLE NetBEUI
PRESET THE NIC
The name of the program category or particular item to be set will appear on the touch key. A touch of the key
will select the item displayed.
Check mark boxes are touch keys that show the status of selections. A box with a check mark means the
function is “on” (enabled) and an unchecked box means the function is “off” (disabled). Alternate touches of a
box will change the on/off status.
If a program step requires more than one screen to display all available settings for a program step, [ ] and
[ ] arrow touch keys on the setting screens allow access to the available selections on all screens. If a
selection is accepted on one of the screens by a press of the [OK] key, the display will return through the
previous selection screens within the same setting step to confirm the settings. After all settings are confirmed,
the [OK] key must be pushed again to advance to the next step.
The currently set numerical value is displayed.
Numerical values can be set by touching the [ ] and [ ] keys.
Summary of Contents for MF9500
Page 1: ...S Printer Manual MF9500 30000113482 01...
Page 15: ...1 6 Part names and functions of peripheral devices PART NAMES AND FUNCTIONS...
Page 53: ......
Page 73: ......


