4
Panel Descriptions
1
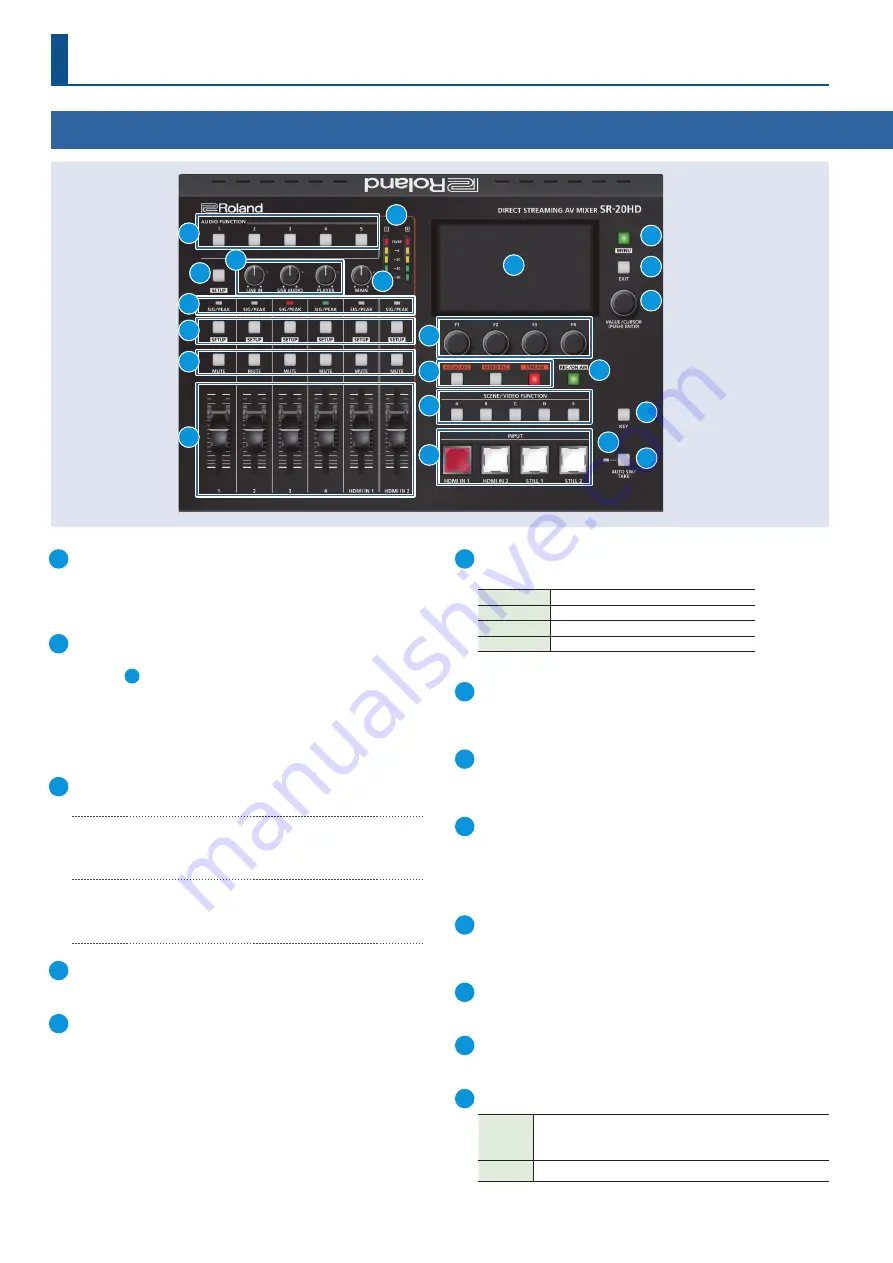
AUDIO FUNCTION
[1]–[5] buttons
Use these buttons to turn on/off or execute the audio-related
functions. You can also assign different functions to each button.
2
[SETUP] button
The audio input/output parameters aside from those selected
using the
7
[SETUP] button are shown at the bottom of the
display.
The target display channel changes each time you press the
button.
LINE IN
Ó
USB AUDIO
Ó
PLAYER
Ó
HEADSET Mic
Ó
MAIN
Ó
Monitor
Ó
LINE IN
Ó
...
3
[LINE IN] knob
Adjusts the input level for the LINE IN jacks.
[USB AUDIO] knob
Adjusts the volume of USB audio that’s input from the device
connected to the USB VIDEO IN port.
[PLAYER] knob
Adjusts the volume used to play back audio files (WAV) or video
files (MP4) on the SD card.
4
Level meter
Indicates the volume level of the main output.
5
[MAIN] knob
Adjusts the main output level.
6
SIG/PEAK indicators
These indicators light up when audio input is detected.
Unlit
Less than -51 dB
Lit green
-50– -21 dB
Lit yellow
-20– -1 dB
Lit red
Over 0 dB (Excessive)
7
[SETUP] buttons
The input channel parameters you selected when pressing these
buttons are shown at the bottom of the display.
8
[MUTE] buttons
Press these buttons to mute (silence) the audio of the selected
input channels.
9
[1]–[4] faders
Adjusts the input level for the AUDIO IN 1–4 jacks.
[HDMI IN 1], [HDMI IN 2] faders
Adjusts the input level for the HDMI IN 1–2 connectors.
10
Display
Shows the status of the input/output video and of streaming/
recording, as well as the parameters and menus.
11
[MENU] button
Switches the menu between visible and hidden.
12
[EXIT] button
Exits a menu level or cancels an operation.
13
[VALUE/CURSOR] knob
Turning
Selects the menu parameters, switches between
parameters shown at the bottom of the display, and edits
their values.
Pressing
Confirms a selected menu item or an edited setting.
Top Panel
2
4
5
11
12
13
16
19
20
21
10
1
3
15
17
6
7
8
9
14
18


