Rohde & Schwarz 1307.9002K03 Quick Start Manual Download Page 141

Basic Measurement Examples

R&S

®

 FSVA/FSV

126

Quick Start Guide 1321.3066.02 ─ 06

c) Press the "Trg/Gate Level" softkey and enter 

50%

.

A static image for the FM AF signal is produced.
Result: (-10 ( 5) dB; this yields a deviation of 100 kHz when the steepness
of the demodulator characteristic is 5 dB/100 kHz.

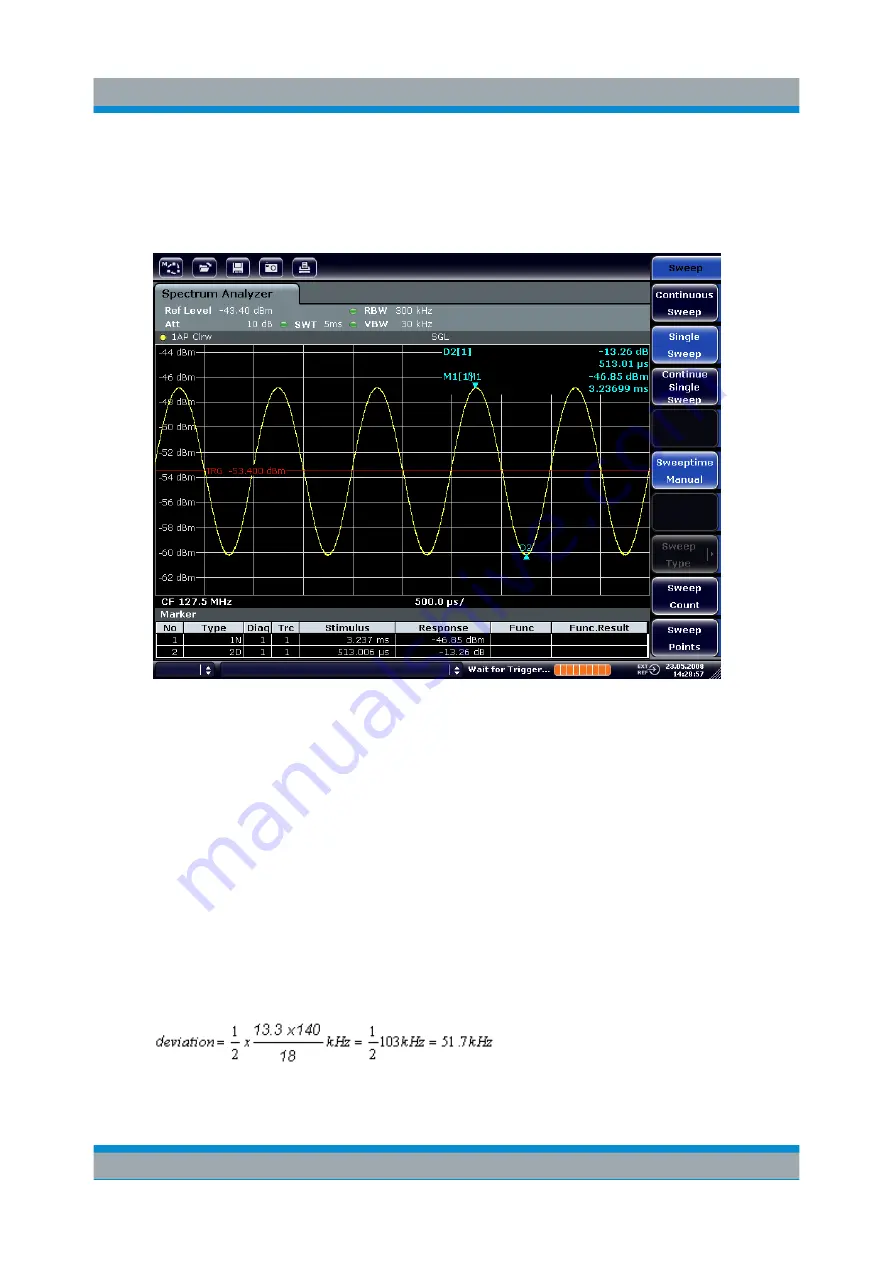
Figure 7-14: Demodulated FM signal

8. Determine the deviation.

a) Press the MKR key.

Marker 1 is activated and placed on the peak of the curve.

b) Press the "Marker 2" softkey.
c) Press the MKR key.
d) Press the "More" softkey.
e) Press the "Min" softkey.

Marker 2 (delta marker) is placed on the minimum of the curve. The level
difference is 13.3 dB, which corresponds to the peak-to-peak deviation.
With the filter slope of 18 dB/140 kHz, the deviation can be calculated as
follows:

Measurements in Zero Span

Summary of Contents for 1307.9002K03

Page 1: ...R S FSVA FSV Signal and Spectrum Analyzer Quick Start Guide Quick Start Guide 1321 3066 02 06 EN 2...

Page 2: ...5 Notes for Users of R S FSV 1307 9002Kxx Models on page 11 R S FSV3 1307 9002K03 R S FSV7 1307 9002K07 R S FSV13 1307 9002K13 R S FSV30 1307 9002K30 R S FSV40 1307 9002K39 1307 9002K40 2017 Rohde Sch...

Page 3: ...e of the product The product is used for its designated purpose if it is used in accordance with its product documentation and within its performance limits see data sheet documentation the following...

Page 4: ...ation item 7 Signal words and their meaning The following signal words are used in the product documentation in order to warn the reader about risks and dangers Indicates a hazardous situation which i...

Page 5: ...afety is not observed either at all or to the extent necessary electric shock fire and or serious personal injury or death may occur 1 Prior to switching on the product always ensure that the nominal...

Page 6: ...t be fuse protected in such a way that anyone who has access to the product as well as the product itself is adequately protected from injury or damage 14 Use suitable overvoltage protection to ensure...

Page 7: ...masks and protective clothing must be worn 7 Laser products are given warning labels that are standardized according to their laser class Lasers can cause biological harm due to the properties of the...

Page 8: ...ckaging until they are ready to be used 4 Cells and batteries must not be exposed to any mechanical shocks that are stronger than permitted 5 If a cell develops a leak the fluid must not be allowed to...

Page 9: ...National waste disposal regulations must be observed 4 If handling the product releases hazardous substances or fuels that must be disposed of in a special way e g coolants or engine oils that must b...

Page 10: ...ien las informaciones de seguridad elementales as como la documentaci n del producto y entr guelas a usuarios posteriores Tener en cuenta las informaciones de seguridad sirve para evitar en lo posible...

Page 11: ...raves o incluso la muerte Indica una situaci n de peligro que si no se evita puede causar lesiones graves o incluso la muerte Indica una situaci n de peligro que si no se evita puede causar lesiones l...

Page 12: ...entaci n del producto o en la hoja de datos En caso de sobrecalentamiento del producto pueden producirse choques el ctricos incendios y o lesiones graves con posible consecuencia de muerte Seguridad e...

Page 13: ...0950 1 EN60950 1 o IEC61010 1 EN 61010 1 v lidos en cada caso 11 A menos que est permitido expresamente no retire nunca la tapa ni componentes de la carcasa mientras el producto est en servicio Esto p...

Page 14: ...manipulaci n mec nica y o t rmica o el desmontaje del producto debe tenerse en cuenta imprescindiblemente el cap tulo Eliminaci n protecci n del medio ambiente punto 1 5 Ciertos productos como p ej la...

Page 15: ...a las bater as y acumuladores o celdas pueden producirse explosiones incendios y o lesiones graves con posible consecuencia de muerte El manejo de bater as y acumuladores con electrolitos alcalinos p...

Page 16: ...sin clasificar sino que debe ser recogido por separado La eliminaci n se debe efectuar exclusivamente a trav s de un punto de recogida apropiado o del servicio de atenci n al cliente de Rohde Schwarz...

Page 17: ...ument up to date and to be informed about new application notes related to your instrument please send an e mail to the Customer Support Center stating your instrument and your wish We will take care...

Page 18: ...perating Manuals and Help 12 2 3 Service Manual 13 2 4 Instrument Security Procedures 13 2 5 Basic Safety Instructions 13 2 6 Data Sheets and Brochures 13 2 7 Release Notes and Open Source Acknowledgm...

Page 19: ...Measuring Harmonics of Sinusoidal Signals 104 7 3 Measuring Signal Spectra with Multiple Signals 108 7 4 Measurements in Zero Span 115 7 5 Storing and Loading Instrument Settings 127 8 Controlling the...

Page 20: ...nd gives instructions how to prevent personal injury or damage caused by dangerous situations Safety information is provided as follows In the Basic Safety Instructions safety issues are grouped accor...

Page 21: ...dure using the touchscreen is described Any elements that can be activated by touching can also be clicked using an additionally connected mouse The alternative procedure using the keys on the instrum...

Page 22: ...unction is displayed If a softkey opens a submenu and you press the softkey a second time the submenu of the softkey is displayed Contents of the help dialog box The help dialog box contains four tabs...

Page 23: ...b 5 Press the ENTER key to display the help topic The View tab with the corresponding help topic is displayed Changing the zoom 1 Change to the Zoom tab 2 Set the zoom using the rotary knob Four setti...

Page 24: ...e new HOME key returns to the first softkey menu of an application The new USER key allows you to configure user defined softkeys for instru ment settings The new PEAK SEARCH key carries out a marker...

Page 25: ...selected In this case the FSV behaves as an FSP e g same number of sweep points bandwidths like FSP etc and also identifies itself at the IDN command as an FSP Thus FSP remote pro grams can be re use...

Page 26: ...1307 9002Kxx Mod els Users of R S FSV 1307 9002Kxx models should consider the following differen ces to the description of the newer R S FSVA FSV 1321 3008Kxx models Functions that are based on the Wi...

Page 27: ...nuals are provided for the base unit and the software options Base unit manual Contains the description of all instrument modes and functions It also pro vides an introduction to remote control a comp...

Page 28: ...Procedures Deals with security issues when working with the R S FSVA FSV in secure areas It is available for download on the Internet 2 5 Basic Safety Instructions Contains safety instructions operat...

Page 29: ...d describe the firmware installation The open source acknowledgment document provides verbatim license texts of the used open source software See www rohde schwarz com firmware FSV 2 8 Application Not...

Page 30: ...sections 1 3 2 5 7 6 4 8 9 10 11 12 13 14 15 17 18 22 19 16 20 21 Figure 3 1 Front panel view of an R S FSVA No Description See 1 General device functions e g Change mode Setup Default Set tings Help...

Page 31: ...7 12 Numeric keyboard units and data entry keys Chapter 6 2 4 Keypad on page 77 13 Rotary knob Chapter 6 2 5 Rotary Knob on page 78 14 Arrow keys Chapter 6 2 6 Arrow Keys UNDO REDO Keys on page 78 15...

Page 32: ...unctions e g Reference frequency external internal noise source Date time display configuration LAN interface Self alignment Firmware update and enabling of options Information about instrument config...

Page 33: ...the level display Sets the level offset and the input impedance Activates the preamplifier option RF Preamplifier R S FSV B22 SCALE for special applications AUTO SET Enables automatic settings for le...

Page 34: ...s MEAS Provides the measurement functions Measurement of multicarrier adjacent channel power Ch Power ACLR Carrier to noise spacing C N C No Occupied bandwidth OBW Spectrum emission mask measurement S...

Page 35: ...nd easy handling of the device The Figure 3 2 shows the touchscreen display of the R S FSVA FSV The indi vidual elements are described in more detail in Chapter 6 Basic Operations on page 65 Figure 3...

Page 36: ...B The front panel provides two female USB connectors to connect devices like a keyboard or mouse Also a memory stick can be connected to store and reload instrument settings and measurement data 3 1 3...

Page 37: ...t 3 1 3 5 POWER SENSOR The LEMOSA female connector is used to connect power sensors of the R S NRP family requires option R S FSVA FSV K9 For details on supported power sensors see the data sheet 3 1...

Page 38: ...ctive the LED is green Risk of damaging the tracking generator To avoid damaging the tracking generator make sure that the reverse power i e input power caused for example by reflections in the test s...

Page 39: ...e R S FSVA FSV cover the two front connectors LO OUT IF IN and IF IN with the SMA caps supplied Three port mixer 1 Connect the LO OUT IF IN output of the R S FSVA FSV to the LO port of the external mi...

Page 40: ...ontained in the R S FSVA FSV the IF signal can be tapped from the line which is used to feed the LO signal to the mixer 2 Feed the signal to be measured to the RF input of the external mixer 3 2 Rear...

Page 41: ...BAND INPUT OUTPUT connectors option B17 11 MONITOR VGA 12 REF IN 13 REF OUT 14 GPIB interface 15 AC Power Supply Connection and Main Power Switch with fuse 16 EXT REF with OCXO option B4 3 2 1 Standar...

Page 42: ...air and STP for shielded twisted pair 3 2 1 3 MONITOR VGA The female VGA connector is used to connect an external monitor Step by step instructions how to connect an external monitor are provided in C...

Page 43: ...re details refer to chapter 7 Remote Control Basics in the Operating Manual 3 2 1 8 TRIGGER OUTPUT The female BNC connector can be used to provide a signal to another device The signal is TTL compatib...

Page 44: ...Always terminate any connected IEC bus cables with an instrument or controller 3 2 1 11 AUX PORT The 9 pole SUB D male connector provides control signals for controlling external devices The voltage...

Page 45: ...ively to the OCXO reference an ultra high precision reference option R S FSV B14 is available This option generates an even more precise 10 MHz reference signal with an output level of 0 dBm If instal...

Page 46: ...face R S FSV B17 The R S FSVA FSV Digital Baseband Interface option R S FSV B17 provides an online digital I Q data interface on the rear panel of the instrument for input and output The digital input...

Page 47: ...ersonal injury or damage to the instrument Read and observe the basic safety instructions provided with the instrument in addition to the safety instructions in the following sections In particular Do...

Page 48: ...the input connectors are all within the specified ranges Signal outputs are connected correctly and are not overloaded Instrument damage caused by electrostatic discharge Electrostatic discharge ESD...

Page 49: ...nd remove it 5 Check the equipment for completeness using the delivery note and the acces sory lists for the various items 6 Check the instrument for any damage If there is damage immediately contact...

Page 50: ...folded out The feet can fold in if they are not folded out completely or if the instrument is shifted Collapsing feet can cause injury or damage the instrument Fold the feet completely in or out to e...

Page 51: ...ruments If you need to stack more than three instruments install them in a rack The overall load imposed on the lowest instrument must not exceed 500 N It is best if all instruments have the same dime...

Page 52: ...voltages and adapts itself automatically to it Refer to the datasheet for the requirements of voltage and fre quency The AC power connector is located on the rear panel of the instrument Connect the R...

Page 53: ...ion are met according to DIN EN IEC 61010 UL61010 CAN CSA C22 2 No 61010 or DIN EN IEC 60950 UL60950 CAN CSA C22 2 No 60950 Otherwise you may be injured due to electrical shock Before switching on the...

Page 54: ...ption R S FSV B34 For installation instructions see the option s installation guide Switching on the battery pack 1 Connect the battery pack to the R S FSVA FSV as described in the installa tion guide...

Page 55: ...hey are used for the first time The R S FSVA FSV B34 charger is a standalone charging device which can be used to charge all four rechargeable batteries of the R S FSVA FSV B32 battery pack simultaneo...

Page 56: ...arging Green LED flashes Charging completed Green LED remains lit Fault Red LED lights up 5 When charging has been completed the rechargeable batteries can be removed from the charger The LCD on the f...

Page 57: ...the front panel After booting the instrument is ready for operation A green LED above the ON OFF key indicates this Warm up time for OCXO When the instrument is switched on the OCXO requires an exten...

Page 58: ...nce the system correction values have been calculated successfully a mes sage is displayed To display the alignment results again later Press the SETUP key Press the Alignment softkey Press the Show A...

Page 59: ...connections using USB hubs Due to the large number of available USB devices there is almost no limit to the expansions that are possible with the R S FSVA FSV The following list shows various USB devi...

Page 60: ...age To access the Windows operating system press the Windows key on the external keyboard Connecting a mouse The mouse is detected automatically when it is connected Select Start Settings Devices Mous...

Page 61: ...d monitor is determined and displayed in the standard Windows configuration dialog box 6 In the configuration dialog box you can switch from the internal monitor lap top icon to the external monitor m...

Page 62: ...following procedure for convenience 1 Select the SETUP hardkey 2 Select the General Settings softkey 5th from the top 3 Select the Language softkey 6th from the top 4 Select an available interface lan...

Page 63: ...u can set the date and time for the internal real time clock as follows Opening the Date and Time Properties dialog box 1 Press the SETUP key 2 Press the General Setup softkey 3 Press the Time Date so...

Page 64: ...the list 4 Optionally select the Automatically adjust clock for daylight saving changes check box 5 Click OK 4 4 4 Aligning the Touchscreen When the device is delivered the touchscreen is initially al...

Page 65: ...g a Theme on page 96 and cannot be changed individually 4 4 5 1 Displaying the Screen Colors Submenu 1 Press the SETUP key 2 Press the Display Setup softkey 3 Press the More softkey 4 Press the Screen...

Page 66: ...Screen Colors Submenu on page 50 press the Select Screen Color Set softkey The Select Screen Color Set dialog box is displayed 2 Select the User Defined Colors option 3 In the screen colors submenu pr...

Page 67: ...to accept the new settings and to close the dialog box Remote command DISP CMAP1 41 PDEF color 4 4 5 4 Defining and Using a User Defined Color Set 1 In the screen colors submenu see Chapter 4 4 5 1 D...

Page 68: ...51 8 Click OK to accept the new settings and to close the dialog box Remote command DISP CMAP1 41 HSL hue sat lum 4 4 6 Setting the Display Power Save Function The R S FSVA FSV provides a feature for...

Page 69: ...surement results using a local printer or a network printer The instrument supports two independent printout settings This allows you to quickly switch between output to a file and a printer 4 4 7 1 C...

Page 70: ...rint Date and Time option to add this information to the printout 9 Click OK to accept the settings and to close the dialog box 4 4 7 2 Selecting the Printout Colors 1 Press the PRINT key 2 Press the...

Page 71: ...hite printout press the Color On Off softkey to switch off the color In the black and white printout all background colors are printed out in white and all color lines in black This allows you to impr...

Page 72: ...deletion of files on the hard disk 4 5 1 Virus Protection Take appropriate steps to protect your instruments from infection Use strong fire wall settings and scan any removable storage device used wit...

Page 73: ...ground when the R S FSVA FSV is started without having to enter a password This function is active until you explicitly deactivate it or change the password For information on how to deactivate or rea...

Page 74: ...enu on page 60 2 Press CTRL ALT DEL then select Sign out The Login dialog box is displayed in which you can enter the different user account name and password Deactivating the automatic login function...

Page 75: ...automatic login function 1 Press the Windows key or the CTRL ESC key combination on your key board to access the operating system of the R S FSVA FSV see also Chap ter 4 5 4 Accessing the Start Menu...

Page 76: ...SV 61 Quick Start Guide 1321 3066 02 06 All necessary system settings can be defined in the Start Settings menu for required settings refer to the Windows 10 documentation and to the hardware descript...

Page 77: ...Copying the files to the instrument 1 Press the SETUP key 2 Press the More softkey 3 Press the Firmware Update softkey The Firmware Update dialog box is displayed 4 Enter the drive name and directory...

Page 78: ...s you want to install and click the Next button 4 Your LAN subnet is scanned and all found instruments are listed Note The setup procedure communicates with the instrument via LAN which means the file...

Page 79: ...e using the R S FSVA FSV If an option has already expired a message box appears for you to confirm In this case all instrument functions are unavailable including remote control until the R S FSVA FSV...

Page 80: ...lp It also describes the user interface elements listed in Figure 3 2 in more detail Note the Conventions Used in the Documentation concerning procedure descriptions and terminology described at the b...

Page 81: ...tab is displayed on the screen In order to switch from one channel display to another simply press the corresponding tab The icon on the tab label indicates that the displayed trace no longer matches...

Page 82: ...fset SWT Sweep time that has been set If the sweep time does not correspond to the value for automatic coupling a bullet is displayed in front of the field The color of the bullet turns red if the swe...

Page 83: ...urement as opposed to the common hardware settings that are always displayed The following types of information may be displayed if applicable Label Description SGL The sweep is set to single sweep mo...

Page 84: ...agram header above the diagram contains the following trace information The header may contain a user defined introductory title see Chapter 6 4 7 Adding a Title to the Diagram Header on page 96 Editi...

Page 85: ...ram grid if available The value in the square brackets after the index indicates the trace to which the marker is assigned Example M1 1 defines marker 1 on trace 1 For more than 2 mark ers a separate...

Page 86: ...r or measurement function Mode dependant Information in Diagram Footer The diagram footer beneath the diagram contains the following information depending on the current mode Mode Label Information FR...

Page 87: ...used for digital input The optional Digital Baseband interface B17 is being used to provide digi tal output Error information If errors or irregularities are detected a keyword and an error message if...

Page 88: ...e status bar Date and time The date and time settings of the instrument are displayed in the status bar 6 2 Means of User Interaction The instrument provides a user interface for operation that does n...

Page 89: ...screen if available see Chapter 6 Basic Operations on page 65 By default this toolbar is not displayed Displaying the toolbar Press the Toolbar icon to the right of the tabs in the display to toggle t...

Page 90: ...a Can be repeated several times Zoom off the diagram is displayed in its original size 6 2 2 Touchscreen A touchscreen is a screen that is touch sensitive i e it reacts in a specified way when a parti...

Page 91: ...ntire screen DIAGRAM TOUCH OFF touchscreen is deactivated for the diagram area of the screen but active for the surrounding softkeys toolbars and menus SCPI command DISP TOUCh STAT OFF 6 2 3 On screen...

Page 92: ...GHz dBm MHz dBm kHz dB and Hz dB These keys add the selected unit to the entered numeric value and complete the entry In the case of level entries e g in dB or dimensionless values all units have the...

Page 93: ...selected option of the focused area if the edit mode is active 6 2 5 Rotary Knob The rotary knob has several functions Increments clockwise direction or decrements counter clockwise direction the ins...

Page 94: ...s before the previous action is retrieved The undo function is useful for example if you are performing a zero span measurement with several markers and a limit line defined and accidentally click the...

Page 95: ...een When pressed it displays the next set of softkeys If the softkey label contains a symbol it represents a submenu of further softkeys When you press it the submenu is displayed The Up key switches...

Page 96: ...d for a specified time Any edit dialog boxes required for entry remain in the display 1 Press the DISPLAY key 2 In the Display Settings dialog box select Softkey Bar State Off The softkeys are no long...

Page 97: ...esigned to enter a numeric value In the documentation these dialog boxes are called edit dialog boxes Dialog boxes that are not only designed for parameter entry have a more complex structure and in t...

Page 98: ...A FSV Chapter 6 3 1 Entering Numeric Parameters on page 83 Chapter 6 3 2 Entering Alphanumeric Parameters on page 84 Chapter 6 3 3 Navigating in Dialog Boxes on page 86 6 3 1 Entering Numeric Paramete...

Page 99: ...rs and special characters via the keypad 1 Press the key once to enter the first possible value 2 All characters available via this key are displayed 3 To choose another value provided by this key pre...

Page 100: ...er your correction Completing the entry Press the ENTER key or the rotary knob Aborting the entry Press the ESC key The dialog box is closed without changing the settings Table 6 2 Keys for alphanumer...

Page 101: ...le Changing the focus The focus on the graphical user interface is moved by pressing an element on the screen or via the rotary knob The focused area is marked with a blue frame see Figure 6 4 If this...

Page 102: ...ll focused areas are in the edit mode automatically if available Otherwise you must switch to edit mode manually Switching to edit mode 1 Press the ENTER key 2 To quit the edit mode press the ESC key...

Page 103: ...SC key To open a drop down list press the arrow next to the list Alternatively press the ENTER key or the rotary knob When opened the list is in edit mode To select an entry without opening a drop dow...

Page 104: ...focus is most easily done by tapping on the ele ment on the touchscreen Alternatively use the Tab key on the on screen key board or the rotary knob to move the focus from one element to the next on th...

Page 105: ...er hardware controls of the instrument are simulated on the screen If you require a Soft Front Panel but do not want to lose too much space for results in the display area a mini soft Front Panel is a...

Page 106: ...c operation with the soft Front Panel is identical to normal operation To acti vate a key either press the key on the touchscreen or click on it with the mouse pointer To simulate the use of the rotar...

Page 107: ...key combination ALT M you can toggle the Mini Front Panel display on and off Auto close option By default the Auto close option is activated and the Mini Front Panel window closes automatically after...

Page 108: ...g the Toolbar Standard file functions can be performed via the icons in the toolbar at the top of the screen see the Chapter 6 2 1 Toolbar on page 74 By default this toolbar is not displayed To displa...

Page 109: ...o real effect see the Sweep Points softkey descri bed in the Operating Manual and online help To zoom into the diagram 1 Display the toolbar as described in Chapter 6 4 5 Displaying the Toolbar on pag...

Page 110: ...ection mode in the diagram While you are in zoom mode touching the screen changes the zoom area In order to select or move a trace or marker you must switch back to selection mode Click on the Selecti...

Page 111: ...am header 6 4 8 Removing the Diagram Footer Some additional diagram specific information is displayed in the diagram footer see Chapter 6 1 4 Diagram specific and Trace Information on page 69 This foo...

Page 112: ...te and time display off 1 Press the SETUP key 2 Press the Display Setup softkey 3 Press the Time Date softkey to Off Changing the format 1 Press the SETUP key 2 Press the Display Setup softkey 3 Press...

Page 113: ...ess the DISPLAY key The Display Settings dialog box is opened 2 Under Display Update Rate select Slow The display is updated less frequently and performance for measurements should improve When data t...

Page 114: ...ing Phase Noise Measuring Channel Power and Adjacent Channel Power For a more detailed description of the basic operating steps e g selecting menus and setting parameters refer to Chapter 6 Basic Oper...

Page 115: ...er input on the instrument front panel 3 Set the center frequency to 128 MHz a Press the FREQ key The dialog box for the center frequency is displayed b In the dialog box enter 128 using the numeric k...

Page 116: ...pixel cor responds to a span of approx 1 4 kHz This corresponds to a maximum uncer tainty of 0 7 kHz You can increase the pixel resolution of the trace by reducing the frequency span Reducing the fre...

Page 117: ...erence level is also opened 2 Using the numeric keypad enter 30 and confirm the entry with the DBM key The reference level is set to 30 dBm The maximum of the trace is near the maximum of the measurem...

Page 118: ...r s Ref IN connector 1 Set the signal analyzer to the default state by pressing the PRESET key The R S FSVA FSV is set to its default state 2 Set the center frequency and the span a Press the FREQ key...

Page 119: ...ter an RF sinusoidal signal or a spectral line must be available The marker must be located more than 25 dB above the noise level to ensure that the specified measurement accuracy is adhered to 7 2 Me...

Page 120: ...T key b Press the RF Atten Manual softkey c Enter 0 dB in the edit dialog box 5 Activate the marker by pressing the MKR key Marker 1 is activated and positioned to the signal maximum fundamental at 12...

Page 121: ...ferentiate the harmonics of a signal from the noise effectively Reducing the video bandwidth Averaging the trace Reducing the resolution bandwidth Reducing the video bandwidth and averaging the traces...

Page 122: ...200 ms In other words the measurement will take significantly more time The video bandwidth that is displayed is marked with a bullet to indicate that it is no longer coupled to the resolution bandwid...

Page 123: ...kHz a Press the BW key b Press the Res BW Manual softkey and enter 10 kHz The noise decreases by approx 25 dB compared to the previous setting Since the video bandwidth is coupled to the resolution b...

Page 124: ...drop larger which thus makes the individual signals clearer Higher spectral resolution at a narrower bandwidth is accomplished through lon ger sweep times at the same span Reducing the resolution band...

Page 125: ...voltage that results from envelope detection is not sufficiently suppressed This produces additional voltages which are visible in the trace in the transition area between the two signals Figure 7 4...

Page 126: ...frequency spacing Note Reducing the resolution bandwidth The resolution bandwidth RBW can be reduced again by turning the rotary knob counterclockwise thus yield ing a higher frequency resolution 5 Se...

Page 127: ...0 In the frequency range display the AM side bands can be resolved with a narrow bandwidth and measured separately The modulation depth of a carrier modula ted with a sinusoidal signal can then be mea...

Page 128: ...measuring the AM modulation depth a Press the MEAS key b Press the More key c Press the AM Mod Depth softkey The R S FSVA FSV automatically sets a marker to the carrier signal in the center of the dia...

Page 129: ...to the default state by pressing the PRESET key The R S FSVA FSV is set to its default state 2 Set the center frequency to 128 MHz and the span to 0 Hz a Press the FREQ key and enter 128 MHz b Press...

Page 130: ...volume 7 4 Measurements in Zero Span For radio transmission systems that use the TDMA method e g GSM or IS136 transmission quality is determined not only by spectral characteristics but also by charac...

Page 131: ...Press the Rf Atten Manual softkey d Enter 20 dB 4 Set the sweep time to 1 ms a Press the SWEEP key b Press the Sweeptime Manual softkey and enter 1 ms The R S FSVA FSV shows the GSM burst continuousl...

Page 132: ...the burst The R S FSVA FSV displays the average mean power during the activation phase of the burst Figure 7 8 Measurement of the average power during the burst of a GSM signal 7 4 1 2 Measuring the E...

Page 133: ...ve for measuring the power of the GSM during the activation phase 1 Switch off the power measurement a Press the MEAS key b Press the All Functions Off softkey 2 Increase the time resolution to 100 s...

Page 134: ...r of the screen or enter 50 s The R S FSVA FSV displays the rising edge of the GSM burst Figure 7 9 Rising edge of the GSM burst displayed with high time resolution 4 Using the trigger offset move the...

Page 135: ...used the signal to noise ratio or the deactivation dynamic range can be measured by comparing the power values during the activation phase and the deactivation phase of the transmission burst For this...

Page 136: ...dBm 4 Set the sweep time to 2 ms a Press the SWEEP key b Press the Sweeptime Manual softkey and enter 2 ms The R S FSVA FSV shows the GSM burst continuously across the dis play 5 Use the trigger sourc...

Page 137: ...the Right Limit softkey g Using the rotary knob move the second vertical line to the end of the burst The R S FSVA FSV displays the power during the activation phase of the burst Figure 7 11 Power mea...

Page 138: ...display only the magnitude of the measurement signal by using the envelope detector the modulation of FM modulated signals cannot be measured directly as in the case of AM modulated signals The volta...

Page 139: ...tivated 1 kHz AF 1 Set the signal analyzer to the default state by pressing the PRESET key The R S FSVA FSV is set to its default state 2 Set the center frequency to 127 50 MHz and the span to 300 kHz...

Page 140: ...Hz This can be verified using the marker and delta marker Figure 7 13 Display of the filter edge of the 300 kHz filter as an FM discriminator characteristic 5 Set the FM deviation to 50 kHz on the sig...

Page 141: ...kHz Figure 7 14 Demodulated FM signal 8 Determine the deviation a Press the MKR key Marker 1 is activated and placed on the peak of the curve b Press the Marker 2 softkey c Press the MKR key d Press...

Page 142: ...ive The hard disk has the drive letter C In the default state the current settings are stored This includes the settings of the measurement functions the activated limit lines and the active transduce...

Page 143: ...red and the dialog box is closed 7 5 2 Storing Traces Before you can store traces you must first select the corresponding item entry To do so proceed as follows 1 Press the SAVE RCL key 2 Press the Sa...

Page 144: ...V is switched on in the factory default state it loads the instrument settings that it had when switched off provided that it was switched off using the ON OFF key on the front panel see Chapter 4 1 8...

Page 145: ...tocols on page 161 Operation with Windows Remote Desktop 130 Operation with a VNC Client 137 Brief Introduction to Remote Control 139 Remote Control Interfaces and Protocols 161 Configuring the GPIB I...

Page 146: ...suitable for remote operation of the R S FSVA FSV via Remote Desktop With the factory settings the default instrument user can connect to the R S FSVA FSV with the Remote Desktop program of the contr...

Page 147: ...program of the controller 8 1 2 Configuring the Controller Remote Desktop Client The Windows Remote Desktop Client is part of the operating system and can be accessed via Start All Applications Window...

Page 148: ...on your selection and how powerful the connection is the options are activated or deactivated 6 To improve the performance you can deactivate the Desktop background Show contents of window while dragg...

Page 149: ...ontroller while accessing them from the R S FSVA FSV activate the Printers option Do not change the remaining settings 10 Open the Display tab The options for configuring the R S FSVA FSV screen displ...

Page 150: ...on page 130 open the General tab 2 In the Computer field enter the IP address of the R S FSVA FSV In the User name field enter instrument to log in as an administrator or Nor mal User to log in as a s...

Page 151: ...ally opens the Soft Front Panel i e the user interface on which all front panel controls and the rotary knob are mapped to buttons 8 To deactivate or activate the Soft Front Panel press the F6 key Aft...

Page 152: ...ted and then restored the R S FSVA FSV remains in the same state 8 1 4 Deactivating the R S FSVA FSV via Remote Operation 1 Click the R S FSVA FSV soft front panel and close the application with the k...

Page 153: ...FSV instruments as of firmware version 3 0 support a VNC and are delivered with a version of the TightVNC software On the client side you can use a web browser or a VNC client to access the instrument...

Page 154: ...ssemble a well functioning program by using the modules of the program examples More complex examples are provided in the Operating Manual chapter Remote Con trol Programming Examples 8 3 1 Basic Step...

Page 155: ...ext Debug Print MyVar Accessing the functions of the VISA32 DLL To enable users to create Visual Basic control applications the VISA32 BAS file must be added to a project so that functions of the VISA...

Page 156: ...unction viWrite and InstrRead encapsulates viRead In addition these wrappers include status checking Public Sub InstrWrite ByVal vi As Long ByVal Cmd As String Dim status As Long Dim retCount As Long...

Page 157: ...used by all subroutines e g the variables for device addresses used by the remote control driver For all example programs shown below the file must contain the following instructions Global analyzer...

Page 158: ...ite analyzer CLS Reset status register CALL InstrWrite analyzer RST Reset instrument END SUB REM Switching the Screen Display On and Off In the default setting all remote control commands are carried...

Page 159: ...when you press a key on the instru ment s front panel Public SUB PowerSave CALL InstrWrite analyzer DISPlay PSAVe HOLDoff 1 Set response time to 1 minute CALL InstrWrite analyzer DISPlay PSAVe ON Swit...

Page 160: ...RLlevel SPACE 20 Provide text variable 20 characters CALL InstrWrite analyzer DISP TRAC Y RLEV Request ref level setting CALL InstrRead analyzer RLlevel 20 retCount Read value REM Displaying values in...

Page 161: ...PC response CALL InstrWrite analyzer ABOR INIT IMM OPC REM In this case the controller can use other instruments CALL InstrRead analyzer OpcOk 2 retCount Wait for 1 from OPC REM Third method Using OPC...

Page 162: ...ROR 100 retCount Debug Print Error Description ERROR END SUB REM 8 3 2 Detailed Programming Examples In the following sections typical programming examples for setting measurement parameters and funct...

Page 163: ...complete command execution device dependent and query error SCPI status register CALL InstrWrite analyzer STAT OPER ENAB 0 Disable OPERation Status reg CALL InstrWrite analyzer STAT QUES ENAB 0 Disabl...

Page 164: ...count CALL InstrWrite analyzer DISP TRAC2 OFF Trace2 blank CALL InstrWrite analyzer DISP TRAC3 OFF Trace3 blank CALL InstrWrite analyzer DISP TRAC4 OFF Trace4 blank CALL InstrWrite analyzer DISP TRAC...

Page 165: ...d level are then read In the following measurements the instrument s default setting can be used for measurements SetupInstrument REM Public Sub MarkerSearch Dim retCount as Long result Space 100 CALL...

Page 166: ...Space 100 CALL InstrRead analyzer result 100 retCount Print Delta 3 result Peak search with search range limit in y direction CALL InstrWrite analyzer CALC THR STAT ON CALL InstrWrite analyzer CALC T...

Page 167: ...X 100MHz Set marker 1 to 100 MHz CALL InstrWrite analyzer CALC MARK COUNT ON Activate frequency counter CALL InstrWrite analyzer INIT WAI Perform sweep with sync CALL InstrWrite analyzer CALC MARK CO...

Page 168: ...RK STAT ON Activate marker 1 CALL InstrWrite analyzer CALC MARK TRAC 1 Set marker 1 to trace 1 CALL InstrWrite analyzer INIT WAI Perform sweep with sync CALL InstrWrite analyzer CALC MARK MAX Set mark...

Page 169: ...alyzer RST Reset instrument CALL InstrWrite analyzer INIT CONT OFF Single sweep mode Setting the frequency CALL InstrWrite analyzer FREQUENCY CENTER 100MHz Center frequency CALL InstrWrite analyzer FR...

Page 170: ...with the length specification is evalu ated and used to calculate the x axis values In ASCII format merely the list of level values is output Binary data is read out in three steps 1 The number of di...

Page 171: ...r for span Default setting of the R S FSV CALL SetupInstrument Default setting CALL InstrWrite analyzer INIT CONT OFF Switch to single sweep CALL InstrWrite analyzer INIT WAI Perform sweep with sync D...

Page 172: ...t Contents of Trace1 asciiResult trace 1 END SUB REM 8 3 2 4 Storing and Loading Instrument Settings Settings and measured data can be stored and loaded You can define which data set is loaded when th...

Page 173: ...directory C R_S Instr user Default setting of the status register CALL SetupStatusReg Configure status register Loading the data record CALL InstrWrite analyzer MMEM LOAD STAT 1 C R_S Instr user TEST...

Page 174: ...the instrument 3 Select an output device 4 Select the output interface 5 Configure the output format 6 Start the printout with synchronization to completion It is assumed that the desired setting is a...

Page 175: ...EN GOTO SelectDevice Stop at end of list Debug Print Printer Str i Devices i Display printer name NEXT i SelectDevice Selection of output device printer language and output interface CALL InstrWrite a...

Page 176: ...zer HCOP DEV LANG BMP BMP file format CALL InstrWrite analyzer MMEM NAME C R_S Instr user PRINT1 WMF Define file name CALL InstrWrite analyzer CLS Reset Status registers CALL viEnableEvent vi VI_EVENT...

Page 177: ...control via a network the PC and the instrument must be connected via the LAN interface to a common network with TCP IP network protocol They are connected using a commercial RJ45 cable shielded or u...

Page 178: ...re Call protocol which in turn relies on TCP IP as the network transport layer The TCP IP network protocol and the associated network services are preconfigured TCP IP ensures connection oriented comm...

Page 179: ...or started the requested command but is delivered to the TCP IP buffers For more information see also the application note 1MA208 Fast Remote Instrument Control with HiSLIP 8 5 Configuring the GPIB In...

Page 180: ...configured directly in the Windows operating system or with LXI LAN eXtension for Instruments The R S FSVA FSV is equipped with a network interface and can be connected to an Ethernet LAN local area...

Page 181: ...existing network made with an ordinary RJ 45 network cable The instrument is assigned an IP address and can coexist with a computer and with other hosts on the same network A dedicated network connec...

Page 182: ...d activates the required drivers The network card can be operated with a 1 GBit Ethernet IEEE 802 3u interface 8 6 2 Assigning the IP Address Depending on the network capacities the TCP IP address inf...

Page 183: ...ou are prompted to restart the instrument You can skip the remaining steps Note When a DHCP server is used a new IP address may be assigned each time the instrument is restarted This address must firs...

Page 184: ...on using the permanent computer name 1 Obtain the name of your DNS domain and the IP addresses of the DNS and WINS servers on your network 2 Press the Windows key on the external keyboard or the CTRL...

Page 185: ...ses For more information refer to the Windows operating system help 8 6 3 Using Computer Names In a LAN that uses a DNS server Domain Name System server each PC or instrument connected in the LAN can...

Page 186: ...mputer name The current computer name is displayed here 2 Enter the new computer name 3 Confirm the entry 8 6 4 Changing the Windows Firewall Settings A firewall protects an instrument by preventing u...

Page 187: ...strument s LXI browser interface works correctly with all W3C compliant browsers In the web browser open the http instrument hostname or http instrument ip address page e g http 10 113 10 203 The defa...

Page 188: ...uration pages Status displays information about the LXI status of the instrument Help Glossary opens a document with a glossary of terms related to the LXI standard 8 7 1 LAN Configuration The LAN con...

Page 189: ...echanism other additional detection mechanisms are permitted mDNS and DNS SD are two additional protocols Multicast DNS and DNS Service Discovery They are used for device communication in zero configu...

Page 190: ...administrator particularly for large LAN installations Errors may affect the entire network Never connect your analyzer to a network unprotected against virus infec tion because this may cause damage...

Page 191: ...and the automatic login mechanism must then be deactivated The network administrator is responsible for creating new users in the network 1 Press the Windows key on the external keyboard or the CTRL E...

Page 192: ...work 8 8 4 Mapping Network Drives 1 Press the SAVE RCL key on the front panel of the R S FSVA FSV 2 Press the File Manager softkey 3 Press the More softkey 4 Press the Network Drive softkey The Map Ne...

Page 193: ...9 Confirm with OK The drive is displayed in the Explorer Note Only networks that you authorized to access are connected Disconnecting network drives 1 Press the SAVE RCL key on the front panel of the...

Page 194: ...Windows key on the external keyboard or the CTRL ESC key combination on your keyboard to access the operating system 2 Open the Windows Explorer 3 Select the desired folder with the right mouse butto...

Page 195: ...ncluding entry 77 Connector AC power supply 26 AF output 22 AUX PORT 29 EXT TRIGGER GATE IN 27 External mixer 23 GPIB interface 28 IF VIDEO 28 LAN 27 MONITOR VGA 27 Noise source control 21 OCXO 30 Pow...

Page 196: ...Connector 28 H Hardware settings Display 67 HiSLIP 162 Protocol 163 Resource string 162 I Icons Toolbar 74 IF VIDEO Connector 28 IFOVL status display 73 Interfaces LAN 162 IP address 162 Changing 167...

Page 197: ...ment label 69 Network 175 Changing user passwords 176 Connecting drives 177 Creating users 176 Disconnecting drives 177 Setting up 130 Sharing directories 179 NOI marker functions 70 Noise source cont...

Page 198: ...ary knob 78 S SA trace information 70 Safety instructions 13 Screen Colors 50 Service manual 13 Service packs 57 Settings Automatic loading 129 Loading 128 Storing 127 Sgl enhancement label 68 Sinusoi...

Page 199: ...e Display 97 Updates 62 USB Connector 28 User account 62 V VBW hardware setting 67 Virus protection 57 VISA 162 Resource string 162 VNC 137 VXI protocol 163 W Web browser Configuration interface 172 W...

Reviews: