background image

REVO Remote Pro (Remote Administration System) 


43


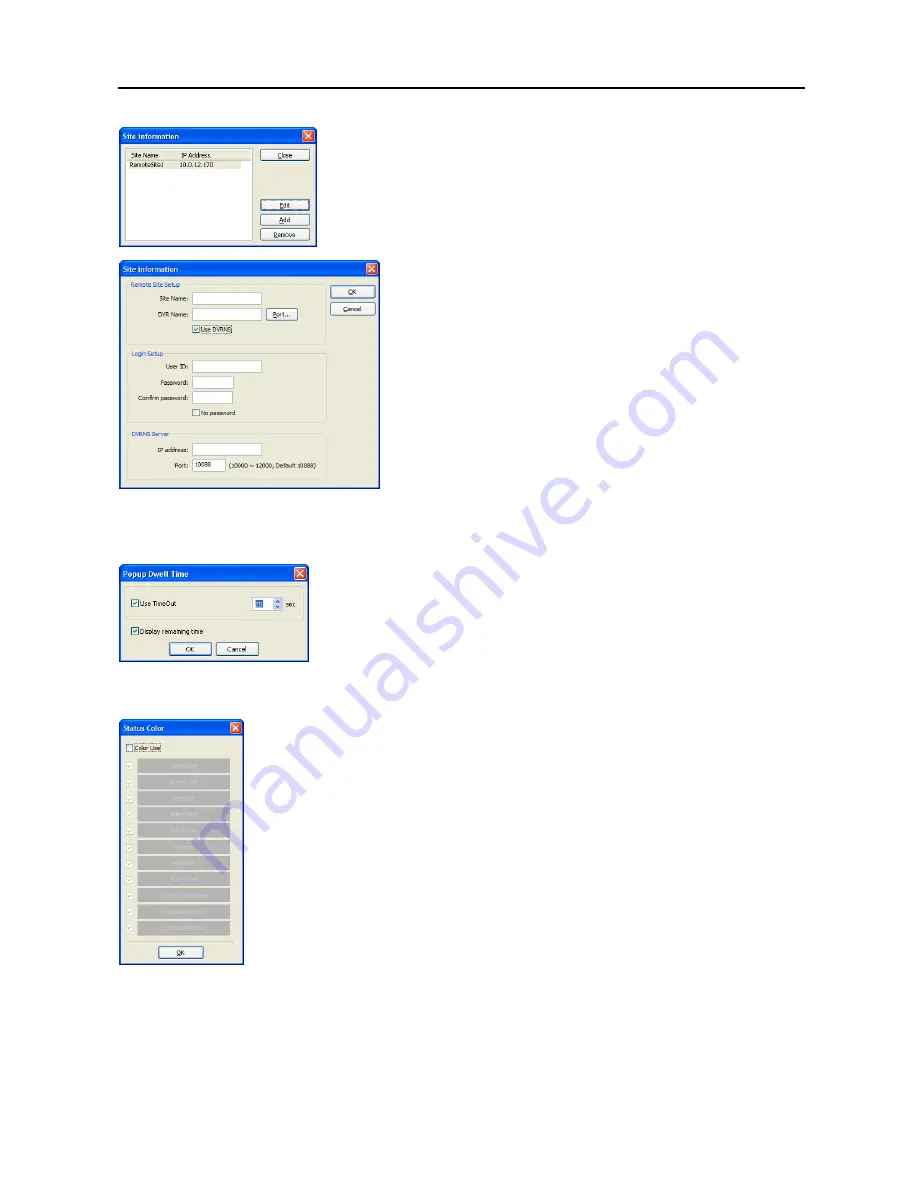
Click the

 Add

 button, and the following 

Site Item

 box appears. 


Remote Site Setup

: Enter the site name and IP address of the DVR 

connected to the devices you want to include on the map.  Click the 

Port…


button and enter the network IP port number (8000 to 12000) that matches 
the value set during the LAN setup on the DVR.  Check the box beside 

Use DVRNS

 to use the DVR name service. 


NOTE:  If you use DVR Name Service, you can enter the name 
registered on the DVRNS server instead of the IP address of the DVR, 
and you do not need to enter the network IP port number. 


Login Setup

: Enter the user ID and password for the DVR associated 

with devices. 


DVRNS Server

: Enter the IP address and port number (10000 to 12000) 

of the DVRNS server, which matches the values set during the DVRNS 
setup on the DVR. 


Clicking the 

OK

 button saves the setting. 


Popup Dwell Time: 

Select 

Popup Dwell Time…

 in the 

Option

 menu to set the duration of the Map popup screen 

displayed when events are detected, and the following 

Popup Dwell Time 

window appears. 


Check the box beside 

Use Timeout

 and adjust the time out dwell from 1 second to 

5 minutes.  Selecting 

Display remaining time

 displays the remaining time out dwell 

on the Map popup screen. 


NOTE:  

Popup Dwell Time

 will be applied to all maps displayed on the map panel. 


Status Color Setting: 

Select the 

Status Color Setting…

 in the 

Option

 menu and the following 

Status Color

 window 

appears.  You can set the device to display a unique color reflecting its status on the Map panel.


Check the box beside 

Color Use

 and select each status box to use.  Click each selected status 

box and select the desired color.  When done, click the 

OK

 button. 


 Unplugged

: Either connection to the remote site has failed, or 

Device No.

 for the device is not 

supported by the remote site. 

 Event off

: Event detection function is not set up. 

 Irregular

: The device is not working properly.


  Video Blind/Video Loss/Motion

: The event is detected. 

 Alarm In

: Alarm in is detected. 

 Alarm Out

: Alarm out is detected.


NOTE:  Devices are displayed as 

Irregular

 based on the system check settings and as 

Video 

Loss

Motion

Alarm In

and


Alarm Out

 based on the event detection settings on the remote 

DVR. 


NOTE:  The device displays mixed color when detecting more than two statuses at the same 
time. 


Name Table: 

Select 

Name Table…

 in the 

Option

 menu to display the name instead of the IP address of the DVR 

on the Map panel, and the following 

Name Table 

setup window appears. 

Summary of Contents for R16DVR3

Page 1: ......

Page 2: ......

Page 3: ...NT GENERATES USES AND CAN RADIATE RADIO FREQUENCY ENERGY AND IF NOT INSTALLED AND USED IN ACCORDANCE WITH THE INSTRUCTION MANUAL MAY CAUSE HARMFUL INTERFERENCE TO RADIO COMMUNICATIONS OPERATION OF THI...

Page 4: ...indicates a need for service 14 Replacement Parts When replacement parts are required be sure the service technician has used replacement parts specified by the manufacturer or that have the same char...

Page 5: ...dvanced Setup 12 System Setup 13 Network Setup 15 Camera Setup 18 Record Setup 19 Event Setup 21 Display Setup 23 Chapter 3 Operation 25 Live Monitoring 25 Display Menu 27 Event Monitoring 28 Active C...

Page 6: ...User s Manual iv...

Page 7: ...Recording in Disk Recycle Mode Records while Playing Back and Transmitting to Remote Site Full Function Infrared Remote Control User friendly Graphical User Interface GUI Menu System Multiple Recordin...

Page 8: ...Adaptors DVR Camera Power Cords DVR Camera USB Mouse Infrared Remote Control and Batteries REVO Remote Pro Software CD and User s Manual This document Digital Video Recorder Power Adaptors Power Cords...

Page 9: ...ector is provided so that you can use a standard multi sync computer monitor as your main monitor Use the cable supplied with your monitor to connect it to the DVR The VGA monitor is automatically det...

Page 10: ...connections CAUTION The network connector is not designed to be connected directly with cable or wire intended for outdoor use Connecting Alarms NOTE To make connections on the Alarm Connector Strip p...

Page 11: ...DOES NOT HAVE A GROUNDING PIN RECEPTACLE DO NOT MODIFY THE PLUG DO NOT OVERLOAD THE CIRCUIT BY PLUGGING TOO MANY DEVICES IN TO ONE CIRCUIT CAUTION Make sure that the DVR is not so close to any heating...

Page 12: ...system ID is 1 to 16 you must to press the ID button on the remote control followed by the number button 1 to 16 10 6 in order to control that DVR If two or more DVRs have the same ID those DVRs will...

Page 13: ...en displays when the DVR is in the Pause mode and the screen displays when the DVR is playing back video Fast Forward Pressing the button plays video forward at high speed Pressing the button again to...

Page 14: ...n change the language during System setup Refer to the Advanced Setup section of this chapter Before using your DVR for the first time you will want to establish the initial settings The following des...

Page 15: ...k Setup Wizard guides you to configure the system for basic operation The wizard also can be accessed by selecting Quick Setup in the Main Setup screen Refer to the following Advanced Setup section Se...

Page 16: ...quality setting requires more storage space Select the Finish button to finish the Quick Setup Wizard and start the Network Setup Select the Next button to start the Network Setup Wizard NOTE The Netw...

Page 17: ...y selecting Test otherwise the Next button will not be selected so that you cannot move to the next step Use DSL PPPoE Setup Selecting the box allows you to set up the DSL network Entering the ID and...

Page 18: ...al keyboard displays See instructions above for using the virtual keyboard NOTE Selecting Quick Setup or Network Setup in the Main Setup screen runs the selected setup wizard Refer to the previous Qui...

Page 19: ...sion Displays the software version of the DVR To upgrade the software connect a USB flash drive containing the upgrade package file rui to the DVR Selecting Upgrade displays the Upgrade screen Select...

Page 20: ...at Disk Time Zone Change Local Setup Imported Auto Deletion DISK FULL Setup Import Fail Search Begin Local Remote Shutdown Setup Exported Search End Local Remote Restart Setup Export Fail Backup Begin...

Page 21: ...TWORK General Tab Transfer Speed Set the transfer speed and select the unit of measure for the transfer speed between bps bits per second and ips images per second Quality Select the quality of the tr...

Page 22: ...ave button NOTE Ask your network provider for your network connection type and connection information NOTE If the DVR is configured for DHCP or ADSL the IP address of the DVR might change whenever the...

Page 23: ...ble to change the settings if Use DVR Name Service is enabled DVRNS Server Enter the IP address or domain name of the DVRNS server NOTE You will need to get the IP address or domain name of the DVRNS...

Page 24: ...ead of IP address if you set up the DNS server during Network setup Port Set the SMTP server port number obtained from your system administrator Use SSL TLS Check the box when sending an e mail via an...

Page 25: ...rom up to eight inputs when video is recording Auto Deletion Adjust the length of time recorded data will be kept by using the slide bar or Up and Down arrows buttons Selecting Never will disable the...

Page 26: ...t the Advanced schedule mode Pre Event Record Selecting Setup allows you to set up the pre event recording by setting the ips Quality Resolution and Dwell for each selected camera channel Post Event R...

Page 27: ...t they will not detect motion Reverse Reverse All Activates inactive highlighted blocks or all inactive blocks and deactivates active highlighted blocks or all active blocks OK Accepts changes and clo...

Page 28: ...e associated with the alarm input Notify Select Mail if you want to send an e mail to the address set during NETWORK Mail setup PTZ Select the preset position for each PTZ camera where you want PTZ ca...

Page 29: ...rnet Freeze Sequence The icon displays while in the Freeze mode and the icon displays while in the Sequence mode Screen Group The screen group number displays when the DVR is in other than the 4x4 dis...

Page 30: ...ll be displayed You also can set up the DVR to display one camera or a group of cameras all the time while cycling through the remaining cameras in a cameo window This can be done with one camera disp...

Page 31: ...reen Freeze Selecting the Freeze icon will freeze the current image on the screen until you select Freeze again It is the same as pressing the FREEZE button on the remote control Selecting the icon ag...

Page 32: ...olor Control and choosing the camera number is the same as pressing and holding a camera button on the remote control for a few seconds You can control brightness contrast hue and saturation for each...

Page 33: ...r 4x4 icon displays the cameras in the selected multiview screen mode PIP 2x2 3x3 or 4x4 Selecting each display mode is the same as pressing the LAYOUT button on the remote control or scrolling the mo...

Page 34: ...fect for 15 seconds if there is no further operation In active cameo mode press the camera button on the remote control for the camera you want displayed as active cameo After setting the camera numbe...

Page 35: ...you want to display the toolbar again position the mouse pointer at the bottom of the screen Change the toolbar location by clicking the empty space on the left side of the toolbar and dragging it to...

Page 36: ...hen selecting 11 to 16 press 10 and then press the 1 to 6 Playback Buttons Backward When in the pause mode pressing the button moves to the previous image Forward When in the pause mode pressing the b...

Page 37: ...the icon displays on the camera screen if Zoom is selected in the Display setup screen OSD tab Audio Selecting Audio while in the full screen mode toggles playing recorded audio On and Off While play...

Page 38: ...d pressing the button toggles between On and Off You will be able to turn the Check Time Overlap on or off only if user defined date and time have been set in the From and To boxes If the DVR s date a...

Page 39: ...n in the Compact view mode switches to the Standard view mode and selecting the icon in the Expanded view mode switches to the Standard view mode Selecting or located at the bottom zooms the record ta...

Page 40: ...p new search conditions From Pressing the button toggles between On and Off When set to Off you can enter a specific Date and Time When set to On the search will be from the first recorded image To Pr...

Page 41: ...time The Playback buttons on the remote control can now be used to review the surrounding video If no video was recorded during the selected time a message appears alerting you that no image was recor...

Page 42: ...ask if you want to copy as much of the video clip as possible in the available space Select Continue and press the button to continue backup Once the backup starts you can cancel it by selecting Stop...

Page 43: ...vious version In this case delete the temporary internet files by selecting Tools Internet Options General tab and then run REVO Remote again NOTE There might be a problem that the bottom of REVO Remo...

Page 44: ...hanging the screen format the selected camera on the current screen will be located in the first cell of the new layout Click the camera button to select the camera to be viewed Click the icon to adju...

Page 45: ...eas with motion Anti Aliasing Screen Enhances image display quality by eliminating stair stepping aliasing effects in the enlarged image NOTE A camera name change in the Web Watch mode does not affect...

Page 46: ...nt log entries using specific conditions and play back the images associated with those event entries Click the icon to save the current image in a bitmap or JPEG file format or click the icon to save...

Page 47: ...ade package on the USB device failed 402 Copying upgrade package on the USB device failed 500 System is busy clip copying TROUBLESHOOTING PROBLEM POSSIBLE SOLUTION No Power Check power cord connection...

Page 48: ...User s Manual 42 MAP OF SCREENS ADVNACED SETUP...

Page 49: ...Remote Control CONNECTORS Video Input 8 RJ 12 12V Max 310mA and 8 BNC Monitor Output Composite 1 RCA VGA 1 DB15 Audio In RJ 12 connector Audio Out 1 RCA connector Alarms Terminal block Ethernet Port...

Page 50: ......

Page 51: ......

Page 52: ......

Page 53: ...mation 1 Chapter 2 Installation 3 Chapter 3 Configuration 7 3 1 Screen 7 3 2 Panel 8 3 3 Menu 13 3 4 Toolbar 27 Chapter 4 Operation 29 4 1 Live Monitoring 29 4 2 Playback and Search 30 4 3 Additional...

Page 54: ...User s Manual ii...

Page 55: ...of monitored images Time lapse and event search of recorded images Remote software upgrades and system programming View system and event log information of remote DVRs Remote monitoring of multiple re...

Page 56: ...User s Manual 2...

Page 57: ...will fail If you have logged on the computer as other user running the file will ask you to enter the user name and password of the administrator user NOTE The User Account Control window might appea...

Page 58: ...y selecting either Select language when starting REVO Remote Pro or Always start REVO Remote Pro using the language below If you select Always start REVO Remote Pro using the language below select the...

Page 59: ...g dialog box appears after finishing the REVO Remote Pro installation select Install MSXML application and click Finish Installing the MSXML is required for REVO Remote Pro to initiate 9 Click Next 10...

Page 60: ...User s Manual 6 11 Enter User Name and Organization and click Next 12 Select Install Now 13 Click Finish to complete the MSXML installation...

Page 61: ...consists of the screen 12 docking panels menu and toolbar NOTE Some panels will not be displayed on the screen in the default frame layout To display those panels open the View menu at the top of the...

Page 62: ...the cursor over the edge of the panel until the cursor changes to or Then click the left mouse button and drag the panel border to enlarge or reduce its size To move a panel to a different position on...

Page 63: ...menu including Remote Setup Remote System Log and Remote Event Log Refer to 3 3 Menu Remote Menu for more details Favorite Sites Panel The Favorite Sites panel displays the list of Favorite sites reg...

Page 64: ...emote site select the device you want to connect to from the Map panel and then drag and drop it in the desired position on the screen or the Status View panel Also placing the mouse cursor on the dev...

Page 65: ...ent View Panel The Watch Event View panel displays events detected at individual remote sites while REVO Remote Pro is in the live monitoring mode The description of event icons is as follows Alarm In...

Page 66: ...heckmark is placed in the box at the left Selecting an event or site from the list and then clicking the right mouse button causes a tooltip to appear which contains the emergency event instruction fr...

Page 67: ...m Menu for more details NOTE Some report options may not be supported depending on the specifications of the remote DVR Status View Panel REVO Remote Pro provides a status display remote setup system...

Page 68: ...ime format Display Option Set up the screen display drag drop popup option display acceleration and OSD Screen Option Select Watch Screen to use the screen for live monitoring only Search Screen to us...

Page 69: ...on the type of video card installed in your PC Video cards with an ATI chipset are recommended NOTE When using dual monitors selecting Overlay drawing will display the image only on the primary monit...

Page 70: ...elect Use modem if you want to use a modem for remote access Security Options Designate whether password confirmation is required Before setup Before startup or Before shutdown of REVO Remote Pro Clic...

Page 71: ...r should match the values set during the DVRNS setup of the remote DVR you want to connect to NOTE The DVRNS server cannot be configured when using modem connections Refer to Appendix DVR Name Service...

Page 72: ...ield will be changed to DVR Name and you can enter the name of remote site registered on the DVRNS server The DVR name you enter should match the name set during the DVRNS setup on the remote DVR Logi...

Page 73: ...utomatically connected when REVO Remote Pro starts Remove Selected Camera Removes selected cameras from the Favorites map Cameras can also be removed by clicking the right mouse button after selecting...

Page 74: ...equencing Displays the list of registered Auto Sequencing groups You can add a new group max 20 change the Auto Sequencing settings of a group or delete the group by using the popup menu displayed by...

Page 75: ...mote sites First select the remote sites to upgrade from the Group List and add them to the Upgrade Sites list by clicking the Add button Then click the Upgrade Now button to initiate the remote upgra...

Page 76: ...ite to add from the Group List and click the Add button Remove All Removes all the sites in the Setup Sites list Setup Now Performs the setup on the Setup Sites Disconnect Disconnects all current conn...

Page 77: ...in the text box Then select a comparison operator from the last list Equal to search for logs that satisfy the condition case sensitive Not Equal to search for logs excluding logs that satisfy the co...

Page 78: ...ation of a remote DVR Set the time range of interest and click the Find button The log entries within the time range displays in the list 100 results can be displayed in a single page Click the Move b...

Page 79: ...ing On allows you to select a desired Auto Sequencing group Record Menu NOTE The Record menu can also be accessed using the toolbar controls Starts or ends panic recording Selecting Record Play initia...

Page 80: ...l screen mode To return to the previous screen mode press the Esc key on the keyboard or select FullScreen Close x from the popup menu displayed by clicking the right mouse button Frame Layout Layout...

Page 81: ...Displays REVO Remote Pro version information 3 4 TOOLBAR The Toolbar allows convenient access to desired functions The controls on the toolbar perform functions as described below Disconnect REVO Rem...

Page 82: ...User s Manual 28...

Page 83: ...creen layout options The formats available are single screen quad 1 7 3x3 4x4 5x5 1 32 6x6 7x7 8x8 and full screen When in one of the multi view formats clicking the or button will move to the previou...

Page 84: ...e the mouse wheel to zoom in and out Color Control Adjust the brightness contrast saturation and hue of live video for each camera by clicking the target icons on the Color Control panel Clicking the...

Page 85: ...Fast Forward Play Go to the Last Image NOTE The speed of fast forward depends on network bandwidth and the number of images per second recorded You can control the playback speed of images that are cu...

Page 86: ...recorded data during that time Select a specific hour by clicking the mouse on the desired hour segment The recorded data of each camera channel are displayed by time in one minute segments and a red...

Page 87: ...ional Functions Searching Data Source Click the button on the Search View panel to set up the data source to be searched Search on Local Searches recorded data on primary storage installed in the remo...

Page 88: ...Saves any video clip of recorded data as an executable file Set up the save parameters in the following dialog box Click the Start button and select Save in Enter a File name and then select Save as t...

Page 89: ...e button on the Search View panel to search for motion in the recorded images on remote DVRs NOTE Motion Search is supported only in the single screen mode Record Period Sets up the record period of i...

Page 90: ...te to display Changing the camera title does not affect the camera name set up on the remote site Enable Audio Enables audio communication with the remote site on the Watch screen Two way audio equipp...

Page 91: ...yer from the REVO Remote Pro options and select the recoding folder path you want Recorded video can be saved as a bitmap or as an executable file using the save function of the Record Player NOTE Pan...

Page 92: ...the panic recording of the remote DVR connected to the Status View panel The On button indicates that the remote DVR is not in the panic recording mode and you can start panic recording by clicking th...

Page 93: ...display depends on the display settings of your PC If you are experiencing display problems click the right mouse button on the background screen and select Properties Settings then set the Color qua...

Page 94: ...he screen by smoothing stair stepping aliasing effects in the enlarged image If video plays slow because of your CPU s slow speed releasing the Anti Aliasing Screen option might improve playback speed...

Page 95: ...S server directly NOTE Refer to the applicable manual for each remote DVR for more details on DVRNS setup STEP 2 REVO Remote Pro DVRNS Server Request the IP address of the remote DVR using the registe...

Page 96: ...he background image size by clicking each field and changing the numbers Position Adjust the position of the background image on the screen Select Auto Fit to fit the map screen size to the background...

Page 97: ...second to 5 minutes Selecting Display remaining time displays the remaining time out dwell on the Map popup screen NOTE Popup Dwell Time will be applied to all maps displayed on the map panel Status...

Page 98: ...larm in event occurs Equipment IP Address User Password Port Each field is filled in automatically with the information user ID password and port number set in Site Information Setting or you can ente...

Page 99: ...ualizes the distance between three or more selected boxes Size adjustment Equalizes the size of two or more selected boxes Clicking the arrow keys while holding the Shift key on the keyboard changes t...

Page 100: ...0x240 pixel 320x240 pixel or 640x480 pixel Memory 4MB of storage memory 96MB or more of RAM Wireless LAN Support IEEE 802 11 Input Device Touch screen Desktop PC Microsoft Windows 2000 Sever 2003 XP w...

Page 101: ...mation Remove Select the site you want to remove and click the Remove button DVRNS Click the DVRNS button to set up the DVRNS function and the DVR Name Service screen is displayed Enter the DVRNS serv...

Page 102: ...reen quad and full screen Single Screen Quad Screen Full Screen NOTE The selected camera video in the quad screen mode will be outlined in green NOTE PTZ control during the full screen display will be...

Page 103: ...ime from virtually anywhere System Diagram Installation 1 Connect your iPod Touch or iPhone to your PC Run the iTunes program on your PC and connect to iTunes Store 2 Enter REVO Mobile in the search f...

Page 104: ...server instead of the IP address of the DVR Login Enter the user ID and password set on the DVR 2 If the registered DVRs use the DVRNS function select DVRNS and enter the IP address or domain name an...

Page 105: ...isconnect Touch to release the connection to the DVR Camera Touch to select the camera to monitor The list of cameras supported by the DVR is displayed Selecting a desired camera from the list and tou...

Reviews: