background image

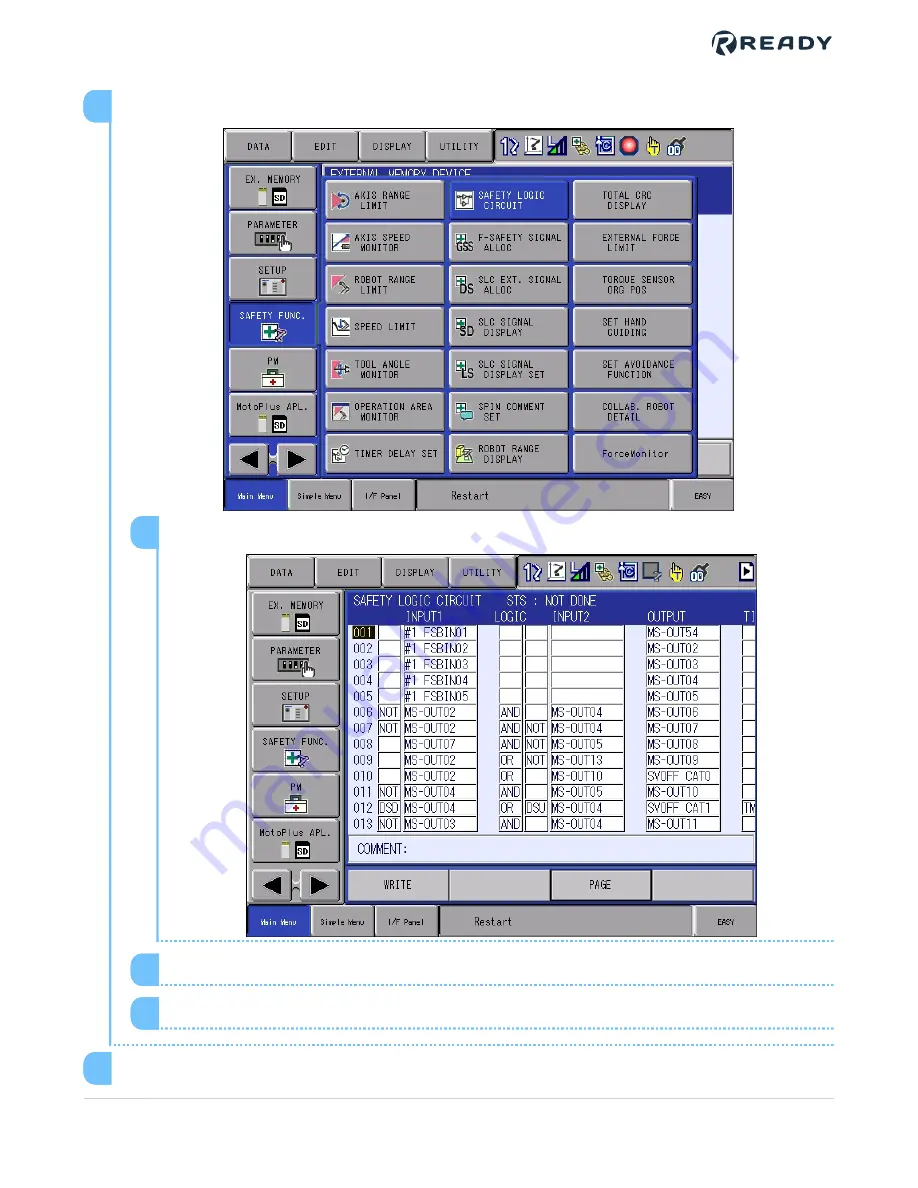
From the Main Menu, tap

SAFETY FUNC.

, then tap

SAFETY LOGIC CIRCUIT

.

Tap the

WRITE

button on the bottom of screen.

1

Tap the

CONFIRM

button on the bottom of screen.

2

At the

Update the file?

prompt tap

YES

.

3

14

From the Main Menu, tap

EX. MEMORY

, then tap

LOAD

.

15

VERSION 1.0.0

© 2021 COPYRIGHT READY Robotics ALL RIGHTS RESERVED

54

Summary of Contents for Forgelos5

Page 1: ...Yaskawa YRC1000micro Startup Guide...

Page 2: ...by themselves a fully integrated workcell As required in ISO 10218 2 READY Robotics strongly recommends performing a complete risk assessment of the integrated workcell per ISO 12100 You may wish to u...

Page 3: ...ing The YRC1000 And Forge OS Through Ethernet 14 Setting Up Forge OS 15 Getting Robot Files From Forge OS 29 Changing Yaskawa Motoman Settings To Prepare For Forge OS 33 Transferring Configuration Fil...

Page 4: ...to your Forge hub and Yaskawa controller 3 Connect the Yaskawa controller to your Forge hub 4 Power up 5 Make changes to the robot safety and communication settings on the Yaskawa pendant 6 Install a...

Page 5: ...REFERENCE Note The default Safety Mode password for Non Collaborative robots 5555 5555 5555 5555 Note For Collaborative robots refer to the 16 digit password in the Collaborative Robot Password Agree...

Page 6: ...s for more information We recommend using an empty USB storage drive with at least 2 GB of storage With the controller powered off insert the USB drive into the back of the Yaskawa Motoman programming...

Page 7: ...have a gray side menu on the left hand side of the screen VERSION 1 0 0 2021 COPYRIGHT READY Robotics ALL RIGHTS RESERVED 7...

Page 8: ...s on the pendant to find and highlight EX MEMORY in the menu list Select SAVE 5 Scroll down to highlight SYSTEM BACKUP CMOS BIN then press SELECT 6 VERSION 1 0 0 2021 COPYRIGHT READY Robotics ALL RIGH...

Page 9: ...er 9 Remove the USB drive from the pendant 10 Keep your USB backup drive in a secure location You can save the backup files from the USB onto a workstation 11 Install the Yaskawa software version YBS2...

Page 10: ...t purchase the controller with optional Functional Safety Unit Expansion parts or if you find the parts missing please contact Yaskawa Motoman Robotics to order the parts listed below and receive inst...

Page 11: ...READY Robotics for the correct startup guide A Forge hub Device YRC1000micro Controller KEBA pendant Electric Shock Warning Disconnect all components from power sources before attempting this installa...

Page 12: ...tch Circuit 1 24 White Pink Key Switch Circuit 1 22 White Key Switch Circuit 2 20 Blue Key Switch Circuit 2 18 White Blue Not Connected Connect the KEBA pendant s Ethernet connector to the Forge hub P...

Page 13: ...ncing Connect fence channel 1 to connector pins 61 and 63 1 Connect fence channel 2 to connector pins 65 and 67 2 3 If you are not using external safety fencing Bridge the FSU I O Breakout pins 61 and...

Page 14: ...thernet cable Route Ethernet cabling from the Forge hub to the Yaskawa controller 1 Connect one end of the Ethernet cable to the LAN port on the back of the YRC1000micro 2 Plug the other end of the Et...

Page 15: ...ller into the computer Note If you do not have enough USB ports on your computer for all of these devices use a USB hub 2 Turn on or restart the Forge hub and press the key on the keyboard that opens...

Page 16: ...Select your language Then click Install Forge 6 Choose a keyboard layout Then click Continue 7 VERSION 1 0 0 2021 COPYRIGHT READY Robotics ALL RIGHTS RESERVED 16...

Page 17: ...n click Continue 8 Select Erase disk and install forgeos Then click Install Now Note If Forge OS is already installed the installation wizard may prompt you with additional options The current goal is...

Page 18: ...erase the entire disk by clicking Continue 10 If you are installing on a Forge Ctrl check the checkbox labeled This hardware is a Forge CTRL Click Continue 11 VERSION 1 0 0 2021 COPYRIGHT READY Roboti...

Page 19: ...rk Pick a username and password and then click Continue Note The username and password that you create here are for accessing the Forge hub computer on a monitor other than the KEBA pendant They are N...

Page 20: ...Wait for the installation to complete 14 Once the installation completes click Restart Now 15 VERSION 1 0 0 2021 COPYRIGHT READY Robotics ALL RIGHTS RESERVED 20...

Page 21: ...installer Unplug the USB installer from your computer and press the Enter key on your keyboard 16 You will see a black screen with the Forge OS 5 logo Wait for Forge OS to finish booting up 17 VERSION...

Page 22: ...y to run on the KEBA pendant Disconnect the monitor keyboard and mouse that you used to install Forge OS 18 On the KEBA pendant tap PAIR PENDANT Note The blue PAIR PENDANT button may take some time to...

Page 23: ...irected to the Settings app until you activate a valid user license 4 Find another USB drive to use for Forge OS license activation Note Contact READY Robotics for your license code You can use any US...

Page 24: ...USB Drive when prompted 4 Remove the USB from your Forge hub 5 6 Import the activation certificate and create the unlock certificate Insert the USB into your PC 1 Find the USB in your PC file explorer...

Page 25: ...tivate 4 The portal generates new text characters Copy all of the text and paste it in the empty Forge_OS License Unlock Certificate txt file 5 Save the unlock certificate file 6 Remove the USB from y...

Page 26: ...om a USB drive you can do that through the System Update screen Note Contact READY Robotics for an update file Update files are too large for the FAT32 file format Use an exFAT or NTFS formatted USB d...

Page 27: ...w under Available Versions tap the version to install 3 Wait for the update to finish and restart Forge OS using the power button at the bottom of the screen 4 You can change system preferences from t...

Page 28: ...and Date settings or the Admin login password Note If you later forget what you change your password to contact READY Robotics to reset it 2 Tap SAVE to save changes and exit the General Settings men...

Page 29: ...will start to add the robot in Forge OS and get the robot files to put onto the robot controller In the Admin role tap the Device Configuration icon to open the Device Configuration app 1 VERSION 1 0...

Page 30: ...Tap Add Device to open the Device Library 2 In the Device Library list select Yaskawa Motoman industrial robot Then tap NEXT 3 VERSION 1 0 0 2021 COPYRIGHT READY Robotics ALL RIGHTS RESERVED 30...

Page 31: ...u are using a force sensor device select it from the dropdown 4 Insert a USB flash drive into the Forge hub as instructed on the screen Use an empty flash drive with at least 2GB of storage 5 Tap Star...

Page 32: ...Insert the USB into the Motoman programming pendant USB port 8 VERSION 1 0 0 2021 COPYRIGHT READY Robotics ALL RIGHTS RESERVED 32...

Page 33: ...are only required if this is your first time setting up Forge OS or if your Yaskawa controller has been factory reset On the Motoman pendant turn the key to the TEACH position fully counter clockwise...

Page 34: ...e drop down list and press the SELECT button on the pendant keypad 3 Enter the Safety Mode password and press ENTER 4 If successful the visible mode will change to SAFETY MODE If an incorrect password...

Page 35: ...FSU and press the SELECT button to set it to INVALID 4 Power off the YRC1000 controller and wait 10 seconds 5 Press and hold the MAIN MENU button while powering up the controller to enter Maintenance...

Page 36: ...SAFETY MODE from the drop down list and press the SELECT button on the pendant keypad 3 Enter the Safety Mode password and press ENTER 4 If successful the visible mode will change to SAFETY MODE If t...

Page 37: ...From the Main Menu tap SYSTEM then tap SETUP Select OPTION FUNCTION and press the SELECT button on the pendant keypad 1 8 VERSION 1 0 0 2021 COPYRIGHT READY Robotics ALL RIGHTS RESERVED 37...

Page 38: ...e sure it s set to USED If not press the SELECT button 2 At the Modify prompt tap YES 3 Back in the OPTION FUNCTION menu highlight the field next to MotoPlus FUNC and set it to USED 4 VERSION 1 0 0 20...

Page 39: ...files SRAMDRV DTA prompt tap YES 6 Save settings to the Safety I O board From the Main Menu tap FILE then tap INITIALIZE Highlight Safety Board FLASH Reset and press the SELECT button 1 9 VERSION 1 0...

Page 40: ...can take up to 60 seconds to complete When the reset is complete the pendant will beep 2 Save settings to the PFL board collaborative robots only HighlightPFL Board FLASH Reset and press the SELECT b...

Page 41: ...mplete When the reset is complete the pendant will beep 3 From the Main Menu tap MotoPlus APL tap FOLDER to select the folder to load files from Tap the forge os folder to open it then tap to open the...

Page 42: ...file on the USB and press the SELECT button 1 Verify that a small black star icon appears to the left of the file name and press the ENTER button on the pendant keypad 2 At the Load prompt tap YES If...

Page 43: ...ELECT 2 Scroll to SAFETY MODE from the drop down list and press the SELECT button on the pendant keypad 3 Enter the Safety Mode password and press ENTER 4 If successful the visible mode will change to...

Page 44: ...se until you are out of the Monitor 5 If you made any changes restart the controller Once the controller has restarted enable Safety Mode and check again to make sure the correct application is runnin...

Page 45: ...CT button 3 Highlight each file and press the SELECT button on the keypad so that it is marked with a star 4 Press ENTER on the keypad 5 At the Load prompt tap YES 6 VERSION 1 0 0 2021 COPYRIGHT READY...

Page 46: ...and the pendant is set to Teach Mode go to Main Menu JOB SELECT JOB Tap the JOB tab in the upper left toolbar and choose DELETE JOB Then select the job to delete 7 From the Main Menu tap EX MEMORY the...

Page 47: ...TA and press the SELECT button on the pendant keypad 2 Verify that the file is marked with a star 3 Press the ENTER button on the pendant keypad 4 VERSION 1 0 0 2021 COPYRIGHT READY Robotics ALL RIGHT...

Page 48: ...the EXTERNAL MEMORY DEVICE screen and then you will be returned to the EX MEMORY SCREEN 6 From the Main Menu tap EX MEMORY then tap LOAD Highlight FILE GENERAL DATA and press the SELECT button 1 10 V...

Page 49: ...e and press SELECT Make sure the file is marked with a star 2 Press ENTER 3 At the Load prompt tap YES 4 From the Main Menu tap SAFETY FUNC then choose SPEED LIMIT 11 VERSION 1 0 0 2021 COPYRIGHT READ...

Page 50: ...2 in the File column and press the SELECT button 1 Select the field next to FILE VALID COND and select SIGNAL 2 and press the SELECT button 2 VERSION 1 0 0 2021 COPYRIGHT READY Robotics ALL RIGHTS RE...

Page 51: ...Tap the READBACK button on the screen 3 Tap the WRITE button on the screen 4 VERSION 1 0 0 2021 COPYRIGHT READY Robotics ALL RIGHTS RESERVED 51...

Page 52: ...eat all sub steps in the previous step for 3 in the File column READYP OFF 12 From the Main Menu tap EX MEMORY then tap LOAD Highlight I O DATA and press the SELECT button 1 13 VERSION 1 0 0 2021 COPY...

Page 53: ...LE YSFLOGIC DAT Note For YRC1000micro with PFL option collaborative robot also highlight and select PSEUDO INPUT SIGNAL PSEUDOIN DAT 2 Press the ENTER button on the pendant keypad 3 At the Load prompt...

Page 54: ...CUIT Tap the WRITE button on the bottom of screen 1 Tap the CONFIRM button on the bottom of screen 2 At the Update the file prompt tap YES 3 14 From the Main Menu tap EX MEMORY then tap LOAD 15 VERSIO...

Page 55: ...MENU when you hear the teach pendant beep 17 Change the security mode to Safety Mode again From the Main Menu select SYSTEM then SECURITY 1 Tap the field next to MODE or press SELECT 2 Scroll to SAFE...

Page 56: ...ghlight Safety Board FLASH Reset and press SELECT 1 At the Reset prompt tap YES 2 Wait for the flash reset to complete This process can take up to 60 seconds to complete When the reset is complete the...

Page 57: ...flash reset to complete This process will take up to 120 seconds to complete When the reset is complete the pendant will beep 3 20 Power off the YRC1000 controller and wait 10 seconds 21 Turn the Yas...

Page 58: ...obot Forge OS attempts to communicate with the robot controller 1 When the robot connects you can add Tool Center Points TCPs or Payloads for the robot You can come back to this later by editing the d...

Page 59: ...anel check the DCP box next to that signal Note To use these I O signals you must integrate your automation equipment with the robot controller 2 Tap SAVE 3 3 Forge OS returns to the Device Configurat...

Page 60: ...the robot s configuration in Forge OS and save Forge creates a TOOL CND file and saves it to USB on the Yaskawa Motoman controller Load the tool file onto the controller while in the Safety mode Reset...

Page 61: ...Payloads onto the USB attached to the Yaskawa Motoman pendant If you didn t see one before you will see a Tool Mismatch error now Note Forge OS saves the updated TCPs and Payloads to tool cnd in the...

Page 62: ...avigate to SYSTEM INFO then SECURITY 2 Select SAFETY MODE from the drop down list 3 Enter the SAFETY MODE password and press the ENTER button on the pendant keypad 4 From the Main Menu tap EX MEMORY t...

Page 63: ...ECT Then press ENTER 2 At the Load screen select YES 3 Power off the Yaskawa controller and wait 10 seconds 8 Power on the controller while holding the Main Menu button on the Yaskawa Motoman 9 VERSIO...

Page 64: ...e sure that the key is still in the TEACH position fully counter clockwise 1 From the Main Menu tap SYSTEM then tap SECURITY 2 Select SAFETY MODE from the drop down list 3 Enter the SAFETY MODE passwo...

Page 65: ...rd FLASH Reset 1 When prompted select YES 2 Wait for the reset to complete 15 20 seconds 3 Save settings to the PFL board collaborative robots only 12 VERSION 1 0 0 2021 COPYRIGHT READY Robotics ALL R...

Page 66: ...rompt tap YES 2 Wait for the flash reset to complete This process will take up to 120 seconds to complete When the reset is complete you ll hear a beep 3 Turn the key to the REMOTE position fully cloc...

Page 67: ...0 seconds 14 Power on the controller When Forge OS reconnects to the robot controller after the final power cycle you will be able to clear the TOOL MISMATCH warning 15 VERSION 1 0 0 2021 COPYRIGHT RE...

Page 68: ...ur 16 digit custom safety mode password from the Collaborative Password Agreement If you do not have that on hand call Yaskawa with your Warranty ID number and they will provide it to you 1 If you are...

Page 69: ...X MEMORY and select DEVICE If you find that the Target Device is set to read an SD card SD Pendant change the field to USB Pendant 1 If the Target Device is set to USB and you continue getting this al...

Page 70: ...t to disabled 2 Check if you set the correct active payload correctly in Forge OS Make sure the Device Configuration provides accurate payload mass and center of mass settings for the tool 1 If using...

Page 71: ...s and hardware integration guides check out our Support page support ready robotics com For articles whitepapers and other resources check out our Resources page ready robotics com resources For produ...

Page 72: ...VERSION 1 0 0 2021 COPYRIGHT READY Robotics ALL RIGHTS RESERVED 72...

Reviews: