52
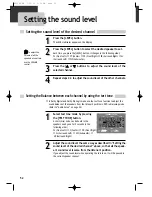
Setting the sound level of the desired channel
Setting the Balance between each channel by using the test tone
1
1
2
2
3
3
4
4
Press the [LEVEL] button.
The LEVEL indicator appears on the display.
Press the [LEVEL] button to select the desired speaker to set.
Each time you press the [LEVEL] button, it changes in the following order;
FL (Front Left)
➝
CT (Center)
➝
FR (Front Right)
➝
SR (Surround Right)
➝
SL
(Surround Left)
➝
WF (Subwoofer)
Press the [
5
5
or
∞
∞
] buttons to adjust the sound level of the
selected channel.
Repeat steps 2-3 to adjust the sound level of the other channels.
1
1
2
2
Select test tone mode by pressing
the [TEST TONE] button.
A short (hiss) noise can be heard in the
speakers one by one for 2 seconds in the
following order;
FL (Front Left)
➝
C (Center)
➝
FR (Front Right)
➝
SL (Surround Left)
➝
SW (Subwoofer)
➝
SR (Surround Right)
Adjust the sound level the same way as described in “Setting the
sound level of the desired channel” above, so that all the speak-
er’s sound level is same from the listener’s position.
If you adjust the sound level when operating the test tone, it will be paused in
the current speaker channel.
■
In Dolby Digital and Dolby Pro Logic mode use the test tone function to adjust the
sound balance of the speakers from the listener’s position in DVD initial setup mode.
(Refer to “Audio Setup” on page 24)
To adjust the
volume of all the
speakers at one time,
use the VOLUME
control.
Setting the sound level
Speaker Setup
LEFT
Type: Small
Level: 0.0 dB
Delay: 0 ms
CENTER
Type: Small
Level:
0.0
dB
Delay: 0 ms
RIGHT
Type: Small
Level:
0.0
dB
Delay: 2 ms
Type: Small
Level:
0.0
dB
Delay: 0 ms
L.SURR
.
Type:
On
Level:
0.0
dB
SUB.W
Type: Small
Level:
0.0
dB
Delay: 0 ms
R.SURR.
Speaker Setup : Default
Select :
5
5 ∞
∞ 2
2 3
3
Test Tone :
3
3
/
8
Level :
1 ¡
Delay :
4 ¢
RTD300 EN 7/25/03 2:36 PM Page 56

