43
EN
PROGRAM1 (ONE TIME)
Program 1 has been saved.
For program recording,
insert a cassette.
PROGRAM1 (ONE TIME)
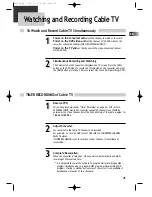
To Confirm or Cancel TIMER RECORDINGS
Timer Program Setting
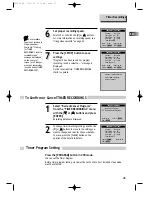
6
6
7
7
Set proper recording speed.
Select SP or SLP with the [
∞
] or [
5
5
] buttons.
For more information on recording speed, see
“Using video cassette” on page 44.
Press the [SETUP] button to save
settings.
“Program # has been saved. For program
recording, insert a cassette....” message is
displayed.
On the reserved time, TIMER RECORDINGS
starts to operate.
1
1
2
2
Select “Review/Cancel Programs”
from the “TIMER RECORDINGS” menu
with the [
∞
∞
] or [
5
5
] buttons and press
[ENTER].
Recording details are displayed.
To change timer recording settings, use the the
[
∞
] or [
5
5
] buttons to move to the setting you
want to change and re-enter the new details.
To erase, press the [CLEAR] button on the
position of the details to delete.
Press the [PROGRAM] button in VCR mode.
You can set the Timer Program.
Before timer program setting, clock must be set to the correct time and video mode
must be selected.
Timer Recordings
PROGRAM1 (ONE TIME)
TIMER RECORDINGS
Make a New Program
Review/Cancel Programs
Move:
5 ∞
Select: ENTER
End: SETUP
If a recordable
tape is not inserted in
Stop mode under
Power ON, “Waiting
for TIMER
RECORDINGS. Insert a
recordable tape”
message is displayed
on the center of
screen for all changes
or output conversions
incurred during TIMER
RECORDINGS SET.
Channel
104 Cable
Start Date 06 / 04
Start Time 10 : 10 AM
End Time
11 : 10 AM
Tape Speed SP
Move:
2 3
Input:
5 ∞
Video: INPUT End: SETUP
Channel
104 Cable
Start Date 06 / 04
Start Time 10 : 10 AM
End Time
11 : 10 AM
Tape Speed SP
Move:
2 3
Input:
5 ∞
Video: INPUT End: SETUP
Channel
104 Cable
Start Date 06 / 04
Start Time 10 : 10 AM
End Time
11 : 10 AM
Tape Speed SP
Cancel: CLEAR Move:
5 ∞
End: SETUP
RTD300 EN 7/25/03 2:36 PM Page 47


