Connecting with TV
8
FRONT-R
FRONT-L
REAR-L
WOOFER
REAR-R
CENTER
SPEAKER
COMPONENT OUT
IN 1
IN 2
OUT
S-VIDEO OUT
WOOFER OUT
AUDIO
ANT.IN
AM
FM
RF.OUT
R
L
VIDEO
Pr
Pb
Y
IMPEDANCE USE 6
Ω
(WOOFER USE 6
Ω
)
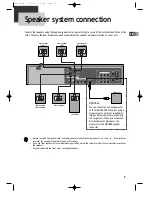
To listen to radio broadcast, connect the FM and AM antenna supplied with your unit.
• Connect the AM loop antenna to the AM antenna connector.
• Connect the supplied FM wire antenna to the FM antenna connector on the back of the DVD-Video player or
connect a coaxial 75 cable (not supplied) to the wall socket and to the FM antenna connector.
•
To prevent interference, keep the AM loop antenna away from DVD Receivers and other components that causes
interference.
•
If the FM wire antenna is connected, be sure to fully extend and keep it as horizontal as possible.
FM/AM Antenna connection
AM loop antenna
(supplied)
FM wire antenna
(supplied)
Video Connection
With the yellow cable (Video Cable) from the Audio/Video Composite Cable, connect the
Video Out
(yellow) jack on the DVD-Video player to the
Video IN
jack on the TV.
Connect the TV to the DVD-Video player with the RF cable provided with the unit. Plug one end of
the RF cable into the “
RF OUT
” jack on the rear panel of the DVD-Video and the other end to the
“
ANT. IN
” jack on the TV.
Optional (DVD only): If your TV has component video jacks, connect the component video cables
(not supplied) to the Component Out (DVD only) jacks (Pb, Pr and Y) on the back of the DVD/Video
player and the TV by matching the colours between the cables and the jacks. This connection
provides better quality picture than composite video type.
Optional(DVD only): If your TV has a S-Video jack, use a S-Video cable (not supplied) to enjoy higher
quality pictures. Connect a S-Video cable to the S-Video Out jack on the back of the DVD-Video and
the S-Video jack on the back of the TV.
Note:
Be sure to change the TV input on your TV when switching between DVD and Video mode.
RTD300 EN 7/25/03 2:36 PM Page 12


