12
CLOCK SET
CLOCK SET
SETUP
■
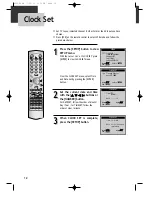
Set TV to your selected channel (CH3 or CH4) or the AV input you have
chosen.
■
Press [VCR] on the remote control to select VCR mode and follow the
procedures below.
Clock Set
1
1
2
2
3
3
Press the [SETUP] button to view
SETUP menu.
With the cursor at CLOCK SET, press
[ENTER] to view CLOCK SET menu.
From the CLOCK SET menu, select Time
and Date Set by pressing the [ENTER]
button.
When CLOCK SET is complete,
press the [SETUP] button.
Set the current date and time
with the [
5
5
,
∞
∞
,
2
2
,
3
3
] buttons or
the [NUMBER] button.
For DATE SET, follow the order of Month /
Day / Year ; for TIME SET, follow the
order of Hour / Minute.
CLOCK SET
TIMER RECORDINGS
CHANNEL SET
FUNCTIONS
LANGUAGE SELECT
Move:
5
5 ∞
∞
Select: ENTER
End: SETUP
Time and Date Set
Auto DST : ON
Move:
5
5 ∞
∞
Select: ENTER
End: SETUP
CLOCK SET
Time - - : - -
(hh:mm)
Date - - / - - / 20 - -
Move:
2
2 3
3
Input:
5
5 ∞
∞
End: SETUP
Time 11 : 01 AM
Date 05 / 24 / 2003 (Sat)
(mm/dd/yy)
Move:
2
2 3
3
Input:
5
5 ∞
∞
End: SETUP
OPEN/CLOSE
–
TRACKING
CLEAR
SETUP
ENTER
OK
ZOOM
REC
PROGRAM
MEMORY
SEARCH
SUBTITLE
AUDIO SOUND FIELD
REPEAT
A–B
DELAY
LEVEL
MUTE
CLK/CNT
TV/VCR
TV INPUT
SLEEP
STEP
SPEED/ANGLE
CH/PRESET
DISPLA
Y
FM/AM
MENU
TITLE/PBC
100/P-SCAN
+
/INPUT
1
2
3
4
5
6
7
8
0
9
VCR
POWER
DVD
TV
VOL+
VOL–
–
TUNING & SEARCH
+
–
+
RTD300 EN 7/25/03 2:36 PM Page 16


