Radiolink Electronic Ltd
54
PART 4 GLIDER MODEL FUNCTIONS
Please note that nearly all of the BASIC menu functions are the same for airplane (ACRO setup),
sailplane (GLID 1A+1F/ 2A+1F/ 2A+2F setups), and helicopter (HELI setups). The features that are
identical refer back to the ACRO chapter. The glider BASIC menu includes MOTOR CUT and does
not include IDLE-DOWN or THR-CUT.
○
→Note: in all cases where ACRO programming labels channel 3 as throttle, GLID programming
labels channel 3 as ARB (airbrake), since airbrakes are normally operated on channel 3 in gliders.
This includes STK-THR reading STK-ARB.
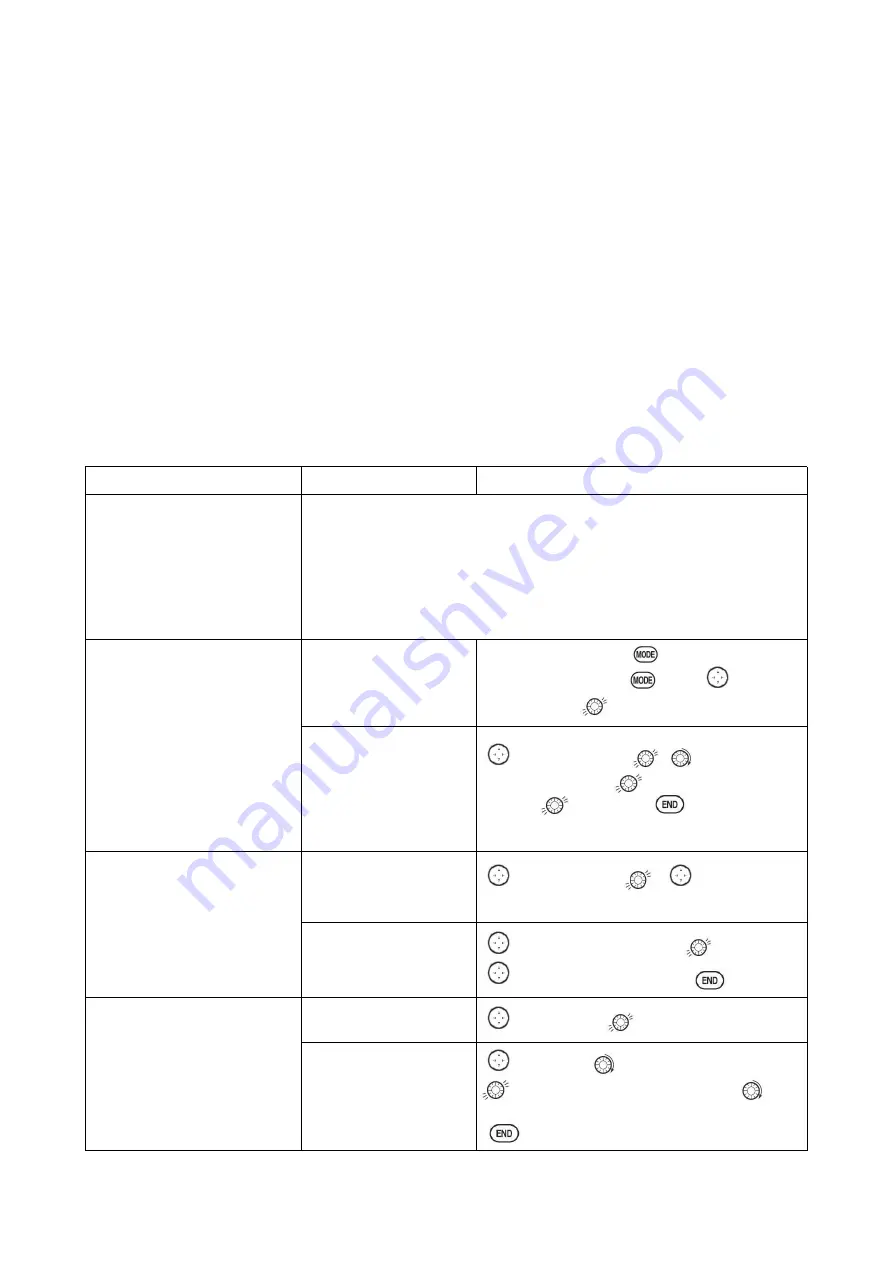
4.1 SET BASIC MENU OF GLID
This guideline is intended to help you get acquainted with the radio, to give you a jump start on
using your new radio, and to give you some ideas and direction in how to do with this powerful
system.
Goals
Steps
Inputs
Prepare your airplane.
Install all servos, switches, receiver per your model’s instructions. Turn on
transmitter then receiver; adjust all linkages so surfaces are nearly centered.
Mechanically adjust all linkages to get as close as possible to proper control
throws and minimize binding prior to radio set up.
Check servo direction and throws.
Make notes now of what you will need to change during programming.
Select the proper MODEL
TYPE for your model. (Ex:
GLID 1A+1F)
[NOTE: This is one of several
functions that require
confirmation to make a change.
Only critical changes such as a
MODEL RESET require
additional key strokes to accept
the change.]
In the BASIC menu, open
PARAMETER submenu.
Turn on the transmitter.
for 1 sec. to
BASIC.(If ADVANCE
again.)
to choose
PARAMETER.
Choose proper MODEL
TYPE. Ex: GLID
(1A+1F).
Confirm the change.
Close submenu.
to MODEL TYPE
,
to
GLID(1A+1F), press
for 1 sec. Are you sure?
Displays.
to confirm.
Return to BASIC
menu.
Name the model
Note that you do not need to
do anything to ‘save’ or store
this data.
In BASIC menu open the
MODE SEL submenu.
to MODEL SEL.
,
to NAME.
(
1
st
character of model’s name is highlighted).
Input airplane name.
Close the submenu.
to change the 1
st
character.
to confirm.
to next character and repeat.
to return.
REVERSE servos as needed for
proper control operation.
In the BASIC menu, open
REVERSE.
to REVERSE.
Choose desired servo and
reverse its direction of
travel.
(Ex: reverse rudder
servo.)
to 4:RUDD,
REV is highlighted. Press
for 1 sec. ‘Are you sure?’ Displays.
to
confirm.
To BASIC menu.


