background image


PRV-9000 Operating Instructions


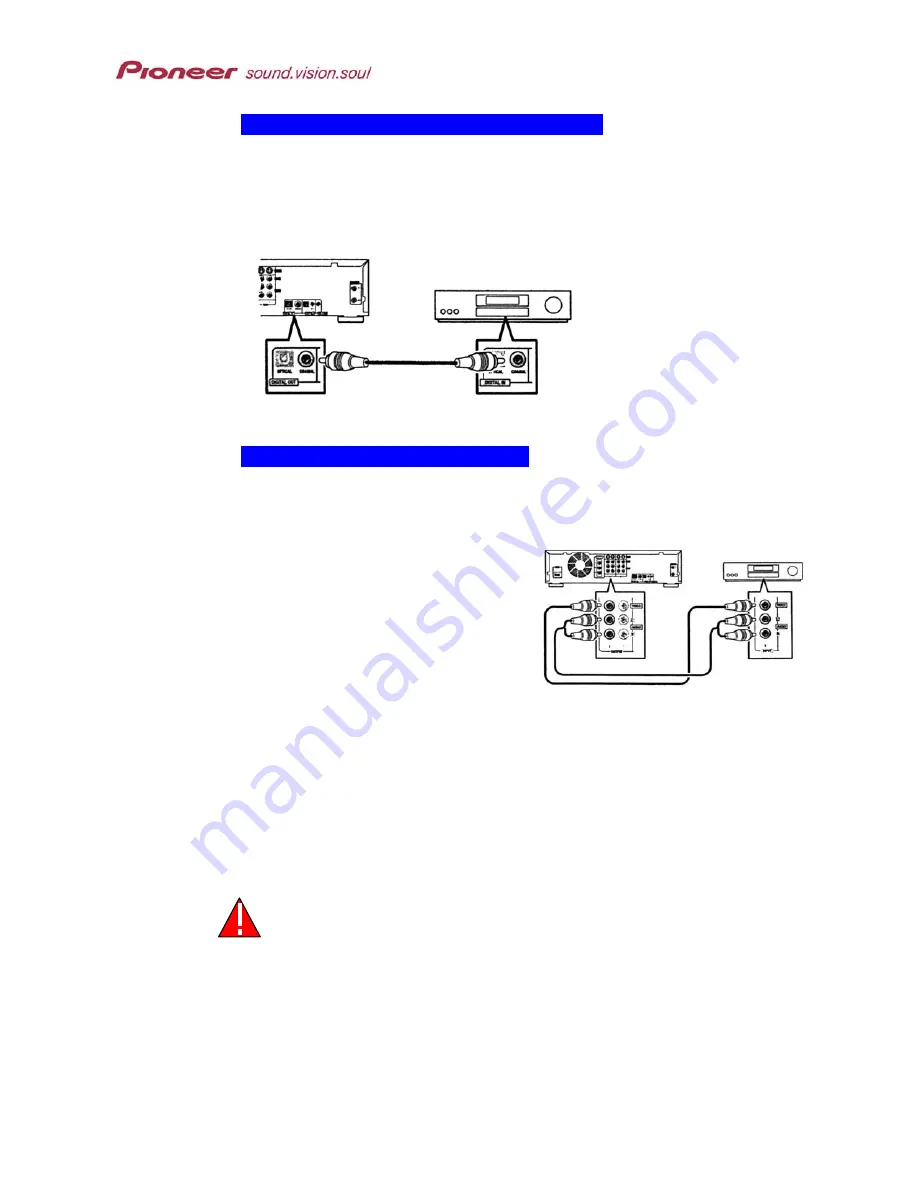
Connect through the Coaxial Digital Output 

For a coaxial connection, use a coaxial cable, similar to a video cable (not 
provided). It is unnecessary to use both optical and coaxial outputs 
simultaneously to achieve surround sound. Pioneer recommends using stereo 
analog as well as one of the digital connections through an AV receiver for best 
disc playback compatibility. 


Connect 

Coaxial Digital 

Output 

to an coaxial input on 

the AV receiver.


Connect Analog Audio and Video 

To send through an AV receiver/amplifier, Pioneer recommends using stereo 
analog as well as a digital connection for best disc playback compatibility. 

1. Connect 

Audio Output

 to the 

analog audio inputs on the AV 
receiver/amplifier. 

2. Connect 

Video Output

 to the 

analog video inputs on the AV 
receiver/amplifier.* 

* As an alternative, you may use 

S-Video Output

 or 

Component Video Output

 to use 

an AV receiver/amplifier 


Note: If using the Digital Out to record while watching another broadcast, there is a 
slight delay in the playing TV channel. 


This recorder is equipped with copy-protection technology. Do not 
use AV cables to connect this unit to a TV via a VCR or other device. 


15

Summary of Contents for PRV-9000

Page 1: ...PRV 9000 DVD Recorder Operating Instructions Version 1 0 November 27 2001 Pioneer Electronic Corporation Pioneer Electronics USA Inc ...

Page 2: ... make the product It is not Pioneer s intent to use any of these names generically and cautions the reader to investigate any claimed trademark before using it for any purpose other than to refer to the product to which the trademark is attached Equipment Copyright This product incorporates copyright protection technology that is protected by method claims of certain U S patents and other intellec...

Page 3: ...d the FCC Certification and negate the user s authority to operate the equipment DOC CLASS B COMPLIANCE This digital apparatus does not exceed the Class B limits for radio noise emissions from digital apparatus set out in the radio interference regulations of the Canadian Department of Communications SAFETY CAUTION Care should always be taken when working with electronic devices To protect you and...

Page 4: ...DING EDITING LIMITATIONS 8 1 4 1 VR Mode 8 1 4 2 Video Mode 9 1 4 3 Editing A DVD Recording 9 1 4 4 On Screen Icons 9 2 CONNECTION OPTIONS 10 2 1 BASIC CONNECTIONS 11 2 1 1 Connect to an Antenna 11 2 1 2 Connect to a TV for Disc Playback 12 2 2 ALTERNATIVE CONNECTIONS REAR PANEL 12 2 2 1 Connect Through S Video Output 13 2 2 2 Connect Through Component Video Out 13 2 2 3 Connect to an AV Receiver ...

Page 5: ...NG DISCS 38 4 4 1 DVD Video Navigation 39 4 4 2 DVD R RW Navigation 39 4 4 3 CD and Video CD Navigation 40 4 4 4 DVD Video Menu Navigation 40 4 4 5 Video CD Menu Navigation 40 4 5 SCANNING DISCS 41 4 6 SLOW MOTION PLAYBACK 42 4 7 FRAME ADVANCE FRAME REVERSE PLAYBACK 43 4 8 RECORDING OPTIONS 44 4 8 1 VR Mode Recording 45 4 8 2 Video Mode Recording 46 4 8 3 TV Audio Channel Recording 47 4 8 4 Video ...

Page 6: ...able Disc Space 75 6 1 3 Check Timer Recording Details 76 6 1 4 Edit Timer Recording Settings 77 6 1 5 Extend a Timer Recording in Progress 77 6 1 6 Stop a Timer Recording in Progress 78 6 1 7 Cancel Timer Recording 78 6 2 VCR PLUS PROGRAMMING SYSTEM 79 6 2 1 VCR Plus Automatic Timer Recording 79 6 2 2 Program With VCR Plus When the Power is OFF 81 6 3 RECORD FROM AN EXTERNAL INPUT 82 6 3 1 Record...

Page 7: ...ROM THE TITLE LIST MENU 100 8 4 ERASE A TITLE FROM THE TITLE LIST MENU 101 9 0 INITIAL SETUP MENU 102 9 1 BASIC SETTINGS 102 9 1 1 Optimized Rec default OFF 103 9 1 2 Tuner Settings 103 9 1 3 Video Settings 103 9 1 4 Video In Out Settings 104 9 1 5 Audio In Settings 105 9 1 6 Audio Out Settings 106 9 1 7 Language Settings 108 9 2 ADVANCED SETTINGS 110 9 2 1 Content Lock a k a Parental Lock 111 9 2...

Page 8: ...cture Quality for Disc Playback 122 11 ADDITIONAL INFORMATION 124 11 1 INSTALLATION MOVING HINTS 124 11 2 ON SCREEN MESSAGES 125 11 3 LANGUAGE CODE LIST 126 11 4 DISC HANDLING GUIDELINES 128 11 5 SCREEN SIZES DISC FORMATS 128 11 6 GENERAL MAINTENANCE ISSUES 129 11 6 1 Cleaning Pickup Lens 129 11 6 2 Clearing Condensation 130 11 7 GENERAL SPECIFICATIONS 130 11 8 BRIEF GLOSSARY 130 12 TROUBLESHOOTIN...

Page 9: ...as CD Audio and Video CD discs read only CD R and CD RW media Note DVD R media is compatible with most DVD Video players and DVD ROM drives DVD RW media is also compatible with many players and drives when using DVD Video mode In either case users should confirm playback compatibility with the target player model or computer system prior to purchase 1 1 Features 1 1 1 Playback The following points...

Page 10: ...ty settings in VR mode the audio is recorded in the uncompressed 16 bit Linear PCM format This format delivers clear audio to accompany the high picture quality Picture Quality Adjustments During playback or recording you can adjust various quality settings to improve the picture For example to copy an old video tape to DVD optimize the picture quality before transferring it to disc Manual Level R...

Page 11: ... issues playing a recordable DVD DVD R RW disc in some players The following points provide general compatibility information Play Video format recordings on a DVD player Video mode Discs formatted and recorded using the Video mode can be played back compatible DVD players and drives Some older players may fail to play back the DVD R RW format DVD Video playback may require additional software to ...

Page 12: ...eries of the same voltage Align batteries according to the charge symbols shown within the compartment Remove batteries from a disused remote control idle for a month or more Dispose of batteries according to the manufacturer s recommendations 1 2 2 Using the Remote Control When using the remote control follow these guidelines Avoid using a remote control if there is direct sunlight or strong fluo...

Page 13: ...le Only DVD playback devices that are specifically compatible with DVD RW recognize this type of media Look for the RW compatible logo on all playback devices Note Damaged or dirty DVD R RW and CD R RW discs may fail to play back Also dirt smears or condensation on the player s lens may also cause faulty playback A disc with one or more of the following logos is playable on the PRV 9000 Note The R...

Page 14: ...may be divided into smaller sequences called chapters Fig 1 2 Figure 1 2 Titles and Chapters 1 3 2 Audio CD Compatibility The compatible Audio CD format supports the following functions 12cm 5 or 8cm 3 discs Linear PCM digital audio CD Audio CD R or CD RW formats plays CD R RW discs recorded in CD Audio Video CD format or with MP3 audio files Note Audio CDs are divided into tracks rather than titl...

Page 15: ... channel surround format used on some DVD Video discs often in addition to Dolby Digital Linear PCM Linear PCM audio may be on some DVD Video discs usually with music related materials PCM is mono or stereo channels only 2 Subtitle Languages DVD discs may have up to 32 subtitle streams however subtitles are not mandatory 3 Screen Aspect Ratio Movies are filmed in a variety of screen formats The bo...

Page 16: ...VD RW media supports both Video and VR modes Many functions are dependent upon the recording method One or more of the following symbols appear throughout this manual to help identify recording compatibility For more information please refer to Chapter 4 GETTING STARTED section 4 8 Recording Options 1 4 1 VR Mode The VR mode Video Recording is a subset of the Video mode While Video mode allows vid...

Page 17: ...ou to make a Playlist of what to play and when to play it leaving the original material intact Fig 1 5 The PRV 9000 recorder plays back the disc according to your Playlist selections Figure 1 5 Original content edited Playlist Throughout this manual the word Original refers to the actual content while the word Playlist refers to the edited version 1 4 4 On Screen Icons While using the PRV 9000 rec...

Page 18: ...Dolby Digital DTS decoder or other equipment with Optical Digital Input 8 Digital Out Coaxial RCA pin to an AV receiver Dolby Digital DTS decoder or other equipment with Coaxial Digital Input 9 Signal Gnd recorder may fail under certain environmental conditions excessive noise terminal is a ground for when multiple devices cause signal interference but is NOT a safe grounding terminal 10 VHF UHF I...

Page 19: ...ord TV programs 1 Connect the antenna cable to the VHF UHF In port on the rear panel 2 Connect the VHF UHF Out port to the VCR s antenna input jack using a RF antenna cable not provided If a VCR is unnecessary connect to the TV s Antenna In jack 3 Connect the VCR s antenna output to the TV s antenna input using your existing RF antenna cable 4 Connect the VIDEO AUDIO OUTPUT 2 ports to the TV s AV ...

Page 20: ...deo The PRV 9000 has standard composite S Video and component video outputs The type of video effects the picture quality S Video delivers a better picture then Composite Video while Component Video provides the best picture The variety of outputs provides flexibility for connecting a wide range of products A V Amplifier To enjoy multi channel surround sound connect an AV amplifier receiver using ...

Page 21: ...ct Through Component Video Out Component Video carries the picture as two separate color singles and a luminance brightness signal These signals are transmitted through a single cable with each end providing three connectors Join one set of cable connectors to the recorder s Component Video Out port then the other set to the Component Video In connections on the display device Figure 2 5 There is ...

Page 22: ... 2 analog to the analog audio input on the AV receiver 4 Connect the Video Output 2 to the video input on the receiver 5 Connect the AV receiver s video output to the display device s video input The diagram shows the PRV 9000 connected to the AV receiver using the recorder s Composite standard Video output As an alternative use the S Video output or Component Video BNC output connections Connect ...

Page 23: ...Audio and Video To send through an AV receiver amplifier Pioneer recommends using stereo analog as well as a digital connection for best disc playback compatibility 1 Connect Audio Output to the analog audio inputs on the AV receiver amplifier 2 Connect Video Output to the analog video inputs on the AV receiver amplifier As an alternative you may use S Video Output or Component Video Output to use...

Page 24: ...ng section 1 Connect RF cables as shown with the antenna cable line connected to the PRV 9000 2 Connect the recorder s Audio Output 2 to the TV s audio input using a stereo audio cable not supplied 3 Connect the recorder s Video Output 2 to the TV s video input using a BNC cable not supplied 4 Connect audio video outputs from the cable box satellite tuner to the recorder s INPUT 2 AUTO REC posts u...

Page 25: ...respectively enables watching recording multiple scrambled television broadcasts 2 3 Alternative Connections Front Panel Alternative connections encompass video and audio sources The following diagrams are only setup suggestions for common types of products Your equipment and setup may differ Become familiar the front ports behind the lower left panel before connecting any components Reading from ...

Page 26: ...the other device are RCA use a BNC pin conversion adapter to make connections 2 3 2 Connecting a Digital Camcorder Connect the front DV In Out jack to a DV digital camcorder or deck to transfer DV tapes or DVD R RW discs to DVD R RW DV cable not provided IMPORTANT The DV In Out jack is for DV equipment only This jack is incompatible with computers digital satellite tuners and D VHS video decks Use...

Page 27: ...into play or stop mode The camcorder is either in camera record mode or record pause mode Playback stopped Verify that the tape is running and that the camcorder is sending a signal The DV camcorder does not operate Check the camcorder for operation or power problems Try switching off the DVC link detailed explanation in a later chapter If problems with audio or video occur read through Chapter 10...

Page 28: ... and the power is in Standby mode 10 AUTO REC indicator Lights when the recorder has been set for automatic recording 11 FUNCTION button Toggles the SMART JOG operations 12 Smart Jog dial control Turn to change the parameters selected with the Function button 13 REC button indicator Press to start recording 14 PAUSE button Press to pause playback or recording 15 PLAY button Press to start or resta...

Page 29: ... mode 8 Audio Level indicators Monitors the audio level during playback and the audio input level during recording 9 Status Bar MN manual rate recording level TITLE current title number playing from the DVD disc TRACK current track number of the playing CD or Video CD CHP current chapter number playing from the DVD disc ANGLE lights when a multi angle scene is available on the playing DVD disc TOT...

Page 30: ...ct Channels and Volume 16 OPEN CLOSE tray 17 NAVI MARK to select a thumbnail image for the current title from within the DISCNAVI menu 18 SETUP press to reveal the Setup menu 19 DISCNAVI press to reveal the Discnavi menu 20 EDIT to access the edit function from within the Discnavi or Title List menu 21 ENTER Joystick use the joystick to navigate on screen menus press Enter to select the highlighte...

Page 31: ...make a selection then press ENTER to activate that feature Information about a highlighted option displays at the bottom of the screen In addition under Help is a summary of the on screen navigation controls The setup procedures in the following section prepares the recorder for full operation and assist you to become familiar with the on screen functions 23 ...

Page 32: ...s are accessed using on screen displays These commands are navigated with the joystick The joystick is very sensitive and only requires gentle pressure in the required direction to move the on screen cursor Use the joystick to highlight the various menus and options then press ENTER to select the highlighted item Information about the highlighted menu or option is shown on the lower portion of the...

Page 33: ... broadcast clock information Time Zone selection Daylight Savings Time DST observed 7 Set Clock Set CH to the channel number for PBS If leaving other settings to Auto causes the recorder to fail manually move the joystick left right to create a setting for the highlighted option Cable turn ON the cable box and set to PBS Digital Satellite Receiver turn OFF the satellite receiver 8 Press ENTER afte...

Page 34: ...ther Daylight Savings Time is observed Move the joystick to the left or right to change settings 9 Press ENTER to register your selections and proceed to the date time submenu 10 Set the date mm dd yyyy and the time Move the joystick to the left or right to navigate the entry fields Use the joystick to the increase or decrease the numbers 11 Press ENTER to store your selections The previous menu a...

Page 35: ...r more screen size and setting information refer to Chapter 11 ADDITIONAL INFORMATION section 11 5 Screen Sizes Disc Formats 6 Choose the aspect ratio to match the setting of the TV or monitor 4 3 Letterbox Standard 4 3 Pan Scan Standard 16 9 Wide Widescreen 7 Press SETUP to exit the Setup menu 8 Press STANDBY ON to change the recorder to the standby mode 9 Press STANDBY ON again to power ON the r...

Page 36: ...8 Select DTS Out from the submenu by using the joystick 9 Verify that the DTS option is set to OFF unless the receiver has a built in DTS decoder If your receiver has this decoder set the option to ON 10 Press ENTER to confirm your selection The cursor moves back to the previous submenu 11 Select 96kHz PCM Out from the submenu 12 Set the sampling rate to 96kHz 48kHz unless your receiver is compati...

Page 37: ...l Skip feature to disable unwanted channels The maximum number of settings stored in the PRV 9000 is 192 channels SETUP ENTER Joystick CHANNEL 1 Press SETUP to access the menu 2 Highlight Initial Setup from the main menu Use the joystick to highlight the option 3 Press ENTER to confirm your selection 4 Highlight Tuner from the Initial Setup menu by using the joystick 5 Select Auto Channel Setting ...

Page 38: ...00 is 192 channels 1 Press SETUP to access the menu 2 Highlight Initial Setup from the main menu by using the joystick 3 Press ENTER to confirm your selection 4 Highlight Tuner from the Initial Setup menu 5 Select Manual CH Setting from the Tuner submenu 6 Press ENTER to jump to the Next Screen option 7 Press ENTER to go to the Manual Channel Setting screen 8 Use the Channel button to set the chan...

Page 39: ...selection 4 Highlight Tuner from the Initial Setup menu by using the joystick 5 Choose VCR Plus CH Setting from the Tuner submenu 6 Press ENTER to jump to the Next Screen option 7 Press ENTER to go to the VCR Plus channel setting screen 8 Assign channels to the guide channels as necessary Refer to a TV Guide or other program chart to choose channels Use the PREV NEXT button to scroll through the 2...

Page 40: ...down the CLEAR button while using the number buttons to input the maker code for your television or monitor Use the first listed code for your television s make Television Maker Maker Code GE 11 28 General 33 Goldstar 10 23 Grandiente 35 Hitachi 06 24 25 31 Magnavox 12 29 Mitsubishi 09 NEC 36 Panasonic 08 22 Philips 07 Pioneer 00 34 RCA 01 15 16 17 18 Sanyo 14 21 Sharp 02 19 27 Sony 04 Toshiba 05 ...

Page 41: ...utput formats Video input output formats DVD Video language settings Parental lock settings Note These settings are explained in later chapters The TV Control buttons on the remote boxed area in the lower right corner of the remote control sends commands to the television or monitor The following chart provides a summary of each button s function Remote Button Function TV power Press to toggle the...

Page 42: ...on the remote or use the SMART JOG on the front panel Note Channels programmed through the antenna are numbered 2 through 69 and cable channels are numbered 2 through 125 Remote Control Number Pad Input the channel then press ENTER Ex Select Channel 4 Press the digit 4 then press ENTER Select Channel 39 Press the digit 3 then the digit 9 Press ENTER As an alternative method for two digit numbers p...

Page 43: ...e secondary signal is absent still provides the primary sound to play If the sound quality is poor when set to Stereo change to Mono When setting to Dual Mono while using an external input port allows audio channel switching to just left just right or both left and right 4 2 3 Displaying Program Titles Channel Call Letters Some broadcast stations transmit the program title and channel call letters...

Page 44: ...ayback operation 1 Press STANDBY ON to power up the recorder If playing a DVD or Video CD also turn the TV viewing device ON 2 Verify that the display device is set to the correct video input if playing a Video disc 3 Press the OPEN CLOSE button on the remote control to open the tray 4 Load a disc in to the tray with the label facing up If loading a double sided disc place the side to be played fi...

Page 45: ...commercial Use this button to skip up to a maximum of four minutes 4 3 2 VR Mode Playback Control The chart below reflects control options when playing back a DVD RW disc in the VR mode Button Function Starts playback If the display shows RESUME playback starts from the previous stopped location Pauses disc playback or resumes playback of a paused disc Stops playback The display shows RESUME Press...

Page 46: ...y The display shows RESUME Press a second time to cancel playback Skips to the start of the current track then to previous tracks Skips to the next track CM SKIP Commercial Skip Each press skips forward 30 seconds which is the approximate length of a commercial Use this button to skip up to a maximum of four minutes 4 4 Navigating Discs During playback you can easily jump to another title chapter ...

Page 47: ...rent title chapter or track If you make a mistake use the CLEAR button to begin again 4 4 1 DVD Video Navigation While a DVD Video disc is playing use the number buttons to input a chapter number within the current title After entering the number press the Enter button to play that chapter Example Change to Chapter 6 6 then ENTER Change to Chapter 24 2 and 4 then ENTER RETURN PLAY STOP PREV NEXT N...

Page 48: ...ide menus to play to different sequences Some menus appear automatically while other menus must be requested If a menu fails to appear press MENU or TOP MENU Button Function TOP MENU Reveals top menu of a DVD disc Which menu displays varies with each disc MENU Reveals a DVD disc menu Varies with each disc and may be the same as TOP MENU RETURN Recalls the previously displayed menu Joystick Moves t...

Page 49: ...for forward scanning and counter clockwise for backward scanning The scanning speed displays on the screen Sound is suppressed during DVD and Video CD scans but is audible when scanning an Audio CD To resume standard playback press the PLAY button Jog Dial PLAY FUNCTION Smart Jog PLAY Normal playback may automatically resume when reaching a new chapter Test the disc for this function before playin...

Page 50: ...viewing Slow Motion Speeds Jog Dial PAUSE JOG MODE PLAY Note Video CD only supports forward slow motion From the Remote Control To view a video segment or disc in slow motion follow the directions below 1 Begin playback of a disc 2 Press the PAUSE button 3 Turn the Jog dial to start slow motion playback Forward motion turn clockwise Reverse motion turn counter clockwise 4 Verify the selected direc...

Page 51: ...aying the material in a professional setting 4 7 Frame Advance Frame Reverse Playback After pausing playback of a DVD or Video CD disc use the Jog dial to control the frame by frame advance Frame reverse is also possible on DVD media however the picture quality may degrade From the Remote Control To view a video segment or disc frame by frame follow the directions below 1 Begin playing a disc 2 Pr...

Page 52: ...atches or other marks on a disc may affect playback and or recording performance Pioneer takes no responsibility for recording failures due to power fluctuations defective discs or damage to the recorder The PRV 9000 can play three different types of DVD disc DVD Video discs DVD RW discs DVD R discs DVD R discs are always Video format rather than VR format This is the same format as pre recorded H...

Page 53: ...ting Video Video V1 high quality V2 standard Playback limited recording limited editing DVD RW Video Recording default VR SP standard MN manual levels 1 to 32 Playback Recording Original Playlist editing DVD Video Video N A N A Playback only 4 8 1 VR Mode Recording When recording in VR format select the recording mode SP standard or MN manual SP fixed recording quality and recording time total tim...

Page 54: ...imes also depend upon the complexity of the original material When recording with poor broadcast reception or signal interference available recording time may be shorter then indicated in the previous chart When recording still pictures or audio tracks only available recording time may be longer then indicated in the previous chart The displayed times time used and time remaining may fail to add u...

Page 55: ... action recalculates time displays Recordings are created in 30 second blocks If the STOP button is pressed in the middle of a block recording continues until the block is complete To record to a DVD R disc press the REC ord button twice The first button press causes the PRV 9000 to enter record standby mode The second press begins the recording session Note To set the unit to record after a singl...

Page 56: ... this manual To display copy control information on screen when recording a TV broadcast or a sequence through an external input refer to the section entitled Display Disc Information On Screen 4 8 5 Content Protection for Recordable Media CPRM Content Protection for Recordable Media CPRM is a copy protection system that allows a broadcast program to be copied once Any additional attempt to copy t...

Page 57: ...he joystick 3 Press ENTER to confirm your selection 4 Highlight Initialize from the Disc Setup menu by using the joystick 5 Choose the appropriate mode from the submenu Video mode VR mode default 6 Use the joystick to highlight Start from the submenu 7 Press ENTER to begin initializing the disc The initialization process may take up to one minute to complete 4 10 Initializing Recording Modes The P...

Page 58: ...els and the PREV NEXT buttons to jump to the previous next pre set level Ignore this step if selecting SP as the recording mode 4 Preview the production for picture quality if necessary Additional instructions below 5 Press the ENTER button to save the selection and dismiss the menu Note For additional information about VR mode refer to earlier in this chapter 4 8 1 VR Mode Recording and to Chapte...

Page 59: ...highlight the appropriate mode V1 high quality V2 standard 4 Preview the production for picture quality if necessary Additional instructions below 5 Press REC MODE again to set the mode and dismiss the menu A production preview option is available on this submenu 1 Select the PREVIEW menu button to activate an on screen display of how the material will appear after recording 2 Adjust the picture q...

Page 60: ... recorder The steps below explain how to adjust the audio from the front panel 1 Press FUNCTION until REC LEVEL appears in the window 2 Turn the Smart Jog dial to adjust the volume level 3 Monitor the audio level meter on the front panel If the red bars at the end of the meter are lighting then the audio level is too high 4 Wait 10 seconds for the recorder to save the settings and dismiss the menu...

Page 61: ...n Video mode the SAP channel is recorded on this channel 7 Set the audio recording level if necessary Refer to the previous section 4 10 4 Adjusting the Audio Recording Level for more information 8 Press REC to complete the process DVD RW recording begins immediately DVD R wait for the on screen display to refresh then press the REC button again begin the recording session Note The previous table ...

Page 62: ...s The maximum recording time is six hours 4 Confirm that the correct recording time appears on the display SETUP Joystick ENTER DISPLAY REC TOP MENU MENU Press STOP to discontinue recording at any time Once recording has begun pressing REC again cancels the selected recording time without stopping the current record session When the timed recording is complete the PRV 9000 automatically enters the...

Page 63: ...ccess the Disc Setup menu 5 Use the joystick to select Finalize from the submenu 6 Highlight Start to prepare for disc finalization 7 Press ENTER to begin finalizing the disc If disc finalization takes more than four minutes to complete an option to cancel the procedure appears on the screen Press ENTER to cancel the operation At four minutes before completion of a longer project the option to can...

Page 64: ...de the information by pressing DISPLAY repeatedly until reaching the end of the on screen data loop Example of DVD Video Video mode on DVD R or DVD RW media On screen data while playing a disc On screen data while a disc is stopped 1 The symbol refers to the video signal recording at 24 frames per second in progressive scans see PureCinema within the glossary at the end of this manual 56 ...

Page 65: ...W media On screen data while playing a disc On screen data while a disc is stopped 2 The mark denotes that the contents are scrambled with CPRM security technology Example of CD media On screen data while playing a disc On screen data while a disc is stopped 57 ...

Page 66: ...ructions Example of Video CD media On screen data while playing a disc On screen data while a disc is stopped Example of Recording to DVD R or DVD RW media Note The on screen data automatically disappears after 150 minutes 58 ...

Page 67: ...ates the value per the recording settings The Stop on screen data for Video format media becomes the same as DVD Video once the disc is finalized If Frame Search is ON the frame number appears next to elapsed time when the disc is paused Recording and playback times for TV recordings are approximately 0 1 shorter than the actual time This disparity is due to the slightly different frame rates betw...

Page 68: ...isallowed either a player or a disc appears on screen 5 1 Disc Searches To locate a certain point or sequence on a disc use one of the Search options A disc can be playing or stopped during any searches The recorder jumps to the specified area of the disc and begins playback Depending upon the disc searches using the menu is possible Press MENU on the remote control to check for this feature Joyst...

Page 69: ...rammed to jump to the closed full frame In DVD technology this full frame is known as an I frame The recorder checks before and after the selected point on the disc for the closed I frame then jumps to that frame To issue a time search to DVD Video and Video format media the disc must be playing The recorder ignores the command if the disc is stopped If Frame Search is ON add a frame number to the...

Page 70: ...ck Note Some material only allows switching subtitles from the disc menu Press MENU on the remote control to check for subtitle options 1 Load a disc into the recorder Disc may be playing or stopped 2 Press SUBTITLE to reveal the first available option 3 Continue pressing SUBTITLE to scroll through the subtitle options The current subtitle is shown on screen and in the front panel display 4 Hold d...

Page 71: ...e recorder to momentarily interrupt playback when changing the audio language Neither the disc nor the recorder is defective When playing a Dual Mono recording on a VR formatted disc in Dolby Digital the audio channel is locked at the current setting Set Dolby Digital Out to Dolby Digital PCM or listen via the analog outputs to switch channels For additional information return to Chapter 2 GETTING...

Page 72: ...ess SHIFT on the remote control 2 Press A B once at the beginning of the section for loop playback 3 Press A B again at the end of the sequence to loop Playback immediately jumps back to the selected starting point and plays the looped segment continuously 4 Press CLEAR to return to normal playback Note The beginning and ending points must be within the same title when looping material on a DVD di...

Page 73: ... Jog Dial Stop ENTER Joystick Play Number Pad 7 PROGRAM Pause Clear Shift Note Program Lists are unavailable for unfinalized VR formatted discs A Program List may contain up to 24 list entries Each List entry can be a track chapter title number or a pause 5 5 1 DVD Program List The Program Memory retains Program Lists for a maximum of 24 discs with each List containing up to 24 entries The support...

Page 74: ...the joystick to move to the first Program List number field if the cursor is not in the proper location 6 Enter a title chapter number for this program list title chapter 8 press 8 on the number pad then press ENTER title chapter 16 press 1 and 6 then press ENTER Note To add a pause instead of a title or chapter press the PAUSE button for a Program List entry instead of entering a title chapter nu...

Page 75: ...ss CLEAR The disc continues playing from the current sequence but the List entries are ignored Occasionally during List playback the start of a non programmed chapter briefly appears on screen This is not a malfunction but a part of the process to change from the end of one chapter to the next programmed chapter To add a currently playing title chapter track to the Program List press SHIFT then ho...

Page 76: ... that space all entries after that point are forced down one step in the List Add pauses anywhere except as the first step or the last step in a Program List After a pause press PLAY to continue playback To delete an entry from the Program List position the cursor over the entry then press CLEAR All following entries move back by one step To delete a Program List stop the disc playback then press ...

Page 77: ...th the current sequence as the first entry To delete a stored Program List for a CD access the program menu press SHIFT then PROGRAM and change the Program Memory option to OFF A Program List may have up to 24 entries The PRV 9000 stores up to 24 Program Lists in the recorder s memory 69 ...

Page 78: ... legacy and current video sources The recorder outputs include component Y C and composite video signals This chapter addresses recording features for the PRV 9000 6 1 Timer Recording The PRV 9000 provides the following two methods for timer recording Standard timer recording information is stored in the recorder for later recording to any disc Disc timer recording information is stored on the des...

Page 79: ...c timer recording is active the first menu item is Disc Timer Rec Figure 6 1 Timer Recording Setup Menu 3 Confirm Timer Rec is highlighted on the menu or highlight Disc Timer Rec if the disc timer option is active 4 Press ENTER to call the menu Timer Recording program appears on screen with 8 available entry lines Figure 6 2 Up to 8 Timer Recording sessions 5 Begin entering information for the tim...

Page 80: ...duled to begin The timer indicator on the recorder s front panel lights when the unit is switched to Standby A blinking light indicates that the disc is un recordable or that no disc has been loaded Note Timer recording fails if the recorder is left ON rather than in Standby Audio is recorded according to the settings on the TV or other display device Stereo Mono or SAP Select the audio using the ...

Page 81: ...om the Setup menu by using the joystick 4 Confirm that Basic is highlighted 5 Use the joystick to move to Disc Timer Rec on the Basic submenu 6 Set Disc Timer Rec to ON Use the joystick to highlight ON then press ENTER Note Ejecting the disc before programming at least one complete entry causes the Disc Timer Rec option to revert automatically to OFF 7 Press SETUP to exit the Disc Setup menu Progr...

Page 82: ...l 1 through 32 VR disc format DV input any setting other than MN 1 through MN 8 Video disc format set to SP V1 and V2 is unavailable then press the REC MODE button afterwards to se the recording mode 13 Press ENTER to save each entry line 14 Activate the Confirm option to check required disc space if necessary See the following section for details 15 Press SETUP to exit the menu once all disc time...

Page 83: ...n a disc timer program activates any standard timer recording setting are turned OFF Ejecting the disc or changing the Disc Timer Rec option to OFF activates the standard timer program s when available Loading an unformatted disc or a disc without a disc timer program deactivates the option Note Disc timer programming is unavailable on a protected disc For more information refer to Chapter 7 EDITI...

Page 84: ...disc up to a maximum of one month in advance If Optimize Disc is active ON during a timer recording the PRV 9000 adjusts the recording quality to fit as much of the sequence as possible on to the disc However if the timer entry is still too long for the available disc space the Time Over message appears 6 1 3 Check Timer Recording Details To verify that a timer program is ready to record refer to ...

Page 85: ...ines available 4 Make your changes to one or more line entries 5 Press SETUP to exit the menu 6 Set the recorder to Standby prior to the next timer recording selection 6 1 5 Extend a Timer Recording in Progress Follow the directions below to adjust the stopping point of a timer recording session after the program begins recording 1 Press and hold the REC button for approximately three seconds The ...

Page 86: ... Press SETUP to access the setup menu 2 Select Timer Rec from the menu or select Disc Timer Rec if the disc timer option is active The Timer Recording program appears on screen 3 Move the cursor to highlight the timer program number to be deleted 4 Press CLEAR to delete the timer program entry When the recorder is in Standby with the timer indicator lit switching ON the recorder keeps the timer pr...

Page 87: ...E ENTER Joystick PlusCode 6 2 1 VCR Plus Automatic Timer Recording VCR Plus makes programming timer recordings very simple Most television guides publish VCR Plus system PlusCode numbers with their program details To make a timer recording from broadcast signals input the code for that program The date start stop times and channel settings are automatically programmed To complete the timer recordi...

Page 88: ...ty level Video format discs although V1 and V2 are unavailable leave at the SP setting then use REC MODE to select a quality level 5 Select the frequency option using the joystick moving left right Frequency options are Once Daily and Weekly 6 Press ENTER to confirm the new settings Program details flash on the bottom of the screen then the menu automatically closing after three seconds Note If th...

Page 89: ...e sequence as possible on to the disc However if the timer entry is still too long for the available disc space the Time Over message appears 6 2 2 Program With VCR Plus When the Power is OFF The recorder can be in Standby mode when entering VCR Plus program codes The following guidelines apply to recording with VCR Plus codes Guide channels must be programmed in to the recorder before using a VCR...

Page 90: ...m external components satellite tuners and DV output devices The following sections address each input device ENTER Joystick PLAYLIST JOG MODE Jog Dial RECord STOP PLAY INPUT SELECT REC MODE TOP MENU Picture disturbance in the recording may occur in the following situations source component pauses playback source component plays an unrecorded segment power fails in the source device the DV cable i...

Page 91: ...N OUT port Although digital camcorders may record as stereo 16 bit 48kHz or twin stereo tracks of 12 bit 32kHz the recorder only records a single stereo track Set DV Input to Stereo1 or Stereo2 Audio output from the DV IN OUT port is limited to 16 bit Audio input through the DV IN OUT port must be 32kHz or 48kHz rather than 44 1kHz 6 3 1 Record From an External Component Follow the directions belo...

Page 92: ...the DVS SD format verify that your camcorder accepts commands from the recorder s remote a PRV 9000 DVD recorder cannot control a second PRV 9000 added with a DV cable the recorder ignores commands sent remotely through a component connected to the DV IN OUT port the recorder ignores commands to duplicate copy protected material but does play back the protected data date and time information from ...

Page 93: ...hen the copy protected sequence ends To pause of stop the recording select Rec Pause or Rec Stop from the menu The camcorder continues to play back the tape but the recorder responds to the menu selection If the recording is re started after stopping the camcorder the recorder may miss the first few seconds of the sequence Use the PAUSE button on the camcorder until the recorder is active so that ...

Page 94: ...ION on the recorder s front panel for approximately three seconds The recorder returns to Standby and the AUTO REC indicator lights The recorder turns ON then OFF in sync with the satellite tuner The auto start function is unavailable in the following situations recorder is already recording a program loaded disc is full or other than recordable media loaded disc is protected loaded disc already c...

Page 95: ...tch the recorder in Standby 2 Press and hold the STOP button on the front panel for three seconds When the recorder is locked the Lock Indicator on front panel blinks twice Note If a command is sent when the recorder is locked the indicator flashes twice after each attempt to send a command 3 Press and hold the STOP button on the front panel for an additional three seconds to unlock the recorder T...

Page 96: ...itional recordings When editing a Playlist the material remains on the disc For example erasing a title from the Playlist tells the recorder to skip that title during playback but the material is still available for later edits DVD titles consist of one or more chapters When a title is inserted in to a Playlist all the chapters within that title also appear on a Playlist A Part is a portion of the...

Page 97: ...n screen Note During Playlist playback there may be a momentary pause between edit points This is not a malfunction but part of the segment processing 7 3 Edit With DISCNAVI Use DISCNAVI Disc Navigator to build and edit a Playlist DISCNAVI also provides a way to record material from a digital camcorder to play individual titles to erase titles and make other changes to Original content Note To edi...

Page 98: ...ailable for chapter thumbnails Follow the directions below to change a title thumbnail 1 Play the title Original or Playlist content 2 Press NAVI MARK to capture the current image as the new thumbnail The image represents the title in the DISCNAVI menu for original and Playlist content 3 Press DISCNAVI to return to the DiscNavi menu Note To change the default image capture point refer to Chapter 9...

Page 99: ...ess ERASE repeatedly to delete the existing name optional Press ERASE to remove each auto assigned character 6 Use the joystick to drop down from the name field to the characters Move left to select either Capitals or lowercase letters if necessary 7 Highlight the first character for the title name 8 Press ENTER to lock in the character The selection appears in the field above 9 Continue selecting...

Page 100: ...about only adding parts of a title refer to Chapter 7 EDITING FUNCTIONS OPTIONS section 7 4 9 Add Part of a Title to a Playlist Note During Playlist playback there may be a momentary pause between edit points This is not a malfunction but part of the segment processing 7 3 5 Copy a Playlist Title Use the Copy Playlist Title function to paste a copy of the title to any line on the Playlist 1 Press ...

Page 101: ...8 Use the joystick to select the new location for the title 9 Press ENTER to confirm the move and to update the Playlist 10 Press DISCNAVI to close the menu Move a Chapter 1 Press the DISCNAVI button to access the menu 2 Press Playlist to change to the Playlist menu if necessary 3 Use the joystick to access the menu on the left side of the screen 4 Switch to the Chapter view 5 Scroll down to Move ...

Page 102: ... two chapters 8 Press ENTER to combine the chapters in to one chapter 9 Press DISCNAVI to exit the menu Note This function is unavailable if there is only one chapter in a title 7 3 8 Erase a Title Chapter When a title or chapter is erased from the Playlist the title chapter is only deleted from the Playlist rather than from the original content Material erased from the original content is lost Er...

Page 103: ...hange to the Playlist menu if necessary 3 Select Add Part from the Playlist DISCNAVI menu 4 Scroll to the appropriate Playlist line if necessary If the Playlist is empty add the segment at the beginning of the Playlist If there are titles already on the Playlist choose where to insert the title Note The segment may be added as a chapter to an existing title 5 Use the PLAY PAUSE and CM SKIP buttons...

Page 104: ...the jog dial to locate the end point of the segment part to be removed 7 Press ENTER to confirm the end point for the unnecessary segment Jump between the start and end points to fine tune the selection if necessary Note When erasing content from the Original material segments less than five seconds in duration are unavailable for deletion 8 Select Preview to verify the part to be removed before c...

Page 105: ...the protect function 4 Use the joystick to highlight the title to protect or unprotect 5 Press ENTER to select the title A padlock icon appears or disappears from in the upper right corner of the title thumbnail Figure 7 1 protected title 1 has a padlock icon in the upper right corner of the thumbnail 6 Press the DISCNAVI button to exit the menu Changing the protection status locks previous edits ...

Page 106: ...ted Undo is unavailable If the recorder is switched to Standby Undo is unavailable The protect unprotect function ignores Undo commands Undo is unavailable for finalized or initialized discs Undo is unavailable after using the Preview function with the Record Mode screen or the Rec NR setting Note Undo is available after exiting the DSICNAVI menu 98 ...

Page 107: ...display the Title List If the disc is not finalized the menu provides multiple functions If the disc is finalized the menu provides a list of titles to play 2 Use the joystick to move around the screen and highlight selections 3 Press ENTER to activate the highlighted option 4 Press TOP MENU or MENU again to exit the Title List Other controls for the Title List are shown at the bottom of the scree...

Page 108: ...ove each auto assigned character 7 Use the joystick to drop down from the name field to the characters Move left to select either Capitals or lowercase letters if necessary 8 Select the first character for the title name The selection appears in the field above Names may be up to 24 characters letters and or numbers in length Note Discs formatted on a different DVD recorder limits the character se...

Page 109: ...from a recorded disc 1 Press STOP if a disc is playing 2 Press TOP MENU or MENU to display the Title List Press ERASE and skip to step 4 if there is only one title on the disc 3 Scroll to Erase Title in the Title List menu 4 Use the joystick to choose the title to be erased 5 Press ENTER to erase the title and update the Title List 6 Press TOP MENU or MENU again to exit the Title List 101 ...

Page 110: ...tup menu follow the directions below 1 Press the SETUP button on the remote control 2 Use the joystick to scroll down to Initial Setup on this menu 3 Press ENTER to access the Initial Setup menu 4 Use the joystick to scroll through the sub menu and review settings 5 Make changes as needed pressing ENTER after a change 6 Press SETUP to close the menu 9 1 Basic Settings Besides programming the clock...

Page 111: ...imited space If the setting is already at the lowest available level MN 1 on standard recording or MN 9 when using the DV Input but there is still insufficient space the recording remains at the lowest available setting and cuts off when the disc is full The Optimize Recording feature only compensates for one timer program 9 1 2 Tuner Settings Tuner settings refer to the following options Auto Cha...

Page 112: ...rocesses when displaying a still frame or field from a DVD disc The default Auto setting automatically chooses the best setting for each image Frame produces a sharp image but may have some jitter Field produces a stable image with little jitter but not as sharp an image as a frame 9 1 4 Video In Out Settings Video In Out provides settings for the following options Component default Interfaced DV ...

Page 113: ...582HDS SD 533HDS SD 532HDS DV Link Leave the setting for the DV Link to the default Auto whenever possible However if the audio and or video signal from a digital camcorder using the DV IN PUT port is corrupted or failing try setting the DVD Link setting to OFF With this option set to OFF some camcorders may still be incompatible with the recorder when connecting with a DV cable 9 1 5 Audio In Set...

Page 114: ...dio real time sound and overdubbing after shooting a scene The Stereo1 setting selects the track recorded while shooting Stereo2 uses the overdubbed sound track Tuner Audio Level If the audio from the display device s built in tuner seems louder than the volume during disc playback adjust this setting to Minimum However the default setting is the standard volume 9 1 6 Audio Out Settings Audio Out ...

Page 115: ...GETTING STARTED section 4 1 3 Setting the Digital Audio Output MPEG Out The default setting is MPEG PCM For information on this option refer to Chapter 4 GETTING STARTED section 4 1 3 Setting the Digital Audio Output Audio DRC When watching Dolby Digital DVDs at a low volume lower level sounds may drop out This dropping also can affect low level dialog Switching ON Audio DRC Dynamic Range Control ...

Page 116: ... plays the disc in that language The Auto Language option may affect this setting The PRV 9000 supports switching between languages any time during disc playback Use the AUDIO button to switch languages Switching languages during playback has no effect on the Audio Language setting For languages other than English default or French select Other The Other setting is described later in this chapter ...

Page 117: ...k is supported but has no effect on these settings Note Some discs fail to recognize the Auto Language function Use the AUDIO and SUBTITLE buttons to make language selections DVD Menu Language Some discs provide disc menus in multiple languages Use the DVD Menu Language option to set the language for the disc menus The default setting for this option locks the menu language to the Subtitle Languag...

Page 118: ...if necessary 2 Use the joystick to highlight Other from the language list This option appears under DVD Menu Language Audio Language and Subtitle Language submenus 3 Press ENTER to confirm your selection 4 Scroll to the appropriate language or use the number pad to select the number corresponding to that language For language options refer to the Language Chart in Chapter 11 5 Press ENTER to confi...

Page 119: ...cessary 2 Confirm that Parental Lock is highlighted 3 Press ENTER to confirm your selection or simply use the joystick to move to the next submenu 4 Use the joystick to highlight Level Change 5 Press ENTER to confirm your selection or simply use the joystick to move to the next submenu 6 Use the number pad to input the numeric password if necessary pressing ENTER to confirm a number 7 Use the joys...

Page 120: ...onfirm your selection 6 Enter the current 4 digit password 7 Press ENTER to confirm your entry 8 Create a new 4 digit password 9 Press Enter to register the new password 9 2 2 On Screen Display With the On Screen display set to the default ON the recorder shows on screen displays for Play Stop etc To hide these displays change this option to OFF 9 2 3 Angle Indicator When playing a DVD Video disc ...

Page 121: ...t Rec on DVD R When recording to DVD R media press the RECORD button twice to begin recording Change the setting to Auto press once to record in the same manner as with DVD RW discs Being as DVD R media is write once technology this feature allows you to verify that the proper type of media write once or multi write is loaded for the current recording session Note In the Auto press once setting th...

Page 122: ... recorder Follow the directions below to change the setting on the remote control 1 Press and hold the RETURN button 2 Press the number that corresponds to the recorder ID 1 2 or 3 3 Verify that the JOG MODE Indicator lights This indicator lights when the remote control ID is changed 4 Confirm that the remote control number displayed on the front panel matches the recorder ID Check this number if ...

Page 123: ...nactivity SETUP ENTER Joystick To access the Disc Setup menu follow the directions below 1 Press the SETUP button on the remote control 2 Use the joystick to scroll to Disc Setup 3 Press ENTER to access the Disc Setup menu 4 Use the joystick to scroll through the sub menu and review settings 5 Make changes as needed pressing ENTER after a change 6 Press SETUP again to close the menu 10 1 Basic Dis...

Page 124: ... different recorder limit the character sets To create a name for a disc follow the steps below 1 Press the SETUP button to access the main menu 2 Use the joystick to select Disc Setup 3 Press ENTER to confirm the selection 4 Use the joystick to highlight Input Disc Name 5 Press ENTER to access the character menu 6 Use the joystick to drop down from the name field to the characters Move left to se...

Page 125: ...n a DVD RW only 10 2 1 VR Format Disc Follow the directions below to initialize a VR formatted disc 1 Press the SETUP button to access the main menu 2 Use the joystick to highlight Disc Setup 3 Press ENTER to access the menu 4 Use the joystick to highlight Initialize 5 Select the VR Disc sub menu 6 Choose Start from the VR sub menu 7 Press ENTER to begin formatting the DVD RW disc Formatting the d...

Page 126: ...nalize a disc VR or Video 1 Press the SETUP button to access the main menu 2 Use the joystick to highlight Disc Setup 3 Press ENTER to access the menu 4 Use the joystick to highlight Finalize 5 Select Finalize on the sub menu 6 Choose Start from the finalize sub menu 7 Press ENTER to begin finalizing the disc and exit the menu 10 3 2 Undo Finalized Disc To edit or record additional material on to ...

Page 127: ... the external inputs disc playback and for recording The following sections detail the various settings available under the Video Adjust menu SETUP ENTER Joystick INPUT SELECT DISPLAY 10 4 1 Set Picture Quality for Tuner and External Inputs Use the Picture Creation option to set picture quality for the built in TV tuner and the external inputs There are multiple preset values suitable for various ...

Page 128: ...inue with adjustments 10 4 2 Create Personalized Settings There are three user presets available for saving personalized picture quality settings Follow the directions below to create user specific settings 1 STOP any disc playback on the recorder 2 Press SETUP to access the menu 3 Use the joystick to highlight Video Adjust on the Setup menu 4 Press ENTER to confirm your selection 5 Press ENTER to...

Page 129: ...review feature to see how adjustments effect recordings Follow the instructions below to adjust the noise level for recordings 1 STOP any disc playback on the recorder Must be an unfinalized recordable disc 2 Press SETUP to access the menu 3 Use the joystick to highlight Video Adjust on the Setup menu 4 Press ENTER to confirm your selection 5 Use the joystick to highlight Rec NR 6 Press INPUT SELE...

Page 130: ...e for most cathode ray tube televisions PDP suitable for plasma display panels Professional suitable for professional monitors Memory1 user preset 1 Memory2 user preset 2 Memory3 user preset 3 5 Press ENTER to lock in the change s 6 Press SETUP to register the settings and exit the menu Create a Personal Settings Group There are three user presets available for saving personalized picture quality ...

Page 131: ...appear White Level adjusts intensity of white White AGC White Automatic Gain Control Black Level adjusts intensity of black Black Setup for correction of floating black color Hue adjusts overall balance between red and green Chroma Level adjusts how rich colors appear 3D YC compensates for misalignments of brightness Y and color C components 7 Use the joystick to adjust the select picture quality ...

Page 132: ...ll in a relatively dust free smoke free environment as possible Locate away from the top of other equipment such as amplifiers or other components that become hot Move away from televisions or monitors if experiencing signal interference Avoid covering with a cloth or other material that may prevent proper cooling Verify that all four supports under the unit are touching the mounting surface To mo...

Page 133: ...owing Cannot play because the disc is incompatible You cannot record on this disc Cannot read CPRM information Cannot prepare for recording Could not record information to disc Cannot edit Could not initialize disc Could not finalize successfully Could not undo finalization successfully Could not cancel the disc protection setting successfully The disc may be dirty or damaged Take out the disc cle...

Page 134: ...he power was cut This message appears when power is restored Could not repair the disc The recorder is unable to repair the disc after power was cut The contents of the recording are lost Incompatible region number The disc s region code is incompatible with the recorder s region code s thus the disc fails to play Any of the following Cannot record any more titles You cannot do this edit with the ...

Page 135: ...la ln 1214 Tamil ta 2001 Bislama bi 0209 Leothian lo 1215 Telugu te 2005 Bengali bn 0214 Lithuanian lt 1220 Tajik tg 2007 Tibetan bo 0215 Latvian lv 1222 Thai th 2008 Breton br 0218 Melagasy mg 1307 Tigrinya ti 2009 Catalan ca 0301 Maori mi 1309 Turkmen tk 2011 Corsican co 0315 Macedonian mk 1311 Tagalog tl 2012 Czech cs 0319 Malayalam ml 1312 Setswana tn 2014 Welsh cy 0325 Mongolian mn 1314 Tonga...

Page 136: ...discs place carefully in a jewel case or disc jacket Avoid storing discs in locations subject to temperature extremes moisture and direct sunlight To avoid warping avoid stacking discs Discs are best maintained when stored upright Do NOT glue or use stickers on a DVD disc Labels may unbalance the disc causing it to fail or even to break Label glue may slip in melt in extreme cases Use the appropri...

Page 137: ...ision or monitor determines image borders or stretches image to fill screen refer to TV or monitor s owner s manual 11 6 General Maintenance Issues Usually it is best to have the unit serviced by an authorized Pioneer Service Center however some in house maintenance is possible The following sections provide directions for minor in house maintenance 11 6 1 Cleaning Pickup Lens The recorder s lens ...

Page 138: ...air recorder performance Leave the recorder alone for approximately an hour to adjust to a temperature change 11 7 General Specifications 11 8 Brief Glossary This section provides a short glossary for terms and acronyms used within this manual Analog Audio An electrical signal that directly represents sound Compare this to digital audio that can be an electrical signal but is an indirect represent...

Page 139: ...ween the softest and the loudest sounds possible in an audio signal without distortion or white noise Dolby Digital and DTS soundtracks are capable of a wide dynamic range thus are popular in move theaters MPEG Audio MPEG is an audio format used on Video CDs and some DVD discs The PRV 9000 can convert MPEG audio to the CPM format for wider compatibility with digital recorders and AV amplifiers See...

Page 140: ...ay the transfer rate If a pound sign appears above the transfer rate data then the segment is from a film source Regions DVD only Regions associate discs and players recorders with a particular area of the world This unit only plays discs with compatible region codes The recorder s region code is stamped on the back panel close to the serial number Some discs are compatible with more than one regi...

Page 141: ...dio input Verify that the Linear PCM audio is set to a value other than 96 kHz 12 2 Timer Recording Issues Although the timer is set the recorder fails to record under the following conditions No discs is loaded Non recordable disc is loaded Loaded disc is protected see section Protect Unprotect an Original Title Loaded disc already contains the maximum number of titles 99 titles Entering a timer ...

Page 142: ... however the recording can be defective 12 3 DV Recording Issues DV also known as IEE 1394 1995 and i LINK supports input output for audio video data and control signals on a single cable One of the following messages may appear on screen when using the DV IN OUT port No DV camera connected The camcorder is not connected properly or the camcorder is switched OFF DV camera is recording The camcorde...

Page 143: ...ly set Linear PCM audio is set to something other than 96kHz 12 4 DV Editing Issues Segments less than 5 seconds in duration may not be deleted from the Original material For additional help with editing refer to the following section or contact your Pioneer representative 12 5 Frequently Asked Questions FAQ 1 Why won t the recorder turn ON Make sure that the recorder is connected properly Reseat ...

Page 144: ...ed or there is a power failure while the recorder is ON all settings return to the original default values Returning the recorder to Standby mode before unplugging the unit saves your settings 6 Why did my screen go blank at the same time that all the buttons stopped working The recorder has a command conflict Press the STOP button on the front panel of the unit and restart playback 7 What does th...

Page 145: ...xternal component is copy protected the recorder is unable to relay the signal accurately Connect the component directly to the viewing device 12 How do I return the screen to normal when it s stretched out horizontally vertically The recorder s input automatically switches into wide mode to match the input signal when necessary If the connected device is incompatible with ID 1 set the component t...

Page 146: ...r a VR disc Confirm that the source material is not copy protected Check that the disc is not copy protected Set the recorder s built in TV tuner to the appropriate channel rather than setting the channel from the television tuner When recording to a Video format disc programs that are copy once protected cannot be recorded Use a VR formatted disc for copy once material Verify that separate record...

Page 147: ...built in TV tuner or an external component is unsupported Verify that the source material is not copy protected or copy once protected 20 What do I do to control my camcorder using the PRV 9000 s remote Some camcorders are not compatible with this remote Check with the camcorder manufacturer for details 21 Can I play my recordable discs in a regular DVD player Generally DVD R and DVD RW discs reco...

Page 148: ...PRV 9000 Operating Instructions For additional information or assistance please contact the Support group at Pioneer Electronics USA Inc Email dvdv pnmt com Phone 310 952 2111 CA 201 327 6400 NJ 140 ...

Page 149: ...PRV 9000 Operating Instructions this page intentionally left blank 141 ...

Page 150: ...PRV 9000 DVD Recorder Pioneer Electronics USA Inc 2265 East 220th Street Long Beach California 90810 United States of America 310 952 2111 http www pioneerelectronics com ...

Reviews: