


Digital Video Recorder User Manual
91
8.5
Setting All-day Video Quality Diagnostics
Purpose:
The device provides two ways to diagnose the video quality: manual and all-day. Perform the following steps to set
the threshold of the diagnosing and the linkage actions.
Steps:
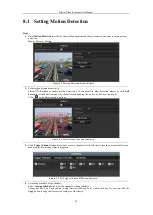
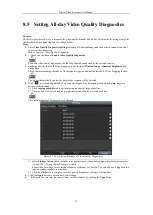
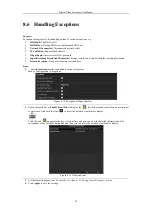
1.
Enter
Video Quality Diagnostics Settings
interface of Camera Management and select a channel you want
to detect video tampering.
Menu> Camera> Video Quality Diagnostics
2.
Check the checkbox of
Enable Video Quality Diagnostics
.
To enable video quality diagnostics, the function should be supported by the selected camera.
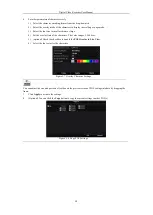
3.
Enable and set the threshold of the diagnostic types, there are
Blurred Image
,
Abnormal Brightness
, and
Color Cast
.
Check the corresponding checkbox of the diagnostic type, and adjust the threshold of it by dragging the bar.
The higher the threshold you set, the harder the exception will be detected.
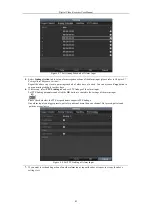
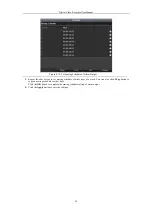
4.
Click
to set handling method of video quality diagnostics. Set arming schedule and alarm response
actions of the channel.
1)
Click
Arming Schedule
tab to set the arming schedule of response action.
2)
Choose one day of a week and up to eight time periods can be set within each day.
Time periods shall not be repeated or overlapped.
Figure 8. 14
Set Arming Schedule of Video Quality Diagnostics
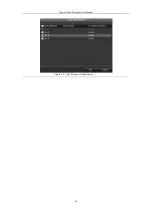
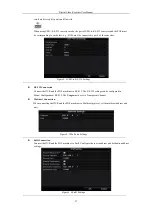
3)
Select
Linkage Action
tab to set alarm response actions of video quality diagnostics alarm (please refer
to
Chapter
8.7 Setting Alarm Response Actions
).
Repeat the above steps to set arming schedule of other days of a week. You can also use
Copy
button to
copy an arming schedule to other days.
4)
Click the
OK
button to complete the video quality diagnostics settings of the channel.
5.
Click the
Apply
button to save and activate settings.
6.
(Optional) you can copy the same settings to other cameras by clicking the
Copy
button.
Summary of Contents for DVR-TVI-04
Page 1: ...Digital Video Recorder User Manual ...
Page 13: ...Digital Video Recorder User Manual 12 Chapter 1 Introduction ...
Page 21: ...Digital Video Recorder User Manual 20 Chapter 2 Getting Started ...
Page 32: ...Digital Video Recorder User Manual 31 Chapter 3 Live View ...
Page 40: ...Digital Video Recorder User Manual 39 Chapter 4 PTZ Controls ...
Page 49: ...Digital Video Recorder User Manual 48 Chapter 5 Recording Settings ...
Page 67: ...Digital Video Recorder User Manual 66 Chapter 6 Playback ...
Page 78: ...Digital Video Recorder User Manual 77 Chapter 7 Backup ...
Page 82: ...Digital Video Recorder User Manual 81 Chapter 8 Alarm Settings ...
Page 87: ...Digital Video Recorder User Manual 86 Figure 8 9 Copy Settings of Alarm Input ...
Page 96: ...Digital Video Recorder User Manual 95 Chapter 9 POS Configuration ...
Page 102: ...Digital Video Recorder User Manual 101 Chapter 10 VCAAlarm ...
Page 110: ...Digital Video Recorder User Manual 109 Chapter 11 VCA Search ...
Page 116: ...Digital Video Recorder User Manual 115 Chapter 12 Network Settings ...
Page 130: ...Digital Video Recorder User Manual 129 Chapter 13 HDD Management ...
Page 142: ...Digital Video Recorder User Manual 141 Chapter 14 Camera Settings ...
Page 146: ...Digital Video Recorder User Manual 145 Chapter 15 DVR Management and Maintenance ...
Page 153: ...Digital Video Recorder User Manual 152 Chapter 16 Others ...
Page 161: ...Digital Video Recorder User Manual 160 Chapter 17 Appendix ...


