Digital Video Recorder User Manual
120
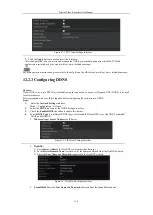
Nickname
: Edit a name for the device as you want.
Server Address
: www.hiddns.com
Device Domain Name
: It refers to the
Device Domain Name
on the device or the
Device Name
on the HiDDNS server you created
.
User Name
: Enter the user name of the device.
Password
: Enter the password of the device.
5.
Click the
Apply
button to save the settings.
After setting all the required parameters for the DDNS, you can view the connecting status of the device by
checking the
Status
information.
12.2.4
Configuring NTP Server
Purpose:
A Network Time Protocol (NTP) Server can be configured on your DVR to ensure the accuracy of system
date/time.
Steps:
1.
Enter the
Network Settings
interface.
Menu > Configuration > Network
2.
Select the
NTP
tab to enter the
NTP Settings
interface.
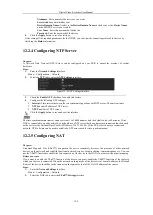
Figure 12. 9
NTP Settings Interface
3.
Check the
Enable NTP
checkbox to enable this feature.
4.
Configure the following NTP settings:
•
Interval:
Time interval between the two synchronizing actions with NTP server. The unit is minute.
•
NTP Server:
IP address of NTP server.
•
NTP Port:
Port of NTP server.
5.
Click the
Apply
button to save and exit the interface.
The time synchronization interval can be set from 1 to 10080 minutes, and the default value is 60 minutes. If the
DVR is connected to a public network, you should use a NTP server that has a time synchronization function, such
as the server at the National Time Center (IP Address: 210.72.145.44). If the DVR is set in a more customized
network, NTP software can be used to establish a NTP server used for time synchronization.
12.2.5
Configuring NAT
Purpose:
Universal Plug and Play (UPnP™) can permit the device seamlessly discover the presence of other network
devices on the network and establish functional network services for data sharing, communications, etc. You can
use the UPnP™ function to enable the fast connection of the device to the WAN via a router without port mapping.
Before you start:
If you want to enable the UPnP™ function of the device, you must enable the UPnP™ function of the router to
which your device is connected. When the network working mode of the device is set as multi-address, the Default
Route of the device should be in the same network segment as that of the LAN IP address of the router.
Steps:
1.
Enter the
Network Settings
interface.
Menu > Configuration > Network
2.
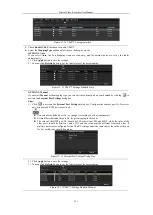
Select the
NAT
tab to enter the
UPnP™ Settings
interface.
Summary of Contents for DVR-TVI-04
Page 1: ...Digital Video Recorder User Manual ...
Page 13: ...Digital Video Recorder User Manual 12 Chapter 1 Introduction ...
Page 21: ...Digital Video Recorder User Manual 20 Chapter 2 Getting Started ...
Page 32: ...Digital Video Recorder User Manual 31 Chapter 3 Live View ...
Page 40: ...Digital Video Recorder User Manual 39 Chapter 4 PTZ Controls ...
Page 49: ...Digital Video Recorder User Manual 48 Chapter 5 Recording Settings ...
Page 67: ...Digital Video Recorder User Manual 66 Chapter 6 Playback ...
Page 78: ...Digital Video Recorder User Manual 77 Chapter 7 Backup ...
Page 82: ...Digital Video Recorder User Manual 81 Chapter 8 Alarm Settings ...
Page 87: ...Digital Video Recorder User Manual 86 Figure 8 9 Copy Settings of Alarm Input ...
Page 96: ...Digital Video Recorder User Manual 95 Chapter 9 POS Configuration ...
Page 102: ...Digital Video Recorder User Manual 101 Chapter 10 VCAAlarm ...
Page 110: ...Digital Video Recorder User Manual 109 Chapter 11 VCA Search ...
Page 116: ...Digital Video Recorder User Manual 115 Chapter 12 Network Settings ...
Page 130: ...Digital Video Recorder User Manual 129 Chapter 13 HDD Management ...
Page 142: ...Digital Video Recorder User Manual 141 Chapter 14 Camera Settings ...
Page 146: ...Digital Video Recorder User Manual 145 Chapter 15 DVR Management and Maintenance ...
Page 153: ...Digital Video Recorder User Manual 152 Chapter 16 Others ...
Page 161: ...Digital Video Recorder User Manual 160 Chapter 17 Appendix ...

