background image

F

rançais

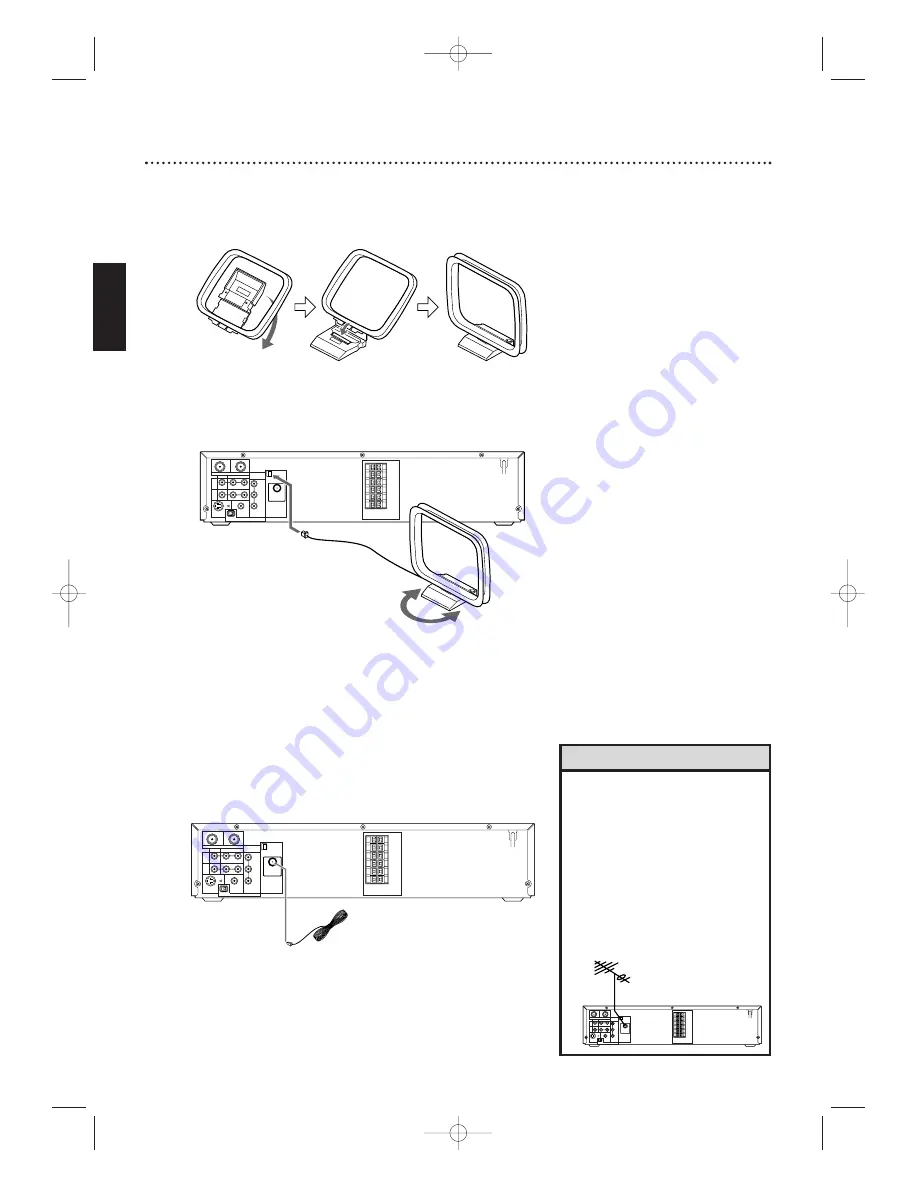
98  Connexions des antennes

Antenne AM 

1

Fixez le support de l’antenne de la façon indiquée

.

2

Connectez l’antenne AM fournie au jack AM, puis
orientez-la pour recevoir le son le plus clair possible

.

Antenne FM

1

Connectez l’antenne FM fournie au jack FM.
Sortez l’antenne FM et fixez son extrémité au mur

.

VIDEO

TV ANTENNA

AUDIO

R  

L

PROGRESSIVE

OUT

IN

ANTENNA 75


ANTENNA 75

Y

Pb/Cb

Pr/Cr

FM

(75

)

DIGITAL
AUDIO OUT

COAXIAL

S-VIDEO

OUT

VCR
   IN

DVD/

 VCR
OUT

COMPONENT
VIDEO OUT

AM

FL

FR

C

SL

SR

W

SPEAKER (4

)

P     I

VIDEO

TV ANTENNA

AUDIO

R  

L

PROGRESSIVE

OUT

IN

ANTENNA 75


ANTENNA 75

Y

Pb/Cb

Pr/Cr

FM

(75

)

DIGITAL
AUDIO OUT

COAXIAL

S-VIDEO

OUT

VCR
   IN

DVD/

 VCR
OUT

COMPONENT
VIDEO OUT

AM

FL

FR

C

SL

SR

W

SPEAKER (4

)

P     I

Ne placez pas l’antenne AM sur le
système de Home Cinema.
Éloignez-la le plus possible du
système et des fils des enceintes.
Éloignez-la des cordons
d’alimentation secteur du système
et d’autres appareils

.

Pour améliorer la réception FM,
connectez une antenne FM
extérieure (non fournie) au jack
ANTENNA 75 Ohm.

Astuce

VIDEO

TV ANTENNA

AUDIO

R  

L

PROGRESSIVE

OUT

IN

ANTENNA 75


ANTENNA 75

Y

Pb/Cb

Pr/Cr

FM

(75

)

DIGITAL
AUDIO OUT

COAXIAL

S-VIDEO

OUT

VCR
   IN

DVD/

 VCR
OUT

COMPONENT
VIDEO OUT

AM

FL

FR

C

SL

SR

W

SPEAKER (4

)

P     I

MX5100VR_Fre.qxd  15/04/2004  10:27 AM  Page 98

Summary of Contents for DVD RECEIVER MX5100VR-37X -

Page 1: ...DE AND OR OWNER S MANUAL FIRST FOR QUICK TIPS THAT MAKE USING YOUR PHILIPS PRODUCT MORE ENJOYABLE IF YOU HAVE READ YOUR INSTRUCTIONS AND STILL NEED ASSISTANCE YOU MAY ACCESS OUR ONLINE HELP AT WWW P4C PHILIPS COM OR CALL 1 800 531 0039 WHILE WITH YOUR PRODUCT Owner s Manual MX5100VR qxd 6 04 2004 3 37 PM Page 1 AM FM Radio Tuner ...

Page 2: ...ran tees that your date of purchase will be on file so no additional paper work will be required from you to obtain warranty service Product Safety Notification By registering your product you ll receive notification directly from the manufacturer in the rare case of a product recall or safety defect Additional Benefits of Product Ownership Registering your product guarantees that you ll receive a...

Page 3: ...by turning the equipment off and on the user is encouraged to try to correct the interference by one or more of the following measures 1 Reorient or relocate the receiving antenna 2 Increase the separation between the equipment and the receiver 3 Connect the equipment into an outlet on a circuit different from that to which the receiver is connected 4 Consult the dealer or an experienced radio TV ...

Page 4: ...ex Search 44 Special Effects Playback 45 Automatic Operation Features 46 Additional VCR Features Multi Channel Television Sound 47 Hi Fi Stereo 48 Speaker and Sound Settings Digital Sound Surround Sound 49 DelayTime 50 51 Speaker Balance 52 53 Disc Playback Features DVD Disc Menus 54 Fast Forward Reverse Search 55 Title Chapter Playback Time Playback 56 Track Playback 57 Paused and Step by Step Pl...

Page 5: ...VD Player or a DVD Access the DVD Player menu by pressing DVD then SETUP PROG on the remote control when playback is stopped Even if a feature is set in the DVD Player s menu it may not be available if the current DVD does not include that feature Available Disc Features All features described in this manual are not available on every Disc If the feature is not available on the Disc you cannot use...

Page 6: ...case Playable Video Cassettes TheVCR of this System has a High Quality HQ system and is compatible with existingVideo Home System VHS equipment Use only video cassettes that have the mark The use of other tapes may result in poor picture quality and excessive deposits on the video heads which may not be covered by the warranty if damage occurs TheVCR also has a 19 micron head which provides a bett...

Page 7: ...age 15 If digital audio connections are not possible connect the System s red and white AUDIO DVD VCR OUT jacks to the Audio In jacks of your Stereo or TV This provides sound for both the DVD Player and theVCR Details are on pages 11 14 Before you begin Refer to the manuals of your TV Cable Box Stereo or other devices as necessary Note the style of jacks and connectors on the other equipment Deter...

Page 8: ...t these items 5 When all connections are complete plug in the power cords of the TV and the System 6 Set your TV to channel 3 or 4 The System s output channel is 3 when you purchase it So set your TV to channel 3 when the System is new If you cannot use channel 3 at your TV you can change the System s output channel to channel 4 To do so press the VCR button to put the System in VCR mode The red V...

Page 9: ... page eight for details 8 If you have not turned on the System already go to page 19 to complete theVCR s First Time Setup With this connection Select TV channels at the Cable Box Satellite Receiver not the System To record or view TV channels 1 PressVCR to put the System inVCR mode The redVCR light will appear on the front of the System 2 Press SKIP i CH o or SKIP j CH p to set the System to the ...

Page 10: ...atellite Receiver on channel 3 the System s default output channel To change it to 4 press and hold VCR PLAY B on the front of the System for 3 5 seconds during tape playback Details are on page eight Set the TV to the Cable Box Satellite Receiver output channel 03 or 04 2 Press VCR to put the System in VCR mode The red VCR light will appear on the front of the System 3 Press VCR TV on the remote ...

Page 11: ...ower cords of the TV and the System to a power outlet Turn on the TV and set it to the Audio Video In channel To find the right Audio Video In channel turn on the System Press DVD to put the System in DVD mode With no Disc in the Player a large DVD logo will appear on the TV screen when you get the TV on the correct Audio Video In channel Go to your lowest TV channel 01 or 02 then change channels ...

Page 12: ... on page 11 If you are using the RF coaxial cable for VCR playback choose channel 3 or 4 at the TV If you are using the yellow video cable for VCR playback choose the Video In channel at your TV 4 Set the P I PROGRESSIVE switch on the rear of the System to I Interlace Or if your TV has Progressive Scan set the P I PROGRESSIVE switch to P Progressive 5 You are ready to connect the AM and FM antenna...

Page 13: ...coaxial cable for VCR playback choose channel 3 or 4 at the TV If you are using the yellow video cable choose the Video In channel at your TV 4 Set the P I PROGRESSIVE switch on the rear of the System to I Interlace 5 You are ready to connect the AM and FM antennas and the Speakers Go to pages 16 17 to connect these items 6 When all connections are complete connect the power cords of the System an...

Page 14: ...deo In channel Go to your TV s lowest channel 01 or 02 and change channels downward until you find the Video In channel To find the right Video In channel at the TV turn on the System Press DVD to put the System in DVD mode With no Disc in the Player a large DVD logo will appear on the TV screen when you get the TV on the correct Video In channel 7 If you have not turned on the System already go t...

Page 15: ...nnel Turn on the TV and set it to the Video In channel To find the right Video In channel on the TV turn on the System Press DVD to put the System in DVD mode With no Disc in the Player a large DVD logo will appear on the TV screen when you get the TV on the correct Video In channel Go to your TV s lowest channel 01 or 02 and change channels downward until you see the DVD logo 7 If you have not tu...

Page 16: ...R L PROGRESSIVE OUT IN ANTENNA 75Ω ANTENNA 75Ω Y Pb Cb Pr Cr FM 75Ω DIGITAL AUDIO OUT COAXIAL S VIDEO OUT VCR IN DVD VCR OUT COMPONENT VIDEO OUT AM FL FR C SL SR W SPEAKER 4Ω P I Do not place the AM antenna on the System Keep it as far as possible from the System and the speaker wires Keep it away from the AC power cords of the System and other equipment For better FM reception connect an outdoor ...

Page 17: ...t a 45 degree angle from the listening position 2 Place the CENTER speaker above or below the TV to localize the sound 3 Place the REAR Surround speakers at normal listening ear level facing each other or mounted on the wall Use the supplied mounting brackets to mount speakers to the wall 4 Place the Subwoofer on the floor near the TV VIEWING AREA Center Speaker Subwoofer Front Speaker left Rear S...

Page 18: ...ries correctly with the and markings on the battery aligned as indicated on the unit Do not mix batteries for example old with new or carbon with alkaline and Remove batteries when the unit will not be used for a long time 1 2 3 Speaker setup You can hang the front center and rear Surround speakers on a wall Each speaker needs one screw not supplied for mounting Use the type and size of screw as s...

Page 19: ...When channel programming is complete the lowest available channel will appear on the TV These channels will be available when you want to watch TV while the System is in VCR mode To put the System in VCR mode press VCR so the red VCR light appears Use the SKIP i CH o and SKIP j CH p buttons to select memorized channels To select non memorized channels use the Number buttons B To skip this feature ...

Page 20: ...eatures are on pages 42 46 If AUTO REPEAT is ON playback will begin when you insert a tape even when the record tab is intact Details are on page 42 You must connect the System to a TV using the RF coaxial cable or the audio video cables in order to use theVCR features These hookups are explained on pages eight and 11 You cannot use theVCR when the System is inTuner mode If you fast forward rewind...

Page 21: ...s the feature at this time This does not indicate a problem with the System If a Disc is dirty or scratched the picture may appear distorted or play may stop Remove the Disc and turn off the System Disconnect the power cord then reconnect it Clean the Disc then turn on the System again and reinsert the Disc You may need to repeat the System s setup because of the temporary power loss When the DVD ...

Page 22: ...nd effect Details are on page 49 REPEAT Button Press to play a Track Audio CD Title or Chapter repeatedly Details are on page 59 SUBTITLE Button Press to select a language for DVD subtitles Details are on page 61 ANGLE Button Press to see a DVD picture from a different angle Details are on page 61 ZOOM Button Press to enlarge the DVD JPEG or Picture CD image Details are on page 62 C RESET CLEAR Bu...

Page 23: ...atch a tape or to watch record TV programs changing channels at the System SelectVCR position in DVD mode to watch a DVD Use TV position to watch TV channels changing channels at the TV or watch one program while recording another Details are on page 35 TIMER SET Button Press to set a timer recording Details are on pages 38 40 REC record I Button Press to start a VCR recording Details are on page ...

Page 24: ... by pressing the SOUND button on the remote Details are on page 49 IR Infrared Remote Sensor Receives a signal from your remote control so you can work your System from a distance Point the remote control toward the System s IR sensor not your TV Display Messages about current operations appear here Details are on page 26 STOP C Button DVD Press to stop Disc playback Details are on page 21 PLAY B ...

Page 25: ...ay a video cassette Press to release Slow Search or Still mode and return to playback Details are on page 45 HEADPHONE Jack Connect headphones not supplied here When headphones are connected Surround Sound is not available AUDIO and VIDEO In Jacks Connect audio and video cables coming from the audio and video out jacks of a camcorder another VCR another DVD Player or audio system here This will be...

Page 26: ...videotape is loaded Appears during repeat play Appears during A B Repeat play Appears during play Appears when play is paused CD appears when an Audio CD is loaded VCD appears when a Video CD is loaded DVD appears when a DVD is in the System Indicates Dolby Digital is available Indicates Dolby ProLogic is available Indicates DTS is available Indicates a stereo broadcast Indicates an AM station Ind...

Page 27: ...nna here Details are on page 16 DIGITAL AUDIO OUT COAXIAL Jack black Connect a coaxial digital audio cable here and to the Coaxial Digital Audio In jack of a Stereo This supplies audio only for the DVD Player Details are on page 15 P I PROGRESSIVE Switch Set to P Progressive only if you are using a Component Video connection to a TV with Progressive Scan Details are on page 12 Set to I Interlace f...

Page 28: ...T UP CH 01 B M E N U OFF ON TIMER PROGRAMMING AUTO REPEAT CHANNEL SET UP CLOCK SET LANGUAGE SELECT AUDIO OUT TV STEREO SAP B M E N U OFF ON TIMER PROGRAMMING AUTO REPEAT CHANNEL SET UP CLOCK SET LANGUAGE SELECT AUDIO OUT TV STEREO SAP B You cannot program channels if you are using a Cable Box or Satellite Receiver If you have an antenna channels 2 69 will be possible If you have Cable TV channels ...

Page 29: ... or DELETE flashes on the screen 6 While your choice is flashing press C RESET CLEAR The channel you added or deleted will be the current channel Added channels are available when you flip through channels using the SKIP i CH o and SKIP j CH p buttons You still can select deleted channels with the Number buttons B STANDBY ON TIMER SET VCR TV SEARCH MODE REPEAT TUNER 3 4 5 6 7 8 9 SLOW 0 10 2 1 VCR...

Page 30: ...r p until the day appears Then press B 5 While theYEAR space is flashing press o or p until the year appears Press B The day of the week will appear automatically To check the time press DISPLAY until the time appears on the TV screen Power failures of more than 30 seconds can erase the clock setting Helpful Hints STANDBY ON TIMER SET VCR TV SEARCH MODE REPEAT TUNER 3 4 5 6 7 8 9 SLOW 0 10 2 1 VCR...

Page 31: ...the clock B To reset the clock follow steps 1 2 on page 30 Select the information you want to change using B or s When the information is flashing use o or p to enter the correct information Press C RESET CLEAR to set the clock Helpful Hints STANDBY ON TIMER SET VCR TV SEARCH MODE REPEAT TUNER 3 4 5 6 7 8 9 SLOW 0 10 2 1 VCR DVD CLEAR DISPLAY SETUP PROG TITLE RETURN MODE SPEED C RESET AUDIO BAND A...

Page 32: ...OGRAMMING AUTO REPEAT CHANNEL SET UP CLOCK SET LANGUAGE SELECT AUDIO OUT TV STEREO SAP B If you select French or Spanish and need English 1 Press DISC MENU so the main MENU appears 2 Press p to choose SELECTION LANGUE or SELEC IDIOMA then press B 3 Press o or p to select ENGLISH 4 Press C RESET CLEAR Helpful Hint STANDBY ON TIMER SET VCR TV SEARCH MODE REPEAT TUNER 3 4 5 6 7 8 9 SLOW 0 10 2 1 VCR ...

Page 33: ...watching TV the channel number and the availability of stereo or second audio will also appear The current time will also appear on the display panel 3 Press DISPLAY again to remove all the displays If the channel you select has no broadcast the screen will be solid blue You cannot access a status display when viewing a still picture during slow motion or during forward and reverse searching Chann...

Page 34: ...press REC I or press PAUSE k again The red RECORD light will come on again 7 To stop recording press STOP C Recording Prevention Video Cassettes have record tabs to ensure that recordings are not accidentally erased 1 To prevent recording break off the tab with a screwdriver 2 To allow recording cover the hole with clear tape Other recording options are on pages 35 41 TheVCR will record in a prese...

Page 35: ...CR TV on the System s remote control to put the System back in VCR position The channel being recorded will appear on the TV screen 6 Press STOP C to stop the recording If you use a Cable Box or Satellite Receiver you may not be able to watch one channel while recording another See pages 9 10 for details Helpful Hints STANDBY ON TIMER SET VCR TV SEARCH MODE REPEAT TUNER 3 4 5 6 7 8 9 SLOW 0 10 2 1...

Page 36: ...f off The TIMER REC light will flash because the VCR of the System is still on standby for timer recordings Press TIMER SET on the remote or STOP EJECT CA on the System to cancel timer standby and use the VCR of the System normally again OTR 0 30 SP The remaining recording time will appear on the display panel Press DISPLAY to see it on the TV screen To change the recording length while an OTR is ...

Page 37: ...R L PROGRESSIVE OUT IN ANTENNA 75Ω ANTENNA 75Ω Y Pb Cb Pr Cr FM 75Ω DIGITAL AUDIO OUT COAXIAL S VIDEO OUT VCR IN DVD VCR OUT COMPONENT VIDEO OUT AM FL FR C SL SR W SPEAKER 4Ω P I System 1 Plays tape System 2 Records tape 1 Audio cables from red white AUDIO DVD VCR OUT jacks of System 1 to AUDIO VCR IN jacks of System 2 2 Video cable from yellow VIDEO DVD VCR OUT jack of System 1 to yellow VIDEO VC...

Page 38: ... away DAILY The VCR will record a TV program at the same time on the same channel every day Monday through Friday WEEKLY The VCR will record a TV program at the same time on the same channel every week for example every Monday B PROGRAM NUMBER 1 DATE START TIME END TIME CHANNEL REC SPEED You cannot access the TIMER PROGRAMMING menu at step 2 if the clock is not set The CLOCK SET menu will appear F...

Page 39: ...t the channel you want to record Leave the Cable Box Satellite Receiver on for the timer recording Details are on page nine 05 04 TUE 07 30 PM 08 30 PM 16 PROGRAM NUMBER 1 DATE START TIME END TIME CHANNEL REC SPEED ONE TIME PROGRAM 05 04 TUE 07 30 PM PROGRAM NUMBER 1 DATE START TIME END TIME CHANNEL REC SPEED AM B PM ONE TIME PROGRAM 05 04 TUE PROGRAM NUMBER 1 DATE START TIME END TIME CHANNEL REC ...

Page 40: ...NG then press B 3 Press o or p to find the program you want to cancel 4 While the program number is flashing press s to clear all the information for that program 5 Press C RESET CLEAR to remove the menu 05 04 TUE 07 30 PM 08 30 PM 16 SP PROGRAM NUMBER 1 DATE START TIME END TIME CHANNEL REC SPEED ONE TIME PROGRAM 05 04 TUE 07 30 PM 08 30 PM 16 SP PROGRAM NUMBER 1 DATE START TIME END TIME CHANNEL R...

Page 41: ...n page 77 3 Press REC I to start recording The red RECORD light will appear on the front of the System 4 Press DVD Press PLAY B to play the DVD 5 To pause the recording pressVCR then press PAUSE k once The red RECORD light will flash To resume recording press REC I or press PAUSE k again The red RECORD light will come on again 6 To stop recording press VCR then press STOP C DISC A Timer Recording ...

Page 42: ...O REPEAT ON CHANNEL SET UP CLOCK SET LANGUAGE SELECT AUDIO OUT TV STEREO ON SAP B M E N U TIMER PROGRAMMING AUTO REPEAT OFF CHANNEL SET UP CLOCK SET LANGUAGE SELECT AUDIO OUT TV STEREO ON SAP B M E N U TIMER PROGRAMMING AUTO REPEAT OFF CHANNEL SET UP CLOCK SET LANGUAGE SELECT AUDIO OUT TV STEREO ON SAP B To cancel Auto Repeat follow steps 1 2 At step 3 press B so OFF appears beside AUTO REPEAT Pre...

Page 43: ...unter while tape play is stopped Press REW h or FF g As the tape rewinds or forwards watch the counter When it reaches zero press PLAY B to play the tape STANDBY ON TIMER SET VCR TV SEARCH MODE REPEAT TUNER 3 4 5 6 7 8 9 SLOW 0 10 2 1 VCR DVD CLEAR DISPLAY SETUP PROG TITLE RETURN MODE SPEED C RESET AUDIO BAND ANGLE SUBTITLE ZOOM DISC MENU OK PAUSE REW FF PLAY STOP SKIP CH SKIP CH REPEAT SOUND SURR...

Page 44: ...Index Mark is a bookmark Find the start of a recording by following these steps 1 Press VCR then press SEARCH MODE until the INDEX SEARCH screen appears 2 Within 30 seconds press o or p until the number of programs you want to skip appears beneath INDEX SEARCH Include the current program in your number You may skip up to 20 programs 3 Within 30 seconds press s for a reverse search or B for a forwa...

Page 45: ... press PAUSE k repeatedly 3 To release the still picture and return to playback press PLAY B Viewing a Slow Motion Picture 1 During tape playback press SLOW The tape will play in slow motion 2 To return to normal playback press PLAY B Slow and Still modes will switch to Stop mode after five minutes to protect the System s VCR and the tape from damage SP LP SLP means this feature will work with tap...

Page 46: ... ejected with the System power on or off but the System s power cord must be plugged in If a timer recording is set and the TIMER REC light is on pressing STOP EJECT CA will turn on the System and or cancel the timer recording The TIMER REC light will turn off Press STOP EJECT CA again to remove the tape Remember to insert a tape and press TIMER SET to reset the timer recording Automatic Tracking ...

Page 47: ...EREO or SAP Second Audio Program Press B so ON appears beside your selection 3 Press DISC MENU to remove the menu M E N U OFF ON TIMER PROGRAMMING AUTO REPEAT CHANNEL SET UP CLOCK SET LANGUAGE SELECT AUDIO OUT TV STEREO SAP B M E N U B OFF ON TIMER PROGRAMMING AUTO REPEAT CHANNEL SET UP CLOCK SET LANGUAGE SELECT AUDIO OUT TV STEREO SAP You can only receive and record in stereo or second audio prog...

Page 48: ...rded in both Hi Fi stereo sound and in monaural sound The audio level of a tape recorded in Hi Fi stereo will differ from the audio level of a tape not recorded in Hi Fi stereo You can change to MONO if you want monaural audio playback Choose MONO at step 3 HIFI will disappear from the status display If you play non Hi Fi tapes while AUDIO OUT is set to HIFI HIFI will not appear on the status disp...

Page 49: ... equipment that contain Dolby Digital by looking for the following logo Dolby Pro Logic Dolby Pro Logic is a decoding technology that can be used to decode two channel material Dolby Pro Logic decoding of two channel sources yields 4 output channels These are Left Center Right and a mono Surround channel DTS Digital Theater System Developed by Digital Theater Systems Inc of the United States Sound...

Page 50: ...screen will appear 3 Press B to select CUSTOM at the top of the menu then press OK This menu will appear 4 Press B to select AUDIO at the top of the menu then press OK AUDIO DRC ON DOLBY DIGITAL ON DOWN SAMPLING ON 5 1CH OK LANGUAGE AUDIO ORIGINAL SUBTITLE OFF DISC MENU ENGLISH PLAYER MENU ENGLISH OK QUICK SETUP PLAYER MENU ENGLISH TV ASPECT 4 3 LETTER BOX DOLBY DIGITAL ON OK 50 Delay Time STANDBY...

Page 51: ...EAR Delay time is 5 ms 9 Press SETUP PROG to remove the menu AUDIO DELAY TIME CENTER 1ms SURROUND 0ms OK AUDIO CENTER 0ms 1ms 2ms 3ms 4ms 5ms OK AUDIO DELAY TIME CENTER 0ms SURROUND 0ms OK AUDIO 5 1CH DELAY TIME BALANCE OK STANDBY ON TIMER SET VCR TV SEARCH MODE REPEAT TUNER 3 4 5 6 7 8 9 SLOW 0 10 2 1 VCR DVD CLEAR DISPLAY SETUP PROG TITLE RETURN MODE SPEED C RESET AUDIO BAND ANGLE SUBTITLE ZOOM ...

Page 52: ...ess p to select 5 1CH then press OK AUDIO 5 1CH DELAY TIME BALANCE OK AUDIO DRC ON DOLBY DIGITAL ON DOWN SAMPLING ON 5 1CH OK LANGUAGE AUDIO ORIGINAL SUBTITLE OFF DISC MENU ENGLISH PLAYER MENU ENGLISH OK QUICK SETUP PLAYER MENU ENGLISH TV ASPECT 4 3 LETTER BOX DOLBY DIGITAL ON OK 52 Speaker Balance STANDBY ON TIMER SET VCR TV SEARCH MODE REPEAT TUNER 3 4 5 6 7 8 9 SLOW 0 10 2 1 VCR DVD CLEAR DISPL...

Page 53: ... see all the available dB values 11Press SETUP PROG to remove the menu AUDIO OK BALANCE TEST FRONT L 3dB CENTER 0dB FRONT R 0dB SUB WOOFER 0dB SURROUND R 0dB SURROUND L 0dB AUDIO FRONT L 6dB 5dB 4dB 3dB 2dB 1dB OK AUDIO BALANCE TEST FRONT L 0dB CENTER 0dB FRONT R 0dB SUB WOOFER 0dB SURROUND R 0dB SURROUND L 0dB OK AUDIO BALANCE TEST FRONT L 0dB CENTER 0dB FRONT R 0dB SUB WOOFER 0dB SURROUND R 0dB ...

Page 54: ...ed DVD light will appear on the front of the System 2 Press TITLE The Title menu will appear If a Title menu is not available the X may appear on the TV screen Or if the DVD only has a main Disc menu as described above it may appear when you press TITLE 3 Press o p s or B to select a Title then press OK Play will begin at the Title you selected Menus vary among DVDs Follow the information accompan...

Page 55: ... Audio CD playback you may search only at 16 times the normal playback speed An h 16 or g 16 will appear briefly on the TV screen Sound will be intermittent during searching on an Audio CD During MP3 playback you can search at only eight times the normal speed An h 8 or g 8 will appear briefly on the TV 3 Press PLAY B to return to normal playback Example Playing a DVD in reverse at twice the norma...

Page 56: ...ime you enter is within the total time of the current Title or Track If it is not the time space will clear and playback will continue at its current point The total time available in the current Track or Title will appear at the right in the Time Search display If you make a mistake entering the time press C RESET CLEAR to clear the time area Enter the correct information TOTAL 1 29 00 12 17 4 4 ...

Page 57: ...n 30 seconds press the Number buttons to select theTrack number Playback will begin at the selected Track For a single digit Track 1 9 enter a zero first For example to play Track 5 press 0 5 You do not have to use the 10 button in Search Mode for Tracks 10 and above C Using SKIP i CH o or SKIP j CH p During playback press SKIP i CH o to skip the current Track and move to the nextTrack The Track n...

Page 58: ...he System then turn it on again later However opening the disc tray will cancel the Resume feature Play will start at the beginning the next time you insert the Disc To cancel Resume and start playing the Disc from the beginning press STOP C a second time while playback is stopped The Stop symbol C will appear briefly in the top right corner of the TV screen Press PLAY B to start playing the Disc ...

Page 59: ...the TV briefly The section will begin to play repeatedly 5 To cancel A B Repeat press A B REPEAT OFF will appear on the TV screen briefly Regular play will resume Example Repeat a DVD Chapter Example Repeat an Audio CD Track Repeat playback and A B Repeat are not available with all Discs The entire A B Repeat section must be within a single Title or Track If you do not enter Point B before the end...

Page 60: ...ess SEARCH MODE again to remove them DVD example 4 To return to a Marker during playback press SEARCH MODE until you see the Markers Press s or B to choose the Marker you want then press OK Disc play will continue from the marked point 1 2 3 4 5 6 7 8 9 10 AC 1 0 12 01 1 2 3 4 5 6 7 8 9 10 AC Opening the disc tray or turning off the System will erase all the Markers To erase a single Marker press ...

Page 61: ...s example eight angles are available 8 Example Angle 1 of eight available angles Example English as first of six available subtitles On some DVDs you must select a subtitle language in the Disc menu If the language does not appear after pressing SUBTITLE several times the Disc does not have subtitles in that language Opening the disc tray will cancel your subtitle setting If the current portion of...

Page 62: ...ack is the position guide To remove it or show it press OK The position of the blue box inside the gray box indicates the position of the zoomed image within the overall picture x2 x4 normal 3 To return the picture to normal press ZOOM 1 2 Example Playing a DVD forward at half the normal speed The sound will be mute during slow motion playback The SLOW button on the remote does not activate slow m...

Page 63: ...ar on the front of the System 2 While playback is stopped press MODE SPEED twice so the RANDOM screen appears Example Audio CD 3 While the RANDOM screen appears press PLAY B The Tracks will play in random order After all the Tracks have played once playback will stop You cannot use the Number buttons or SEARCH MODE to select another Track while playing a Program Use SKIP i CH o or SKIP j CH p to s...

Page 64: ...pear Press the Number buttons to enter a four digit password The password will appear on the screen Write it down so you don t forget it Press OK You are finished Go to step 7 If you have set a password before this menu will appear Press the Number buttons to enter your current four digit password Asterisks will appear instead of your password This protects its identity 5 Press p to select CHANGE ...

Page 65: ... 17 Not appropriate for children under 17 6 R Restricted parental approval required for viewers under 18 4 PG13 Unsuitable for children under 13 3 PG Parental Guidance suggested 1 G General Audience recommended for all ages RATING EXPLANATIONS STANDBY ON TIMER SET VCR TV SEARCH MODE REPEAT TUNER 3 4 5 6 7 8 9 SLOW 0 10 2 1 VCR DVD CLEAR DISPLAY SETUP PROG TITLE RETURN MODE SPEED C RESET AUDIO BAND...

Page 66: ...nnels stereo during Audio CD playback 1 Press DVD to put the System in DVD mode The red DVD light will appear on the front of the System 2 Press AUDIO BAND during Audio CD playback to choose STEREO L CH or R CH Only the right channel is heard Only the left channel is heard Both right and left channels are heard stereo STEREO L CH R CH 1 ENG DolbyD 5 1ch 48k 3 Example English audio If a language is...

Page 67: ...ess K or L to select the Track or File you want Choose FIRST PLAY to start play at the first individual File or Track listed Press TITLE to return to the first item on the first screen 4 After choosing a Track or File press PLAY B or OK Starting with the Track or File you selected the Tracks Files will play in the order they were recorded i e 1 2 3 During JPEG or Picture CD playback press MODE SPE...

Page 68: ...he current Track MP3 only will appear MP3 example Or the following may appear to indicate Repeat play T The current Track is playing repeatedly G Tracks in the current Folder Group are playing repeatedly A All Tracks are playing repeatedly 3 Press DISPLAY again to remove the display TR 2 25 0 01 15 STANDBY ON TIMER SET VCR TV SEARCH MODE REPEAT TUNER 3 4 5 6 7 8 9 SLOW 0 10 2 1 VCR DVD CLEAR DISPL...

Page 69: ...e during DVD playback Details are on page 61 Choose OFF to disable the Angle icon If you selected AUTO POWER OFF press OK repeatedly to set AUTO POWER OFF to ON or OFF The default setting is ON Choose ON if you want the System to switch toVCR mode automatically if there is no activity at the DVD Player for 35 minutes TV ASPECT ANGLE ICON AUTO POWER OFF 6 Press SETUP PROG to remove the menus STANDB...

Page 70: ... use the LANGUAGE settings to select different languages for the Audio or Subtitles of DVDs as well as languages for DVD Disc menus and the menus of the DVD Player SETUP menus 1 Press DVD to put the System in DVD mode The red DVD light will appear on the front of the System 2 While playback is stopped press SETUP PROG The QUICK SETUP screen will appear 3 Press B to select CUSTOM at the top of the ...

Page 71: ...961 Croatian 5464 Czech 4965 Danish 5047 Dutch 6058 English 5160 Esperanto 5161 Estonian 5166 F H Faroese 5261 Fiji 5256 Finnish 5255 French 5264 Frisian 5271 Gaelic Scots 5350 Galician 5358 Georgian 5747 German 5051 Greek 5158 Greenlandic 5758 Guarani 5360 Gujarati 5367 Hausa 5447 Hebrew 5569 Hindi 5455 Hungarian 5467 I K Icelandic 5565 Indonesian 5560 Interlingua 5547 Interlingue 5551 Inupiak 55...

Page 72: ... System s speakers or adjust the Delay Times Details are on pages 50 53 6 If you selected DRC press OK repeatedly to turn Dynamic Range Control DRC On or Off Choosing ON compresses the range of volume by suppressing loud sounds and raising low sounds If you selected DOLBY DIGITAL press OK repeatedly to select ON or OFF Select ON if you used the DIGITAL AUDIO OUT COAXIAL jack to connect the System ...

Page 73: ...N MODE SPEED C RESET AUDIO BAND ANGLE SUBTITLE ZOOM DISC MENU OK PAUSE REW FF PLAY STOP SKIP CH SKIP CH REPEAT SOUND SURROUND VOLUME REC A B 1 3 2 3 CH 7 49 0 01 46 0 03 27 CH Chapter Current Chapter number total Chapters Elapsed playing time of the current Chapter remaining playing time of the current Chapter TT 1 2 0 00 00 1 23 45 TT Title Current Title number Total Titles Elapsed playing time o...

Page 74: ...ft corner of the TV screen 3 Within 10 seconds press OK repeatedly to choose ON or OFF ON brightens the dark parts of the picture OFF shows the original picture as recorded STANDBY ON TIMER SET VCR TV SEARCH MODE REPEAT TUNER 3 4 5 6 7 8 9 SLOW 0 10 2 1 VCR DVD CLEAR DISPLAY SETUP PROG TITLE RETURN MODE SPEED C RESET AUDIO BAND ANGLE SUBTITLE ZOOM DISC MENU OK PAUSE REW FF PLAY STOP SKIP CH SKIP C...

Page 75: ...on the display panel when you release the button When a station with sufficient signal strength is found the station will be tuned and searching will stop You can press and hold SKIP j CH p to search backward to the last available station STANDBY ON TIMER SET VCR TV SEARCH MODE REPEAT TUNER 3 4 5 6 7 8 9 SLOW 0 10 2 1 VCR DVD CLEAR DISPLAY SETUP PROG TITLE RETURN MODE SPEED C RESET AUDIO BAND ANGL...

Page 76: ...resetting You can store up to 40 preset radio stations automatically by follow ing these steps 1 Press TUNER to select Tuner mode The red TUNER light will appear on the front of the System 2 Press and hold SETUP PROG until AUTO appears on the System s display panel then release SETUP PROG The System will start scanning for stations FM stations will be set first followed by AM stations The System w...

Page 77: ...ore onto a videotape SP standard play fastest tape speed recording time for a T120 tape is approximately two hours best picture quality LP long play average tape speed You cannot record in LP with this VCR If tapes were recorded on a different VCR in LP speed the tape will play in LP in the VCR of this System SLP super long play slowest tape speed recording time for a T120 tape is approximately si...

Page 78: ...y the other DVD feature buttons The red DVD light appears on the front of the System when it is in DVD mode To use the VCR press VCR then try the other VCR feature buttons The red VCR light appears on the front of the System when it is in VCR mode To use the Tuner press TUNER then try the other Tuner feature buttons The red TUNER light appears on the front of the System when it is in Tuner mode Th...

Page 79: ...t camera angles See if multiple angles are available by referring to the Disc case or DVD Disc menu Details are on page 61 You cannot change the audio or subtitle language of a DVD The DVD does not contain audio or subtitles in the desired language Not all DVDs contain audio or subtitles in multiple languages See if other languages are available by referring to the Disc case or DVD Disc menu Detai...

Page 80: ...gs differently Details are on page nine Finish programming a timer recording at least five minutes before it is set to begin 12 p m is noon 12 a m is midnight There is no picture or the picture is noisy or has streaks during video cassette playback Put the System in VCR mode Press VCR or SOURCE so the red VCR light appears on the front of the System If you used the supplied RF coaxial cable to con...

Page 81: ...tereo light on the TV might not glow If the status display indicates you are receiving stereo you are Details are on page 47 Only tapes recorded in Hi Fi audio will play in Hi Fi audio Tapes recorded in normal audio will play in monaural single channel audio Cleaning theVideo Heads Your System automatically cleans the video heads of the VCR each time you insert a tape However the heads may become ...

Page 82: ...ed or cost associated with packaging Product lost in shipment and no signature verification of receipt can be provided A product used for commercial or institutional purposes including but not limited to rental purposes Products sold AS IS or RENEWED CARRY IN SHIP IN WARRANTY For Carry In warranty repair take the product to a Philips authorized service center for repair When the product has been r...

Page 83: ...isplays vcr 33 one touch recording 36 open close A button 21 24 parental controls 64 65 password 64 pause k button 22 45 58 62 picture cds 6 67 68 play B buttons 20 22 24 25 45 player menu 70 71 playing discs 21 playing tapes 20 power cord 27 preset radio stations 76 program 63 quick setup 69 70 72 radio stations 75 random 63 rear panel 27 rec I record button 23 34 record I button 25 36 record lig...

Page 84: ...reuve d achat Retournez la carte d enregistrement ci incluse afin de garantir que la date d achat de votre produit sera classée dans nos dossiers et éviter ainsi le besoin de remplir d autres formulaires afin d obtenir votre service de garantie Avis sur la sécurité des produits En enregistrant votre produit vous serez avisé directement par le fabri quant de toutes défectuosités com promettant la s...

Page 85: ...e d interférences nuisibles à la réception radio ou télévision ce qui peut être déterminé en mettant l appareil hors tension puis sous tension l utilisateur peut corriger le problème en effec tuant l une ou l autre des procédures suivantes 1 Réorientation ou déplacement de l antenne de réception 2 Augmentation de la séparation entre le dispositif et le récepteur 3 Connexion du dispositif dans une ...

Page 86: ...e vidéocassette Répétition de lecture 124 Compteur de défilement de cassette 125 Recherche chronologique Recherche indexée 126 Lecture d effets spéciaux 127 Fonctions de commande automatique 128 Fonctions additionnelles de magnétoscope Son de télévision multi audio 129 Stéréo stéréophonique haute fidélité 130 Enceintes et réglages du son Son numérique son surround 131 Délai 132 133 Balance des enc...

Page 87: ...ion des fonctions du lecteur DVD ou d un DVD Pour accéder au menu du lecteur de DVD appuyez sur DVD puis sur SETUP PROG sur la télécommande lorsque la lecture est arrêtée Même si une fonction est réglée au menu du lecteur DVD il est possible que celle ci ne soit pas disponible si le DVD utilisé n offre pas cette fonction Fonctions de disque disponibles Les fonctions décrites dans le présent guide ...

Page 88: ...idéocassettes lisibles Le magnétoscope de ce lecteur système est doté d un système Haute Qualité HQ et est compatible avec le matériel VHS actuel N utilisez que des vidéocassettes dotées de cette marque L utilisation de d autres types de cassette peut résulter en une qualité réduite de l image et une accumulation excessive de dépôts sur les têtes vidéo qui en cas de dommages ne seront pas couverte...

Page 89: ...dio numérique n est pas possible connectez les prises AUDIO DVD VCR OUT rouge et blanc du lecteur système aux prises Audio In de votre chaîne stéréophonique ou téléviseur Cette connexion fournit l audio pour le lecteur DVD ainsi que le magnétoscope Plus de détails aux pages 93 96 Avant de commencer Consultez les guides de votre téléviseur boîtier du service du câble chaîne stéréophonique ou autres...

Page 90: ... réglé à 3 à l origine Vous devez donc régler votre téléviseur au canal 3 lorsque le lecteur système est neuf Si vous ne pouvez pas utiliser le canal 3 sur votre téléviseur vous pouvez changer le canal de sortie du lecteur système au canal 4 Pour ce faire appuyez sur le bouton VCR pour mettre le lecteur système en mode VCR Le voyant vouge de magnétoscope se trouve sur le devant du lecteur système ...

Page 91: ...sion allez à la page 101 pour effectuer la configuration du magnétoscope Avec la connexion de cette page Sélectionnez les canaux de télévision depuis le boîtier du service du câble système RDS et non pas depuis le lecteur système Pour enregistrer ou regarder des canaux de télévision 1 Appuyez sur VCR pour mettre le lecteur système en mode VCR Le voyant vouge de magnétoscope se trouve sur le devant...

Page 92: ...enfoncée la touche VCR PLAY B située sur la façade du système pendant 3 à 5 secondes durant la lecture de la cassette pour en savoir plus reportez vous à la page 90 Syntonisez le téléviseur au canal de sortie du boîtier du service du câble système RDS 03 ou 04 2 Appuyez sur VCR pour mettre le lecteur système au mode Magnétoscope Le voyant vouge de magnétoscope se trouve sur le devant du lecteur sy...

Page 93: ...o Video In approprié Pour vous aider à trouver le canal d entrée audio vidéo approprié mettez le lecteur système sous tension Appuyez sur DVD pour mettre le lecteur système en mode DVD Sans aucun disque dans le lecteur un logo DVD vidéo de grande taille est affiché à l écran de télévision lorsque le téléviseur est syntonisé au canal d entrée audio vidéo approprié Passez au canal de télévision le p...

Page 94: ...In à partir du téléviseur 4 Placez le sélecteur P I PROGRESSIVE situé à l arrière du système sur I Interlace Ou bien si votre téléviseur est doté du balayage progressif placez le sélecteur P I PROGRESSIVE sur P Progressive 5 Vous êtes maintenant prêt à connecter les antennes AM et FM et les enceintes Allez aux pages 98 99 pour savoir comment connecter ces éléments 6 Quand toutes les connexions son...

Page 95: ...rtir du téléviseur 4 Placez le sélecteur P I PROGRESSIVE situé à l arrière du système sur I Interlace 5 Vous êtes maintenant prêt à connecter les antennes AM et FM et les enceintes Allez aux pages 98 99 pour savoir comment connecter ces éléments 6 Quand toutes les connexions sont faites branchez les cordons d alimentation du téléviseur et du système de Home Cinema dans une prise de courant Allumez...

Page 96: ...pproprié mettez le lecteur système sous tension Appuyez sur DVD pour mettre le lecteur système en mode DVD Sans aucun disque dans le lecteur un logo DVD vidéo de grande taille est affiché à l écran de télévision lorsque le téléviseur est syntonisé au canal d entrée audio vidéo approprié Passez au canal de télévision le plus bas 01 ou 02 puis changez les canaux vers le bas jusqu à ce que la lecture...

Page 97: ...glez le au canalVideo In approprié Pour vous aider à trouver le canal d entrée Video approprié mettez le lecteur système sous tension Appuyez sur DVD pour mettre le lecteur système en mode DVD Sans aucun disque dans le lecteur un logo DVD vidéo de grande taille est affiché à l écran de télévision lorsque le téléviseur est syntonisé au canal d entrée audio vidéo approprié Passez au canal de télévis...

Page 98: ...R L PROGRESSIVE OUT IN ANTENNA 75Ω ANTENNA 75Ω Y Pb Cb Pr Cr FM 75Ω DIGITAL AUDIO OUT COAXIAL S VIDEO OUT VCR IN DVD VCR OUT COMPONENT VIDEO OUT AM FL FR C SL SR W SPEAKER 4Ω P I Ne placez pas l antenne AM sur le système de Home Cinema Éloignez la le plus possible du système et des fils des enceintes Éloignez la des cordons d alimentation secteur du système et d autres appareils Pour améliorer la ...

Page 99: ...te centrale au dessus ou en dessous du téléviseur pour localiser le son 3 Placez les enceintes surround arrière face à face et à hauteur d oreille ou montées au mur Utilisez les équerres de montage fournies pour fixer les enceintes au mur 4 Placez le caisson de basses au sol à proximité du téléviseur Zone de visualisation Enceinte centrale Caisson de basses Enceinte avant droite Enceinte arrière s...

Page 100: ...res ou endommager la télécommande Installez TOUTES les piles de façon à ce qu elles correspondent aux bornes et tel qu indiqué sur le dispositif Évitez de mélanger les piles usagées et neuves ou carbone et alcaline etc Retirez les piles du boîtier lorsque la télécommande n est pas utilisée pour une période de temps prolongée 1 2 3 Configuration des enceintes Vous pouvez fixer au mur les enceintes ...

Page 101: ...tous les canaux disponibles Lorsque la programmation des canaux est terminée le canal le plus bas disponible est affiché à l écran du téléviseur Ces canaux seront disponibles lorsque vous voulez regarder la télévision en mode VCR Pour mettre le système en mode magnétoscope appuyez sur VCR pour faire apparaître le voyant VCR Utilisez les boutons SKIP 3 CHo et SKIPw3 CHp pour sélectionner les canaux...

Page 102: ...ure de cassette se trouvent aux pages 124 128 Si RÉPÉTITION AUTOMATIQUE est en marche la lecture commence automatique ment suivant l insertion de la cassette même si la languette de protection est intacte Plus de détails en page 124 Vous devez raccorder le lecteur système au téléviseur avec le câble coaxial RF ou les câbles audio vidéo afin de pouvoir utiliser les fonctions du magnétoscope Ces con...

Page 103: ...tème est dans l impossibilité d accéder à la fonction Ceci n est pas indicateur d un problème avec le lecteur système Si un disque est sale ou rayé les images pourront se déformer ou la lecture pourra être interrompue Enlevez le disque et mettez le lecteur système hors tension Débranchez le cordon d alimentation puis branchez le de nouveau Nettoyez le disque remettez le lecteur système sous tensio...

Page 104: ... en page 141 Bouton SUBTITLE Sous titres Appuyez sur ce bouton pour sélection ner la langue de sous titrage du DVD Plus de détails en page 143 Bouton ANGLE Appuyez sur ce bouton pour voir l im age d un DVD sous un angle différent Plus de détails en page 143 Bouton ZOOM Appuyez sur ce bouton pour agrandir l image pendant la lecture d un DVD d un fichier JPEG ou d un CD images Plus de détails en pag...

Page 105: ...egarder in DVD sélectionnez la position VCR en mode DVD Utilisez la position TV pour regarder des canaux de télévision en changeant les canaux à partir du téléviseur ou regardez une émission tout en enregis trant une autre Plus de détails en page 117 BoutonTIMER SET Réglage de l horloge Appuyez sur ce bouton pour régler un enregistrement Plus de détails en pages 120 122 Bouton RECORD I ENREGISTRER...

Page 106: ...mmande Plus de détails en page 127 Capteur à distance IR Infrarouge Reçoit un signal de votre télé commande vous permettant de faire fonctionner votre lecteur système à distance Dirigez la télé commande vers le capteur IR du lecteur système et non pas vers le téléviseur Affichage Les messages concernant les opérations du disque en cours apparaissent ici Plus de détails en page 108 Bouton STOP C DV...

Page 107: ...pour faire jouer une vidéocassette Appuyez sur ce bouton pour relâcher les modes Ralenti Recherche ou Fixe et retourner au mode de lecture Plus de détails en page 127 Jack HEADPHONE Connectez le casque non fourni à cet endroit Lorsqu un casque est connecté le son surround n est pas disponible Prises d entrée AUDIO et VIDÉO Connectez ici les câbles audio et vidéo des prises de sortie audio et vidéo...

Page 108: ...assette vidéo a été chargée Affiché lors de la lecture répétée Affiché lors de la lecture répétée A B Affiché pendant la lecture Affiché lorsque la lecture est suspendue CD apparaît quand un CD audio a été chargé VCD apparaît quand un CD vidéo a été chargé DVD apparaît quand un DVD a été chargé Indique que Dolby Digital est disponible Indique que Dolby Pro Logic est disponible Indique que DTS est ...

Page 109: ...DIO OUT COAXIAL noire Connectez un câble coaxial audio numérique ici et à la prise COAXIAL DIGITAL AUDIO IN d une chaîne stéréophonique Cette connexion ne fournit le son que pour le lecteur DVD Plus de détails en page 97 Sélecteur P I PROGRESSIVE Sélectionnez P Progressive seulement si vous utilisez la connexion vidéo composantes d un téléviseur avec Progressive Scan Plus de détails en page 94 Sél...

Page 110: ...de des touches numérotées CH 01 REGLAGE AUTO REGLAGE CHAINES BREGLAGE AUTO REGLAGE MANUEL M E N U 1 PROGRAMMATION REP AUTO A BREGLAGE CHAINES REGLAGE HORLOGE SELECTION LANGUE SORTIE AUDIO TV STEREO M SAP M E N U 1 BPROGRAMMATION REP AUTO A REGLAGE CHAINES REGLAGE HORLOGE SELECTION LANGUE SORTIE AUDIO TV STEREO M SAP Il est impossible de programmer des canaux lorsque vous utilisez un boîtier du ser...

Page 111: ...ou SUPPRESSION clignote à l écran 6 Avec votre choix toujours clignotant appuyez sur C RESET CLEAR Le canal que vous avez ajouté ou supprimé sera le canal en cours Les canaux ajoutés sont disponibles lorsque vous faites défiler les canaux à l aide des boutons SKIP 3 CHo et SKIPw3 CHp Vous pouvez toujours sélectionner les canaux supprimés à l aide des touches numérotées REGLAGE MANUEL CHAINE 30 CAT...

Page 112: ...our apparaisse Ensuite appuyez sur B 5 Avec ANNÉE qui clignote appuyez sur o ou p jusqu à ce que l année apparaisse Appuyez sur B Le jour de la semaine est affiché automatiquement REGLAGE HORLOGE MOIS JOUR ANNÉE 0 3 2 0 JEU 2 0 0 3 HEURE MINUTE AM PM REGLAGE HORLOGE MOIS JOUR ANNÉE 0 3 2 0 HEURE MINUTE AM PM REGLAGE HORLOGE MOIS JOUR ANNÉE 0 3 HEURE MINUTE AM PM Appuyez sur DISPLAY jusqu à ce que ...

Page 113: ...LOGE MOIS JOUR ANNÉE 0 3 2 0 JEU 2 0 0 3 HEURE MINUTE AM PM 0 5 4 0 REGLAGE HORLOGE MOIS JOUR ANNÉE 0 3 2 0 JEU 2 0 0 3 HEURE MINUTE AM PM 0 5 Pour réinitialiser l horloge effectuez les étapes 1 2 à la page 112 Sélectionnez les informations que vous voulez modifier à l aide de B ou s Lorsque l information clignote utilisez o ou p pour entrer les informations appropriées Appuyez sur C RESET CLEAR p...

Page 114: ...GRAMMATION REP AUTO A REGLAGE CHAINES REGLAGE HORLOGE SELECTION LANGUE SORTIE AUDIO TV STEREO M SAP Si vous sélectionnez Français ou Español mais que vous voulez afficher en anglais 1 Appuyez sur DISC MENU de façon à ce que MENU soit affiché 2 Appuyez sur p pour choisir SÉLECTION LANGUE ou SELEC IDIOMA puis appuyez sur B 3 Appuyez sur o ou p pour sélectionner ENGLISH 4 Appuyez sur C RESET CLEAR As...

Page 115: ...uméro de canal et la disponibilité de STEREO ou SAP est également affichée L heure est également affichée sur le devant du lecteur système 3 Appuyez sur DISPLAY de nouveau pour supprimer tous les écrans ARRET 5 40 PM CH 02 STEREO SAP SLP ARRET SLP 0 12 34 HIFI Si le canal que vous avez sélectionné n est pas en cours de transmission l écran est entièrement bleu Il est impossible d accéder à un écra...

Page 116: ...nt appuyez sur REC I ou sur PAUSE k de nouveau Le voyant RECORD rouge s allume de nouveau 7 Pour interrompre l enregistrement appuyez sur STOP C Prévention contre l enregistrement Toute cassette vidéo dispose d une languette de sécurité afin d assurer que l enregistrement ne soit pas effacé par accident 1 Pour empêcher d enregistrer enlevez la languette à l aide d un tournevis 2 Pour permettre d e...

Page 117: ... en page 93 5 Appuyez sur VCR TV sur la télécommande du lecteur système pour mettre le lecteur système en position VCR Le canal en cours d enregistrement est affiché à l écran du téléviseur 6 Appuyez sur STOP C pour interrompre l enregistrement Si vous utilisez un boîtier du service du câble ou un système RDS il est possible que vous ne puissiez pas visionner un canal tout en en enregistrant un au...

Page 118: ...our le mettre hors tension Suivant un enregistrement immédiat le voyant TIMER REC se met à clig noter parce que le magnétoscope est toujours en attente d un enreg istrement programmé Appuyez sur le bouton TIMER SET de la télécom mande ou sur le bouton STOP EJECT CA du lecteur système pour annuler l enregistrement programmé en attente et utiliser le magnéto scope normalement ECS 0 30 SP Le temps d ...

Page 119: ...ENNA AUDIO R L PROGRESSIVE OUT IN ANTENNA 75Ω ANTENNA 75Ω Y Pb Cb Pr Cr FM 75Ω DIGITAL AUDIO OUT COAXIAL S VIDEO OUT VCR IN DVD VCR OUT COMPONENT VIDEO OUT AM FL FR C SL SR W SPEAKER 4Ω P I Lecteur système 1 Dispositif de lecture Dispositif d enregistrement du lecteur système 2 1 Câbles audio rouge et blanche en provenance des prises AUDIO DVD VCR OUT du lecteur système 1 aux prises AUDIO VCR IN d...

Page 120: ...oscope enregistre un programme de télévision le jour de votre choix pour les 12 prochains mois QUOTIDIEN Le magnétoscope enregistre un programme de télévision à la même heure sur le même canal tous les jours du lundi au vendredi HEBDO Le magnétoscope enregistre un programme de télévision à la même heure sur le même canal toutes les semaines par exemple chaque lundi NO DE PROG 1 B NORMAL QUOT HEBDO...

Page 121: ...squ à ce que l heure apparaisse à côté de DEBUT Appuyez sur B Appuyez sur o ou p jusqu à ce que la minute apparaisse Appuyez sur B Finalement appuyez sur o ou p pour pointer vers AM ou PM AM ou PM se met à clignoter près de l heure de début Appuyez sur B 7 Effectuez de nouveau la procédure à l étape 6 pour régler l heure de fin de l enregistrement 8 Appuyez sur o ou p jusqu à ce que le numéro de c...

Page 122: ...SC MENU 2 Appuyez sur o ou p pour sélectionner PROGRAMMATION puis appuyez sur B 3 Appuyez sur o ou p pour trouver le programme que vous voulez annuler 4 Avec le numéro de programme qui clignote appuyez sur s pour effacer toutes les informations pour ce programme 5 Appuyez sur C RESET CLEAR pour supprimer le menu PROGRAMME UNIQUE NO DE PROG 1 DATE 0 5 0 4 DIM DEBUT 0 7 3 0 P M FIN 0 8 3 0 P M CHAIN...

Page 123: ...r Plus de détails sur la vitesse des cassettes en page 159 3 Appuyez sur REC I pour commencer l enregistrement Le voyant RECORD rouge est allumé sur le devant du lecteur système 4 Appuyez sur DVD Appuyez sur PLAY Bpour faire jouer le disque 5 Pour interrompre l enregistrement appuyez surVCR puis sur PAUSE k une fois Le voyant RECORD rouge se met à clignoter Pour reprendre l enregistrement appuyez ...

Page 124: ...chés à l écran pendant le rembobi nage de la cassette M E N U 1 PROGRAMMATION BREP AUTO M REGLAGE CHAINES REGLAGE HORLOGE SELECTION LANGUE SORTIE AUDIO TV STEREO M SAP M E N U 1 PROGRAMMATION BREP AUTO A REGLAGE CHAINES REGLAGE HORLOGE SELECTION LANGUE SORTIE AUDIO TV STEREO M SAP M E N U 1 BPROGRAMMATION REP AUTO A REGLAGE CHAINES REGLAGE HORLOGE SELECTION LANGUE SORTIE AUDIO TV STEREO M SAP Pour...

Page 125: ...e de cassette est interrompue Appuyez sur REW hou FF g Alors que la cassette se rembobine ou défile vers l avant observez le compteur Lorsqu il atteint zéro appuyez sur PLAY Bpour faire jouer la cassette ARRET SLP 0 00 00 HIFI ARRET SLP 1 23 45 HIFI STANDBY ON TIMER SET VCR TV SEARCH MODE REPEAT TUNER 3 4 5 6 7 8 9 SLOW 0 10 2 1 VCR DVD CLEAR DISPLAY SETUP PROG TITLE RETURN MODE SPEED C RESET AUDI...

Page 126: ... istrement Essentiellement un repère est un signet Trouvez le point de départ d un enregistrement en effectuant la procédure suivante 1 Appuyez surVCR puis sur SEARCH MODE jusqu à ce que RECHERCHE INDEX apparaisse à l écran 2 Dans les 30 secondes appuyez sur o ou p jusqu à ce que le nombre de programmes que vous voulez sauter apparaisse en dessous de RECHERCHE INDEX Vous devez inclure le programme...

Page 127: ...lusieurs reprises 3 Pour libérer l image fixe et reprendre la lecture appuyez sur PLAY B Affichage d une image au ralenti 1 Pendant la lecture de la bande appuyez sur SLOW La lecture de la cassette s effectue au ralenti 2 Pour reprendre la lecture normale appuyez sur PLAY B Les modes Ralenti et Fixe sont interrompus automatiquement après cinq minutes pour éviter d endom mager le lecteur système et...

Page 128: ...ée avec le lecteur système sous tension ou hors tension mais le lecteur système doit être branché Si un enreg istrement programmé est réglé et que le voyant TIMER REC est allumé STOP EJECT CA allume le lecteur système et ou annule l enreg istrement programmé Le voyant TIMER REC s éteint Appuyez sur STOP EJECT CA de nouveau pour enlever la cassette N oubliez pas d insérer une cassette et d appuyer ...

Page 129: ...yez sur VCR puis sur DISC MENU 2 Appuyez sur o ou p pour sélectionnerTV STEREO ou SAP Second Audio Program Appuyez sur B pour afficher M à côté de votre sélection 3 Appuyez sur DISC MENU pour supprimer le menu M E N U 1 PROGRAMMATION REP AUTO A REGLAGE CHAINES REGLAGE HORLOGE SELECTION LANGUE SORTIE AUDIO BTV STEREO M SAP M E N U 1 BPROGRAMMATION REP AUTO A REGLAGE CHAINES REGLAGE HORLOGE SELECTIO...

Page 130: ... AUDIO TV STEREO M SAP Toutes les émissions sont enregistrées en stéréophonie Hi Fi et en monophonie Le niveau audio d une cassette enregistrée en stéréophonie haute fidélité est différent du niveau audio d une cassette non enregistrée en stéréophonie haute fidélité Vous pouvez passer à MONO si vous voulez une lecture en monophonie Sélectionner MONO étapes 3 HIFI disparaît de l écran d état Si vou...

Page 131: ...n son Dolby Digital Pour savoir quels DVD et appareils sont compatibles Dolby Digital cherchez le logo suivant Dolby Pro Logic Dolby Pro Logic est une technologie de décodage qui peut être utilisée pour décoder des enregistrements à deux canaux Le décodage de deux canaux par Dolby Pro Logic produit quatre canaux de sortie gauche centre droit et un canal surround mono DTS Digital Theater System cré...

Page 132: ...LLATION RAPIDE apparaîtra 3 Appuyez sur le bouton B pour sélectionner CUSTOM PERSONNALISÉ en haut du menu puis appuyez sur OK Ce menu apparaîtra 4 Appuyez sur le bouton B pour sélectionner AUDIO en haut du menu puis appuyez sur OK SON DRC HF DOLBY DIGITAL EF SOUS ÉCHANTILLON EF 5 1CH OK SON ORIGINAL SOUS TITRE HF MENU DU DISQUE ENGLISH MENU DU LECTEUR ENGLISH LANGUE CONF RAP MENU DU LECTEUR ENGLIS...

Page 133: ... Le réglage par défaut du délai arrière surround est de 5 ms 9 Appuyez sur SETUP PROG pour quitter le menu SON TEMP DE DECALAGE CENTRE SURROUND OK 1ms 0ms SON CENTRE 0ms 1ms 2ms 3ms 4ms 5ms OK SON TEMP DE DECALAGE CENTRE SURROUND OK 0ms 0ms SON 5 1CH TEMP DE DECALAGE BALANCE OK STANDBY ON TIMER SET VCR TV SEARCH MODE REPEAT TUNER 3 4 5 6 7 8 9 SLOW 0 10 2 1 VCR DVD CLEAR DISPLAY SETUP PROG TITLE R...

Page 134: ...onner AUDIO en haut du menu puis appuyez sur OK 5 Appuyez sur p pour sélectionner 5 1CH 5 1 CAN puis appuyez sur OK SON 5 1CH TEMP DE DECALAGE BALANCE OK SON DRC HF DOLBY DIGITAL EF SOUS ÉCHANTILLON EF 5 1CH OK SON ORIGINAL SOUS TITRE HF MENU DU DISQUE ENGLISH MENU DU LECTEUR ENGLISH LANGUE CONF RAP MENU DU LECTEUR ENGLISH ASPECTTV 4 3 BOÎTE AUX LETTRES DOLBY DIGITAL EF OK 134 Balance des enceinte...

Page 135: ...de volume va de 6 dB à 6 dB Appuyez sur o ou p pour voir toutes les valeurs dB disponibles 11Appuyez sur SETUP PROG pour quitter le menu SON BALANCE TEST AVANT L 3dB CENTRE 0dB AVANT R 0dB SUBWOFER 0dB SURROUND R 0dB SURROUND L 0dB OK SON AVANT L 6dB 5dB 4dB 3dB 2dB 1dB OK SON BALANCE TEST AVANT L 0dB CENTRE 0dB AVANT R 0dB SUBWOFER 0dB SURROUND R 0dB SURROUND L 0dB OK SON BALANCE TEST AVANT L 0dB...

Page 136: ...ystème en mode DVD Le voyant DVD rouge est allumé sur le devant du lecteur système 2 Appuyez sur TITLE Le menu de Titre est affiché Si un menu de titre n est pas disponible un X peut apparaître à l écran du téléviseur Ou si le DVD ne dispose que d un menu de disque principal tel que décrit ci dessus celui ci peut être affiché lorsque vous appuyez sur TITLE 3 Appuyez sur o p s ou B pour sélectionne...

Page 137: ... Lors de la lecture d un CD audio vous pouvez effectuer une recherche arrière ou avant à seulement 16 fois la vitesse normale de lecture Les valeurs h 16 ou g 16 apparaissent brièvement à l écran du téléviseur L audio est intermittent lors de la recherche d un CD audio Lors de la lecture d un fichier MP3 vous pouvez effectuer une recherche à seulement huit fois la vitesse normale Les valeurs h 8 o...

Page 138: ...es et 30 secondes 1 2 3 3 0 Assurez vous que le temps que vous entrez se situe à l intérieur du temps total du titre ou de la piste en cours Dans le cas contraire l espace de temps est effacé et la lecture continue à partir du point en cours Le temps total disponible de la piste ou titre en cours est affiché à l écran de recherche chronologique Si vous faites une erreur appuyez sur C RESET CLEAR p...

Page 139: ...cherche de piste TR Dans les 30 secondes appuyez sur les touches numérotées pour sélectionner le numéro de piste La lecture commence à la piste sélectionnée Pour une piste à un seul chiffre 1 9 entrez d abord un zéro Par exemple pour lire la piste 5 appuyez sur 0 5 Vous n avez pas à utiliser le bouton 10 en mode recherche pour la piste 10 et au delà C À l aide des touches SKIPw3 CHp ou SKIP CHo Lo...

Page 140: ...errompue la dernière fois Vous pouvez reprendre la lecture au même point même si vous mettez le lecteur DVD magnétoscope hors tension puis sous tension de nouveau plus tard En revanche l ouverture du tiroir de disque annule la fonction de reprise La lecture commence au début la prochaine fois que vous insérez un disque Pour annuler la reprise de la lecture et commencer la lecture depuis le début a...

Page 141: ...termine puis appuyez sur REPEAT A B de nouveau A B est affiché à l écran de télévision La lecture de la section est effectuée à plusieurs reprises 5 Pour annuler Répétition A B appuyez sur REPEAT A B OFF est affiché à l écran du téléviseur La lecture reprend normalement Exemple Répétition d une piste CD audio Exemple Répétition d un chapitre DVD Les fonctions de répétition de lecture et de répétit...

Page 142: ...us pouvez aussi appuyer à nouveau sur SEARCH MODE pour les effacer Exemple DVD 4 Pour retrouver le marqueur plus tard appuyez sur SEARCH MODE jusqu à ce que vous voyiez les marqueurs Appuyez sur s ou B pour sélectionner le marqueur de votre choix puis appuyez sur OK La lecture du disque continue à partir du point marqué 1 2 3 4 5 6 7 8 9 10 AC 1 0 12 01 1 2 3 4 5 6 7 8 9 10 AC L ouverture du tiroi...

Page 143: ...on d angle Dans cet exemple huit angles sont disponibles 8 Exemple Angle 1 de huit angles disponibles Exemple English comme premier sous titre entre six sous titres disponibles Sur certains DVD vous devez sélectionner une langue de sous titre à partir du menu Disque Si la langue n est pas affichée après avoir appuyé sur SUBTITLE plusieurs fois le disque ne dispose pas de fonctions de sous titres d...

Page 144: ... affichée lors d une lecture avec zoom est un guide de position Pour la supprimer ou l afficher appuyez sur OK La position de la boîte bleue à l intérieur de la boîte grise représente la position de l image agrandie par rapport à l image globale x2 x4 normale 3 Pour redonner à l image sa taille normale appuyez sur ZOOM Exemple lecture d un DVD vers l avant à la moitié de la vitesse normale 1 2 L a...

Page 145: ...iché 2 Avec la lecture interrompue appuyez deux fois sur MODE SPEED pour afficher l écran ALÉATOIRE Exemple CD audio 3 Avec l écran ALÉATOIRE affiché appuyez sur PLAY B La lecture des pistes s effectue dans l ordre aléatoire Lorsque les pistes ont été lues une fois la lecture s arrête ALÉATOIRE PROGRAMME ALÉATOIRE PAS D INDICATION CD SON PROGRAMME DUR E CD SON T T T T T T T T Vous ne pouvez pas ut...

Page 146: ...uis appuyez sur OK La première fois que vous sélectionnez un mot de passe ce menu est affiché Appuyez sur les touches numérotées pour entrer un mot de passe de quatre chiffres Le mot de passe est affiché à l écran Prenez ce mot de passe en note pour ne pas l oublier Appuyez sur OK Vous avez terminé Passez à l étape 7 Si vous avez déjà réglé un mot de passe ce menu est affiché Appuyez sur les touch...

Page 147: ...al est inactif tous les disques peu vent être lus 8 Matériel pour adultes 7 NC 17 Ne convient pas aux enfants de moins de 17 ans 6 R Réservé aux adultes per mission parentale nécessaire pour toute personne de moins de 18 ans 4 PG13 Ne convient pas aux enfants de moins de 13 ans 3 PG Surveillance parentale recom mandée 1 G Grand public recommandé pour tous les âges EXPLICATIONS DU CLASSEMENT STANDB...

Page 148: ...e le canal droit ou les deux canaux stéréo lors de la lecture d un CD audio 1 Appuyez sur DVD pour mettre le lecteur système en mode DVD au besoin Le voyant DVD rouge est allumé 2 Appuyez sur AUDIO BAND lors de la lecture d un CD audio pour choisir entre STEREO L CH ou R CH STEREO Seul le canal droit se fait entendre L CH R CH Seul le canal gauche se fait entendre Les canaux gauche et droit se fon...

Page 149: ...u L pour sélectionner le fichier ou la piste de votre choix Choisissez PREMIER TITRE pour commencer la lecture à partir du premier fichier ou piste individuelle affichée Appuyez sur TITLE pour retourner au premier élément du premier écran 4 Après avoir choisi une piste ou un fichier appuyez sur PLAY B ou OK En commençant avec la piste ou le fichier que vous avez sélectionné la lecture des pistes f...

Page 150: ...te fichier en cours sont affichés dans la partie supérieure de l écran Exemple MP3 Ou ce qui suit peut être affiché pour indiquer une lecture répétitive T La lecture de la piste en cours sera effectuée à plusieurs reprises G La lecture des pistes du dossier en cours sera effectuée à plusieurs reprises A La lecture de toutes les pistes sera effectuée à plusieurs reprises 3 Appuyez sur DISPLAY de no...

Page 151: ...améra multiples sont disponibles pendant la lecture du DVD Plus de détails en page 143 Choisissez HF pour désactiver l icône d angle Si vous avez sélectionné ARRET AUTO appuyez sur OK à plusieurs reprises pour régler ARRET AUTO à EF ou HF La valeur par défaut est EF Sélectionnez EF si vous voulez que le lecteur système bascule automatiquement au mode VCR après 35 minutes d inactivité du lecteur DV...

Page 152: ...c tionner une langue puis appuyez sur OK Appuyez sur SETUP PROG pour supprimer le menu Astuces 152 Langue Vous pouvez utiliser le menu LANGUE pour sélectionner des langues différentes pour l audio et les sous titres des DVD pour les menus de disque DVD et les menus de configuration du lecteur DVD 1 Appuyez sur DVD pour mettre le lecteur système en mode DVD Le voyant DVD rouge sur le devant du lect...

Page 153: ...59 Catalan 4947 Chinois 7254 Corse 4961 Croate 5464 Tchèque 4965 Danois 5047 Hollandais 6058 Anglais 5160 Espéranto 5161 Estonien 5166 F H Féringien 5261 Fidji 5256 Finlandais 5255 Français 5264 Frison 5271 Gaélique Écosse 5350 Galicien 5358 Géorgien 5747 Allemand 5051 Grec 5158 Groenlandais 5758 Guarani 5360 Goujrati 5367 Haoussa 5447 Hébreu 5569 Hindi 5455 Hongrois 5467 I K Islandais 5565 Indoné...

Page 154: ...gler les délais Plus de détails en page 132 135 6 Si vous sélectionnez DRC appuyez sur OK à plusieurs reprises pour mettre la commande de gamme dynamique DRC En fonction ou Hors fonction Cette fonction permet d égaliser le volume audio en supprimant les sons trop puissants et en augmentant le volume des sons trop faibles Si vous sélectionnez DOLBY DIGITAL appuyez sur OK à plusieurs reprises pour s...

Page 155: ... C RESET AUDIO BAND ANGLE SUBTITLE ZOOM DISC MENU OK PAUSE REW FF PLAY STOP SKIP CH SKIP CH REPEAT SOUND SURROUND VOLUME REC A B 1 3 2 3 CH 7 49 0 01 46 0 03 27 CH Chapitre numéro du chapitre en cours nombre total de chapitres Temps de lecture écoulé du chapitre en cours temps de lecture restant du chapitre en cours TR 4 12 0 03 21 0 02 15 TR piste numéro de piste en cours nombre total de pistes T...

Page 156: ...érieur gauche de l écran 3 Dans les 10 secondes appuyez sur OK à plusieurs reprises pour sélectionner ON ou OFF ON permet d éclaircir les parties sombres de l image OFF affiche l image originale telle qu elle a été enregistrée STANDBY ON TIMER SET VCR TV SEARCH MODE REPEAT TUNER 3 4 5 6 7 8 9 SLOW 0 10 2 1 VCR DVD CLEAR DISPLAY SETUP PROG TITLE RETURN MODE SPEED C RESET AUDIO BAND ANGLE SUBTITLE Z...

Page 157: ... apparaîtra sur l affichage lorsque vous relâcherez le bouton Lorsque le système trouve une station émettant un signal suffisamment puissant la recherche s arrête Pour revenir à la dernière station disponible tenez enfoncé le bouton SKIP j CH p STANDBY ON TIMER SET VCR TV SEARCH MODE REPEAT TUNER 3 4 5 6 7 8 9 SLOW 0 10 2 1 VCR DVD CLEAR DISPLAY SETUP PROG TITLE RETURN MODE SPEED C RESET AUDIO BAN...

Page 158: ...u à 40 stations de radio automatiquement en suivant les étapes ci dessous 1 Appuyez sur TUNER pour passer en mode tuner Le voyant rouge TUNER apparaîtra sur la façade du système 2 Maintenez enfoncé le bouton SETUP PROG jusqu à ce que AUTO automatique apparaisse sur l affichage du système puis relâchez SETUP PROG Le système commencera alors à rechercher les stations Il commencera par les stations F...

Page 159: ...image Une vitesse d enregistrement de cassette moins élevée affecte la qualité de l image mais vous pouvez enregistrer plus de données sur la cassette SP standard play vitesse standard vitesse la plus élevée la durée d enregistrement d une cassette T120 est d environ deux heures meilleure qualité d image LP long play vitesse intermédiaire Il n est pas possible d enregistrer en LP avec ce magnétosc...

Page 160: ... sur DVD pour allumer le voyant DVD rouge sur le devant du lecteur système Ceci indique que le lecteur système est en mode DVD Pour utiliser les fonctions de magnétoscope appuyez sur VCR puis essayez les autres boutons de fonction de magnétoscope Appuyez sur VCR pour allumer le voyant VCR vert sur le devant du lecteur système Ceci indique que le lecteur système est en mode VCR Pour utiliser le tun...

Page 161: ...de caméra différents Se référ er au coffret du disque ou au menu de disque DVD pour vérifier si ces angles multiples sont disponibles Plus de détails en page 143 Vous ne pouvez pas modifier la langue de l audio ou des sous titres d un DVD Le DVD ne contient pas d audio ou de sous titres dans la langue désirée Certains DVD seulement contiennent l audio ou les sous titres en langues multiples Se réf...

Page 162: ...un boîtier du service de câble système RDS réglez vos enregistrement programmés d une autre façon Plus de détails en page 91 Terminez l enregistrement programmé au moins cinq minutes avant qu il ne commence 12 p m désigne midi 12 a m désigne minuit Il n y a pas d image ou il y a du bruit ou des lignes dans l image lors de la lecture de la cassette vidéo Placez le lecteur système en mode VCR Appuye...

Page 163: ... aux prises AUDIO IN du téléviseur le voyant stéréo du téléviseur peut ne pas s allumer Si l afficheur d état indique que vous recevez la stéréophonie vous la recevez Plus de détails en page 129 Seules les cassettes enregistrées en audio haute fidélité peuvent être jouées en haute fidélité Toute cassette enregistrée en audio normale sera jouée en monophonie canal unique Nettoyage des têtes vidéo V...

Page 164: ...reuve signée de la réception un produit utilisé à des fins commerciales ou institutionnelles y compris mais non de façon limitative les fins de location un produit vendu TEL QUEL ou RÉNOVÉ GARANTIE D UN PRODUIT APPORTÉ AU CENTRE DE SERVICE EXPÉDIÉ Pour une réparation sous garantie d un produit apporté au cen tre de service apportez le à un centre de service agréé Philips pour le faire réparer Lors...

Page 165: ...une cassette 102 107 128 enregistrement de base 116 d un canal écoute d un autre canal 117 prévention 116 programmé 120 122 enregistrement immédiat 118 enregistrement programmé annulation 122 paramètres 120 122 garantie 164 glossaire 159 horloge 112 113 icône angle 151 image fixe 127 140 ir télécapteur infrarouge 106 jpeg 149 150 langue dvd 152 153 langue audio dvd 148 langue magnétoscope 114 lect...

Reviews: