


167
Admin Screen Features
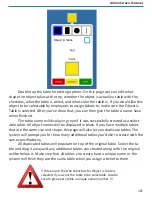
Double tap the table for editing options. On this page you can edit what
shape the object takes at the top, whether the object is actually a table with the
checkbox, what the table is called, and what color the table is. If you would like this
object to be selectable by employees to assign tickets to, make sure the Object is
Table is selected. After you’ve done that, you can then give the table a name. Save
when finished.
The table name will display in green if it was successfully created as a select-
able table. All object names will be displayed in black. If you have multiple tables
that are the same size and shape, this page will also let you duplicate tables. The
system will prompt you for how many additional tables you’d like to create with the
same specifications.
All duplicated tables will populate on top of the original table. Select the ta-
ble and drag it away and any additional tables you created along with the original
will be below it. Make sure that all tables you create have a unique name or the
system will think they are the same table when you assign a ticket to them.
!!! Make sure that the checkbox for Object is Table is
selected if you want the table to be selectable. Also be
sure to give every table a unique name/number. !!!