background image

CONNECT WIRELESSLY TO A DEVICE VIA INFRASTRUCTURE MODE

In Infrastructure mode, the camera and your device both connect to an access point, and communicate through that wireless 

network. The camera can connect to access points that are not encrypted, use WPA encryption, or use WPA2 encryption. To 

connect the camera to your device via an existing wireless network, follow the instructions below:

 1.  Connect your device to a wireless network. The access point for the network must have DHCP enabled.

 2.  Make sure that you know the name and password for the network, since you will need that information to connect the 

camera to the same network.

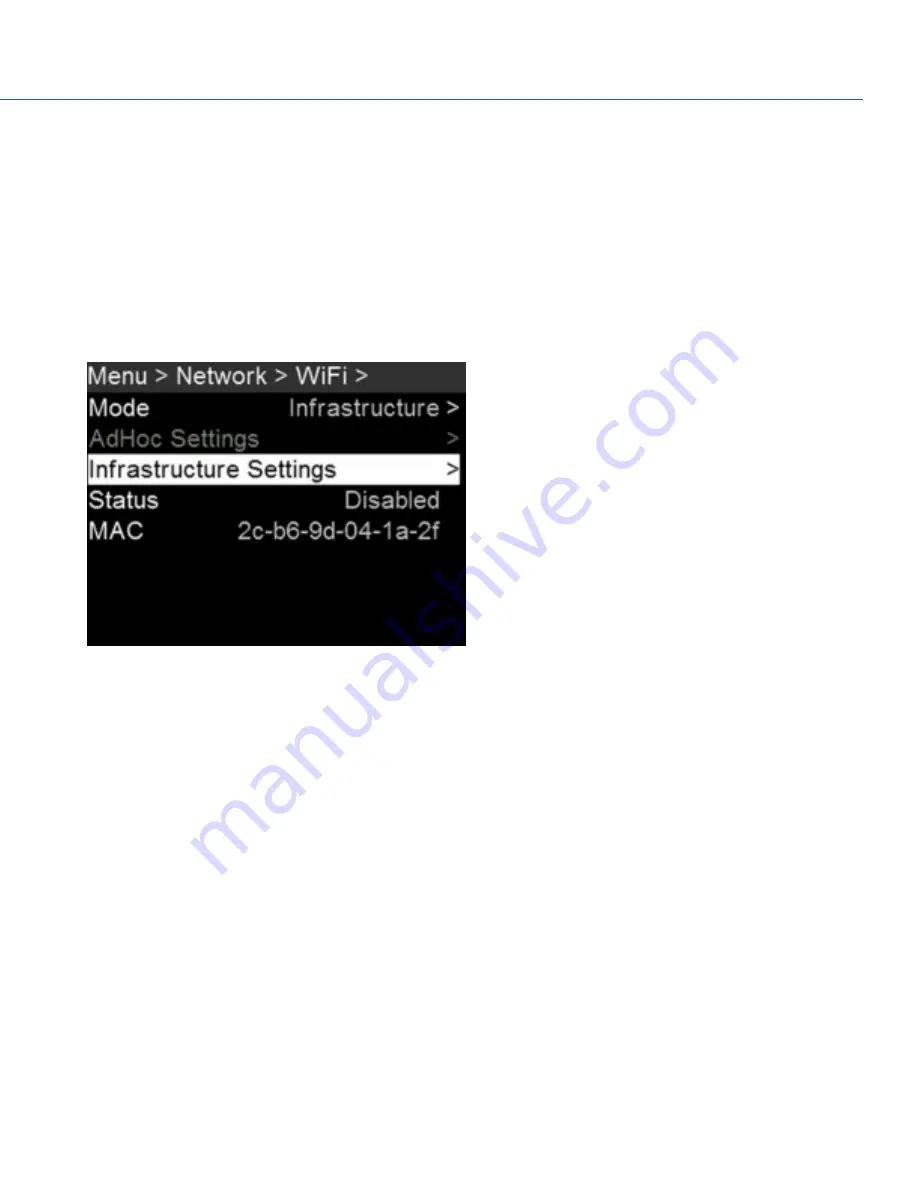
 3.  Go to Menu > Network > WiFi.                  
 4.  Select Infrastructure from the Mode menu.                     
 6.  Select Infrastructure Settings on the WiFi menu.                     

Figure: Infrastructure Mode

 7.  Select Access Points.
 8.  Select Scan to search for available wireless networks.

The available wireless networks (access points) display.

 9.  Highlight the wireless network that your device is connected to and select Select. 
 8.  If you select an encrypted network, follow the instructions below to enter the passphrase for the network:

 A.  Select a security option from the Encryption menu.

 B.  Select Passphrase.

 C.  For each character in the password, use the Scroll Wheel to select a character. Turn clockwise to cycle through the 

characters in this order: uppercase alphabet, lowercase alphabet, numbers 0–9, characters (#, &, etc.).

 D.  Press the Left and Right keys to move to the previous or next character, respectively.

 E.  Select Delete to delete a character.

 F.  Select Clear to clear the name.

 G.  Once you have selected the passphrase you want, press Enter.

 9.  To enable/disable DHCP, select IP Config and set up the IP settings. 

COPYRIGHT © 2017 PANAVISION INTERNATIONAL, L.P.

FW: V-0.5.35   

|

   81

PANAVISION MILLENNIUM DXL

Summary of Contents for Millennium DXL

Page 1: ...PANAVISION COM...

Page 2: ...RNATIONAL L P FW V 0 5 35 2 PANAVISION MILLENNIUM DXL TABLEOFCONTENTS Audio During Playback 111 Timecode Genlock Multi Camera Setup 112 Timecode 112 Genlock 114 Master Slave Operation 116 Set Up Stere...

Page 3: ...Lens Information 148 Lens Mount 148 Default Key Functions 149 Default Keys 149 Menu Map 151 COPYRIGHT 2017 PANAVISION INTERNATIONAL L P FW V 0 5 35 3 PANAVISION MILLENNIUM DXL...

Page 4: ...compliance with FCC regulations shielded cables must be used with this equipment Operation with non approved equipment or unshielded cables is likely to result in interference to radio and TV recepti...

Page 5: ...be able to return your products to your local retailer upon purchase of an equivalent new product Disposing of this product correctly will help save valuable resources and prevent any potential negati...

Page 6: ...ke and exhaust ports do not impede airflow Failure to permit adequate airflow may result in overheating of the camera degraded operation and in extreme situations damage to the camera DO NOT operate o...

Page 7: ...proprietary wavelet based REDCODE RAW compression then stored to a Panavision MINI MAG RAW data is recorded independently of any RGB domain color processing such as ISO White Balance or other RGB col...

Page 8: ...VISION MILLENNIUM DXL CAMERA SYSTEM COMPONENTS NOTE Availability of components listed in this chapter is subject to change at any time CAMERA BODY For more information on connectors go to Input Output...

Page 9: ...rsor up 6 Nav South Move cursor down 7 Nav Enter Navigation Select 8 Assistant A Assistant B Programmable keys Assistant A Assistant B Toggle lock unlock all keys on Assistant Side 9 Menu Access Exit...

Page 10: ...ortcut when available 4 Navigation Wheel Move cursor up down 5 Nav West Move cursor left Return to the last menu 6 Nav East Move cursor right Select menu 7 Nav North Move cursor up 8 Nav South Move cu...

Page 11: ...ht Side Assistant Side NOTE When the camera is powered only by battery and not AC power the Power Status LED PWR does not turn on You can press the button on the battery to check the battery charge le...

Page 12: ...media present Green Ready to record Amber Finalizing Red flashing slow Media mounted with 5 and 10 of media space available Red flashing fast Media mounted with 5 of media space available Red Recordin...

Page 13: ...available Red flashing fast Media mounted with 5 of media space available Red Recording media mounted with 10 of media space available 2 Record Status LED1 Off Not recording or media not mounted Red...

Page 14: ...r accessories and an additional PWR IN Studio In port The power out ports on the DXL Hot Swap Module provide a combined 14V power out combined 10 A max current when the module is receiving power The b...

Page 15: ...a spring loaded cover 14V Aux Power Out on the next page 3 14V 5A 2 pin 0B LEMO Power out 14V 5A Aux Power Out on page 17 4 24V Fischer 3 pin 102 Power out 24V Aux Power Out on page 17 5 USB PWR USB...

Page 16: ...0B LEMO connector LEMO EEG 0B 302 CLL supplies unregulated 11 5 to 17 VDC battery pass through power The maximum sustained current draw is 3 0A Figure Front Face of Connector Looking at the Camera LE...

Page 17: ...ut NOTE Mating connector is FGG 0B 302 CLAD 24V AUX POWER OUT The two 2 Fischer connectors DG 102 A052 130 up convert from 12V to 24V Figure 24V Connector Looking at the Camera FISCHER 3 PIN CONNECTOR...

Page 18: ...NAL DESCRIPTION DIRECTION 1 14V VBATT 11 5 TO 18V DC 9A In 2 Ground Common ground N A 3 28V VBATT 18 to 30V DC 3A Exclusively powers attached accessories and lens control devices Power from this pin d...

Page 19: ...t battery drain the LEDs on the DXL Hot Swap Module do not illuminate when the camera is off and a power source is present Figure DXL Hot Swap Module COPYRIGHT 2017 PANAVISION INTERNATIONAL L P FW V 0...

Page 20: ...is powered via the PWR IN port Flashing Voltage via the PWR IN port is low 4 14V 5A 24V Off Module off Green Port available 5 OB on board battery at bottom of module Off Battery is not present Green...

Page 21: ...lude Panavision FIZ module for the cmotion Camin 3M Panavision FIZ module for the Preston MDR Panavision FIZ module for the RTMotion LATITUDE Panavision FIZ module for TILTA For more information on co...

Page 22: ...onal components with the Panavision Millennium DXL Base plate Jumper block Third party FIZ devices EFV and brackets Additional modules Cheese plate and handles COPYRIGHT 2017 PANAVISION INTERNATIONAL...

Page 23: ...oximately 90W 15V at 6A when configured with a Primo VF and an SSD The camera via the DC IN port also provides approximately 72W 24V 3A exclusively to power attached accessories and lens control devic...

Page 24: ...right side of the camera The Power Status LED illuminates amber as the camera turns on The Power Status LED illuminates green to confirm that the camera is turned on and ready to use TURN OFF THE CAME...

Page 25: ...nector including batteries and the DC IN connectors on any modules Figure Auto Boot on Power Switch ENABLE AUTO BOOT ON POWER 1 Toggle the Auto Boot on Power switch to On identified by a white star 2...

Page 26: ...the battery plate down in order to access the top screws and slide the battery plate up in order to access the bottom screws For more information go to Slide Battery Plate Up and Down on the next page...

Page 27: ...y position on the slide The highest position is ideal for studio shoots and the lowest position is ideal for hand held shoots To slide the battery plate follow the instructions below 1 Move the silver...

Page 28: ...rrows These pages are Home Page This is the page that displays when the camera turns on and displays recording information and project settings This page cannot be toggled on off For more information...

Page 29: ...Resolution 6 REDCODE REDCODE compression setting REDCODE on page 45 7 Monitor Shortcut to the Monitor page Home Page above 8 Power Status DC voltage in or of remaining battery capacity Power Status on...

Page 30: ...k GEN Indicator on page 35 WIFI Indicates WiFi connection WiFi Indicator on page 35 LAN LAN Indicator on page 35 Cal T E CAL T E Indicator on page 36 13 Temperature Temperature Camera sensor and elect...

Page 31: ...select NONE ASSIGN ITEMS TO SLOTS ON USER PAGE Use the arrow buttons on the camera to assign the following statuses and shortcuts to the slots ITEM DESCRIPTION DETAILS None Slot remains blank N A Ape...

Page 32: ...nu Resolution ISO ISO Shortcut to ISO menu ISO on page 38 LCD Brightness Brightness of the attached LCD Shortcut to LCD Brightness menu LCD Brightness on page 38 Magnify Magnify setting Shortcut to Ma...

Page 33: ...SDI 4 SDI 5 Monitor preferences applied to each SDI out port Monitor Preferences on page 58 2 Top VF Monitor preferences applied to the top viewfinder Monitor Preferences on page 58 3 Color Space Outp...

Page 34: ...Pre Amp Gain on page 107 2 Input Volume for each audio channel Audio Meter VU Meter on page 110 3 Timecode Current timecode value Timecode on page 56 4 Monitor Mix Shortcut to the Monitor Mix Monitor...

Page 35: ...r shows the current genlock status Grey No genlock signal is detected or the signal cannot cross lock to project 24 00 fps vs 23 98 fps Red During process of sync or genlock is lost while recording Gr...

Page 36: ...ate whether the sensor temperature or exposure has decreased or increased respectively NOTE T and E indicators change colors independently of each other POWER STATUS The Power Status element displays...

Page 37: ...lor component Tint range is 100 to 100 with a default of 0 000 NOTE Selecting Auto White Balance calculates a new Tint value The value does not change if you adjust the color temperature manually Sele...

Page 38: ...ure ISO LCD BRIGHTNESS To set the brightness of the Operator and Assistant Side UIs follow the instructions below 1 Add LCD Brightness to the User Page For more information go to User Page on page 31...

Page 39: ...ins The Magnify tool magnifies a 1920 x 1020 region centered on a 1920 x 1080 display If the resolution is lower than 1920 x 1020 the image border cannot be magnified Use the following equations to de...

Page 40: ...desaturated image that allows you to check for proper exposure The Exposure meter colors indicate the following information Purple Underexposed indicates sensor exposure levels that may be noisy if g...

Page 41: ...at all other values the desaturated image represents the luminance value of the ISO adjusted image Purple IRE 0 4 Blue IRE 5 Teal IRE 10 12 Green IRE 41 48 Pink IRE 61 70 Straw IRE 92 93 Yellow IRE 94...

Page 42: ...XL The table below omits rows for the anamorphic formats since the pixel dimensions for each anamorphic format and the corresponding non anamorphic format are the same For more information go to Anamo...

Page 43: ...2 30 72 12 96 33 34 6K 16 9 HD 5760 3240 28 80 16 20 33 04 5K Full Format 5120 2700 25 60 13 50 28 94 5K 2 1 5120 2560 25 60 12 80 28 62 5K 2 4 1 WS 5120 2160 25 60 10 80 27 78 5K 16 9 HD 4800 2700 24...

Page 44: ...orphic options listed in the following sections ANAMORPHIC 2 8K 6 5 7 5K 6 5 7K 6 5 6 5K 6 5 6K 6 5 5K 6 5 4K 6 5 NOTE Using a 6 5 aspect ratio at 2x anamorphic gives you a 2 4 1 aspect ratio COPYRIGH...

Page 45: ...there is no extra room for Look Around REDCODE Select the target REDCODE compression ratio for your project If the camera is able to achieve the target compression ratio the compression ratio displays...

Page 46: ...oRes is not supported when the format is 4K FF QuickTime files have the same metadata that is in the REDCODE RAW files The metadata is per clip and not per frame At this time there is no tool for extr...

Page 47: ...les similar to how the camera creates multiple R3D files Figure File Structure R3D Apple ProRes When recording Apple ProRes only this is the file structure of the recorded files on the SSD when the SS...

Page 48: ...ip and not per frame At this time there is no tool for extracting that metadata from the mxf files You can select any resolution When recording Avid DNxHD HR the camera scales that format to the Resol...

Page 49: ...to how the camera creates multiple R3D files Figure File Structure R3D DNxHD HR When recording Avid DNxHD HR only this is the file structure of the recorded files on the SSD when the SSD is formatted...

Page 50: ...arget REDCODE compression ratio For more information go to REDCODE on page 45 4 To set up Apple ProRes A In the Codec menu select the Apple ProRes menu B Select the Resolution C Select the Video Codec...

Page 51: ...an direction reverses and the sensor scans the image from the bottom to the top The Sensor Scan Flip feature is intended for Low Mode Stedicam and other inverted mounting scenarios To enable the Senso...

Page 52: ...g frame rate automatically changes its value to match the project time base The maximum frame rate for each format is determined by several factors including project time base REDCODE and Look Around...

Page 53: ...0 fps 29 97 fps 47 95 fps 48 00 fps 50 00 fps 59 94 fps To select a project time base follow the instructions below 1 Go to Menu Project Settings Timebase Figure Timebase VARISPEED When a recording fr...

Page 54: ...he Slate information follow the instructions below 1 Go to Menu Project Settings Slate 2 Set up the following Camera ID Camera Position Camera Color Changes the color of the Clip Information slot on t...

Page 55: ...shutter speed and shutter angle equivalents The calculations in the table use a recording frame rate of 24 fps SHUTTER SPEED 1 XX SEC SHUTTER ANGLE SHUTTER SPEED 1 XX SEC SHUTTER ANGLE 1 32 270 1 120...

Page 56: ...e signal also includes metadata This can be accessed via the TIMECODE port 5 pin LEMO on the Communication Module For more information go to TIMECODE on page 145 LTC OUT Enable LTC Out to output the l...

Page 57: ...rts when recording starts Press PWR REC to activate Pre Record Press PWR REC a second time to start recording Press PWR REC a third time to stop recording Trigger Pre Record When selected the Pre Reco...

Page 58: ...nitor whose preferences you want to change You can set up preferences for each of the following monitors SDI 1 SDI 2 SDI 3 SDI 4 SDI 5 UHD Assistant VF Viewfinder Top VF Operator VF To see what monito...

Page 59: ...Overlay Import Export on page 62 RESOLUTION Select the output resolution for monitors You cannot select a resolution for view finders VFs since the resolution is determined automatically For more inf...

Page 60: ...e information go to RETURN on page 142 2 Enable the monitor to support the external feed A Go to Menu Monitoring Monitor Preferences B Select the monitor you want to see the live feed on C Enable Allo...

Page 61: ...imum possible size Available range is 0 to 100 OFFSET X Y Percentage to offset guide from its default centered position Available range is 100 to 100 100 Right aligned for X offset and bottom aligned...

Page 62: ...s below 1 Go to Menu Monitoring Overlay Import Export 2 Select On Media overlays 3 Select one of the following Import Import All EXPORT FROM SSD TO CAMERA To export overlays from the camera to an SSD...

Page 63: ...o Mode EXPOSURE Shutter Angle When you change the frame rate in this mode the shutter angle stays to the current setting Shutter Speed When you change the frame rate in this mode the shutter angle cha...

Page 64: ...y open data files are closed Failure to properly unmount media may result in lost data or corrupted files While removing an SSD without unmounting first does not damage the media it does increase the...

Page 65: ...nto the media bay 2 Go to Menu Media Format Media 3 Configure the following settings optional File System for more information go to Format Media Overview above Reel Number Camera ID Camera Position E...

Page 66: ...low to upgrade media firmware 1 Connect the Panavision MINI MAG to a computer and copy the media firmware upgrade file to the SSD 2 Unmount the SSD from the computer and insert it into the camera medi...

Page 67: ...COLOR MENU To access the Color menu go to Menu Color Figure Color Menu COPYRIGHT 2017 PANAVISION INTERNATIONAL L P FW V 0 5 35 67 PANAVISION MILLENNIUM DXL...

Page 68: ...set up 3 Select Display Preset 4 Select the color space and gamma curve pairing to apply to the monitor The gamma curve you select in this menu overrides the default gamma curve To change the default...

Page 69: ...Select a saturation setting Figure Saturation COMPATIBLE 3D LUT FORMATS The Panavision Millennium DXLis compatible with the following 3D LUTs DaVinci Resolve 3D Cube LUT cube IRIDAS Adobe 3D Cube LUT...

Page 70: ...ras When exporting 3D LUTs from camera to an SSD the 3D LUTs are saved to a folder on the SSD called luts When importing 3D LUTs from an SSD to camera the 3D LUTs must be stored on the SSD in a folder...

Page 71: ...the camera to an SSD follow the instructions below 1 Go to Menu Color LUT Import Export 2 Select In Camera 3 Select one of the following Delete Export Export All COPYRIGHT 2017 PANAVISION INTERNATIONA...

Page 72: ...Camera Presets or Looks that are saved internally on the camera Media Presets or Looks that are on the SSD in the path shown for example On Media presets OTHER DEFAULTS In addition to setting up prese...

Page 73: ...a presets 3 Select one of the following Import Import All EXPORT FROM SSD TO CAMERA To export camera presets from the camera to an SSD follow the instructions below 1 Go to Menu User Presets Camera Pr...

Page 74: ...mera Looks saved internally on the camera On Media Looks saved to an SSD IMPORT FROM SSD TO CAMERA To import Look presets from an SSD to the camera follow the instructions below 1 Go to Menu User Pres...

Page 75: ...s not display project settings Various statuses and shortcuts can be assigned to this page For more information go to User Page on page 31 Monitor Page This page displays the color space gamma curve o...

Page 76: ...ructions below A Select Visible Pages B Toggle the following on off User Page Monitor Page Audio Page Figure Toggle Pages On Off 4 Press Back to return to the Operator or Assistant menu COPYRIGHT 2017...

Page 77: ...ording starts Change After Time If the Side UI is not on the home page the Side UI returns to the home page after the amount of time you specify in the next step Figure Select When Screen Should Retur...

Page 78: ...ge 3 Select the action that you want to map to the key and press Enter ASSIGNABLE ACTIONS You can assign the following actions to a key Auto WB Black Balance Camera Presets Eject Media Exposure Format...

Page 79: ...hat provides communication support for third party applications The camera uses the RED Command Protocol R C P to communicate information between the camera and an application As with all wireless dev...

Page 80: ...ection will be encrypted via WPA2 6 If you selected WPA2 as the encryption option type the passphrase that will be required to access the network 7 Close the menu Figure Ad Hoc Mode 8 Connect your dev...

Page 81: ...7 Select Access Points 8 Select Scan to search for available wireless networks The available wireless networks access points display 9 Highlight the wireless network that your device is connected to...

Page 82: ...ou are using For example if you are connecting an iOS device go to Settings Wi Fi and select the wireless network The camera and your device are now connected 12 To ensure that your app can communicat...

Page 83: ...the camera obtains an IP address netmask address and gateway address automatically from the DHCP server You cannot manually enter anything in the IP Address Netmask and Gateway fields when DHCP is ena...

Page 84: ...nd commands to All The camera can send commands to all devices on the network None The camera can only receive commands The camera cannot send commands Custom The camera can send commands to a specifi...

Page 85: ...emperatures Each fan control mode affects the sensor temperature sensor warm up time fan speed and resulting fan noise When selecting a fan mode first take into consideration how each fan mode behaves...

Page 86: ...hortens the sensor warm up time and increases the fan speed NOTE The intent of Target Temperature is to set the sensor temperature so that you can then create a calibration map for that temperature NO...

Page 87: ...he temperature directly affected by the Target Temperature setting Temperature Core The current temperature of the camera core Fan Speed 1 The fan speed measured as the percentage of the maximum speed...

Page 88: ...e Power Out menu shows the status of the power out ports on the camera In this menu you can also enable disable each power in port The statuses are N A The device is not present OK The power out port...

Page 89: ...0 CAMERA INFO Displays the following camera information Type Camera type Firmware Version Current firmware version PIN The personal identification number that is specific to your camera SVN Revision T...

Page 90: ...ect Settings on page 42 DNXHD HR This status menu is available only if recording to an Avid codec is enabled Displays the following codec information Video Codec Resolution Frame Rate Dimensions To ch...

Page 91: ...is go to Slate on page 54 Slate Camera Position To change this go to Slate on page 54 Sync Status Genlock Status OLPF Type Information only Calibration Temperature Calibration Integration Time CONNECT...

Page 92: ...genlock signal GENLOCK SOURCE Select a genlock input BRAIN Default Rear Module BRAIN GPIO BRAIN GPI in High Map an action to the release of a trigger or off position of a switch BRAIN GPI in Low Map...

Page 93: ...exposure of the current calibration file go to Menu Maintenance System Status Other BLACK BALANCE CALIBRATE SENSOR AT CURRENT SETTINGS The camera calibrates the sensor at the current exposure and temp...

Page 94: ...makes multiple passes through the following phases of the calibration Capturing Analyzing Erasing Programming 8 When the Calibration Successful dialog displays select OK to complete the process The ne...

Page 95: ...he calibration map is created mm 01 Day Day that the calibration map is created dd 28 Time Time according to the 24 hour clock in the camera hhmmss 122150 For example a sequence of calibration maps ma...

Page 96: ...the camera applies the map temporarily and does not import it into the camera Export Export selected calibration map from camera to SSD Export All Export all files from camera to SSD Import Import sel...

Page 97: ...mps on R3D files when recording to an SSD The camera uses the 24 hour clock convention military time For example enter 2 35 p m as 14 35 00 The date and time are saved when you close the Date Time men...

Page 98: ...Record Tally LED on the EVF to illuminate red when recording SSD Tally Light Enable the Record Tally LED on the media bay to illuminate red when recording For more information go to Left Side Operato...

Page 99: ...the instructions below 1 Ensure that an SSD is properly mounted to the camera 2 Go to Menu Maintenance Save Log Figure Save Log 3 Select Save Log The log file is saved as a txt file in the SSD root di...

Page 100: ...follow the instructions below 1 Go to Menu Maintenance Camera Defaults Reset Defaults Figure Reset Defaults 2 Select Reset Defaults 3 Select YES on the screen that asks you to confirm the action The...

Page 101: ...restores all factory defaults 1 Go to Menu Maintenance Camera Defaults Wipe Camera Figure Wipe Camera 2 Select Wipe Camera 3 Select YES on the screen that asks you to confirm the action The camera tu...

Page 102: ...you can initiate a firmware upgrade from within the menu 1 Go to Menu Maintenance Upgrade 2 Select Camera 3 Select Upgrade Camera Firmware Figure Upgrade Camera Firmware COPYRIGHT 2017 PANAVISION INTE...

Page 103: ...wing actions Move selected clip to the Play List All Move all clips to the Play List Apply Image Metadata Image data such as color gain and curves recorded with the image displays with the playback im...

Page 104: ...hones offer you the ability to capture scratch track audio Most controls in the Audio menu Menu Audio are only applicable when an audio module is attached Input signals are routed via a high quality p...

Page 105: ...channel names display in the Audio Meter but are not included in the clip metadata 1 To set up the audio channels go to Menu Audio Control 2 Select the channels you want to set up Channel 1 2 or Chan...

Page 106: ...0 9 C Press the Left and Right keys to move to the previous or next character respectively D Select Delete to delete a character E Select Insert to insert a character up to 6 characters available sele...

Page 107: ...you want to adjust CH1 CH2 CH3 CH4 3 Use the Scroll Wheel to select a value 4 Press Enter to set the value as the Pre Amp Gain 5 To link a pair of channels together A Use the Scroll Wheel to highlight...

Page 108: ...o mix for the channel Range is 100 Full Left to 100 Full Right The default for Channel 1 and Channel 3 is 100 The default for Channel 2 and Channel 3 is 100 Volume Adjust volume for the channel Range...

Page 109: ...ting you want C Press Enter Figure Set Up Channel Stereo Setting 3 To set up a channel s volume A Select Mixer Monitor Vol for the channel you want to set up B Use the Scroll Wheel to highlight the se...

Page 110: ...2 are the default channels correlating with the MIC 1 and MIC 2 inputs on the camera Channel 3 and Channel 4 are greyed out unless the camera detects audio input The channel names selected in the Aud...

Page 111: ...lipping Third line 12 dBFS Audio close to clipping Fourth line 2 dBFS Audio is clipping Fifth line far right border 0 dBFS Audio is clipping if signal exceeds 1 dBFS the whole bar is red NOTE In the A...

Page 112: ...HD SDI monitor output The camera can generate timecode on its own or can receive and sync to timecode generated by an external source Timecode displays on the side UI panels SDI overlays and is embedd...

Page 113: ...ettings Timecode 3 Select the desired Display Mode 4 Set Source to External The TC indicator turns green when an external timecode source is locked Figure Use External Timecode SYNC TIMECODE WITH ACN...

Page 114: ...hronization to sync the camera sensor 1 Use a BNC cable to connect the GENLOCK port on the camera to genlock device 2 Set up the frequency for the HD SDI output select Auto to automatically match the...

Page 115: ...me Rate FPS from home page To set up and enable Sensor Sync Mode follow the instructions below 1 Use a BNC cable to connect the GENLOCK port on the camera to genlock device 2 Go to Menu Maintenance GP...

Page 116: ...eo 3D productions When cameras are operated in Master Slave configuration you can perform the following operations Power Turn off the Master camera to turn off both cameras Record Press the PWR REC ke...

Page 117: ...follow the instructions below A Go to Menu Network Camera B Type a name for the camera Example CAM A LEFT MASTER etc in the Camera ID field C Set Target to All Figure Set Target to All D Go to Menu Ne...

Page 118: ...Camera B Type a name for the camera Example CAM B RIGHT SLAVE etc in the Camera ID field Figure Set Target to All C Set Target to None Figure Set Target to All D Go to Menu Network Ethernet COPYRIGHT...

Page 119: ...All NOTE Cameras can also be set up in a Master Master configuration To set up Master Master set Target to All on both cameras allowing either camera to make changes and control record start stop COP...

Page 120: ...ter and Slave cameras select the desired Reel Number and Camera ID settings The Reel Number and Camera ID settings on both cameras should match 3 On the Master camera change the Camera Position to Lef...

Page 121: ...a SET UP STEREO 3D CONFIGURATION This section describes basic procedures for connecting two 2 cameras in a Master Slave configuration for 3D operation NOTE When providing the signals to a Stereo Image...

Page 122: ...each camera to the genlock device The GEN and SYNC indicators in the Lower Status Row illuminate green 4 Follow the instructions in Set Up Master Slave Operation on page 117 to set Master and Slave ca...

Page 123: ...nerator with Universal Power Supply Ambient ACL 202CT Ambient ACL 203 Ambient ACL 204 Denecke SB T Evertz Master Clock 5600MSC NOTE Ensure that your genlock device provides a full strength genlock sig...

Page 124: ...irectory 4 Eject or unmount the SSD and then remove the SSD 5 Ensure that the camera is turned off 6 Insert the SSD with the force_upgrade folder into your camera 7 Turn on the camera The upgrade runs...

Page 125: ...you to electric shock and serious injury There are no user serviceable parts inside Alteration or repairs made to the camera lens or other accessory except by a Panavision authorized service facility...

Page 126: ...module or lens mount is not functioning correctly or is not communicating with the camera POTENTIAL RESOLUTIONS Perform a Hardware Rediscover For more information go to Rediscover Hardware Rediscover...

Page 127: ...like a System Restore in that it changes all settings to the factory default values To perform a Hard Restore follow the instructions below 1 With the camera turned off hold the PWR REC key on the cam...

Page 128: ...o to Sensor Calibration on page 93 TIMECODE OR GENLOCK DOES NOT FUNCTION SYMPTOM The SYNC GEN and or TC light is red yellow or greyed out POTENTIAL RESOLUTIONS Ensure that your timecode or genlock dev...

Page 129: ...era firmware For more information go to Upgrade Camera Firmware on page 124 Reset your camera s default settings For more information go to Reset Defaults on page 100 Check your footage on a computer...

Page 130: ...s collectively known as peripherals may be experiencing issues Remove all peripherals except for the media bay and upgrade firmware Then attach another peripheral and upgrade firmware again Repeat thi...

Page 131: ...x 4320 Sensor Size Large Format 40 96mm x 21 60mm Diagonal 46 31mm Dynamic Range 15 stops Max Frame Rates 60 fps at 8K Full Frame 8192 x 4320 75 fps at 8K 2 4 1 8192 x 3456 Recording Codec 8K RAW with...

Page 132: ...PYRIGHT 2017 PANAVISION INTERNATIONAL L P FW V 0 5 35 132 PANAVISION MILLENNIUM DXL APPENDIX B MECHANICAL DRAWINGS NOTE Dimensions are shown in mm FRONT VIEW Figure Panavision Millennium DXL Front Vie...

Page 133: ...BACK VIEW Figure Panavision Millennium DXL Back View COPYRIGHT 2017 PANAVISION INTERNATIONAL L P FW V 0 5 35 133 PANAVISION MILLENNIUM DXL...

Page 134: ...SIDE VIEW RIGHT Figure Panavision Millennium DXL Side View Right COPYRIGHT 2017 PANAVISION INTERNATIONAL L P FW V 0 5 35 134 PANAVISION MILLENNIUM DXL...

Page 135: ...SIDE VIEW LEFT Figure Panavision Millennium DXL Side View Left COPYRIGHT 2017 PANAVISION INTERNATIONAL L P FW V 0 5 35 135 PANAVISION MILLENNIUM DXL...

Page 136: ...TOP VIEW Figure Panavision Millennium DXL Top View COPYRIGHT 2017 PANAVISION INTERNATIONAL L P FW V 0 5 35 136 PANAVISION MILLENNIUM DXL...

Page 137: ...the input output connectors on the camera NOTE When connecting a cable to a connector align the key and red marker on the cable connector with the corresponding key and marker on the device connection...

Page 138: ...Figure Panavision Millennium DXLConnectors COPYRIGHT 2017 PANAVISION INTERNATIONAL L P FW V 0 5 35 138 PANAVISION MILLENNIUM DXL...

Page 139: ...out 2 pin LEMO 14V Aux Power Out on page 146 7 AUX Communication Module Aux power out 7 pin LEMO AUX Power Out on page 144 8 TIMECODE Communication Module Timecode in and out 5 pin LEMO TIMECODE on p...

Page 140: ...Front Face of the Connector Looking at the Camera LEMO EGJ 2B 304 CLA CONNECTOR PIN SIGNAL DESCRIPTION DIRECTION 1 14V VBATT 11 5 TO 18V DC 9A In 2 Ground Common ground N A 3 28V VBATT 18 to 30V DC 3...

Page 141: ...t 4 2 2 50 00 59 94 60 00 3G SDI SMPTE ST 424 2 970 Gbps SMPTE ST 425 2 970 Gbps UHD 10 bit 4 2 2 23 98 24 00 29 97 30 00 6G SDI SMPTE 2081 5 940 Gbps 1 Ensure you select a frequency supported by your...

Page 142: ...quency supported by your monitor 2 The output is progressive scan p it does not support progressive segmented frame PsF or interlaced i scan formats 3 The frequency options depend on project time base...

Page 143: ...ximum sustained current draw is 3 0A Figure Front Face of Connector Looking at the Camera LEMO EEG 0B 302 CLL CONNECTOR PIN SIGNAL DESCRIPTION DIRECTION 1 GROUND Common ground N A 2 11 5 to 17 VDC 11...

Page 144: ...nd N A 2 RS232 RX RS232 RX Receive In 3 RS232 TX RS232 TX Transmit Out 4 VBATT 11 5 to 17V DC 2 0A 11 5 to 17 VDC unregulated battery pass through power Out 5 NC No connection NC N A 6 GND Camera grou...

Page 145: ...AG 0B 305 CLN CONNECTOR PIN SIGNAL DESCRIPTION DIRECTION 1 GROUND Camera Ground N A 2 TIMECODE IN S Timecode input SMPTE single ended In 3 N A No connection NC N A 4 5 V OUT 5 V out 200 mA max Out 5 T...

Page 146: ...Data pair D N A 8 BI_DD Data pair D N A LCD EVF PORTS Custom digital video and power interconnection between the camera and RED LCDs and EVFs The pinout is not published 14V AUX POWER OUT The DXLM Mo...

Page 147: ...t from 12V to 24V Figure 24V Connector Looking at the Camera FISCHER 3 PIN CONNECTOR PIN SIGNAL DESCRIPTION DIRECTION 1 GROUND Common ground N A 2 24V 24V Out 3 Trigger Active Low to start stop record...

Page 148: ...eries lenses The lens mount is also compatible with select adaptors that support other lens mounts LENS WEIGHT AND LENS SUPPORT Use a lens support system when mounting heavy or long lenses to your cam...

Page 149: ...1 Assistant A Assistant B Toggle lock unlock all keys on Assistant Side Assistant B Press1 Assistant A Assistant B Toggle lock unlock all keys on Assistant Side Nav North Press Move cursor up Nav Sout...

Page 150: ...r A Operator B Toggle lock unlock all keys on Operator Side Nav North Press Move cursor up Nav South Press Move cursor down Nav East Press Move cursor left Select menu Nav West Press Move cursor right...

Page 151: ...COPYRIGHT 2017 PANAVISION INTERNATIONAL L P FW V 0 5 35 151 PANAVISION MILLENNIUM DXL MENU MAP See the Menu Map on the following page...

Page 152: ...CAMERA PRESETS In Camera On Media looks Operator Assistant Operator A Operator B Assistant A Assistant B 1 2 1 2 KEY MAPPING Mode Maximum Record Speed Maximum Preview Speed Target Temperature Post Rec...

Reviews: