Connections
32 - ENGLISH
Getting Started
Before connecting to the projector
z
Before connecting, carefully read the operating instructions for the external device to be connected.
z
Turn off the power of all devices before connecting cables.
z
Acquire any connection cable necessary to connect the external device to the system that is either not supplied
with the device or not available as an option.
z
Video signals containing too much jitter may cause the images on the screen to randomly wobble or wafture. In
this case, a time base corrector (TBC) must be connected.
z
The projector accepts video signals, S video signals, analog RGB signals (synchronous signals are TTL level),
and digital signals.
z
Some computer models are not compatible with the projector.
z
Use a cable compensator when you connect devices to the projector using long cables. Otherwise the image
may not display properly.
z
Refer to “List of compatible signals” (
page 118) for the types of video signals that can be used with the
projector.
▶
■
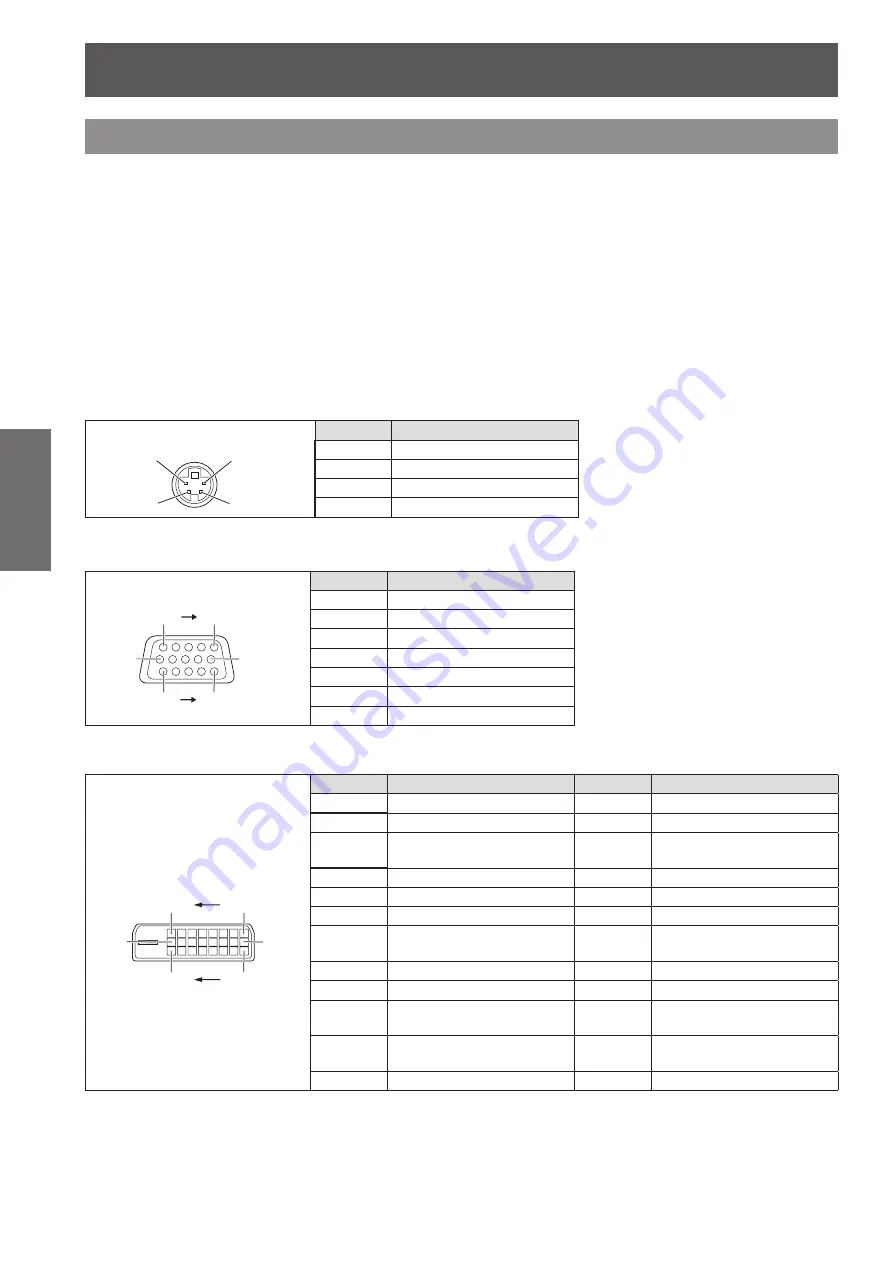
<S-VIDEO IN> terminal pin assignments and signal names
Outside view
Pin No.
Signal name
(1)
(2)
(3)
(4)
(1)
Ground (luminance signal)
(2)
Ground (color signal)
(3)
Luminance signal
(4)
Color signal
▶
■
<RGB 2 IN> terminal pin assignments and signal names
Outside view
Pin No.
Signal name
(4)
and
(9)
are not used.
(5)
-
(8)
,
(10)
, and
(11)
are GND
terminals.
(10)
(6)
(11)
(15)
(1)
(5)
(1)
R/P
R
(2)
G/Y
(3)
B/P
B
(12)
DDC data
(13)
SYNC/HD
(14)
VD
(15)
DDC clock
▶
■
<DVI-D IN> terminal pin assignments and signal names
Outside view
Pin No.
Signal name
Pin No.
Signal name
(17)
(24)
(16)
(9)
(1)
(8)
(1)
T.M.D.S data 2–
(13)
―
(2)
T.M.D.S data 2+
(14)
+5 V
(3)
T.M.D.S data 2/4
shield
(15)
GND
(4)
―
(16)
Hot plug detection
(5)
―
(17)
T.M.D.S data 0–
(6)
DDC clock
(18)
T.M.D.S data 0+
(7)
DDC data
(19)
T.M.D.S data 0/5
shield
(8)
―
(20)
―
(9)
T.M.D.S data 1–
(21)
―
(10)
T.M.D.S data 1+
(22)
T.M.D.S clock
shield
(11)
T.M.D.S data 1/3
shield
(23)
T.M.D.S clock+
(12)
―
(24)
T.M.D.S clock–
Connections


