3D Recording/Playback Mode (3D REC/PB): Displaying and Managing Clips
37
3D
Rec
o
rd
ing/P
la
y
ba
c
k
M
ode
(
3
D RE
C/P
B
)
3D Recording/Playback Mode (3D REC/PB)
This chapter describes the 3D recording/playback mode and how to record and playback Dual P2 3D clips.
For details on connections, recording and playback operations refer to the following section.
(
➝
“3D Signal Recording and Playback” Vol. 1, page 38)
Although display and playback is limited to Dual P2 3D clips, basic operations (in main mode) are the same as for normal clips
except for a few restrictions. The following sections will explain the differences from normal operation (main mode).
◆
NOTE:
• The thumbnail screen displays only Dual P2 3D clips recorded on this unit or on a 3D compliant P2 device. This mode does not display regular
P2 clips and care is required to avoid formatting such cards.
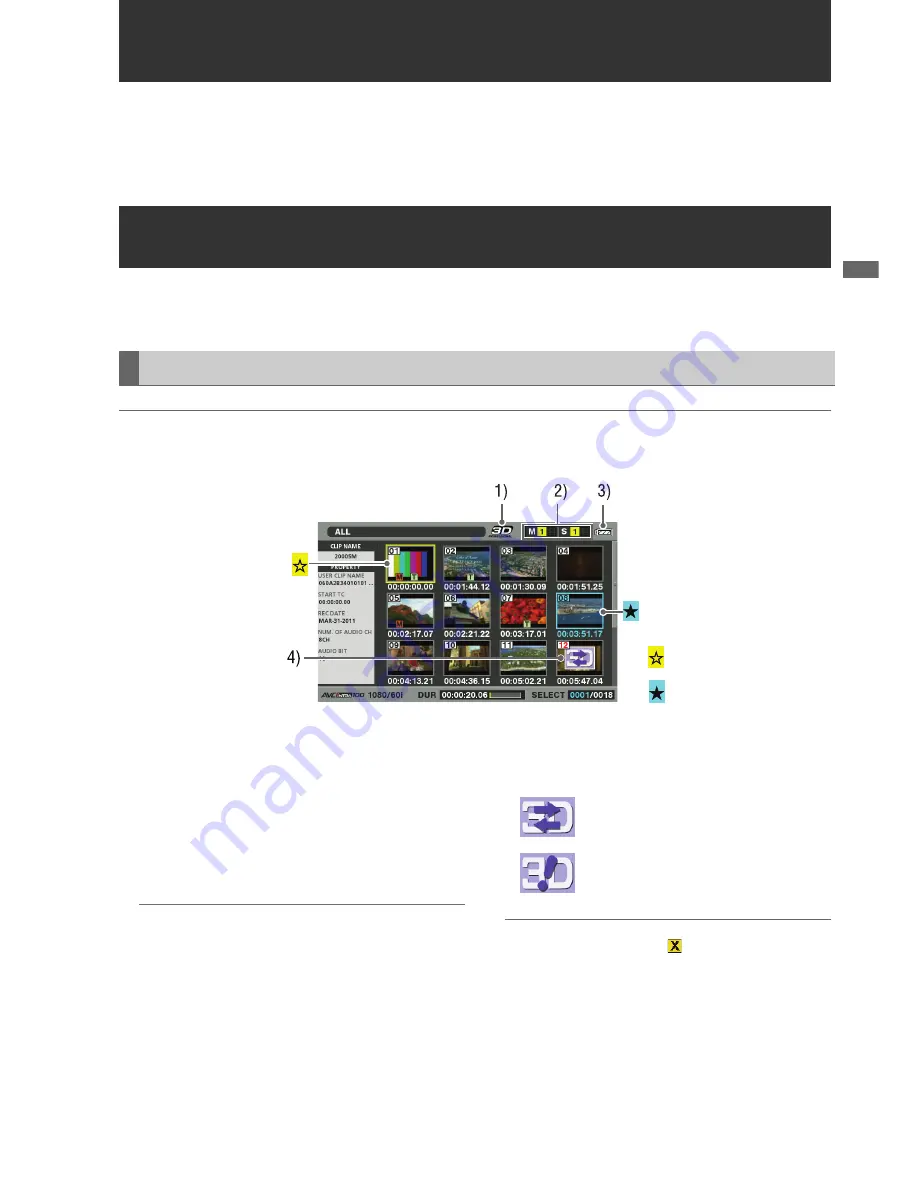
1)
“3D” Logo
Indicates that a 3D thumbnail is displayed.
2)
Slot status indication
L indicates the P2 card status on master side and R
indicates that on slave side. (
➝
For details on displayed
data, see “Thumbnail Screen” page 10).
3)
Battery status indicator
Indicates remaining battery capacity on the master unit.
◆
NOTE:
• Battery capacity on the slave unit is indicated on the slave unit.
4)
Bad Dual P2 3D clip indicator
Appears when an L or R clip has been inserted incorrectly
or something else is wrong with a Dual P2 3D clip.
◆
NOTE:
• If the bad clip indicator (yellow
) appears, repair the clip, see
(
➝
Setting Menu “OPERATION” - “REPAIR CLIP” page 52).
Displaying and Managing Clips
Thumbnail Screen Names and Functions
Pointer (yellow frame)
Selected clip (blue)
An L clip is inserted in a slave unit, or an R clip is
inserted in a master unit. Insert the clips correctly.
No L or R clip has been inserted.
Insert the missing clip.


