background image

L-718-8-E

1. BEFORE YOU BEGIN

When  you received, the sensor and transmitter,


both should be thoroughly inspected for any sign of 

damage by rough handling during transit.

If you have something to inquire, contact the nearest OVAL sales/service office in your district.

1.1 Confirming the Tag Information

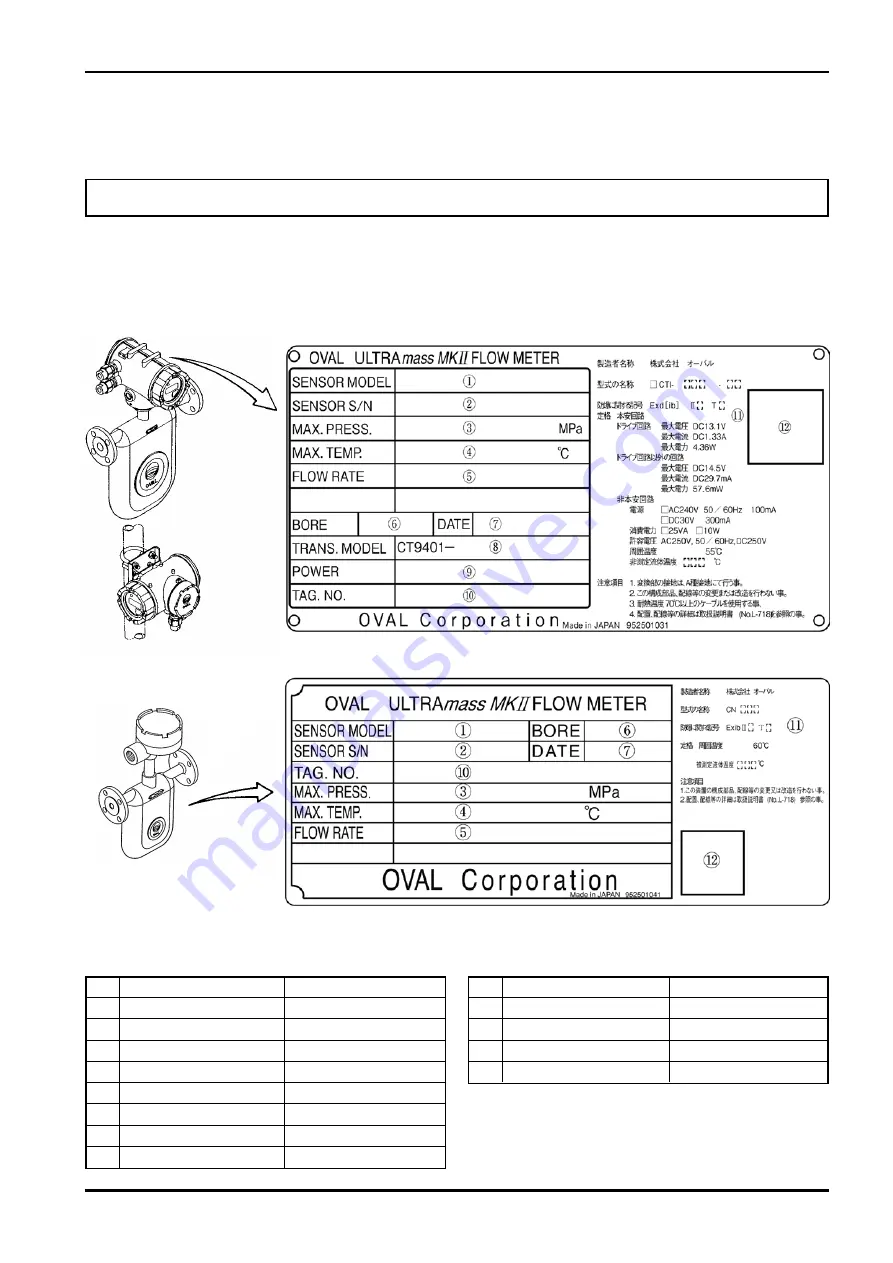
Product  code  and  major  ratings  appear  on  the  meter  nameplate.  Make  sure  that  the  product  you 
received complies with the specifications in your order.

Integrally-

mounted Type

Separately-mounted

Sensor Unit


No. 

Item 

Description


  Model 


  Product No.


  Max. Operating Press.


  Max. Operating Temp.


  Flow Range


Nominal Flange Dim.


  Date of Manufacture


Model


No. 

Item 

Description


  Power Source


Tag. No. 

Only when so specified.


  Ex. Specification


Certificate Nameplate

NOTE:
When you inquire, supply complete information 

as  to  the  product  name,  model  number, 

product number, ratings, etc.

Separately-mounted 

Transmitter

Fig. 1.1 Tag Location

Items shown on the tag

Summary of Contents for Ultra mass MKII CN003

Page 1: ...mum benefit from the product we recommend you to be well familiar with the information and instructions given in this manual before you place it in service and retain this manual at the field location...

Page 2: ...arately Mounted Sensor SUS316L SUS316L Hastelloy C 20 3 4 Separately Mounted Sensor Hastelloy C 22 3 5 Sanitary Fitting Type Sensor 24 3 6 Separately Mounted Transmitter CT9401 25 4 INSTALLATION 26 4...

Page 3: ...er and Output Signal Wiring Connections 39 5 9 2 Separately mounted Sensor to Transmitter CT9401 Intercabling 40 SEPARATELY MOUNTED TRANSMITTER CT9401 TERMINAL BOX 41 5 10 How to Change Cable Entry Or...

Page 4: ...ture 58 9 REPLACEMENT PARTS AND RETURNING EQUIPMENT 59 9 1 Parts List recommended parts 59 SEPARATELY MOUNTED TRANSMITTER TAG 59 SAFETY STATEMENT ON RETURNED GOODS 64 REPAIR REQUEST SHEET 65 NOTES ON...

Page 5: ...e sure that the product you received complies with the specifications in your order Integrally mounted Type Separately mounted Sensor Unit No Item Description Model Product No Max Operating Press Max...

Page 6: ...ity variation around 25 C and 65 R H 1 4 Operating Conditions In order to maintain the design metering accuracy and long service life it is essential that the ratings such as the flowrate density pres...

Page 7: ...is technology has resulted in this ULTRAmass MKII ULTRAmass Mark II a top performance easy to use general purpose flowmeter It consists essentially of a high performance sensor and a transmitter CT940...

Page 8: ...olume A1 Analog 1 instantaneous A2 Analog 2 instantaneous SEt PASS Security mode See Section 6 1 for Security mode Menu Items Menu items on the display are selectable with an infrared sensor behind th...

Page 9: ...on with remotely located transmitter CT9401 R For high pressure gas safety regulations and CE mark compliant models consult the factory Item Description Model CN003 CN006 CN010 CN015 CN025 CN050 CN080...

Page 10: ...IIA T3 or Exd ib IIA T4 4 Exd ib IIB T2 5 ATEX EexnC nL IIB T3 6 Dusttight and waterproof IP66 Installation Integrally mounted or remotely mounted remote mount only for CN003 and one combined with hig...

Page 11: ...this value C by specific gravity d 1 for water gives the pressure loss or C P MPa d For liquids with viscosities below 1 mPa s use the curve 1 0 mPa s 2 For high viscosity liquids not shown in the gra...

Page 12: ...0 1 0 1 0 01 0 001 0 0001 0 00001 0 000001 1000mPa s 100mPa s 10mPa s 1mPa s 0 01mPa s Flowrate kg min Pressure Loss Coeff C L 718 8 E 12 Flowrate kg min Pressure Loss Coeff C Model CN006 Model CN010...

Page 13: ...L 718 8 E 13 Flowrate kg min Pressure Loss Coeff C Flowrate kg min Pressure Loss Coeff C Model CN015 Model CN025 Continued on next page...

Page 14: ...Flowrate kg min Pressure Loss Coeff C Flowrate kg min Pressure Loss Coeff C L 718 8 E 14 Model CN050 Model CN080...

Page 15: ...t Product Code Description Item Model C T 9 4 0 1 Field mount transmitter CT9401 Construction K Integrally mounted R Separately mounted Power Source 6 20 to 30 DC 7 85 to 264V AC 50 60Hz M M 2 mass fl...

Page 16: ...ASME JPI 150 282 89 1 2 ASME JPI 300 291 95 ASME JPI 600 303 95 JIS 10K 299 95 JIS 20K 299 95 15 JIS 30K 319 115 CN015 JIS 40K 319 501 268 65 205 115 10 JIS 63K 343 120 ASME JPI 150 325 89 1 2 ASME J...

Page 17: ...SME JPI 300 563 165 ASME JPI 600 582 165 JIS 10K 657 185 JIS 20K 675 200 80 JIS 30K 725 210 CN080 JIS 40K 725 869 602 174 510 210 58 JIS 63K 771 230 ASME JPI 150 698 190 3 ASME JPI 300 717 210 ASME JP...

Page 18: ...9 1 2 ASME JPI 300 344 95 ASME JPI 600 95 JIS 10K 125 JIS 20K 125 25 JIS 30K 130 CN025 JIS 40K 569 329 83 262 130 14 JIS 63K 444 140 ASME JPI 150 108 1 ASME JPI 300 124 ASME JPI 600 124 NOTE Weight sh...

Page 19: ...5 25 JIS 63K 185 ASME JPI 150 152 2 ASME JPI 300 165 ASME JPI 600 165 JIS 10K 185 JIS 20K 200 80 JIS 30K 210 CN080 JIS 40K 869 602 174 510 210 60 JIS 63K 756 230 ASME JPI 150 190 3 ASME JPI 300 210 AS...

Page 20: ...ME JPI 300 276 95 ASME JPI 600 289 95 JIS 10K 256 95 JIS 20K 256 95 15 JIS 30K 276 115 CN010 JIS 40K 276 362 218 53 163 115 6 JIS 63K 294 120 ASME JPI 150 282 89 1 2 ASME JPI 300 291 95 ASME JPI 600 3...

Page 21: ...7 127 1 1 2 ASME JPI 300 560 155 CN050 ASME JPI 600 575 610 452 121 385 155 JIS 10K 513 155 JIS 20K 523 155 50 JIS 30K 561 165 JIS 40K 561 165 22 JIS 63K 595 185 ASME JPI 150 550 152 2 ASME JPI 300 56...

Page 22: ...E JPI 150 89 1 2 ASME JPI 300 344 95 ASME JPI 600 95 JIS 10K 125 JIS 20K 125 25 JIS 30K 130 CN025 JIS 40K 480 329 83 262 130 11 JIS 63K 444 140 ASME JPI 150 108 1 ASME JPI 300 124 ASME JPI 600 124 NOT...

Page 23: ...5 22 JIS 63K 185 ASME JPI 150 152 2 ASME JPI 300 165 ASME JPI 600 165 JIS 10K 185 JIS 20K 200 80 JIS 30K 210 CN080 JIS 40K 780 602 174 510 210 57 JIS 63K 756 230 ASME JPI 150 190 3 ASME JPI 300 210 AS...

Page 24: ...59 869 602 174 510 91 51 8 IDF 3S NOTE CN003 is of separately mounted type Model Sanitary Fitting L H h1 A W D Approx Weight Nom Dim Rating kg CN003 10 Ferrule 10A 265 344 186 49 179 34 4 1 CN006 10 F...

Page 25: ...r CT9401 Stanchion Mount All dimensions in millimeters U bolt for 2 Pipe 2 pieces 290 242 120 134 108 56 74 70 50 55 180 70 20 110 124 160 131 123 Cable Entry G1 2 Non I S Side Cable Entry G1 2 I S Si...

Page 26: ...tion location where pipeline oscillation is held below 0 3G to ensure stable and accurate metering 10 Locate the control valve downstream of ULTRAmassMK II Where cavitation may possibly occur install...

Page 27: ...affected by the flow pattern of process fluid Basically therefore it does not require any flow straighteners However connection with a deformed piping requires to use a concentric reducer or tapered p...

Page 28: ...arrangement as to open the line to the atmosphere immediately downstream of the meter 4 3 4 Prevention of Flow Range Over CAUTION Exceeding the meter s maximum flowrate will not significantly reduce...

Page 29: ...sensor flanges be sure to correct the flange face to face dimension tilt and off center of the pipes immediately before and after the sensor 2 Make sure of the flow direction by referring to the flow...

Page 30: ...g material use JIS G 3447 Stainless Steel Sanitary Tubes 2 Installation Sandwich the gasket between the sensor and ferrule and tighten with the clamp Be sure to install the gasket in line with the gro...

Page 31: ...sor lagging to facilitate inspection and maintenance 1 Careful attention should be paid to the maximum permissible temperature when steam trace is applied see General Specifications on page 9 2 If ste...

Page 32: ...the transmitter up and the sensor secured so that loosening bolts will not cause the transmitter to come off 3 Loosen bolts with hex wrench See Fig 4 10 M8 hex socket head screws at four places 4 Rota...

Page 33: ...four mating guide holes and install into place by pressing it along its axis After determining the physical orientation of display install the LCD display faceplate display cover and cover lock setsc...

Page 34: ...EC compatibility requirements for pressuretight packings Accordingly do not attempt to use pressuretight packings other than those furnished To accommodate varying finished O D of the cable three diff...

Page 35: ...terminal blocks for power and output signals 5 1 2 Power and Output Signal Connections common to integrally and separately mounted types 1 Terminals for wiring connections are found at the back of tr...

Page 36: ...ver and make wiring connections Using hex key M3 loosen the bolt and remove the cover lock Using a flat tool loosen the terminal cover by slowly rotate it counterclockwise until it comes off Separatin...

Page 37: ...ing instrument make wiring connections to terminals 1 and 2 If a shielded wire is used connect the shield to terminal G of the transmitter similar to Section 5 3 Analog Output Wiring Connections If a...

Page 38: ...erminal For output wiring use shielded twisted pair AWG 24 to 16 Maximum load resistance for analog output 1 and 2 is 600 Transmission lengths with frequency output voltage pulse are 10 meters max at...

Page 39: ...G 2 ANALOG 2 ANALOG 1 ANALOG 1 D GAIN D GAIN PULSE S OUT S IN S IN COM S OUT GND NEUT EARTH TERMINAL BOARD LINE PULSE 1 2 3 4 5 6 7 8 9 10 11 12 ANALOG 2 ANALOG 2 ANALOG 1 ANALOG 1 D GAIN D GAIN PULSE...

Page 40: ...tion 1 Transmitter end Bundle shielded wires for BRN RED GRN WHT BLU GRY PUR YEL ORG wire slip a black insulating sleeve over them and connect to the tie point strip as shown in the figure Exercise ca...

Page 41: ...e ranges from 15 C to 80 C use PVC interconnect cable If cable temperature falls below 15 C or exceeds 80 C use Teflon interconnect cable Shield Wires BRN RED GRN WHT BLU GRY PUR YEL ORG Transmitter C...

Page 42: ...structure of terminal block can be either A or B shown below Follow procedure according to the type of your terminal block Fig 5 12 Terminal block A Terminal block B Remove the isolation cover Fig 5...

Page 43: ...rminal box without exerting excessive force onto sensor cables After rotating reassemble terminal box in reverse procedure Fig 5 19 Terminal block A Terminal block B Remove screws from terminal block...

Page 44: ...ocedure to select the nature of error to be displayed on the LCD and available error messages see Sections 6 4 1 Selection of Error Messages and 8 1 1 Error Messages respectively 6 2 Display Menu Sele...

Page 45: ...operations described in Sec 6 3 2 Key Scroll with a single key Pressing the key on the display with your finger causes the optical sensor to respond and the ACK indicator appears at the most signific...

Page 46: ...ZEro Adj Zeroing ends Abort 3 sec elapsed Key Protect OFF and SET PASS ON Key Protect OFF and SET PASS ON Dens d X XXXX ON Temp t XX XX ON D Total XXXXXXXX ON Less than 5 sec ON Between 5 and 7 sec in...

Page 47: ...on 8 1 1 Error Messages NOTES 1 When errors occur corresponding error codes are sequentially and automatically displayed 2 When errors are removed it returns to the normal display Currently selected m...

Page 48: ...CD display itself it does not affect the output and error processing in any way You can get around this problem by changing the units of registration 6 4 3 How to Change Displayed Units of Registratio...

Page 49: ...low a warmup period for about 30 minutes Zeroing When the flowmetering status settles down to stability shut off the downstream valve to stop the process fluid flow completely Zero the meter in this s...

Page 50: ...e second or longer Then while this screen stays on hold your finger closer to for a period between 5 and 7 seconds 4 PASS screen appears 3 seconds later it automatically returns to F1 mass flowrate sc...

Page 51: ...e before the product leaves the factory and is used to change modes 2 Procedure to Operate the Key on the LCD Display 1 At F1 mass flowrate screen hold your finger closer to for a period between 5 and...

Page 52: ...min or less than 5 sec rEAdy ON 5 to 7 sec OFF 1 sec rESEt 3 sec elapsed Key Protect OFF Abort 3 sec elapsed Analog 1 A1 XX ON Analog 2 A2 XX ON Key Protect ON No command for 5 sec min or less than 5...

Page 53: ...le zeroing is in progress a message ZEro Adj appears for 30 seconds or so Normally it takes about 30 seconds to complete the zeroing process If zeroing proves to be a failure an error message Err 51 w...

Page 54: ...e width at ON L level as shown below in stead of 50 7 7 About Voltage Pulse Output Specification Voltage pulse output is optionally available CAUTION When voltage pulse output specification is selecte...

Page 55: ...ture out of 220 220 C range Select at Error Indicator Same as Err 24 Density Outside Limits Density out of 0 5g mL range left Err 25 P O Sig Alarm AD input out of 10 95 range Transmitter Err 31 EEPROM...

Page 56: ...e Adjustment failure Zeroing error Zeroing error above max allowable range 10 Slug flow alarm Slug flow alarm Out of predetermined density range such as bubble entrapment default 0 3 to 2gmL Fixed out...

Page 57: ...before removing or installing the glass cover 2 Increasing the sensitivity too high can make the sensor too ready to respond even to the glass cover resulting in a stay ON sensor So use the ACK mark o...

Page 58: ...ard Max ambient temp range 0 200 150 100 50 0 50 100 150 200 5 10 15 20 25 30 35 40 45 50 55 60 65 Fluid temperature Ambient temperature MAX ambient temperature Please contact us in the case the ambie...

Page 59: ...ND RETURNING EQUIPMENT This section is provided for spare parts available to minimize downtime should any problem arise Order replacement parts from the OVAL representative in your area Part names for...

Page 60: ...Flow mass cutoff setup Spec set 9 Dens unit Density unit select Spec set 10 Dens damp Density damping setup Spec set 11 Slug low limit Slug flow density low limit setup Spec set 12 Slug high limit Sl...

Page 61: ...37 Sensor failure 38 Transmitter failure 39 Parameter Aalarm 40 Adjustment failure Valid invalid select of individual errors Spec set 41 Slug flow alarm 42 Fixed output 43 Calibration in progress 44 B...

Page 62: ...ensity calibration outside Factory set 63 Cal freq Frequency at density calibration Factory set 64 Freq coeff Density correction factor Factory set Transmitter Information 65 Tag Tag No Factory set 66...

Page 63: ...2 000 g ml Slug duration 0 sec Density compensation OFF Standard temp 20 00 Expansion coef 0 00024 Temperature Unit Damp 2 5 sec Analog output 1 Assign Mass Flow URV 180 000 kg min LRV 0 000 kg min Lo...

Page 64: ...MSDS is available attach here NOTE MSDS stands for Material Safety Date Sheet It informs us of the physical and chemical properties of meterials and how to handle them SAFETY STATEMENT ON RETURNED GO...

Page 65: ...quipment will NOT be processed Include your instructions and conditions accurately and in detail NOTE To avoid misunderstanding completely fill in this form Equipment Model Serial No Connections Power...

Page 66: ...L 718 8 E 66...

Page 67: ...L 718 8 E 67...

Page 68: ...L 718 8 E 68...

Page 69: ...L 718 8 E 69...

Page 70: ...L 718 8 E 70...

Page 71: ...L 718 8 E 71...

Page 72: ...L 718 8 E 2018 09 Revised 2000 12 Released L 718 8 E 1 All specifications are subject to change without notice for improvement...

Reviews: