


114
Using the Camera Remote Unit RM-1
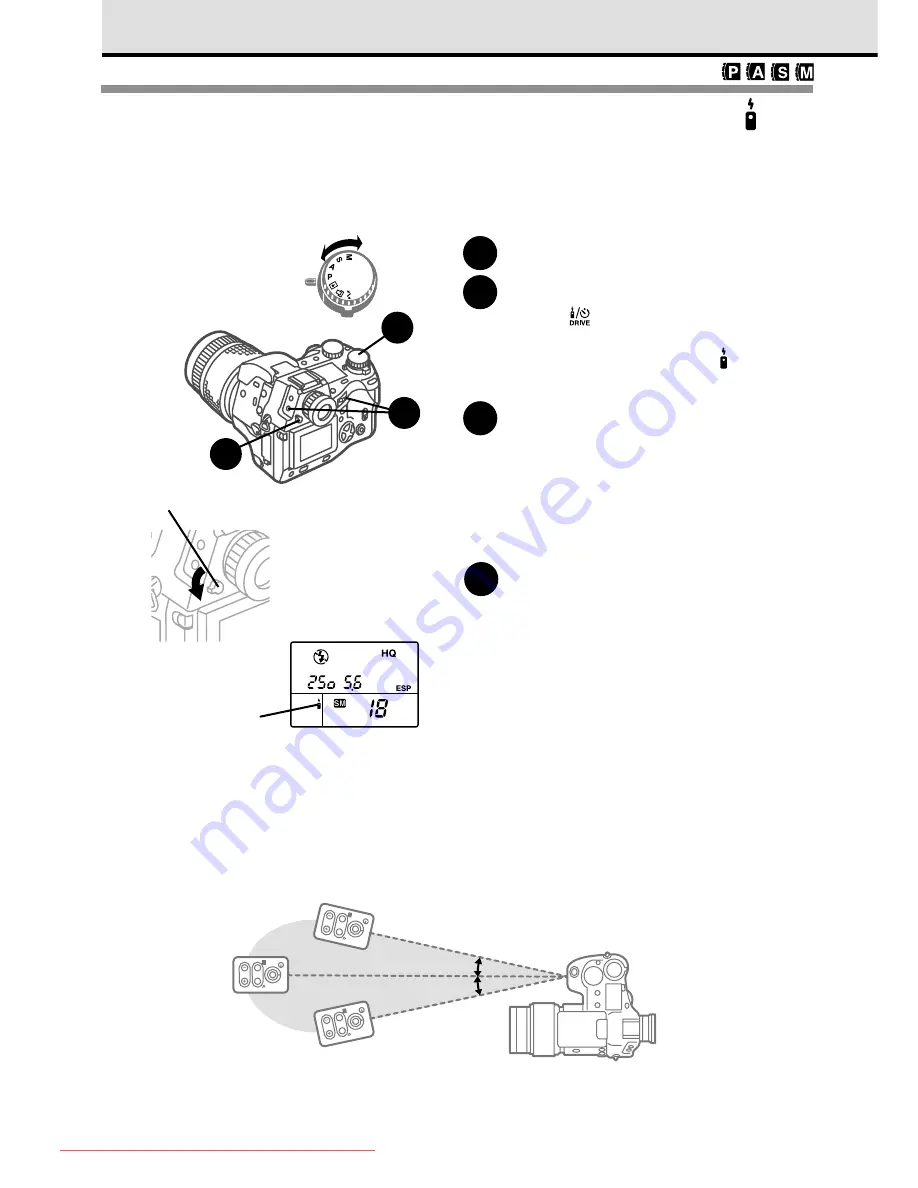
With the camera in the remote mode, you can release the shutter with the electronic
remote unit RM-1 while standing in front of the camera. The shutter will release 2
seconds after pressing the transmit button on the remote unit.
1
Set the mode dial to
P
,
A
,
S
, or
M
.
2
Press and hold down the drive
button
, and then turn the main
dial or the sub dial until you see
the remote control mark appear in
the control panel.
3
Mount the camera on a tripod and
compose the picture.
If the subject is not yet composed in the
center of the viewfinder, you can use focus
lock. (
➞
65) If you are going to include
yourself in the picture, focus on the area
where you intend to appear in the picture.
4
Pull down the eyepiece shutter
lever to prevent light entering the
viewfinder from behind the camera.
Pull down the eyepiece shutter lever on
the left of the viewfinder.
Light entering the viewfinder from behind
the camera could wash out the picture with
white light.
Working range of the remote unit
Use the remote in front of the camera within the range of distances and angles shown below. The
following elements could narrow the working range of the remote/self-timer sensor: direct sunlight or
any other strong light source, fluorescent light, or any device emitting electrical or radio waves.
Remote control
mark
ON
OFF
2
1
4
Eyepiece
shutter lever
Camera
WW
TT
W W
T T
WW
TT
Approx. 2m (6.6 ft.) (outdoor)
Approx. 3m (10 ft.) (indoor)
Approx. 3m (10 ft.) (indoor)
Approx. 2m (6.6 ft.) (outdoor)
15
°
15
°
Approx. 5m (16.6 ft.) (indoor)
Approx. 3m (10 ft.) (outdoor)
Remote unit
Downloaded From camera-usermanual.com
Summary of Contents for E10 - CAMEDIA E 10 Digital Camera SLR
Page 20: ...18 Downloaded From camera usermanual com ...
Page 36: ...Downloaded From camera usermanual com ...
Page 38: ...Downloaded From camera usermanual com ...
Page 42: ...Downloaded From camera usermanual com ...
Page 52: ...Downloaded From camera usermanual com ...
Page 66: ...Downloaded From camera usermanual com ...
Page 86: ...84 Downloaded From camera usermanual com ...
Page 89: ...Downloaded From camera usermanual com ...
Page 90: ...Downloaded From camera usermanual com ...
Page 98: ...96 Downloaded From camera usermanual com ...
Page 108: ...Downloaded From camera usermanual com ...
Page 112: ...110 Downloaded From camera usermanual com ...
Page 115: ...Downloaded From camera usermanual com ...
Page 125: ...Downloaded From camera usermanual com ...
Page 138: ...136 Downloaded From camera usermanual com ...
Page 144: ...Downloaded From camera usermanual com ...
Page 149: ...Downloaded From camera usermanual com ...
Page 153: ...Downloaded From camera usermanual com ...
Page 158: ...156 Downloaded From camera usermanual com ...
Page 160: ...Downloaded From camera usermanual com ...
Page 166: ...Downloaded From camera usermanual com ...
Page 170: ...Downloaded From camera usermanual com ...
Page 171: ...Downloaded From camera usermanual com ...
Page 181: ...Downloaded From camera usermanual com ...
Page 187: ...Downloaded From camera usermanual com ...
Page 196: ...Downloaded From camera usermanual com ...
Page 198: ......


