background image

- 38 -

2. Setting Up

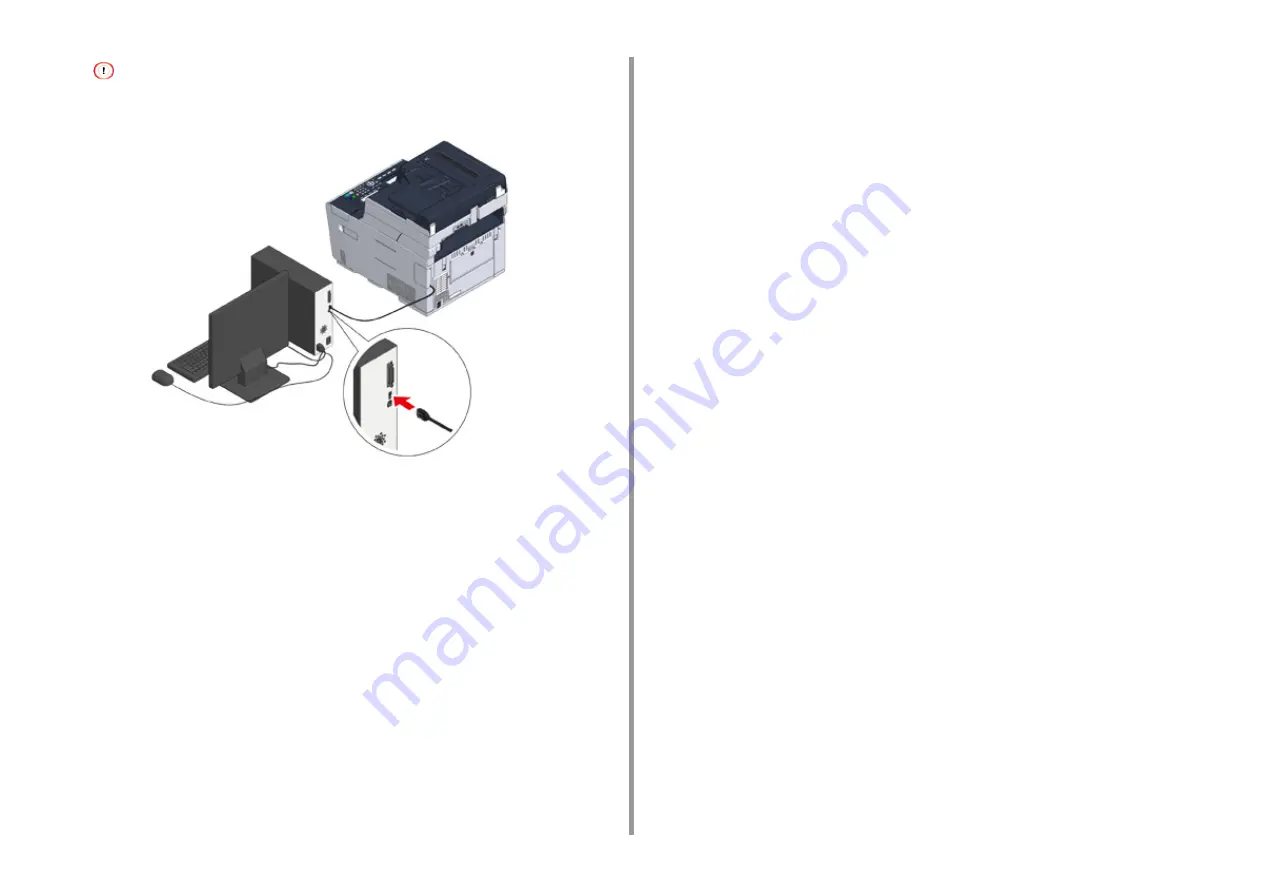
For Windows, do not insert the other end of the USB cable into the computer until the instruction is displayed on 
the screen when the driver installation is in progress.

Go to the procedure to "Loading Paper in the Tray".

Summary of Contents for MC563

Page 1: ...MC563 ES5463 MFP User s Manual ...

Page 2: ...ion 41 Setting Up This Machine 42 Language Setup 42 Setting the Administrator Password 43 Easy Setup 43 Connecting to a Wireless LAN 45 Before Connecting to a Wireless LAN 45 Enabling Wireless LAN Connection 46 Connecting to an Access Point Infrastructure 47 Connecting to the Machine Directly 51 Installing a Driver and Software to a Computer 53 For Windows 53 For Mac OS X 56 3 Basic Operations 60 ...

Page 3: ... 129 9 Troubleshooting 131 If Paper Jams Occur 132 If the Error Code is 370 371 372 132 If the Error Code is 380 381 382 385 389 137 If the Error Code is 390 141 If the Error Code is 391 392 393 144 If the Error Code is 409 146 If a Document Jam Occurs 152 If a Document is Visible in the Paper Path 152 If a Document is Invisible in the Paper Path 153 Copy Problems 155 Unable to Copy 155 Print Prob...

Page 4: ...1 Before starting Cautions Related to Safety General Cautions About This Manual Trademarks and Other Information License ...

Page 5: ...rting Cautions Related to Safety Indicates additional information which if ignored or not followed may result in personal injury or death Indicates additional information which if ignored may result in personal injury ...

Page 6: ...s left plugged into the outlet for an extended period of time dust adheres on the bases of the plug blades and a short may occur possibly resulting in fire Do not vacuum spilled toner with an electric vacuum cleaner Vacuuming spilled toner with an electric vacuum cleaner may result in ignition due to sparks from electric contacts or other reasons If toner spills on the floor or other places wipe t...

Page 7: ... field of vision Do not touch a broken liquid crystal display Injury may result If you get liquid liquid crystal spilled from the liquid crystal display into your eyes or mouth immediately rinse with a large amount of water Seek medical advice if necessary Do not disassemble the image drum or toner cartridge or force them open You may inhale the scattered toner or the toner may land on your hands ...

Page 8: ...en permission from Oki Data Corporation 2016 Oki Data Corporation Manual Composition User s Manual PDF Stored in the DVD ROM which comes with the machine Advanced Manual PDF Download this manual from the Oki data web site and refer to it About Descriptions Marks symbols illustrations and other descriptions are provided About Marks About Symbols About Illustrations Unless otherwise specified this m...

Page 9: ...tion or other items that are displayed on the display screen on the operator panel Indicates a menu window or dialog box name that is displayed on the screen on a computer They can be clearly distinguished in descriptions or illustrations in procedures Indicates a message on the display screen or entered text Indicates a file name on a computer Indicates the topic title of a link destination Indic...

Page 10: ...004 108 EC compliance and configurations other than this may affect that compliance EMERGENCY FIRST AID Take care with toner powder If swallowed give small amounts of cold water and seek medical attention DO NOT attempt to induce vomiting If inhaled move the person to an open area for fresh air Seek medical attention If it gets into the eyes flush with large amounts of water for at least 15 minute...

Page 11: ...IMPORTER TO THE EU AUTHORISED REPRESENTATIVE OKI Europe Limited Blays House Wick Road Egham Surrey TW20 0HJ United Kingdom For all sales support and general enquiries contact your local distributor ENVIRONMENTAL INFORMATION ...

Page 12: ...ereby granted free of charge to any person obtaining a copy of this software and associated documentation files the Software to deal in the Software without restriction including without limitation the rights to use copy modify merge publish distribute sublicense and or sell copies of the Software and to permit persons to whom the Software is furnished to do so subject to the following conditions ...

Page 13: ...the Machine Installing the Optional Equipment Connecting a Telephone Line Connecting the Power Code Connecting a LAN Cable USB Cable Loading Paper in the Tray Checking the Setting Information Setting Up This Machine Connecting to a Wireless LAN Installing a Driver and Software to a Computer ...

Page 14: ...nstall the machine in a location subject to high temperatures or in a location near fire Do not install the machine in a location where chemical reactions may occur such as a laboratory Do not install the machine near alcohol thinners or other flammable solvents Do not install the machine in a location within the reach of small children Do not install the machine in an unstable location such as on...

Page 15: ...arpet Do not install this machine in a closed room or other locations with bad circulation and ventilation If you use this machine in a small room continuously for an extended period of time make sure to ventilate the room Install this machine away from a source that emits strong magnetic fields or noise Install this machine away from a monitor or television Carry this machine by holding both its ...

Page 16: ... 16 2 Setting Up Side view when the additional tray unit is installed ...

Page 17: ...oner cartridge is not installed in the ES model Install the toner cartridge that is included in this machine Refer to Replacing the Image Drum Software DVD ROM Power cord Telephone cable Envelope lever The envelope lever is attached to the MP tray Use the envelope lever if envelopes wrinkle after being printed For instructions refer to the Advanced Manual LAN cables or USB cables are not included ...

Page 18: ... Packaging and cushioning materials are required for transporting the machine Do not dispose of it and keep it for future use 1 Remove the machine from the box and then remove accessories cushioning materials and the plastic bag from the machine 2 Lift the machine and then place it where it is to be installed Do not open the scanner unit until step 4 3 Remove the cushioning materials protection ta...

Page 19: ...g of the cartridge Turn the levers of all 4 toner cartridges If you close the output tray without turning the blue lever it may cause a malfunction Be sure to turn the blue lever until its top aligns on the lug in the back of the toner cartridge 7 Pull the locking levers on the fuser unit toward you to unlock 8 Hold the fuser unit handle and lift the fuser unit out of the machine ...

Page 20: ...he fuser unit to the grooves behind the toner cartridges place the fuser unit into the machine 11 Push the levers on the fuser unit to lock 12 Close the output tray a slowly and push the center of the output tray for confirmation If the error message that the output tray is open does not disappear make sure that the output tray is closed securely ...

Page 21: ... 21 2 Setting Up 13 Hold the handle B to close the scanner unit ...

Page 22: ...dule when you want to use a wireless connection After installing be sure to change the wireless LAN setting from DISABLE to ENABLE on the operator panel 1 Check that the machine is turned off and power cord and all the cables are unplugged Installing the wireless LAN module with the machine turned on may cause the machine and wireless LAN module to malfunction 2 Open the wireless LAN module cover ...

Page 23: ...ss LAN Attach the additional tray unit when increasing the number of sheets or paper to be set is needed Up to 2 trays can be installed Set the number of trays on the printer driver after installing them 1 Check that the machine is turned off and power cord and all the cables are unplugged Installing the additional tray unit with the machine turned on may cause the machine and additional tray unit...

Page 24: ...to install two additional trays fix them together with the lock pieces 3 Slowly stack the machine on the additional tray unit aligning their back sides and right sides 4 Screw the machine and additional tray unit with the lock pieces ...

Page 25: ... is installed When the machine is connected to a network over Bonjour When the machine is connected via USB interface Setting Additional Tray s to the Windows PCL Printer Driver 1 Click Start and then select Devices and Printers 2 Right click OKI MC563 and then select OKI MC563 PCL6 from Printer properties 3 Select the Device Options tab 4 Enter the total number of trays and then click OK If a TCP...

Page 26: ...l number of trays for Available Trays in Installable Options 5 Click OK Setting Additional Tray s to the Mac OS X Printer Driver 1 Select System Preferences from the Apple menu 2 Click Printers Scanners 3 Select the machine and then click Options Supplies 4 Select the Options tab 5 Select the total number of trays for Available Tray and then click OK ...

Page 27: ...r reception fails set Super G3 to OFF You cannot connect an ISDN line directly To connect use a terminal adapter TA and connect to the LINE connector of the machine Connecting to the Public Line If Using Only for Faxes Connecting to the Public Line If Connecting a Telephone to the Machine Connecting the Optical IP telephone Connecting to the ADSL Environment Connecting PBX Home Telephone or Busine...

Page 28: ...nto a public line analog c 2 Remove the telephone connector cover d 3 Plug the telephone cable f that is connected to the external telephone into the TEL connector e of the machine A telephone that is connected to the machine is called an external telephone Connecting to the Public Line If Connecting a Telephone to the Machine ...

Page 29: ... the machine may not be able to receive the fax If you connect a telephone with the fax function disable the fax function of the telephone disable fax reception before using In the case of direct interconnection separate construction work is required Contact your telephone company 1 Plug the included telephone cable a that is connected to the Optical device IP telephone d into the LINE connector b...

Page 30: ...e ADSL modem f into the LINE connector b of the machine 2 Connect the phone line splitter e to the ADSL modem f with a telephone cable g and then plug another telephone cable h into the public line analog c 3 Remove the telephone connector cover 4 Plug the telephone cable i that is connected to an external telephone into the TEL connector d of the machine If a fax dial fails set the PBX line to ON...

Page 31: ...d door phones Business Phone is a simple switcher which accommodates three or more telephone lines with which many telephones can be shared allowing for extension phones or other usage 1 Plug the telephone cable that is connected to a control device such as PBX into the LINE connector a of the machine 2 If you use a telephone line for both fax and phone plug the telephone cable of the external tel...

Page 32: ... the public line analog c into the LINE connector b of the machine 2 Remove the telephone connector cover 3 Plug the telephone cable f that is connected to the CS tuner or digital television e into the TEL connector d of the machine Connecting a CS Tuner or Digital Television ...

Page 33: ... cord into the outlet Do not plug or unplug the power cord with wet hands Install the power cord in a location where users cannot step on it and do not place any object on the power cord Do not bundle or tie the power cord Do not use a damaged power cord Do not overload the outlet Do not connect the power cords of this machine and other electric products to the same outlet If the power cord of thi...

Page 34: ... 34 2 Setting Up 1 Plug the power cord into the power connector 2 Plug the power cord into the outlet ...

Page 35: ...e following steps Connecting a LAN Cable Connecting a USB Cable A LAN cable category 5e or higher twist pair straight is not supplied 1 Prepare a LAN cable category 5e or higher twist pair straight and hub 2 Check that the machine and computer are turned off 3 Open the interface cover on the back side of the machine pressing the center part of it Connecting a LAN Cable ...

Page 36: ... end of the LAN cable into the network interface connector 5 Pass the LAN cable under the tab and then close the interface cover 6 Insert the other end of the LAN cable into the hub Go to the procedure to Loading Paper in the Tray ...

Page 37: ...terface cover on the back side of the machine pressing the center part of it 4 Insert one end of the USB cable into the USB interface connector on the machine Do not insert the USB cable into the network interface connector It may cause a malfunction 5 Pass the USB cable under the tab and then close the interface cover 6 Insert the other end of the USB cable into the USB interface connector on the...

Page 38: ... For Windows do not insert the other end of the USB cable into the computer until the instruction is displayed on the screen when the driver installation is in progress Go to the procedure to Loading Paper in the Tray ...

Page 39: ...ut Paper Types That Can be Loaded 1 Pull the paper cassette out 2 Slide the paper guide a to the width of paper to be loaded 3 Slide the paper stopper b to the length of paper to be loaded 4 Fan a stack of paper well and then align the edges of the paper 5 Load paper with the print side face down Do not load paper above the mark on the paper guide 6 Secure the loaded paper with the paper guide ...

Page 40: ... 40 2 Setting Up 7 Replace the paper cassette into the machine Push the paper cassette until it stops ...

Page 41: ...erver Secondary Set the IP address for a Secondary DNS server WINS Server Primary Set the name up to 15 characters or the IP address for the Primary WINS server WINS Server Secondary Set the name up to 15 characters or the IP address for the Secondary WINS server Item Description Setting Value Mail Server Address Set the IP address or host name for the SMTP server You can enter up to 64 characters...

Page 42: ... Setup and press the button 3 Enter the administrator password and then press the OK button The factory default administrator password is 999999 4 Press the or button repeatedly to select Manage Unit and press the button 5 If you do not want to change the display language go to step 5 in Setting the Administrator Password To change the display language press the or button repeatedly to select Lang...

Page 43: ... button repeatedly to select Easy Setup and press the button 4 Enter the administrator password and then press the OK button The factory default administrator password is 999999 If the administrator password is changed enter the updated password 5 Check that 1 Date Time Setting is selected and then press the button 6 Press the or button to select the Time Zone you want to set and press the button ...

Page 44: ...y your provider or network administrator IP address subnet mask default gateway DNS Server Primary DNS Server Secondary WINS Server Primary WINS Server Secondary 18 Network Setting was completed is displayed for several seconds and the screen returns to the Setup Menu screen 19 To set up the Scan To E mail function press the button repeatedly to select 4 E mail Setting and press the button If you ...

Page 45: ...tion speed of a wireless LAN connection may be slower than that of a wired LAN or USB connection depending on the environment If you want to print big data such as a photo it is recommended to print with a wired LAN or USB connection Connecting to an Access Point Before connecting this machine to a wireless LAN access point check the following 1 Check if your wireless LAN access point matches the ...

Page 46: ...turning the machine on After attaching the wireless module enable the wireless LAN module on the operator panel 1 Press the SETTING button 2 Press the button to select Admin Setup and press the button 3 Enter the administrator password and then press the OK button The factory default administrator password is 999999 If the administrator password is changed enter the updated password 4 Press the or...

Page 47: ...up wireless and Yes is selected Press the OK button and go to step 6 4 Press the SETTING button 5 Press the or button repeatedly to select Wireless Infrastructure Setting and press the button 6 Enter the administrator password on the administrator password entry screen and then press the OK button The factory default administrator password is 999999 If the administrator password is changed enter t...

Page 48: ...button 5 Press the or button repeatedly to select Wireless Infrastructure Setting and press the button 6 Enter the administrator password on the administrator password entry screen and then press the OK button The factory default administrator password is 999999 If the administrator password is changed enter the updated password 7 Check that the screen displays the Cannot be used simultaneously wi...

Page 49: ...called a network key security key password or Pre shared Key 2 Check that the wireless LAN access point starts and is operating properly 3 Turn the machine on Check that the screen displays Do you want to Set up wireless and Yes is selected and then press the OK button 4 Press the SETTING button 5 Press the or button repeatedly to select Wireless Infrastructure Setting and press the button 6 Enter...

Page 50: ...press the OK button Enter the Pre shared Key select Done at the end and then press the OK button If you selected WEP enter the WEP Key and then press the OK button 17 If the displayed content is the same as that you checked in step 1 select Yes and then press the OK button It takes approximately 30 seconds for the machine to detect the wireless LAN access point When the screen indicates that conne...

Page 51: ...hen press the OK button The factory default administrator password is 999999 If the administrator password is changed enter the updated password 6 Press the or button repeatedly to select Network Menu and press the button 7 Check that Network Setting is selected and then press the button 8 Press the button repeatedly to select Wireless AP Mode Setting and press the button 9 Check that the screen d...

Page 52: ...Menu and press the button 6 Check that Network Setting is selected and then press the button 7 Press the button repeatedly to select Wireless AP Mode Setting and press the button 8 Check that the screen displays the Cannot be used simultaneously with wireless infrastructure message for several seconds and Enable is selected on the Please enable disable wireless AP mode screen Press the OK button 9...

Page 53: ...k the status of this machine before installing This machine is turned on For network connection this machine is connected to the network via a LAN cable and required information such as IP address is already set 1 Insert the included Software DVD ROM into a computer 2 When Auto Play is displayed click Run setup exe If the User Account Control dialog box is displayed click Yes 3 Select a language f...

Page 54: ...ck Install Optional Software Installation starts The following software is installed PCL6 Printer Driver Including Network Extension and Color Swatch Utility Scanner Driver ActKey FAQ Install other software from Custom Install Installing Software Advanced Manual 9 Make sure that the software is successfully installed and then click Printing Test Select the printer for test printing and the click P...

Page 55: ... 55 2 Setting Up 10 Click Complete 11 Click Next If the following dialog box is displayed click Yes ...

Page 56: ...vanced Manual Install the Mac OS X scanner driver 1 Make sure that the machine and a computer are connected and the machine is turned on and then insert the included Software DVD ROM into the computer 2 Double click the OKI icon on the desktop 3 Drivers Scanner Double click Installer for OSX 4 Click Continue 5 Check that the displayed content and then click Continue For Mac OS X ...

Page 57: ...l the Mac OS X PS printer driver When the installation is complete print a test page in step 15 1 Make sure that the machine and a computer are connected and the machine is turned on 2 Insert the Software DVD ROM into a computer 3 Double click the OKI icon on the desktop 4 Drivers PS Double click Installer for OSX 5 Enter the administrator password and then click OK Follow the on screen instructio...

Page 58: ...chine and then make sure that OKI MC563 PS is displayed for Use To change the name enter a new name into Name 11 Click Add 12 If Installable options is displayed click Continue Types of Names Displayed in the Connection Methods List Network OKI MC563 last 6 digits of MAC address Bonjour USB OKI DATA CORP MC563 USB ...

Page 59: ...ed to Printers and OKI MC563 PS is displayed for Kind If OKI MC563 PS is not displayed for Kind correctly click delete the machine from Printers and then newly perform steps 8 to 12 14 Click Open Print Queue 15 Select Print Test Page from the Printer menu ...

Page 60: ...3 Basic Operations Names of Components Basic Operations on the Operator Panel Turning the Machine On or Off Loading Paper Setting a Document This section describes basic operations of this machine ...

Page 61: ...ch component Front View Rear View Inside of the machine Front View Symbol Name a Auto document feeder ADF b Document tray c Scanner unit d Operator panel Basic Operations on the Operator Panel e USB port f MP tray Multipurpose tray g Open button h Paper supporter i Envelope lever ...

Page 62: ...Wireless LAN module cover Symbol Name m Output tray n Tray 1 Rear View Symbol Name a Telephone connector for connecting an external telephone b LINE connector c Rear output tray d Power connector e Interface connector cover f Network interface connector g USB interface connector ...

Page 63: ...erations Inside of the machine Symbol Name a LED head b Fuser unit c Toner cartridge Image drum Y yellow d Toner cartridge Image drum M magenta e Toner cartridge Image drum C cyan f Toner cartridge Image drum K black ...

Page 64: ...ok dial operation PRINT button Displays the print function screen SCAN button Displays the scan function screen COPY button Displays the copy function screen 3 STATUS Displays the status menu Flashes lights up if there is an error 4 SETTING Displays the machine setting menu screen 5 REDIAL HELP Displays the Help screen 6 RESET LOG OUT On the top screen of each function logs you out On the setting ...

Page 65: ...OP Cancels copying fax transmissions or other jobs 13 START COLOR Starts scanning in color 14 START MONO Starts scanning in black white 15 CLEAR Executes the following actions according to the entered items when pressed or held Minimizes a setting value Enters zero as a setting value Clears what is entered Cancels a selected item 16 Scroll right Proceeds to the next screen Moves the cursor right d...

Page 66: ...screen and pull it forward Entering Characters Deleting Entered Characters Entering Characters If the character entry is required while setting an item the entry screen appears Enter characters using the buttons keyboard or numeric keypad on the operator panel Adjusting the Angle of the Display Screen Entering Characters ...

Page 67: ...s or numeric keypad for numbers 2 After entering all the characters select Enter and then press the OK button Deleting Entered Characters Press the CLEAR button on the operator panel to delete an entered character Press and hold the CLEAR button to delete all the entered characters Or press the or button on the operator panel to select and then press the OK button ...

Page 68: ...Machine On Turning the Machine Off 1 Check that no documents are set on the document glass or in the ADF and the ADF cover is closed 2 Press the power switch for approximately a second When the machine is turned on the power switch LED lamp lights up 3 The home screen appears when the machine is ready Turning the Machine On ...

Page 69: ...is blinking message is displayed on the operator panel and the power switch LED lamp flashes at approximately one second intervals After a while the machine automatically turns off and the power switch LED lamp goes out What You Should Do If You Do Not Use This Machine for an Extended Period of Time If you do not use this machine for an extended period of time due to holidays trips or other reason...

Page 70: ... If you print on paper that is not recommended by Oki Data check the print quality and the movement of the paper thoroughly in advance to ensure that there are no problems Paper type About Paper Types That Can be Loaded Paper type Paper size Paper weight A4 210 x 297 64 to 220 g m2 17 to 58 lb For duplex printing 64 to 176 g m2 17 to 47 lb If you set paper that is 148 mm 5 8 inches wide or narrowe...

Page 71: ...ight Partly printing paper Subject to plain paper 64 to 220 g m2 17 to 58 lb Color paper Subject to plain paper 64 to 220 g m2 17 to 58 lb Available paper size Tray capacity Paper weight A4 A5 A6 1 B5 B6 1 Letter Legal 13 inches Legal 13 5 inches Legal 14 inches Executive Statement 1 8 5 SQ 8 5 x 8 5 inches Folio 210 x 330 mm 16K 184 x 260 mm 16K 195 x 270 mm 16K 197 x 273 mm Custom size 2 250 she...

Page 72: ... type with glue that remains intact when subjected to hot roll pressure fusing in the machine Window envelopes are not suitable Labels Labels must be of the type recommended for use in copiers and laser printers in which the base carrier page is entirely covered by labels Other types of label stocks may damage the machine due to the labels peeling off during the printing process Available paper si...

Page 73: ...e out 2 Slide the paper guide a to the width of paper to be loaded 3 Slide the paper stopper b to the length of paper to be loaded 4 Fan a stack of paper well and then align the edges of the paper 5 Load paper with the print side face down Do not load paper above the mark on the paper guide 6 Secure the loaded paper with the paper guide Loading Paper in Tray 1 2 3 ...

Page 74: ...nting on the paper fed from the MP tray To stop printing open the output tray For instructions on how to remove paper see If Paper Jams Occur If you open and close the MP tray vigorously the paper feed roller of MP tray may fall and get in the way of loading paper If the paper feed roller of MP tray has fallen raise the paper feed roller of MP tray before loading paper 1 Open the MP tray forward b...

Page 75: ...l its edge touches the paper feed entrance Do not load paper above the mark When a printer is in the power saving mode press the Power Save button to restore from the mode 7 Set Paper Size Media Type and Media Weight on the paper setup screen 8 Press Close Do not load paper in different sizes types or weights When adding sheets of paper remove paper loaded in the MP tray bundle the whole batch of ...

Page 76: ...sunlight Near the inside of an exterior wall On an uneven surface Where static electricity may be generated Where temperature excessively rises high and temperature rapidly changes Near this machine an air conditioner a heater or duct Do not unwrap paper until just before you use Do not leave paper unwrapped for a long period Doing so may result in printing problems Depending on the print media en...

Page 77: ...ADF Set the document on the document glass Documents with holes or tears Documents folded or damaged Documents with fold lines or badly curled or rolled documents Damp documents Documents that are stuck together due to static electricity Carbon backed documents Cloth metal sheets OHP films Stapled clipped taped documents or documents with sticky notes Documents that are pasted each other or docume...

Page 78: ...hard document gently Do not set a document that has sharp protrusions About the Scannable Area Texts or images within the 2 mm area from the edges of standard paper cannot be scanned Do not jog a document stack on the ADF cover It may cause the document feed roller of ADF to fall and get in the way of loading documents 1 Open the ADF cover 2 Push the document feed roller into the ADF cover Setting...

Page 79: ...t the document so that its top edge is pulled into the ADF first 5 Align the document guide to the document width If document feed problems often occur when documents are sent from the ADF reduce the number of document pages to set Documents of up to 50 sheets 80 g m2 and 5 mm high can be loaded regardless of the size If documents to be set on the ADF are curled adjust the document guides to fit t...

Page 80: ...on is set to Landscape align the right edge of the document with the upper left corner of the glass Do not press the document glass forcefully 3 Close the document glass cover gently Do not close the document cover vigorously It may cause the document feed roller of ADF to fall and get in the way of loading documents If the document feed roller of ADF has fallen open and close the ADF cover Settin...

Page 81: ...4 Copy Copying Cancelling Copying Specifying the Number of Copies ...

Page 82: ...el 2 Set a document in the ADF or on the document glass 3 Set the copy setting if necessary Useful Functions Advanced Manual For a Better Finish Advanced Manual Color Settings Advanced Manual Advanced Copy Settings Advanced Manual 4 Press the MONO or COLOR button ...

Page 83: ... 83 4 Copy Cancelling Copying You can cancel copying before a message is displayed to inform you that copying is complete 1 Press the STOP button when scanning the document ...

Page 84: ...the ADF or on the document glass 3 Enter the number of copies by using the numeric buttons You can enter the number of copies from 1 to 99 If you enter an incorrect value press the CLEAR button and then enter the correct value 4 Press the MONO or COLOR button Sorting Each Set in Page Order Sort Advanced Manual ...

Page 85: ...5 Scan Sending Scanned Data as an E mail Attachment Saving Scanned Data in a Shared Folder Cancelling Scanning ...

Page 86: ...to E mail following the steps in Checking the Setting Information 2 Press the SETTING button on the operator panel 3 Press the button to select Easy Setup and press the OK button 4 Enter the administrator password and then press Enter The factory default password is 999999 If the administrator password is changed after installing the machine enter the updated password 5 Press the button to select ...

Page 87: ...To select Cc or Bcc press several times and then press the OK button 6 Press the button to select Manual Input and press the OK button 7 Enter an e mail address You can enter up to 80 characters 8 Set scan settings if necessary 9 Press the MONO or COLOR button Specifying a Destination from Address Book or Group List Advanced Manual Specifying a Destination Using One touch Button Advanced Manual Sp...

Page 88: ...ent is saved 1 Click Start on the Windows task bar right click Computer and then click Properties 2 Check the name of Computer name You need the computer name you checked when you register the destination in the machine Write it down 3 Close the window 4 Create a folder in which documents are saved on the computer 5 Right click the created folder and then click Properties 6 Click the Sharing tab a...

Page 89: ...s the OK button 11 Press the button to select User Name and then press the button 12 Enter a user name If domain management is enabled enter User name2 domain name If domain management is enabled and you cannot establish a connection even after entering User name2 domain name delete domain name Follow the instructions on the Advanced Manual you can find on the Oki data web site access the Web page...

Page 90: ...e USB Cable Creating a Shared Folder in a Computer The following procedure uses the factory default setting 1 Press the SCAN button on the operator panel 2 Set a document in the ADF or on the document glass 3 Press the button to select Shared Folder and then press the OK button 4 Check that Select Profile is selected and then press the OK button 5 Press the button to select a profile and then pres...

Page 91: ... 91 5 Scan Cancelling Scanning You can cancel scanning while a message is being displayed to inform you that scanning is in progress 1 Press the STOP button on the operator panel ...

Page 92: ...6 Print Printing from a Computer Windows Printing from a Computer Mac OS X Cancelling a Print Job About Screens and Functions of Each Printer Driver ...

Page 93: ...from a Computer Windows For Windows PCL Printer Driver For Windows PS Printer Driver 1 Open the file to print 2 Select Print from the File menu 3 Select the printer driver 4 Click Preferences For Windows PCL Printer Driver ...

Page 94: ... settings in each tab to suit your needs 6 Click OK 7 Click Print on the Print Screen 1 Open the file to print 2 Select Print from the File menu 3 Select the PS printer driver 4 Click Preferences For Windows PS Printer Driver ...

Page 95: ... 95 6 Print 5 Change the settings in each tab to suit your needs 6 Click OK 7 Click Print on the Print screen ...

Page 96: ...per size paper tray and paper weight and paper type with the printer driver 1 Open the file to print 2 Select Print from the File menu 3 Select the machine from Printer 4 Select the paper size from Paper Size 5 Change the settings on each panel to suit your needs For Mac OS X ...

Page 97: ... 97 6 Print If setting details are not displayed in the print dialog box for Mac OS X10 8 5 to 10 11 click Show Details at the bottom of the dialog box 6 Click Print ...

Page 98: ... cancelled If the operator panel indicates that printing is in progress for a long time delete the print job from the computer 1 Press the PRINT button on the operator panel 2 Check that Job List is selected and then press the OK button 3 Press the button to select a job to cancel and then press the OK button 4 Check that Delete is selected and then press the OK button 5 Press the or button on the...

Page 99: ...edia Specifies the paper size type weight paper feed method or other settings 4 Finishing Mode Specifies the multi page printing booklet printing poster printing or other settings 5 2 Sided Printing Duplex Specifies this setting when you want to perform duplex printing 6 Orientation Specifies the printing direction 7 Color Setting Switches between color printing and monochrome printing 8 Toner sav...

Page 100: ...int type 5 Advanced Sets other printing settings 6 Default Resets each setting value in the tab to its default setting value Item Description 1 Watermarks Specifies when you want to use stamp print 2 Overlays Store the print formats to printer or sets when printing print formats which are registered to the printer beforehand as overlays 3 Fonts Specifies TrueType fonts and printer fonts 4 User Aut...

Page 101: ...a page order to print 4 Page Format Specifies the number of pages that is printed on a sheet of paper and booklet printing 5 Image layout Displays a sample image for the set layout 6 Advanced Allows you to set detailed settings for print quality and a paper size Item Description 1 Tray Selection Changes the paper feed tray 2 Color Selects Color or Black White 3 Advanced Allows you to set detailed ...

Page 102: ...aper of a different size from that of the document 4 Watermarks Specifies when you want to use stamp print 5 Overlays Sets when printing print formats which are registered to the printer beforehand as overlays 6 Advanced Sets other print options 7 User Auth Specifies the user authentication 8 About Displays the version of the printer driver 9 Default Resets the settings on the tab to their default...

Page 103: ... Border Specifies a type of a boundary 4 Two Sided Specifies when performing duplex printing 5 Reverse page orientation Reverses the direction of a page to print by selecting this check box 6 Flip horizontally Flips left and right to print by selecting this check box Item Description 1 ColorSync Specifies the ColorSync function 2 In printer Performs color matching with this machine 3 Profile Speci...

Page 104: ...er size check box is selected 6 Scale down only Only reduces a document to fit the output paper size by selecting this check box Item Description 1 All Pages From Specifies the paper feed tray If you specify Auto Select a tray is automatically selected 2 First Page From Select this setting to print only the first page from the specified tray 3 Remaining From Select this setting to print the remain...

Page 105: ...Panel Item Description 1 Grayscale Specifies to use monochrome printing 2 Color Specifies alignment to color mode when printing in color Item Description 1 Quality1 Quality2 Feed Paper Specifies the print quality toner saving paper type etc ...

Page 106: ...entication 3 Password The password for user authentication 4 Authentication type Specify an authentication type to be used 5 Summary Account Specify an account name and type Item Description 1 Job Type Specifies the job type Job Type Option can be used if Shared Print or Private Print is selected 2 Job Type Option Specify a job name to be displayed on the operator panel and password required when ...

Page 107: ... 107 6 Print Supply Levels Panel Item Description 1 Consumables Displays the remaining amount of consumables ...

Page 108: ...7 Fax Basic Operations of Fax Functions Setting for Receptions ...

Page 109: ...button 4 Check that Add Destination is selected on the start screen and then press the button 5 Press the button to select Manual Dial and then press the OK button 6 Enter the destination number and then press OK 7 Change settings if necessary The default settings for sending a fax are as follows Scan Size A4 or Letter Resolution Normal Density 0 You can change the default settings by pressing the...

Page 110: ...ax is selected and then press the OK button to open the start screen 3 Press the button to select Fax Job View Cancel and then press the OK button 4 Press the button to select a job to cancel and then press the OK button 5 Check the job and then press the button 6 Press the button to select Delete Reserved Tx and then press the OK button 7 Press the or button on the confirmation screen to select Y...

Page 111: ... both phone calls and faxes with the machine detecting automatically Ans Fax Ready Mode Select this mode if you want to use the answering phone function of an external telephone as well as the fax function of the machine Tel Ready Mode Select this mode if you often use the external telephone that is connected to the machine DRD If you use the distinctive ring detection DRD function that is provide...

Page 112: ... New Zealand Australia and Hong Kong This pattern is to apply to America s DRD Type 1 2 sec ON 4 sec OFF repeat Type 2 0 8 sec ON 0 4 sec OFF 0 8 sec ON 4 sec OFF repeat Type 3 0 4 sec ON 0 2 sec OFF 0 4 sec ON 0 2 sec OFF 0 8 sec ON 4 sec OFF repeat Type 4 0 3 sec ON 0 2 sec OFF 1 sec ON 0 2 sec OFF 0 3 sec ON 4 sec OFF repeat Country Code New Zealand This pattern is to apply to New Zealand s DRD...

Page 113: ...999999 respectively 4 Select Enter and then press the OK button 5 Press the button to select Fax Setup and then press the OK button 6 Press the button to select Other Settings and then press the OK button 7 Press the button to select Ring Response and then press the OK button 8 Press the button to select a waiting time and then press the OK button 9 Press the button until the top screen is display...

Page 114: ...8 Maintenance Replacing Consumables Cleaning Each Part of the Machine This section describes how to maintain the machine to keep the machine comfortable and extend its life ...

Page 115: ...vacuum cleaner Vacuuming spilled toner with an electric vacuum cleaner may result in ignition due to sparks from electric contacts or other reasons If toner spills on the floor or other places wipe the toner with a damp rag or other cloth Some parts inside the machine become very hot Do not touch the locations around a CAUTION HOT label Burns may result Keep toner cartridges out of the reach of ch...

Page 116: ...n one year following breaking the seal If you replace the toner cartridge image drum while it is being used the toner consumption will not be counted normally By opening and closing the output tray after the message COLOR toner has run out is displayed you are able to print Please replace the toner cartridge as failure to do so may damage the image drum Toner powder may spill if you remove a toner...

Page 117: ...il the tip aligns on the lug of the cartridge 6 Lift the toner cartridge d from right side and remove it from the machine While removing consumables be careful not to hit them to the LED head 7 Unpack a new toner cartridge Burns may result The fuser unit is extremely hot Do not touch it Burns may result Never throw used toner cartridges into a fire They may explode and the toner inside may fly off...

Page 118: ... e from the toner cartridge 10 Insert a new toner cartridge d by aligning its left side indentation f with the protrusion g on the image drum so the toner cartridge and image drum color labels align Then insert the right side gently into place Do not insert a toner cartridge without removing the tape ...

Page 119: ... cause a malfunction Be sure to turn the blue lever until its top aligns on the lug in the back of the toner cartridge If the toner cartridge is not securely attached printing quality may deteriorate 12 Wipe the lens of the LED head with a soft tissue paper lightly Do not use solvents such as methyl alcohol or thinners They damage the LED head 13 Close the output tray b slowly and push the center ...

Page 120: ...tions Printing quality may deteriorate after 1 year following the unpacking of the toner cartridge Replace the toner cartridge with a new one Although opening and closing the output tray may extend the life of an image drum for a while it is recommended to replace it soon after the Install New image drum message is displayed When pressing the SETTING button Admin Setup Manage Unit System Setup Nea...

Page 121: ...Hold the handle B and open the scanner unit a completely 3 Press the button A and open the output tray b completely 4 Identify the image drum that reached its lifetime by its label color 5 Remove the image drum c from the machine and place the image drum on a flat surface While removing consumables be careful not to hit them to the LED head 6 Hold the cartridge pinch the tip of blue lever d of the...

Page 122: ...otrusion g on the image drum so that the toner cartridge and image drum color label align Then insert the right side gently into place 12 Hold the cartridge pinch the tip of blue lever d of the toner cartridge and turn forward until the tip aligns on the lug of the cartridge If you close the output tray without turning the blue lever when installing the toner cartridge into the image drum it may c...

Page 123: ... the scanner unit a Do not close the scanner unit vigorously It may cause the document feed roller of ADF to fall and get in the way of loading documents If the document feed roller of ADF has fallen open and close the ADF cover 16 Please recycle image drums If you must dispose of an image drum put it in a plastic bag or similar container and dispose of it in accordance with your municipality s or...

Page 124: ...or more Do not leave the image drum for 5 minutes or more even under room light 1 Prepare new image drum and toner cartridge 2 Hold the handle B and open the scanner unit a completely 3 Press the button A and open the output tray b completely 4 Identify an empty toner cartridge by its label color 5 Remove the image drum c from the machine and place it on a flat surface Replacing the Image Drum and...

Page 125: ...rface 7 Remove the desiccant pack 8 Remove the toner cover 9 Unpack a new toner cartridge 10 Shake the cartridge several times vertically and horizontally 11 Remove the tape d from the toner cartridge Burns may result Never throw a used image drum or toner cartridge into a fire They may explode and the toner inside may fly off and cause burns ...

Page 126: ...ever h of the toner cartridge and turn forward until the tip aligns on the lug of the cartridge If you close the output tray without turning the blue lever when installing the toner cartridge into the image drum it may cause a malfunction Be sure to turn the blue lever until its top aligns on the lug in the back of the toner cartridge 14 Check a label color of a new image drum and place the drum i...

Page 127: ... in the way of loading documents If the document feed roller of ADF has fallen open and close the ADF cover 17 Please recycle image drums and toner cartridges If you must dispose of an image drum put it in a plastic bag or similar container and dispose of it in accordance with your municipality s ordinances or guidelines ...

Page 128: ...n the document glass once a month to maintain image quality of the printouts Do not use benzine thinners or alcohol They may damage the plastic parts of the machine 1 Open the document glass cover 2 Wipe lightly the document holding pad a and document glass b with a soft cloth that has been slightly moistened with water and squeezed well Cleaning the Document Glass ...

Page 129: ... of ADF to fall and get in the way of loading documents If the document feed roller of ADF has fallen open and close the ADF cover Clean the LED head if vertical white lines appear images are faded or the periphery of letters are smudged in the printouts Do not use solvents such as methyl alcohol or thinners because they may damage the LED head Do not expose the image drum to direct sunlight or st...

Page 130: ...wly and push the center of the output tray for confirmation 5 Hold the handle B to close the scanner unit a Do not close the scanner unit vigorously It may cause the document feed roller of ADF to fall and get in the way of loading documents If the document feed roller of ADF has fallen open and close the ADF cover Burns may result The fuser unit is extremely hot Do not touch it ...

Page 131: ...9 Troubleshooting If Paper Jams Occur If a Document Jam Occurs Copy Problems Print Problems Scan Problems Fax Problems If an Error Message is Displayed on the Operator Panel ...

Page 132: ...nd see the corresponding page If the Error Code is 370 371 372 If the Error Code is 380 381 382 385 389 If the Error Code is 390 If the Error Code is 391 392 393 If the Error Code is 409 1 If documents are set in the ADF or on the document glass remove them 2 Hold the handle B and open the scanner unit a completely If the Error Code is 370 371 372 ...

Page 133: ...nd place the image drums on a flat surface While removing consumables be careful not to hit them to the LED head 5 Cover the removed image drums with paper so that the image drums are not exposed to light 6 Remove the jammed paper slowly by pulling the edge of paper Burns may result The fuser unit is extremely hot Do not touch it ...

Page 134: ...ser unit press the jam release lever c on the fuser unit and slowly pull the jammed paper toward you 8 Tilt back the lock levers d on the both sides of the fuser unit toward you 9 Hold the fuser unit handle and lift the fuser unit out of the machine ...

Page 135: ...t unit toward you and remove the belt unit by holding the lock levers 11 Remove the jammed paper slowly by pulling the edge of paper 12 Hold the lock levers of belt unit and place the belt unit into the machine 13 Turn the lock levers e on the both sides of the belt unit forward ...

Page 136: ...r unit into the machine 15 Tilt the lock levers c on the both sides of the fuser unit 16 Replace the four image drums into the machine 17 Close the output tray b slowly and push the center of the output tray for confirmation 18 Hold the handle B to close the scanner unit a ...

Page 137: ...r of ADF to fall and get in the way of loading documents If the document feed roller of ADF has fallen open and close the ADF cover 1 If documents are set in the ADF or on the document glass remove them 2 Hold the handle B and open the scanner unit a completely If the Error Code is 380 381 382 385 389 ...

Page 138: ...nd place the image drums on a flat surface While removing consumables be careful not to hit them to the LED head 5 Cover the removed image drums with paper so that the image drums are not exposed to light 6 Remove the jammed paper slowly by pulling the edge of paper Burns may result The fuser unit is extremely hot Do not touch it ...

Page 139: ...ver c on the fuser unit and slowly pull the jammed paper toward you 8 Tilt back the lock levers d on the both sides of the fuser unit toward you 9 Hold the fuser unit handle and lift the fuser unit out of the machine 10 Check that any pieces of paper do not remain inside the machine ...

Page 140: ... unit into the machine 12 Tilt the lock levers d on the both sides of the fuser unit 13 Put all four image drums back into the machine 14 Close the output tray b slowly and push the center of the output tray for confirmation 15 Hold the handle B to close the scanner unit a ...

Page 141: ... feed roller of ADF to fall and get in the way of loading documents If the document feed roller of ADF has fallen open and close the ADF cover 1 If documents are set in the ADF or on the document glass remove them 2 If paper is loaded on the MP tray remove the paper If the Error Code is 390 ...

Page 142: ...b completely While removing consumables be careful not to hit them to the LED head 5 Remove the four image drums from the machine and place the image drums on a flat surface 6 Cover the removed image drums with paper so that the image drums are not exposed to light Burns may result The fuser unit is extremely hot Do not touch it ...

Page 143: ...owly by pulling the edge of paper 8 Put all four image drums back into the machine 9 Close the output tray b slowly and push the center of the output tray for confirmation 10 When loading paper on the MP tray load the paper with the print side face up 11 Hold the handle B to close the scanner unit a ...

Page 144: ...s fallen open and close the ADF cover A paper jam has occurred while feeding paper from a paper tray If paper jams occur frequently clean the paper feed rollers For details refer to Cleaning the Paper Feed Rollers Tray 1 Tray 2 Tray 3 Advanced Manual This procedure uses Tray 1 as an example 1 Pull out the cassette of the indicated tray 2 Remove the jammed paper If the Error Code is 391 392 393 ...

Page 145: ...r in the cassette and ensure that paper is correctly loaded 3 Replace the paper cassette into the machine 4 Hold the handle B and open the scanner unit a completely 5 Press the button A and open the output tray b completely 6 Close the output tray b slowly and push the center of the output tray for confirmation ...

Page 146: ...se the document feed roller of ADF to fall and get in the way of loading documents If the document feed roller of ADF has fallen open and close the ADF cover Opening and closing the output tray starts printing 1 Close the rear output tray b 2 Hold the handle B and open the scanner unit c completely If the Error Code is 409 ...

Page 147: ...nd place the image drums on a flat surface While removing consumables be careful not to hit them to the LED head 5 Cover the removed image drums with paper so that the image drums are not exposed to light 6 Remove the jammed paper slowly by pulling the edge of paper Burns may result The fuser unit is extremely hot Do not touch it ...

Page 148: ... fuser unit press the jam release lever e on the fuser unit and slowly pull the jammed paper toward you 8 Tilt the lock levers f on the both sides of the fuser unit toward you 9 Hold the fuser unit handle and lift the fuser unit out of the machine ...

Page 149: ...t unit toward you and remove the belt unit by holding the lock levers 11 Remove the jammed paper slowly by pulling the edge of paper 12 Hold the lock levers of belt unit and place the belt unit into the machine 13 Turn the lock levers g on the both sides of the belt unit forward ...

Page 150: ... unit into the machine 15 Tilt the lock levers f on the both sides of the fuser unit 16 Put all four image drums back into the machine 17 Close the output tray b slowly and push the center of the output tray for confirmation 18 Hold the handle B to close the scanner unit c ...

Page 151: ...hooting Do not close the scanner unit vigorously It may cause the document feed roller of ADF to fall and get in the way of loading documents If the document feed roller of ADF has fallen open and close the ADF cover ...

Page 152: ...cover a 2 Pull out the document upward Sticky notes and labels attached on the documents may cause a document jam When using the ADF remove sticky notes or labels from the document If removing labels is unavailable use the document glass 3 Close the ADF cover a Remove the document on the document tray and then close the ADF cover Otherwise documents may be torn or folded If a Document is Visible i...

Page 153: ...step 4 if you cannot remove the jammed document Do not try to remove the document by force 3 If you were able to remove the document proceed to step 8 4 Open the inner cover b 5 If you can see the edge of the jammed document pull it out gently If a Document is Invisible in the Paper Path ...

Page 154: ...nt tray and gently pull out the document to remove 7 If you were able to remove the document close the inner cover 8 Close the ADF cover slowly Remove the document on the document tray and then close the ADF cover Otherwise documents may be torn or folded If an error occurs while copying the copying gets canceled ...

Page 155: ...ed Tray Paper Feed Advanced Manual Is the loaded paper compatible with duplex printing Duplex copying cannot be performed depending on the paper size paper type or paper weight Load the appropriate paper for duplex printing and then set the paper size document type and document weight correctly Loading Paper Is the media type of the paper tray set to Plain or Recycled If Paper feed is set to Auto ...

Page 156: ...om Advanced Manual Did you press Reduce or Enlarge The specified size of paper is not loaded in the trays Specify a paper feed tray Or specify a zoom ratio manually Making Enlarged or Reduced Copies Zoom Advanced Manual Point to check Solution Reference Is Mixed Size set to OFF Set Mixed Size to ON Copying Different Size Documents Mixed Size Advanced Manual Is the size of your document supported f...

Page 157: ...ress the PRINT button and then select Online An error message is displayed on the operator panel Check the error messages displayed on the operator panel or press on the operator panel Error Message List The interface setting is disabled Whether there is a consistency with the machine s settings and the network connection environment check the settings of the interface that you are using on the op...

Page 158: ...g data from another interface Wait until printing is complete Received invalid data is displayed on the operator panel and the machine does not print Press the SETTING button on the operator panel select Admin Setup Print Setup Print menu Printer Adjust Timeout Injob and then select a longer time The factory default setting is 40 seconds Cause Solution Reference ...

Page 159: ...ble connected to the machine Check the cable connections and then connect the cables properly Connecting a LAN Cable USB Cable Is there any damage to the cable Change the cable Is the network setting correct Set the network setting correctly Connecting a LAN Cable USB Cable Has any error occurred Follow the on screen instructions on the display screen of the machine If you use the Scan To PC funct...

Page 160: ...n History Advanced Manual Did you specify the appropriate dial type Specify the appropriate dial type for your region User Install Advanced Manual Has any problem occurred at the recipient machine Ask the recipient to have the recipient s machine ready for reception Is the error code 23 marked on the Transmit Receipt Journal Press the SETTING button on the operator panel select Admin Setup User In...

Page 161: ...l Printing a Document That is Received in the Confidential Box of This Machine Advanced Manual Receiving a Document That is Saved in a Destination Bulletin Board Box by Fax Fcode Polling Advanced Manual Setting Secure Reception Advanced Manual Unable to Receive a Fax Point to check Solution Reference Did you specify the appropriate reception mode Check the reception mode Setting the Reception Mode...

Page 162: ...le Inspection is required PU Flash Error Turn the machine off and then back on If the same error occurs contact your dealer Inspection is required PU Communication Error Turn the machine off and then back on If the same error occurs contact your dealer Offline Mode Press Print Online on the operator panel The STATUS button turns off when the machine turns online Data present Data remains unprinted...

Page 163: ...a toner cartridge that matches your machine Error Postscript A postscript error has occurred Please check data Image Drum Unit Near Life The image drum indicated on the screen is near life Have a new image drum ready C Cyan blue M Magenta red Y Yellow K Black Fuser Unit Near Life The fuser unit is near life Have a new fuser unit ready Belt Unit Near Life The belt unit is near life Have a new belt ...

Page 164: ... or PC fax transmission data was received To erase the message press Close If you performed private printing the data was deleted because it was incomplete Print again Received data has been discarded because Job Type is restricted Data whose job type is not defined in the acceptable job type settings was received The data was discarded without being processed Select a job type defined in the acce...

Page 165: ...um We recommend using an optimum toner cartridge Y Non Recommended Toner Error 550 554 614 620 The installed Y Yellow toner cartridge is not optimum We recommend using an optimum toner cartridge K Non Recommended Toner Error 553 557 617 623 The installed K Black toner cartridge is not optimum We recommend using an optimum toner cartridge COLOR Toner Cartridge not installed 610 611 612 613 A color ...

Page 166: ...the image drum indicated on the screen reached its lifetime Replace with a new image drum to print C Cyan blue M Magenta red Y Yellow K Black Please change Fuser Unit 354 The fuser unit reaches its lifetime Replace the fuser unit with a new one Opening and closing the output tray can resume printing for a while Replace with a new one as soon as possible for maintaining the print quality Please cha...

Page 167: ...he USB Memory is write protected Unlock the protection USB Memory disconnected The USB Memory was removed while performing Scan To USB Memory Connect USB Memory and try again Connect to PC failed No destination computer was found for Scan to Computer Make sure that your computer is turned on and recordable To erase the message press Close Scan To Computer Problems Advanced Manual Communication Err...

Page 168: ...s for the shared folder Storage Space Full Memory in the FTP server is low Delete unnecessary files and ensure the free space Please change File Name The specified file name is not acceptable Check the FTP server settings and change the file name Device communication protocol not supported The server does not support CIFS or FTP Check the server settings Please check Network Share Name The name of...

Page 169: ...n to Computer Check the settings on the computer Scan To Computer Problems Advanced Manual Deleting data This machine ran out of color toner Color print data is being deleted Wait for a while Error PDF The PDF file is damaged Check the file Invalid Password This PDF file is password protected Enter a password to print This document restricts printing to a valid owner password Password protected PD...

Page 170: ...esn t work please try firmware update over USB Updating the firmware failed Update again Caution unknown Consumable detected Go to User Manual Trouble Shooting to restore operation Error 709 You can use any consumables in your product but you must accept the risks of using non genuine consumables If the use of non genuine consumables causes damage to the product or results in your product not func...

Page 171: ...ed Display language is being changed Wait for a while Language Change Failed Error num CODE Switching display languages failed Press the power button to turn the machine off and then back on Detected an abnormality of internal database The data must be deleted After pressing Format the data will be deleted and then reboot Data base is beyond restoration To delete the data base press Format ...

Page 172: ...ating Management Specifications Changing the Administrator Password Saving Power Consumption with the Power Save Function Specifications This section describes how to manage the machine and its specifications ...

Page 173: ...et password 1 Press the SETTING button on the operator panel 2 Press the button to select Admin Setup and press the OK button 3 Enter the administrator password The factory default administrator name and password are admin and 999999 respectively 4 Select Enter and then press the OK button 5 Press or several times and press Manage Unit 6 Press or several times and press Admin Password 7 Enter a ne...

Page 174: ...ntering Sleep mode see Setting the Length of Idle Time Before Entering Sleep Mode Press the POWER SAVE button to recover from Power Save mode The machine also recovers from Power Save mode when some data is received from a computer or another device or a document is set Setting the Length of Idle Time Before Entering Power Save Mode Setting the Length of Idle Time Before Entering Sleep Mode Restri...

Page 175: ...nection is established with Telnet or FTP When the transition time to enter Sleep mode or Deep Sleep mode from Power Save mode elapses and the connection is disconnected the machine enters Sleep mode E mail reception is enabled Wireless LAN is enabled Google Cloud Print is enabled LLTD is enabled IPv6 Global Address is assigned In Deep Sleep mode you cannot use the following protocols to print NBT...

Page 176: ...twork interface connector A telephone cable is connected to the LINE connector Wireless LAN is enabled Enable If you do not use the machine for a certain period of time the machine automatically turns off Disable Disables the Auto Power Off function The machine does not automatically turn off The machine does not automatically turn off in the following cases When an error has occurred When a delay...

Page 177: ...etup and press the OK button 3 Enter the administrator password The factory default administrator name and password are admin and 999999 respectively 4 Select Enter and then press the OK button 5 Press or several times and press Manage Unit 6 Press Power Save 7 Press Auto Power Off Time 8 Select transition time Setting the Length of Idle Time Before Auto Power Off Works ...

Page 178: ...D x H 427 x 576 x 472 mm Power supply N36401B 230V AC 10 Power consumption Typical operation 640 W Idle 100 W Peak 1270 W Power save mode Less than 20 W Sleep mode Less than 7 8 W Deep sleep mode Less than 1 5 W Auto power off mode Less than 0 5 W Operating condition Operating Temperature 10 32 C Humidity 20 80 RH Idle Temperature 0 43 C Humidity 10 90 RH Interface USB 2 0 Ethernet 10BASE T 100BAS...

Page 179: ...12 seconds Mono 12 seconds Copies Up to 99 Copy speed Color Up to 30 cpm Mono Up to 30 cpm Fax Specifications Item MC563 ES5463 MFP Compatibility ITU T G3 Super G3 Compression method MH MR MMR JBIG Modem speed Up to 33 6 Kbps Lines PSTN PBX Line interface RJ11 x 2 Line TEL Transmission speed Approx 2 seconds page ITU T no 1 JBIG Normal Stored document memory size 256 MB Storage document capacity U...

Page 180: ...ter Simplex Up to 31 ppm Duplex Up to 14 ppm color First print out time Color Approx 7 5 seconds A4 Mono Approx 7 5 seconds A4 Paper size Tray 1 Legal 13 13 5 14 Letter Executive A4 A5 A6 B5 B6 Statement 8 5 SQ Folio 16K 197 x 273 mm 195 x 270 mm 184 x 260 mm Custom size Additional tray unit Optional Legal 13 13 5 14 Letter Executive A4 A5 B5 8 5 SQ Folio 16K 197 x 273 mm 195 x 270 mm 184 x 260 mm...

Page 181: ...ment Conditions When in operation 10 32 C Relative Humidity of 20 80 maximum wet bulb temperature of 25 C maximum dry bulb temperature of 2 C When not in operation 0 43 C Relative Humidity of 10 90 maximum wet bulb temperature of 26 8 C maximum dry bulb temperature of 2 C Conditions for the guarantee of print quality Operating Range Temperature 10 C humidity 20 to 80 RH Temperature 32 C humidity 2...

Page 182: ...C et CNR d Ubdustrie Canada applicables aux appareils radio exempts de licence L exploitation est autorisée aux deux conditions suivantes 1 I appareil ne doit pas produire de brouillage et 2 I utilisateur de I appareil doit accepter tout brouillage radioélectrique subi même si le brouillage est susceptible d en compromettre le fonctionnement This Class B digital apparatus complies with Canadian IC...

Page 183: ...work Information Supplies Report Job Log Fax Speed Dial List Group List Fax Tx Log Fax Rx Log Fax Tx Rx Log Daily Tx Rx Log Report Fcode Box List Block Junk Fax List E mail Internet Fax Journal Report Address Book Print PCL Font List PSE Font List PPR Font List FX Font List Color Tuning Pattern Color Profile List ...

Page 184: ...um MP Tray Usage When Mismatching Select Tray Fax Tray 1 ON Tray 2 ON Tray 3 ON MP Tray OFF Copy Tray 1 ON Prior Tray 2 ON Tray 3 ON MP Tray OFF Paper Feed Tray 1 Auto Tray Switch ON Tray Sequence Down Duplex Last Page Skip Blank Page Address Book E mail Address Edit Register Name E mail Address Group No Delete Sort by Name Sort by Number Search E mail Group Edit Register Name Address No Delete So...

Page 185: ...h Profile Edit Register Profile Name Protocol Target URL Port No User Name Password CIFS Character Set Scan Size Image Settings Density Document Type Background Removal Show Through Removal Resolution Contrast Hue Saturation RGB File Name Grayscale File Format Color Mono Grayscale Mono Binary Encrypted PDF Compression Rate Color Grayscale Edge Erase Width Delete Sort By Name Sort By Number Search ...

Page 186: ...er Search Store Document Settings Store Fcode Bulletin Board Delete Fcode Bulletin Board Print Fcode Box Received Documents View Information System Information Serial No Asset No Lot No Firmware Version CU Version PU Version Panel Version Total Memory Flash Memory Network Network Information Wireless lnfrastructure Information ...

Page 187: ...r Primary WINS Server Secondary 4 E mail Setting Mail Server Address Sender s Address From Receive Setting Authentication Method AirPrint Enable Google Cloud Print Register to Google Cloud Print Google Cloud Print Settings Using Cloud Service DNS Server Primary DNS Server Secondary Proxy Proxy Server Proxy Server Port No Proxy User ID Proxy Password Wireless lnfrastructure Setting Admin Password W...

Page 188: ... Default Settings Resolution Normal Background Removal Auto Density 0 Scan Size A4 Continuous Scan Document Glass OFF Continuous Scan ADF OFF Edge Erase OFF TTl ON Transmit Confirmation Report OFF Memory Tx ON Fcode Box Edit Register Confidential Box Box Name Sub Address Hold Time I D Code Bulletin Box Box Name Sub Address Delete Security Function ID Check Tx OFF Broadcast Destination ON Confirm D...

Page 189: ...oft Ringer Volume High Remote Receive Number OFF FaxServer Function Environmental Settings FaxServer Function OFF Prefix Suffix faxserver Text OFF Default Settings Scan Size A4 Density 0 Resolution Normal Background Removal Auto Continuous Scan OFF Compression Rate Low Security Function Broadcast Destination ON Confirm Dial OFF Internet Fax Setup Default Settings Scan Size A4 Density 0 Resolution ...

Page 190: ...Reply To Broadcast Destination ON MDN Response OFF A R Full Print OFF MCF Report OFF Timeout Of MCF Report 15 minutes Print Check Message OFF USB Memory Setup File Name TWAIN Setup Network TWAIN ON Port No 9967 WSD Scan Setup WSD Scan Enable Binding Long Edge Bind PC Scan Mode Simple Scan Mode Scanner Adjust Scanner Calibration Adjust Scan Position FBS Side Reg 0 Front Edge 0 ADF Front side Side R...

Page 191: ...er Black Setting 0 Paper Color Setting 0 SMR Setting SMR Setting Black 0 SMR Setting Yellow 0 SMR Setting Magenta 0 SMR Setting Cyan 0 BG Setting BG Setting Black 0 BG Setting Yellow 0 BG Setting Magenta 0 BG Setting Cyan 0 HU Setting OFF VL Cleaning Gloss Mode OFF Print Position Adjust Tray 1 X Adjust 0 mm Y Adjust 0 mm Duplex X Adjust 0 mm Duplex Y Adjust 0 mm Tray 2 X Adjust 0 mm Y Adjust 0 mm ...

Page 192: ...Density 0 Adjust Registration Ink Simulation OFF UCR Low CMY100 Density Disable CMYK Conversion ON System Configuration Menu Personality Auto Emulation Alarm Release Manual Auto Continue OFF Error Report OFF PCL Setup Font Source Resident Font No I0 Font Pitch 10 CPI Font Height 12 point s Symbol Set PC 8 A4 Print Width 78 Column White Page Skip OFF CR Function CR LF Function LF Print Margin Norma...

Page 193: ...n 0 inch Left Margin 0 inch Fit To Letter Disable Text Height Same EPSON FX Setup Character Pitch 10 CPI Character Set SET 2 Symbol Set IBM 437 Letter O Style Disable Zero Character Normal Line Pitch 6 LPI White Page Skip OFF CR Function CR Line Length 80 Column Form Length 11 7 inch TOF Position 0 inch Left Margin 0 inch Fit To Letter Disable Text Height Same Private Print Setup Verify job option...

Page 194: ...Network Selection Wireless reconnection Wireless AP Mode Setting Wireless AP Mode Disable Automatic connection push button Manual Setup SSID Password Connection Settings SSID Password IPv4 Address AP mode user settings Don t disclose user Factory Defaults Save Syslog Print Syslog Mail Server Setup SMTP Server SMTP Port 25 SMTP Encryption None Receive Setting Disable POP3 Server POP3 Port 110 POP E...

Page 195: ...Mbps Offline Receive Disable Serial Number Enable Connected Host Normal System Setup Access Control Disable Unit of Measure Millimeter Default Paper Size A4 Default Scan Size A4 Date Format dd mm yyyy Allow All Reports To Print Disable Near Life LED Enable Near Life Status Enable USB Memory lnterface Enable Panel Contrast 0 Power Save Power Save Time 1 minute Sleep Time 15 minutes Auto Power Off T...

Page 196: ...cument Mode Mode1 High Humid Mode OFF Quiet Mode OFF Drum Near Life Timing 1000 Fuser Near Life Timing 1000 Belt Near Life Timing 1000 MF Tone DP Pulse Tone Reception Mode Fax Ready Mode DRD Type Type 1 Dial Tone Detection OFF Busy Tone Detection ON Monitor Control OFF Monitor Volume Middle TTI Register Edit Standard TTl TTI 1 TTI Number TTI Calendar Type dd mm yyyy Super G3 ON Wireless Module Dis...

Page 197: ...low Drum 100 Belt 100 Fuser 100 K Toner 7 0K 100 C Toner 6 0K 100 M Toner 6 0K 100 Y Toner 6 0K 100 Counter Print Count Tray 1 00000000 Tray 2 00000000 Tray 3 00000000 MP Tray 00000000 Color 00000000 Mono 00000000 Scan Count Total Scanned Pages 00000000 Scanned Pages 00000000 Total Scanned Pages ADF 00000000 Scanned Pages ADF 00000000 Wireless Information ...

Page 198: ...rica Building 7W A 2I FH Dubai Airport Free Zone PO Box 54604 Dubai UAE Tel 971 4 204 5810 Website www oki com me Oki Systems Finland Oy Vänrikinkuja 3 02600 Espoo Tel 358 0 207 900 800 Fax 358 0 207 900 809 HEVLWH ZZZ RNL Oki Systems Holland b v Neptunustraat 27 29 2132 JA Hoofddorp Helpdesk 0800 5667654 Tel 31 0 23 55 63 740 Fax 31 0 23 55 63 750 Website www oki nl Oki Systems Norway AS Tevlingv...

Page 199: ...46590302EE Rev2 ...

Reviews: