background image

Application Functions

10

VarioLink 9522

10-101

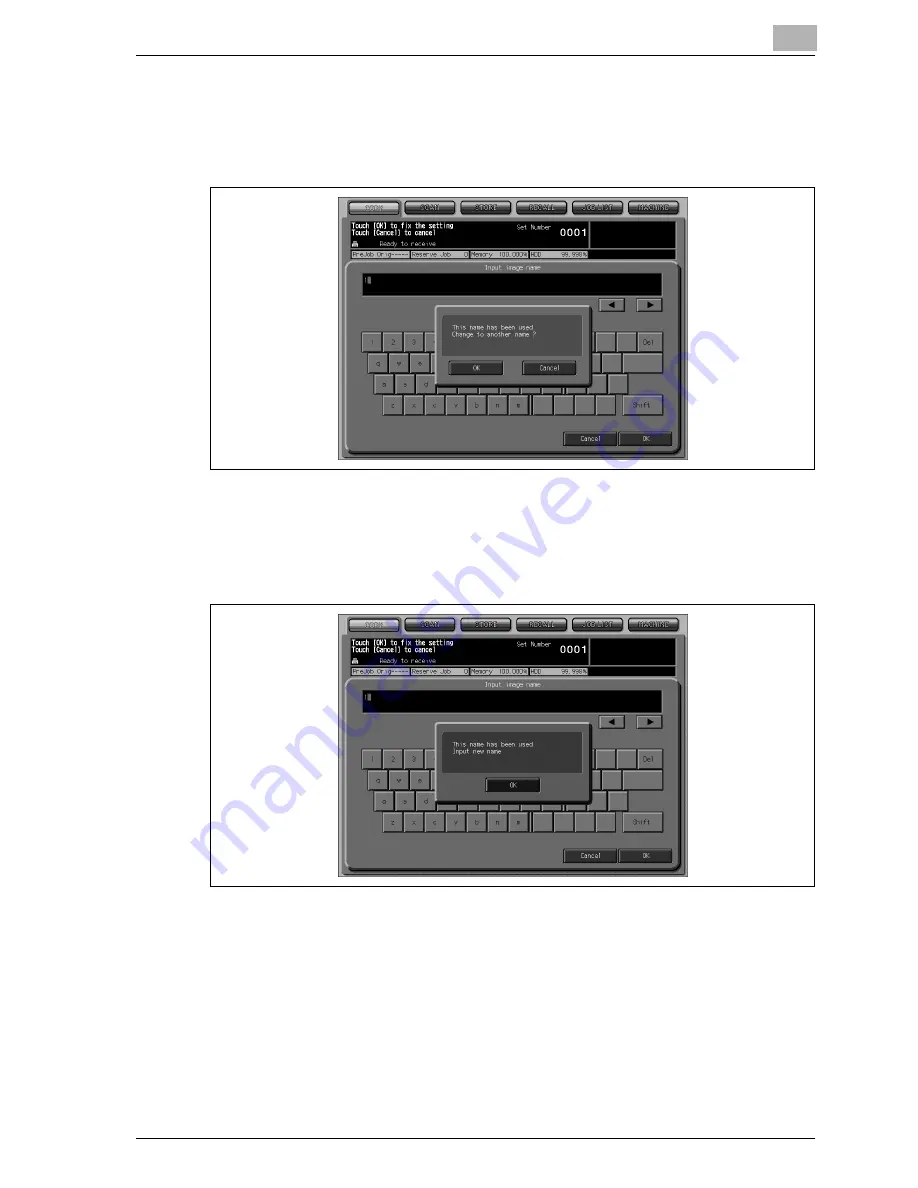
Popup menu for name duplication

If the entered name is duplicated, the popup menu will be displayed instead 
of the Copy Screen.

If both [OK] and [Cancel] keys are displayed, the image with the entered 
name applied can be overwritten.
Touch [Cancel] to overwrite the existing image data. To store the new data 
with a new name, touch [OK].

If the popup menu shows [OK] only, the existing image data cannot be over-
written. Touch [OK] to enter a new name.
Either of the above two can be specified in the Administrator setting.

Summary of Contents for VarioLink 9522

Page 1: ...Printing for Professionals Oc VarioLink 9522 Copy Operations User s Guide...

Page 2: ......

Page 3: ...VarioLink 9522 Copier User s Guide...

Page 4: ......

Page 5: ...can easily be referred to when questions or problems arise during operation The illustrations used in this manual may appear slightly different from views of the actual equipment FEDERAL OR STATE STA...

Page 6: ...witch 2 25 2 3 Automatically Resetting the Copy Conditions Auto Reset Setting 2 28 2 4 To Use Machine When Power Save LED Lights 2 29 2 4 1 Automatically Conserving Energy Auto Low Power 2 30 2 4 2 Au...

Page 7: ...4 1 Replenishing Staple Supply in Finisher FS 528 4 23 4 4 2 Replenishing Staple Supply in Finisher FS 611 4 27 4 5 Emptying Scrap Box of Punch Kit 4 31 4 6 Emptying Scrap Box of Z Folding Unit 4 33...

Page 8: ...t PK 505 7 7 7 2 4 Post Inserter PI 506 7 7 7 2 5 Large Capacity Unit LU 407 7 8 7 2 6 Large Capacity Unit LU 408 7 8 7 2 7 Z Folding Unit ZU 607 7 9 7 2 8 Trimmer Unit TU 502 7 9 7 2 9 Multi Punch GP...

Page 9: ...9 4 Zoom 9 25 9 4 1 Copying in 1 000 Magnification Mode 9 25 9 4 2 Changing Magnification Ratio 9 26 9 4 3 Setting Magnification Ratio Automatically Auto Zoom 9 29 9 5 Simplex Duplex Setting 9 30 9 5...

Page 10: ...Images Fully to the Edges All Image Area 10 61 10 16 Adjusting Position of Copy Image Page Margin Shift 10 62 10 17 Reducing Images to Create Binding Margin Page Margin Reduce Shift 10 68 10 18 Printi...

Page 11: ...over Sheet Feeding Post Inserter 11 22 11 8 Using Finisher Manually 11 24 11 9 Using Multi Punch GP 501 11 27 11 9 1 Punching File Holes in Copies 11 28 11 9 2 Exchanging the Die Set 11 31 11 10 Using...

Page 12: ...s 13 11 13 4 2 Recalling Stored Job Settings 13 14 13 5 Function Key 13 16 13 6 Recalling Previous Job Settings 13 18 13 7 Displaying Screen for Operation Guide Help Mode 13 19 13 8 Adjusting Response...

Page 13: ...the Auto Low Power function can be set for 1 minute 3 minutes 5 minutes 10 minutes 15 minutes 30 minutes 60 minutes 90 min utes 120 minutes or 240 minutes This function can be disabled in the Utility...

Page 14: ...To reduce paper consumption use this function to copy a fixed number 2 4 or 8 of original pages onto one sheet of copy paper We recommend that you utilize the Auto Low Power Auto Shut Off Auto matic D...

Page 15: ...tio when paper size is selected manually Automatically selected when Auto Zoom is touched Auto Paper Automatically selects paper size to match the original documents Auto Low Power Automatically lower...

Page 16: ...is compatible with this feature Check Mode To check the job settings before running multiple copies press Mode Check on the control panel to display the Check Screen Combine Originals Copies a fixed n...

Page 17: ...specified manually or detected automatical ly down the page Insert Image Inserts the pages scanned from the original glass into a document scanned from the document feeder in order to output them tog...

Page 18: ...11 with Trimmer Unit TU 502 Folds printed sheets in the center to make a booklet Use Trimming to trim the end of booklets Multi Tri Fold Finisher FS 611 Folds printed sheets in three Neg Positive Reve...

Page 19: ...Job Scans documents into memory while specifying different copy conditions for each original then prints all the documents collectively Proof Copy To ensure correct output before running multiple cop...

Page 20: ...g the tandem mode contact your representative Weekly Timer Can be set according to the needs of each work environment Turns main body power Off On daily or weekly during lunch time on holidays and als...

Page 21: ...n of copy paper tray setting and a network setup User s Guide Network Scanner This guide describes the operation of the network scanner function equipped for the machine as standard Please refer to th...

Page 22: ...guide describes the operation of the printer function equipped for the machine Please refer to this guide for how to use Plug in driver in user mode To operate safely be sure to read Section 1 Precau...

Page 23: ...ion cards badges or insignias Copyrighted works without permission of the copyright owner In addition it is prohibited under any circumstances to copy domestic or for eign currencies or works of art w...

Page 24: ......

Page 25: ...1 Precautions for Installation and Use...

Page 26: ......

Page 27: ...e all of the precautions appear in each section of this manual Some parts of the contents of this section may not correspond with the pur chased product Warning and precaution symbols The following in...

Page 28: ...duct as a fire electrical shock or breakdown could result If the prod uct employs a laser the laser beam source could cause blindness Power cord WARNING Do not scratch abrade place a heavy object on h...

Page 29: ...k If proper wall outlet is not available the customer shall ask qualified electrician for the installation Do not use a multiple outlet adapter nor an ex tension cord in principle Use of an adapter or...

Page 30: ...in a fire or electrical shock CAUTION Do not tug the power cord when unplugging Pulling on the power cord could damage the cord resulting in a fire or electrical shock Remove the power plug from the...

Page 31: ...ervice representative CAUTION After installing this product mount it on a se cure base If the unit moves or falls it may cause personal injury Do not place the product in a dusty place or a site expos...

Page 32: ...from the power outlet and then call your authorized service representative If you keep on using it as is a fire or electrical shock could result Do not keep using this product if this product has bee...

Page 33: ...h that are susceptible to magnetism They could cause these products to malfunction When moving the machine CAUTION Whenever moving this product be sure to dis connect the power cord and other cables F...

Page 34: ...gel ngden er 775 800 nm For Norway Users ADVARSEL Dersom apparatet brukes p annen m te enn spesifisert I denne bruksanvis ning kan brukeren utsettes for usynlig laserstr ling som overskrider grensen f...

Page 35: ...oduct must be used with a shielded network cable and shielded USB interface cable The use of non shield cables is likely to result in interference with radio com munications and is prohibited under CI...

Page 36: ...th a shielded network 10 Base T 100 Base TX cable and a shielded parallel cable The use of non shielded cables is likely to result in interference with radio communications and is prohibited under CIS...

Page 37: ...5 For Canada Users This Class A digital apparatus complies with Canadian ICES 003 Cet appareil num rique de la classe A est conforme la norme NMB 003 du Canada For Users in countries not subject to C...

Page 38: ...of the fixing unit CAUTION CAUTION DO NOT put your hand between the main body and developing fixing unit otherwise you may be injured This product employs a Class IIIb Laser Diode that emits an invisi...

Page 39: ...522 1 15 CAUTION To avoid injury DO NOT put your hand on top of the printed sheets Be sure to hold both sides of the printed sheets when removing them and DO NOT leave your hand on the printed sheets...

Page 40: ...egible please contact your service representative This safety message you could get an electrical shock because disconnecting power from this section does not cut off power from adjacent sections of t...

Page 41: ...n of options Be sure to choose a level and solid floor for the installation place 38 6 980 11 6 295 26 6 675 5 9 150 4 6 116 17 1 435 81 4 2066 63 1 1603 93 2 2366 55 9 1420 27 2 690 39 0 990 47 4 120...

Page 42: ...PI 506 ZU 607 LU 408 MK 721 TU 502 5 9 150 4 6 116 7 2 183 63 1 1603 55 9 1420 38 6 980 20 9 530 5 9 150 33 1 840 16 1 410 26 6 675 47 4 1203 27 4 695 109 1 2770 97 3 2470 Main Body FS 528 PI 506 ZU 6...

Page 43: ...530 Unit inches mm 38 6 980 26 6 675 12 0 305 4 6 116 5 9 150 15 8 400 47 4 1203 16 1 410 33 1 840 26 4 670 15 8 400 22 1 562 26 4 670 138 0 3505 149 8 3805 35 4 899 Unit inches mm Main Body FS 611 PI...

Page 44: ...ency fluctuations as possible Operating environment The environmental requirements for correct operation of the machine are as follows Operating temperature 10 C 50 F to 30 C 86 F Humidity 10 to 80 St...

Page 45: ...on for use of finisher Finisher tray of Finisher FS 528 FS 611 gradually goes down while printed materials output DO NOT allow any object to interfere with the operation of the tray on the left side o...

Page 46: ......

Page 47: ...2 Preparation for Use...

Page 48: ......

Page 49: ...Preparation for Use 2 VarioLink 9522 2 3 2 Preparation for Use 2 1 Machine Configuration External machine items 1 2 3 4 5 6 6 7 8 9 10 11 12 13 14 14 15 16...

Page 50: ...ed paper 8 Tray 3 universal tray Holds 1 000 sheets of 21 lb paper For details of pa per information see page 3 3 9 Tray 2 universal tray Holds 500 sheets of 21 lb paper For details of paper informati...

Page 51: ...supplying toner 3 Toner unit Opens 90 degrees to the right when supplying ton er 4 Conveyance fixing unit Pulled out for removal of mishandled paper For handling levers and knobs of this unit see pag...

Page 52: ...eset key Restores machine to the initial settings 3 Interrupt key Stops copying printing scanning in progress to allow a simple copying job 4 Stop key Ceases the copying sequence deletes the stored me...

Page 53: ...creen or various counters 12 Mode Memory key Registers Recalls the desired copy settings and also re calls previous job settings 13 Accessibility key Adjusts the response time in touch panel control p...

Page 54: ...original type or adjustment level of background removal and also to recall a preset density 4 AES key Touched to activate AES Automatic Exposure Selection 5 Density adjustment keys Used to specify the...

Page 55: ...2 20 Punch key Touched to use the Punch mode 21 Staple key Touched to use the Staple mode 22 Function keys Touched to recall the job setting previously registered us ing Mode Memory Up to five setting...

Page 56: ...efer to the User s Guide Network Scanner 5 JOB LIST tab Touched to display the Job List Screen 6 MACHINE tab Touched to display the Machine Status Screen and flash es in orange when machine trouble oc...

Page 57: ...achine status display Prompts you if any door or cover is open 17 Scanner message Displays the current status of scanning job 18 Machine status icons Indicate original count of previous job number of...

Page 58: ...2 Preparation for Use 2 12 VarioLink 9522 Large Capacity Unit LU 407 LU 408 1 2 3 4 4 1 2 3 5 6 7 8 9 10 11 6 7 8 9 10 11 5 Large Capacity Unit LU 408 Large Capacity Unit LU 407...

Page 59: ...e paper size to be load ed 5 Paper loading button Pressed to lower the bottom plate to allow paper loading 6 Paper feed roller Conveys copy paper to main body 7 Paper guides Hold paper to fix the posi...

Page 60: ...2 Preparation for Use 2 14 VarioLink 9522 Finisher FS 528 FS 611 Punch Kit PK 505 Finisher FS 528 Finisher FS 611 1 2 3 4 5 6 1 2 3...

Page 61: ...en Punch Kit PK 505 is installed 2 Secondary sub tray Holds sets output in Sort Group Face Up or Face Down mode 3 Primary main tray Holds sets output in the selected finishing mode other than specifie...

Page 62: ...2 Preparation for Use 2 16 VarioLink 9522 1 2 3 4 5 6 7 8 9 10 11 12 1 2 3 4 5 6 7 8 9 11 12 Finisher FS 528 Punch Kit PK 505 Finisher FS 611 Punch Kit PK 505...

Page 63: ...for removal of punch scraps 7 Stacker conveyance lever FN 5 Opens down and leftward to remove mishandled paper 8 Stacker unit handle FN 7 FS 528 FN 6 FS 611 Pulls out the unit to allow clearing misha...

Page 64: ...ually 2 Upper unit release lever Opens upward to slide the upper unit leftward when removing mishandled paper 3 Upper tray paper guides Hold cover sheets to fix the position 4 Cover sheet feeder upper...

Page 65: ...ns to allow removal of mishandled paper 3 Knob FN 4 Turned to ease removal of mishandled paper 4 Knob FN 5 Turned to ease removal of mishandled paper 5 Handle FN 2 Can be withdrawn to allow removal of...

Page 66: ...while finished sets are delivered impeding the movement may cause an unexpected trouble 6 1 2 3 4 5 No Name Description 1 Front right cover Opens to allow removal of mishandled paper 2 Front door Open...

Page 67: ...Description 1 Trimmer unit knob Can be turned to ease removal of mishandled pa per 2 Scrap box Holds trim scraps cut off from the booklets and withdrawn for removal of trim scraps 3 Trimmer pressure r...

Page 68: ...2 Preparation for Use 2 22 VarioLink 9522 Multi Punch GP 501 1 2 3 4 5 6 7 8 9 10 11 12 13 14...

Page 69: ...paper or replacement of die set 6 Mounting of die set Mounts the die set 7 Punch scrap box Withdrawn for removal of punch scraps 8 Power switch Turned on when using the multi punch 9 Lever GP5 Opens...

Page 70: ...I 506 Punch Kit PK 505 PostScript Kit PS 504 Large Capacity Unit LU 407 Large Capacity Unit LU 408 Toner Recycle Cut Kit RC 501 Z Folding Unit ZU 607 Multi Punch GP 501 Mounting Kit MK 721 Trimmer Uni...

Page 71: ...al operation To turn on the power 1 Turn ON the main power switch The main power switch is located inside the machine Open the front door and left side door to reach it When the main power switch is t...

Page 72: ...wer is on may have been changed in the Utility mode A user section name and password may be required to operate the machine If a key counter or copy card is required follow the instruction on the scre...

Page 73: ...d all the LEDs on the control panel other than the Power LED will go out and the Power LED will turn orange from blue 2 The message Power off in progress Do not turn the main power off appears Do not...

Page 74: ...l Auto or Initial Setting can be selected as copy conditions to be re sumed Make this selection in the Utility mode Full Auto is initially selected Copy conditions specified as Full Auto are as follow...

Page 75: ...wer Save has been activat ed the machine will become available for operations If Weekly Timer has been acti vated the Machine Status Screen will appear with the message Timer interrupt mode Enter pass...

Page 76: ...panel turned off The Start LED will turn orange while the Power LED keeps blue 2 Note If the Auto Shut Off function activates at the same time the power will be turned off The touch panel will not go...

Page 77: ...y 90 minutes of copier inactivity with the Power Save LED lit and all other LEDs on the control panel and touch panel turned off The Power LED keeps blue Detail The Auto Shut Off can be set for OFF 1...

Page 78: ...Low Power in 10 seconds Press key screen to cancel 2 Power Save will be activated The Power Save LED will be lit and the LCD screen will be turned off 2 Reminder Be sure to press Power Save for one se...

Page 79: ...rrupt 0 The Timer Interrupt password is to be specified in the administrator set ting Ask your administrator for the password 0 You cannot specify the copy time shorter than 5 minutes entering 0 for h...

Page 80: ...ss Start Enter a 1 digit hour ex 3 for 3 hours using the control panel key pad 0 9 then press Start Input desired copy time 3 hour s minute s 4 Set the minute for the interrupt use then press Start En...

Page 81: ...er password section name and or section password specified by the administrator are verified Copy quantity limit for each section can also be set When the machine is turned on one of the following Use...

Page 82: ...ion name max 8 characters and or 8 digit sec tion password 2 Touch OK Check that the screen message changes to Ready for copy 3 Start machine operation Normal copying printing scanning job is availabl...

Page 83: ...3 Paper and Original Information...

Page 84: ......

Page 85: ...U 607 Trimmer Unit TU 502 3 1 1 Paper Weight 2 Reminder Be sure to use paper only of the weight specified for the tray otherwise copy quality may be deteriorated or machine trouble may occur Detail Th...

Page 86: ...ry sub tray 11 to 80 lb Primary main tray 14 to 80 lb Staple 14 to 28 lb Can be stapled with up to two cover sheets 57 lb attached Folding mode tray Fold Staple 17 to 28 lb Can be saddle stitched with...

Page 87: ...nt according to the number of stapled sheets See the tables on page 3 6 for details Finisher FS 611 Secondary sub tray 200 sheets 21 lb Primary main tray normal 500 sheets 21 lb 5 5 8 5 v A5 w v B6 w...

Page 88: ...unch Unlimited operated for each one of output sheets Z Fold 1 sheet only Up to 5 z folded sheets can be included in a stapled set See the table on page 3 7 for details of z folded and non folded shee...

Page 89: ...old with Staple mode using Finisher FS 528 FS 611 Paper size Number of stapled sheets 8 5 11 w v 5 5 8 5 v B4w A4w v B5v A5v 11 17 w A3w 2 9 100 sets 50 sets 10 20 50 50 21 30 30 30 31 40 25 25 41 50...

Page 90: ...17 w 8 5 14 w 8 5 11 w v 9 11 v Foolscap 5 5 8 5 v SRA4 w A3 w B4 w A4 w v B5 w v A5 v B4 and B5 are JIS sizes To change them to ISO sizes contact your service representative Available to detect A5 v...

Page 91: ...5T w v A5T w v Tab Paper Custom Size Max 12 36 18 11 314 mm 460 mm to min 3 94 5 51 100 mm 140 mm Tray 4 Large Capacity Unit LU 407 Standard 8 5 11 v 9 11 v A4 v B5 v B5 v is JIS size To change it to...

Page 92: ...1 17 W w 8 5 11 W w v 5 5 8 5 W v A3W w B4W w A4W w v B5W w v A5W v Tab Paper 11 17 T w 8 5 11 T w v 5 5 8 5 T v A3T w B4T w A4T w v B5T w v A5T v Tab Paper Custom Size Max 12 36 18 03 314 mm 458 mm t...

Page 93: ...ndard 11 17 w 8 5 14 w 8 5 11 w v 9 11 v Foolscap 5 5 8 5 v SRA4 w A3 w B4 w A4 w v B5 w v A5 v Custom Max 8 27 11 7 210 mm 297 mm to min 7 17 5 83 182 mm 148 mm Wide Paper 11 17 W w 8 5 11 W w v 5 5...

Page 94: ...m 148 mm Wide Paper 11 17 W w 8 5 11 W w v 5 5 8 5 W v A3W w B4W w A4W w v B5W w v A5W v Tab Paper 11 17 T w 8 5 11 T w v 5 5 8 5 T v A3T w B4T w A4T w v B5T w v A5T v Tab Paper Custom Size Max 12 36...

Page 95: ...sparencies tracing paper Detail For details on copying onto OHP transparencies see page 10 27 7 CAUTION Do not use paper with staples or paper that conducts electricity silver carbon etc An accident m...

Page 96: ...Function Setting 01 Feed Tray Setting in Utility mode Select the paper trays to be selected automatically by 01 Feed Tray Auto Selection when Auto Paper functions Tray priority is available Select On...

Page 97: ...d transparencies or trace paper Coated original such as carbon backed paper Original printed on paper thicker 53 lb Bond 200 g m2 Original printed on paper thinner than 14 lb Bond 50 g m2 Original tha...

Page 98: ...ADF to scan originals Normal mode Mixed mode Z Folded Original mode Single Feed mode Specifications for each mode are described as follows Detail Detectable original size can be selected from AB serie...

Page 99: ...5 11 v and 5 5 8 5 v mixed 8 5 14 w 8 5 11 w v and 5 5 8 5 v mixed Original weight 14 to 35 lb Bond 50 g m2 to 130 g m2 Feeder capacity 100 sheets 21 lb Bond Curling tolerance 10 mm or less Original p...

Page 100: ...page 9 10 for details Item Description Detectable original size 11 17 w 8 5 14 w 8 5 11 w v 5 5 8 5 w v Foolscap A3 w B4 w A4 w v B5 w v A5 w v Original weight 14 to 53 lb Bond 50 g m2 to 200 g m2 Ori...

Page 101: ...4 Supplies Handling...

Page 102: ......

Page 103: ...f the tray When paper in a tray becomes empty the indicator flashes on the tray key Follow the procedure below to supply the empty tray with paper 2 Reminder Paper setting for each tray can be made fr...

Page 104: ...ray to be used See page 9 44 for details To load paper in tray 1 2 or 3 0 Be sure that the machine is powered ON before withdrawing the tray 0 Only one tray can be withdrawn at a time 1 Withdraw the t...

Page 105: ...e the rear guide to the edge of the paper 4 When paper is seated properly close the paper feed roller 5 Push in the tray until it locks into place 2 Reminder Be sure to fan paper before loading it may...

Page 106: ...loaded in the tray See page 9 44 for details 2 Reminder Do not use paper with staples or paper that conducts electricity silver carbon etc otherwise an accident may occur as a result of fire To avoid...

Page 107: ...paper size Load OHP transparencies or thick paper one sheet at a time or stack regular paper up to 150 sheets or to the line indicated on the paper guides The indicator on the Machine Status Screen a...

Page 108: ...t the power turned on the tray bottom plate will not function Be sure to turn on the sub power switch before loading paper in the tray 1 Open the tray top door The tray bottom plate will go up To load...

Page 109: ...2 4 9 3 Adjust the position of paper guides Turn the paper guide knobs upper 4 pieces counterclockwise to loosen them Move the two paper guides to the appropriate positions according to the size indic...

Page 110: ...es Turn the paper guide knobs upper clockwise to fix them Align the front edge of the bottom fixing plate of paper guides Insert the paper guide knob lower to the screw hole at fixing posi tion then t...

Page 111: ...de door What if the screw hole previously used is unavailable after moving the paper guides Find another hole available to fix the knob 5 Adjust the position of rear stopper Turn the rear stopper knob...

Page 112: ...arioLink 9522 Move the position of the rear stopper to the appropriate position according to the size indication on the bottom plate Turn the two rear stopper knobs clockwise to fix the rear stopper L...

Page 113: ...Supplies Handling 4 VarioLink 9522 4 13 6 Press the paper loading button 7 Load paper into the tray LU 407 LU 408 LU 407 LU 408...

Page 114: ...te will not go down any more 9 Close the tray top door 2 Reminder Do not load above the limit indicated on the paper guides Be sure that the rear stopper is correctly positioned according to the pa pe...

Page 115: ...ray 1 2 or 3 1 Withdraw the tray specified for a tab paper size 2 Open the paper feed roller 3 Place tabbed sheets on the tray as illustrated above 4 Move the side guide plates to the edge of the pape...

Page 116: ...n the top door 3 Press the paper loading button to lower the bottom plate 4 Load tabbed sheets into the tray as illustrated above 5 Move the paper guides to the edge of tabbed sheets Set paper alignin...

Page 117: ...t the next copying job can be started afresh with the 1st tabbed sheet 2 Note If the machine with this function enabled stops the current job due to a trouble such as paper misfeed a message will appe...

Page 118: ...ts in bypass tray 1 Open the bypass tray 2 Specify a tab paper size for the bypass tray For details of size setting see page 9 44 3 Load tabbed sheets as illustrated above Rear Front Rear Front Exampl...

Page 119: ...splayed on the touch panel When toner supply from the toner storage also becomes low the message will change to No Toner Please add toner Add toner by following the procedure below to exchange the ton...

Page 120: ...to spill toner inside the machine or not to get toner on your clothes or hands If your hands become soiled with toner wash them with soap and wa ter If toner gets in your eyes immediately flush them w...

Page 121: ...new toner bottle several times to loosen toner then remove the toner bottle cap 5 Set the new toner bottle into the toner unit positioning the hollow part of the toner bottle on the top Be sure to set...

Page 122: ...4 Supplies Handling 4 22 VarioLink 9522 6 Push the lever backward until it stops 7 Return the toner unit to its original position then close the machine front door securely...

Page 123: ...for each option to replenish staple supply 4 4 1 Replenishing Staple Supply in Finisher FS 528 When the staple cartridge of Finisher FS 528 becomes empty the Cartridge indicator lights in orange in t...

Page 124: ...dling 4 24 VarioLink 9522 2 Pull out the stacker unit slowly by holding the stacker unit handle until it stops 3 Remove the staple cartridge Hold the knob of the staple cartridge then pull it downward...

Page 125: ...taple cartridge Open the cartridge cover then set a staple roll into the cartridge Close the cartridge cover then remove the lock tape while pulling it horizontally 5 Insert the staple cartridge as sh...

Page 126: ...the stacker unit to its original position 7 Close the finisher door 2 Reminder When removing lock tape from the staple roll DO NOT pull it upward otherwise the tape may be broken and remain inside the...

Page 127: ...r FS 611 When the staple cartridge of Finisher FS 611 becomes empty the Cartridge indicator lights in orange in the maintenance supply indicator area of the Machine Status Screen Follow the procedure...

Page 128: ...stacker unit slowly by holding the stacker unit handle until it stops 3 Remove the staple cartridge Pull up the knob of the staple cartridge then remove it while sliding it along the stapler rail 4 R...

Page 129: ...t the staple case into the staple cartridge while aligning the arrow sides of both case and cartridge then remove the lock tape from the case 6 Insert the staple cartridge while sliding it along the s...

Page 130: ...rioLink 9522 8 Close the Finisher door 2 Reminder Do not remove the staples remaining inside the staple cartridge when re filling it with new staples otherwise the first sheet output after the replen...

Page 131: ...alled in Finisher FS 528 FS 611 When the scrap box of the punch kit becomes full the Hole Punch Scrap Box indicator lights in orange in the maintenance supply indicator area of the Machine Status Scre...

Page 132: ...4 Supplies Handling 4 32 VarioLink 9522 2 Withdraw the scrap box 3 Empty the scrap box 4 Return the scrap box to its original position then close the finisher door securely...

Page 133: ...inisher FS 528 FS 611 When the scrap box of the z folding unit becomes full the Hole Punch Scrap Box indicator lights in orange in the maintenance supply indicator area of the Machine Status Screen Fo...

Page 134: ...4 Supplies Handling 4 34 VarioLink 9522 2 Withdraw the scrap box 3 Empty the scrap box 4 Return the scrap box to its original position then close the z folding unit front door securely...

Page 135: ...es full the Trim Scrap Box in dicator lights in orange in the maintenance supply indicator area of the Ma chine Status Screen If it occurs during the machine operation a message will be displayed on t...

Page 136: ...4 Supplies Handling 4 36 VarioLink 9522 2 Withdraw the scrap box 3 Empty the scrap box 4 Return the scrap box to its original position then close the trimmer unit front door securely...

Page 137: ...in the maintenance supply indicator area of the Machine Status Screen Follow the procedure below to empty the scrap box 2 Reminder Once withdrawing the scrap box be sure to empty it even if a small am...

Page 138: ...4 Supplies Handling 4 38 VarioLink 9522 2 Withdraw the scrap box 3 Empty the scrap box 4 Return the scrap box to its original position then close the multi punch door securely...

Page 139: ...5 Troubleshooting...

Page 140: ......

Page 141: ...representative Be sure to contact your service representative immediately by following the procedure below To contact service representative 1 Make note of the report code number C indicated in the s...

Page 142: ...trouble To obtain this limited functionality of the machine consult your service representative Be sure to utilize the limited function only temporarily and arrange for ma chine repair immediately 1 I...

Page 143: ...achine operation cannot be continued until all the locations are cleared When clearing mishandled paper heed the following precautions Do not turn off the main power switch and sub power switch while...

Page 144: ...ate the area that should be cleared first Action to remove mishandled paper is displayed in the message area Detail Service can set the machine to display jam codes in the message area of the Jam Posi...

Page 145: ...Troubleshooting 5 VarioLink 9522 5 7 If provided touch Next to go to the next page of a series of illustrations Touch Jam Position to return to the Jam Position Screen...

Page 146: ...VarioLink 9522 Overview of jam position display Main body Finisher FS 528 option Main body Finisher FS 611 Post Inserter PI 506 option Main body Finisher FS 611 Post Inserter PI 506 Large Capacity Uni...

Page 147: ...serter PI 506 Large Capacity Unit LU 407 LU 408 option Main body Z Folding Unit ZU 607 Finisher FS 611 Post Inserter PI 506 Trimmer Unit TU 502 Large Capacity Unit LU 407 LU 408 option Main body Multi...

Page 148: ...l conveyance section on the right side of main body 17 Finisher sub tray post inserter 7 Horizontal conveyance section of large capacity unit 18 Finisher folding stapling section 8 Feeding inlet of ma...

Page 149: ...emoving mishan dled paper be sure to leave no torn paper inside the machine If the machine is installed with the optional large capacity unit the jam number 6 will flash in stead Open the front door o...

Page 150: ...emoving mishan dled paper be sure to leave no torn paper inside the machine If the machine is installed with the optional large capacity unit the jam number 6 will flash in stead Open the front door o...

Page 151: ...emoving mishan dled paper be sure to leave no torn paper inside the machine If the machine is installed with the optional large capacity unit the jam number 6 will flash in stead Open the front door o...

Page 152: ...Link 9522 Flashing No 4 Mishandled paper in tray 4 1 Open the top door of large capacity unit then reload pa per neatly 2 Close the top door Flashing No 5 Mishandled paper in bypass tray 1 Reload pape...

Page 153: ...the right side of main body 1 Open the front door of the large capacity unit 2 Open the vertical convey ance door to remove mis handled paper When removing mishan dled paper be sure to leave no torn p...

Page 154: ...ance section of large capacity unit 1 Open the front door of the large capacity unit 2 Open the horizontal convey ance guide lever to remove mishandled paper When removing mishan dled paper be sure to...

Page 155: ...into the main body Be sure to feed mishan dled paper into the main body before pulling out the conveyance fixing unit ADU cradle other wise torn paper may be left inside the machine 3 Turn down the le...

Page 156: ...5 Troubleshooting 5 18 VarioLink 9522 4 Open the lever M3 to remove mishandled paper 5 Open the lever M1 to remove mishandled paper 6 Open the lever M12 to re move mishandled paper...

Page 157: ...are and push it in gently oth erwise machine trouble may be caused 8 Close the front door and left side door of the main body 7 CAUTION Precaution for high temperature The fixing area of the conveyanc...

Page 158: ...of the main body 2 Turn down the lever M4 clockwise to release the lock then pull out the conveyance fixing unit ADU cradle The conveyance fixing unit is heavy Use care and pull it out gently oth erwi...

Page 159: ...are and push it in gently oth erwise machine trouble may be caused 5 Close the front door and left side door of the main body 7 CAUTION Precaution for high temperature The fixing area of the conveyanc...

Page 160: ...the main body 2 Turn down the lever M4 clockwise to release the lock then pull out the conveyance fixing unit ADU cradle The conveyance fixing unit is heavy Use care and pull it out gently oth erwise...

Page 161: ...lever M7 to remove mishandled paper 6 Return the conveyance fixing unit ADU cradle to its origi nal position then turn the le ver M4 counterclockwise to lock it The conveyance fixing unit is heavy Us...

Page 162: ...nto the fixing area when opening the conveyance fixing unit to remove mishandled paper Flashing No 11 Mishandled paper in fixing unit 1 Open the front door and left side door of the main body 2 Turn d...

Page 163: ...he conveyance fixing unit is heavy Use care and push it in gently oth erwise machine trouble may be caused 5 Close the front door and left side door of the main body 7 CAUTION Precaution for high temp...

Page 164: ...e door of the main body 2 Turn down the lever M4 clockwise to release the lock then pull out the conveyance fixing unit ADU cradle The conveyance fixing unit is heavy Use care and pull it out gently o...

Page 165: ...are and push it in gently oth erwise machine trouble may be caused 5 Close the front door and left side door of the main body 7 CAUTION Precaution for high temperature The fixing area of the conveyanc...

Page 166: ...28 VarioLink 9522 Flashing No 13 Mishandled paper in Finisher FS 528 1 Remove paper on the prima ry main tray and secondary sub tray if any 2 Open the finisher door 3 Turn down the lever FN2 to remov...

Page 167: ...z folding unit rightward to check for mishandled paper Remove it if any 4 Open the lever FN4 to the right then turn the knob FN3 both clockwise and counter clockwise to remove mishan dled paper 5 Open...

Page 168: ...eed mishandled paper into the stacker unit Be sure to feed mishan dled paper into the stack er unit before pulling it out otherwise torn paper may be left inside the ma chine 7 Holding the lever FN7 p...

Page 169: ...to its original position Use care to push in the stacker unit gently other wise machine trouble may be caused 10 Close the finisher door Flashing No 13 Mishandled paper in Finisher FS 611 1 Remove pa...

Page 170: ...led paper If the machine is installed with Z Folding Unit ZU 607 open the lever FN6 of z folding unit rightward to check for mishandled paper Remove it if any 4 Open the lever FN4 to the right then tu...

Page 171: ...th clockwise and counter clockwise to remove mishan dled paper Be sure to perform this operation before pulling out the stacker unit oth erwise torn paper may be left inside the machine 6 Holding the...

Page 172: ...ooting 5 34 VarioLink 9522 8 Holding the lever FN6 return the stacker unit to its original position Use care to push in the stacker unit gently other wise machine trouble may be caused 9 Close the fin...

Page 173: ...ivering section 1 Open the ADF cover to re move mishandled paper 2 Open the conveyance guide lever to the right then turn the release knob both clock wise and counterclockwise to remove mishandled pap...

Page 174: ...ndled paper in ADF reversing section 1 Raise the ADF then open the document pad to remove mishandled paper 2 Close the ADF then open the feeding tray to the left to re move mishandled paper 3 Open the...

Page 175: ...ays to their original positions Flashing No 17 Mishandled paper in secondary sub tray of Finisher FS 528 1 Open the finisher door 2 Open the lever FN4 to the right then turn the knob FN3 both clockwis...

Page 176: ...hing No 17 Mishandled paper in secondary sub tray of Finisher FS 611 1 Open the finisher door 2 Open the lever FN4 to the right then turn the knob FN3 both clockwise and counter clockwise to remove mi...

Page 177: ...ink 9522 5 39 Flashing No 17 Mishandled paper in post inserter 1 Remove paper on the up per lower tray of post insert er if any 2 Holding the top cover switching lever open the top cover to the left 3...

Page 178: ...ing 5 40 VarioLink 9522 4 Return the top cover to its original position 5 Open the finisher door 6 Open the lever FN1 to the left to remove mishandled paper 7 Close the finisher door Finisher FS 528 F...

Page 179: ...the finisher door 2 Open the lever FN5 to the left then turn the knob FN3 both clockwise and counter clockwise to remove mishan dled paper Be sure to perform this operation before pulling out the sta...

Page 180: ...er FN9 to the right to remove mishandled paper 5 Open the lever FN10 to the upper left to remove mishan dled paper If the machine is installed with trimmer unit open the front door and front right cov...

Page 181: ...ting 5 VarioLink 9522 5 43 6 Holding the lever FN6 return the stacker unit to its original position Use care to push in the stacker unit gently other wise machine trouble may be caused 7 Close the fin...

Page 182: ...rioLink 9522 Flashing No 19 Mishandled paper in trimmer unit 1 Open the front door of the trimmer unit 2 Open the front right cover of the trimmer unit 3 Turn the trimmer unit knob counterclockwise to...

Page 183: ...22 5 45 4 Open the trimmer pressure release lever upward to re move mishandled paper 5 Return the trimmer pressure release lever to its original position 6 Close the front right cover then close the f...

Page 184: ...arioLink 9522 Flashing No 20 Mishandled paper in Z folding unit 1 Open the front door of the Z folding unit 2 Open the lever FN1 to the upper right to remove mis handled paper 3 Return the lever FN1 t...

Page 185: ...5 47 4 Open the lever FN8 to the lower right to remove mis handled paper Also open the finisher le ver FN2 on the left side downward to remove mishandled paper 5 Holding the lever FN2 pull out the uni...

Page 186: ...8 VarioLink 9522 6 Open the lever FN3 down ward then turn the knob FN4 counterclockwise the knob FN5 clockwise to remove mishandled paper 7 Open the lever FN6 down ward to remove mishandled paper 8 Re...

Page 187: ...9522 5 49 9 Open the lever FN7 upward to remove mishandled paper 10 Return the lever FN6 to its original position 11 Holding the lever FN2 return the unit to its original posi tion 12 Close the front...

Page 188: ...Flashing No 21 Mishandled paper in Multi Punch GP 501 1 Open the multi punch front door 2 Open the lever GP1 upward to remove mishandled paper 3 Open the lever GP2 right ward then turn the knob GP3 c...

Page 189: ...ion then remove mishandled paper When completed with re moving mishandled pa per return the lever GP2 to its original position 5 Open the lever GP5 down ward to remove mishandled paper 6 Turn the knob...

Page 190: ...ever GP6 leftward then turn the knob GP7 clockwise and also turn the knob GP8 counterclockwise to remove mishandled paper When completed with re moving mishandled pa per return the lever GP6 to its or...

Page 191: ...Lubricate it at the position illustrated below 2 Reminder Never use the oil on the general market For the oil to be used in this pro cedure please contact your service representative If burrs still re...

Page 192: ...Please set reserved size paper Please load designated paper in Tray With the above message the Detail Check key will be displayed on the Ma chine Status Screen Touch Detail Check and follow the instr...

Page 193: ...come empty Follow the procedure below to change the tray selection for the current job or supply the empty tray with paper To change the tray selection 1 Touch the desired tray key 2 Touch OK to resto...

Page 194: ...4 3 Inconformity in Paper Setting The machine automatically stops when paper in the selected tray should be replaced according to the paper setting specified in reserve setting and dis plays either of...

Page 195: ...Troubleshooting 5 VarioLink 9522 5 57 2 Note If wrong size is loaded in the tray the following popup menu will be dis played Replace with the correct size then touch Close...

Page 196: ...ke an appropriate measure described below to continue the operation Remedy 1 Memory overflow in current job When memory overflow occurs while scanning the first job the machine im mediately stops and...

Page 197: ...w occurs while scanning the reserve job the machine immediately stops and displays one of the following popup menus 1 Take either of the following actions To delete all the scanned data and discontinu...

Page 198: ...oting 5 60 VarioLink 9522 2 Press Start on the control panel The machine starts scanning for the reloaded original to complete the job 2 Note If the job settings include Booklet the Stop Scan key will...

Page 199: ...s Displayed When any trouble affects the electrical signal of the copier the message Please switch Off On will be displayed in the message area Follow the procedure below to turn the machine power off...

Page 200: ...OFF the main power switch The message Power off in progress Do not turn the main power off appears Do not the main power off while this message is displayed 3 Wait about 10 seconds or longer 4 Turn O...

Page 201: ...creen Is Displayed When any trouble occurs on the printer board No Response from Control ler message will be displayed on the touch panel Follow the procedure below to turn the machine power off then...

Page 202: ...OFF the main power switch The message Power off in progress Do not turn the main power off appears Do not the main power off while this message is displayed 3 Wait about 10 seconds or longer 4 Turn O...

Page 203: ...mer unit front door or trimmer stacker cover open Securely close the trimmer unit front door and trimmer stacker cover Copy image is not clean or shows spots Is the original glass clean Wipe the glass...

Page 204: ...per ate Is any mishandled paper left inside the finisher Check for a paper misfeed and re move it as required Is finisher door slightly open Securely close the finisher door Staples are incorrectly po...

Page 205: ...there any gap found be tween side guide plates or paper guides when using by pass tray and paper in the selected tray Make sure the side guide plates or paper guides are securely aligned to the paper...

Page 206: ......

Page 207: ...6 Maintenance...

Page 208: ......

Page 209: ...p the following areas clean Cleaning the ADF scanning glass Keep the ADF scanning glass clean otherwise soil marks may be copied re sulting in dark lines on the copies Raise the document feeder then c...

Page 210: ...ightly with water if it is difficult to clean Cleaning the ADF Guide Cover The ADF guide cover should be kept clean otherwise soil marks may be cop ied or the original size cannot be detected correctl...

Page 211: ...cycle running time start date OPC drum counter counter cycle running time start date Check the list then print it from the Copy Screen if desired 2 Note Machine can be set to display the Utility Menu...

Page 212: ...the counter list 1 Press Utility Counter on the control panel The Utility Screen will be displayed The counter information will be displayed on the left side of the screen Do you want to exit Utility...

Page 213: ...PC drum counter will be dis played 3 Print the counter list if desired Touch COPY tab to display the Copy Screen Select the desired paper size then press Start After the counter list is printed out th...

Page 214: ...erformance When preventive maintenance is due a message and the PM icon will prompt you to contact your service representative for maintenance Detail The administrator can call for service using the U...

Page 215: ...7 Specifications...

Page 216: ......

Page 217: ...772 77 2 0 647 64 7 0 500 50 0 XY Zoom interlocked and individual 0 250 to 4 000 25 0 400 0 in 0 001 increments Preset zoom 3 Resolution 600 dpi Copy paper Tray 1 to 3 11 to 57 lb Bypass tray 11 to 6...

Page 218: ...72 W 780 D 1 203 H mm Main body ADF LU 407 FS 611 MK 721 TU 502 Space requirements 3 672 W 1 930 D Main body ADF LU 407 FS 611 MK 721 TU 502 7 87 200 mm or more on the back 5 91 100 mm or more on both...

Page 219: ...s normally to the primary main tray or secondary sub tray Offset delivery Output sorted grouped sets to the primary main tray having each set offset by approx 30 mm upon ex it Staple delivery Output s...

Page 220: ...Output unfinished sets normally to the sec ondary sub tray Staple delivery Output stapled sets to the primary main tray Fold Staple delivery Output stapled 2 positions in the cent er and folded sets...

Page 221: ...w 8 5 14 w 8 5 11 w v 5 5 8 5 w v Foolscap A3 w B4 w A4 w v B5 w v A5 w v 3 holes 11 17 w 8 5 11 v A3 w B4 w A4 v B5 v Dimensions 148 W 509 D 122 H mm Weight Approx 3 kg Power source Supplied from fin...

Page 222: ...11 to 80 lb With paper type specified as Embossed 14 to 57 lb Dimensions 430 W 639 D 690 H mm Weight Approx 30 kg Power source Supplied from main body Specifications Function Paper feeding into main b...

Page 223: ...81 mm or less Paper type in Z Fold mode Plain paper 15 to 24 lb Paper sizes in Z Fold mode 11 17 w 8 5 14 w A3 w B4 w Paper sizes other than listed above will be output without any fold Dimensions 169...

Page 224: ...escription Name GP 501 Speed Up to 120 sheets per minute Punch Sheet Size 8 5 11 v Punch Edge 11 Paper weight in Hole Punch mode 20 lb bond to 68 lb cover Paper Bypass Mode Sheet Size Paper sizes and...

Page 225: ...8 Before Making Copies...

Page 226: ......

Page 227: ...e a basic copy 2 Note The following procedure is basic and not always applicable to the oper ation of selected copy conditions When using a specific function be sure to follow the procedure described...

Page 228: ...e 9 3 Separate Scan See page 9 17 Quality Adj See page 9 20 Zoom See page 9 25 Application See Section 10 Output Setting See Section 11 Simplex Duplex See page 9 30 Paper Setting See page 9 39 Image R...

Page 229: ...control panel keypad For detailed information on setting print quantity see page 8 13 Entered quantity will be displayed on the touch panel 5 Press Start on the control panel When the machine starts s...

Page 230: ...tatus Screen or the Job List Screen will be restored The current job will be displayed in the job list with the count set quantity indicated at the upper right corner of the screen 2 Note The screen t...

Page 231: ...jobs or to cancel unused reserve jobs See page 12 3 for details Machine can be set to use Dark Tone Control function that is to slow down the copying speed automatically in order to maintain the copy...

Page 232: ...smooth flat originals Detail For original sizes available in the ADF see page 3 16 Be sure not to use unsuitable ADF originals See page 3 15 for details To position the original in Normal mode 0 Befor...

Page 233: ...mode Staple Fold Staple Multi Half or Book let See page 9 3 for details To position the original in Mixed mode Mixed size originals can be copied together from the ADF 0 Before placing the original i...

Page 234: ...e in dicated on the paper guides otherwise the original may be misfed or damaged or machine trouble may be caused Once closed do not open the document feeder otherwise the selected copy conditions may...

Page 235: ...he ADF Set the original in the same direction as that of the original direction icon displayed on the Copy Screen Up to 100 sheets of the original can be set at a time 3 Adjust paper guides 2 Reminder...

Page 236: ...e Centering is se lected the ADF should be kept open while scanning the original 1 Raise the ADF 2 Position the original FACE DOWN in the left rear corner aligning the edge with the left measuring gui...

Page 237: ...t or change the print quantity To set print quantity The machine is initially set to copy the original set in amounts determined by the print quantity setting then output sorted sets 1 Enter the desir...

Page 238: ...e procedure below to change the print quantity that has been al ready entered 1 Press C clear quantity The quantity displayed on the touch panel will return to 0001 2 Enter the correct quantity from t...

Page 239: ...Copy Screen to check that the message Ready to set re serve job is displayed in the message area A few seconds after the Wake up Screen appears on the touch panel the Machine Status Screen will be dis...

Page 240: ...y Screen to make another reserve job setting See page 9 57 for details If No is touched the Machine Status Screen or the Job List Screen will be restored The current job will be displayed in the job l...

Page 241: ...s Screen factory default the Copy Screen or the Job List Screen The popup menu varies depending on this selec tion The Job List Screen is provided to change the operation order of reserve jobs or to c...

Page 242: ...ils 1 Press Stop on the control panel while the current job is in progress With the popup menu displayed right after pressing Start for scan ning the original of re serve job the current job cannot be...

Page 243: ...op Job to cancel the job or touch Continue to complete the job 2 Reminder Touching Stop Job will delete all the scanned data Scanning a job in Separate Scan mode 1 Touch Stop Job to cancel the job or...

Page 244: ...to cancel the job or touch Continue to complete the job 2 Reminder Touching Stop Job will delete all the scanned data Printing the job using Program Job 1 Touch Stop Job to cancel the job or touch Co...

Page 245: ...art scanning the reserve job while printing The following popup menu will be displayed 2 Touch No to restore the Machine Status Screen If machine has been set to display the Copy Screen as the initial...

Page 246: ...can to stop scanning the reserve job and continue print ing Touch Print to stop printing and continue the scanning job Touch Scan Print to cancel both scanning and printing jobs Touch Continue to rest...

Page 247: ...9 Basic Job Settings...

Page 248: ......

Page 249: ...under following conditions Copying from double sided original Making double sided copies Combine Originals Booklet Book Copy Staple etc Using ADF Using original glass Key Description Select for the or...

Page 250: ...direction key to highlight it 4 Touch OK to complete the setting and return to the Copy Screen Touch Default Set to restore the initial setting or touch Cancel to resume the previous setting Select f...

Page 251: ...uble sided copies upside down on the reverse side using the originals having the same edge as page top Prerequisites 0 Top binding is available only in 2 1 or 2 2 copy mode 0 If the machine restores t...

Page 252: ...ioLink 9522 3 Touch Top in the Bind Direction area to highlight it 4 Touch OK to complete the setting and return to the Copy Screen Touch Default Set to restore the initial setting or touch Cancel to...

Page 253: ...sfed or damaged or machine trouble may be caused If the number of original sheets exceeds 100 divide them into blocks to scan For details see Separate Scan Mode on page 9 17 0 To scan the original fro...

Page 254: ...ear sides For details see page 8 9 2 Touch Original Setting on the Copy Screen The Original Setting Screen will be displayed 3 Touch Mixed to highlight it 4 Touch OK to complete the setting and return...

Page 255: ...function in correctly Prerequisites 0 Load the original in the ADF 0 This mode requires more scanning time to detect the original size 1 Position the original Normal originals can be set together wit...

Page 256: ...ator can set the machine to automatically feed the original one second after placing the original in the ADF Auto Start Procedure in normal Single Feed mode 0 Load the original in the ADF Set one shee...

Page 257: ...ns then press Start The original will be fed and scanned then printing job will start in suc cession when the machine becomes ready for output Procedure in Auto Start mode 1 Touch Original Setting on...

Page 258: ...the ADF paper guides according to the original size to be loaded 7 Position a sheet of the origi nal in the ADF Never set more than one original otherwise ma chine trouble may be caused The set origin...

Page 259: ...ual size of the original Prerequisites The scanning area can be selected from standard sizes input size and full area 0 Standard sizes 11 17 w 8 5 14 w 8 5 11 w v 5 5 8 5 w v A3 w B4 w A4 w v B5 w v A...

Page 260: ...he machine scans the specified standard size area irrespective of the original size Selecting Full Area Select Full Area for small original that cannot be detected 5 Touch OK The Original Setting Scre...

Page 261: ...de Detail See page 4 15 for details on loading tabbed copy paper in a tray Use the Utility mode to specify whether or not to use the Auto Image Shift Tab Print function See POD Administrator s Referen...

Page 262: ...per Size Screen will be displayed 4 Touch the desired size key to highlight it then touch OK The Original Setting Screen will be restored 5 Touch OK to return to the Copy Screen Touch Default Set to r...

Page 263: ...um number of the original available in the ADF does not change in this mode Do not load more than 100 original sheets or above the limit mark otherwise paper misfeed or damage to the orig inal may be...

Page 264: ...key is already high lighted the Separate Scan mode has been activated automatically due to some copy selection 4 Press Start on the control panel The machine starts scanning the original 5 Replace the...

Page 265: ...Enter the desired print quan tity then press Start For details on setting print quantity see page 8 13 All the data in memory will be output Detail To delete the scanned data without printing or to s...

Page 266: ...the background whiteness Background Removal when copying newspaper or recycled paper originals Detail Preset Density programs the desired density selected among 16 expo sure levels divided from the d...

Page 267: ...iginal Type For details see POD Administrator s Refer ence Photo Mode Density Selection specifies the exposure level to be se lected by AES in Photo mode This setting can be made in the Utility mode F...

Page 268: ...justment level from 4 to 4 Or touch Standard to resume the standard level Touch OK to complete the setting 4 Recall the preset density Touch Quality Adj on the Copy Screen Touch Preset Density 1 or Pr...

Page 269: ...s of the original image Text Used when copying a text original In this mode the edges of cop ied text will be sharpened to provide higher legibility Detail Density by Original Type can shift each of n...

Page 270: ...9522 3 Touch the desired mode key in the Original Type area to highlight it 4 Touch OK to complete the setting and return to the Copy Screen Touch Default Set to restore the initial setting or touch C...

Page 271: ...age Procedure 1 Close the ADF securely and then press Reset on the control panel The initial setting will be restored Check that 1 0 is highlighted to indicate that the 1 000 magnification is automati...

Page 272: ...ed on the screen Preset Zoom Select one from the three ratios previously programed Detail The Enlarge Reduce and Preset Zoom ratio setting is described in POD Administrator s Reference Procedure 1 Tou...

Page 273: ...ngthwise magnification ratio Similarly touch the horizontal zoom key the third one in the left side line to enter the desired widthwise magnification ratio The en tered ratio will be displayed on the...

Page 274: ...9 Basic Job Settings 9 28 VarioLink 9522 Preset Zoom Touch the desired preset zoom key in the Preset Zoom area 3 Touch OK to return to the Copy Screen Touch Cancel to resume the previous setting...

Page 275: ...l For details of Paper Setting see page 9 39 Prerequisites 0 Auto Zoom is incompatible with Auto Paper while Image Rotation is available 0 Auto Zoom will not function for the tray of the size specifie...

Page 276: ...e single sided or double sided original scanned from the ADF Prerequisites 0 Specify the original direction on the Original Setting Screen according to that of the original loaded in the ADF 0 The dou...

Page 277: ...al set direction and binding direction 1 Touch Original Setting on the Copy Screen to display the Orig inal Setting Screen 2 Touch and highlight the original direction key according to the direction o...

Page 278: ...direction of double sided copies 1 Touch Output Setting on the Copy Screen to display the Out put Setting Screen 2 Touch the desired binding direction key to highlight it To make double sided copies...

Page 279: ...al glass 0 Double sided copies can be arranged upside down on the back pages 0 The machine is set to match the binding direction of copies to that of the original automatically For details see POD Adm...

Page 280: ...able the machine from scanning the original placed on the original glass 3 Specify other conditions for making double sided copies Selecting the original set direction 1 Touch Original Setting on the...

Page 281: ...make double sided copies arranged upside down on the back pages se lect Top 3 Touch OK to return to the Copy Screen For details on specifying binding direction of double sided copies see page 11 3 4 S...

Page 282: ...522 7 When all originals are scanned touch Scan Complete 8 Press Start to print All the data in memory will be output Detail To delete the scanned data without printing or to suspend the printing job...

Page 283: ...Specify the original direction on the Original Setting Screen according to that of the original loaded in the ADF 0 The normal single sided copies having the same edge as page top can be made from dou...

Page 284: ...he Orig inal Setting Screen 2 Touch and highlight the original direction key according to the direction of the original loaded in the ADF 3 To make normal single sided copies having the same edge as p...

Page 285: ...om and Image Rotation The tray specified as Custom cannot be used when these functions are ac tivated Type Weight Using Paper Setting on the Copy Screen or Machine Status Screen paper specifications p...

Page 286: ...tails The original sizes to be detected from the ADF or original glass can be changed See POD Administrator s Reference The administrator can set a tray or paper condition to be incompatible with Auto...

Page 287: ...appropriate paper size will be selected auto matically Or a message will prompt you that an appropriate size cannot be found in any tray In this case load paper of the size referred in the message 2...

Page 288: ...copy paper Also the original to be placed only in landscape w orientation e g 11 17 8 5 14 can be copied onto paper loaded in a tray in portrait orientation v with the appropriate magnification ratio...

Page 289: ...5 8 5 w v 1 Touch Image Rotation Off on the Copy Screen to highlight it When Image Rotation is released the Rotation icon on the Copy Screen will disappear to indicate that this function is canceled...

Page 290: ...Status Screen by touching the Custom Size Reg key For details see POD Administra tor s Reference The minimum size available in custom size setting can be changed Con tact your service representative...

Page 291: ...ount remaining in the tray 2 Load copy paper into the tray with the setting to be changed The changed setting will not be cleared when copying job is com pleted using that tray 3 Touch Paper Setting t...

Page 292: ...ngs 9 46 VarioLink 9522 The same settings are available on both Paper Setting and Tray Setting Screens To register more than one paper setting or to delete a registered paper setting see POD Administr...

Page 293: ...Standard Custom Wide paper Tab paper To select Standard 1 Touch Size Setting then touch Standard The machine will au tomatically detect the size loaded in the tray The tray can also be set to detect...

Page 294: ...250 314 mm 2 6 93 9 02 176 229 mm tray 4 LU 407 1 7 68 12 36 195 314 mm 2 7 99 18 11 203 460 mm tray 4 LU 408 3 Touch Lead Edge Rear Edge or Center to specify the de sired image position 4 To recall a...

Page 295: ...to the selected wide size to a maximum of 314 mm 6 Similarly select the widthwise dimension key and enter the de sired special size Entered size should fall within the range from the widthwise dimens...

Page 296: ...tabbed paper size key to highlight it 3 If a custom tabbed paper size is desired touch Custom Size to display the Size Input Screen 4 Select the lengthwise widthwise dimension key to highlight it then...

Page 297: ...e previous menu 6 Touch OK to complete the setting and return to the Paper Set ting Screen 6 Change the paper setting Change the paper setting of the tray either by selecting the one pre viously regis...

Page 298: ...9 Basic Job Settings 9 52 VarioLink 9522 To program a new setting 1 Touch Change Setting 2 Touch Paper Type Select the desired paper type key then touch OK...

Page 299: ...ouch Weight Select the desired paper weight key then touch OK 4 Touch Colored Paper Select the desired color key then touch OK 5 Touch Hole Punch Touch Pre Punched when using paper with punch holes or...

Page 300: ...e adjustment item Vertical Horizontal Up Down or Right Left and touch to select the value to be positive or negative Use or touch screen keypad to enter the desired adjust ment value then touch OK The...

Page 301: ...g is desired for future use follow the procedure below to register it 1 Touch Register to display the Paper Setting Register Screen 2 Use Next or Previous to scroll to the desired paper type weight ke...

Page 302: ...Basic Job Settings 9 56 VarioLink 9522 4 Touch OK to complete the setting 7 Touch Close on the Paper Setting Screen The tray key with the paper setting changed will display the newly specified setting...

Page 303: ...machine to disable this function Contact your service representative if desired Prerequisites 0 Job settings Max 100 0 The default screen setting can be made in the Utility mode See page 5 15 of POD A...

Page 304: ...will be displayed after the machine starts to scan the current job Touch Close to set reserve job 2 Select copy conditions for the reserve job as desired position origi nal s then press Start Repeat s...

Page 305: ...to start scanning automatically on loading the original in the ADF while the message Ready to set reserve job is dis played on the Copy Screen For details see page 6 88 of POD Adminis trator s Refere...

Page 306: ...Size Normal Left Upside Down Right Right Left Top Normal Mixed Z Folded Orig Single Feed Standard Size Cus tom Size Tab Paper Size Size keys Full Area Original Setting Direc tion Normal Left Upside D...

Page 307: ...reset Density2 Zoom Vertical zoom Horizontal zoom Numerics key Original Setting Direc tion Normal Left Upside Down Right Bind Direction Right Left Top Special Normal Mixed Z Folded Orig Single Feed Or...

Page 308: ...ters Combine Originals Booklet Front Cover Back Cover Insert Sheet Horizontal Verti cal Common Booklet Magazine Binding Common Tray Paper Post Inserter Paper Common Tray Paper Post Inserter Paper Comm...

Page 309: ...tive Reverse Image Repeat Frame Center Erase Image Centering All image Area Common Size Manual Input Size Auto Detect Repeat Common 2 Repeat 4 Repeat 8 Repeat 2 Repeat R D Reverse 2 Repeat L U Reverse...

Page 310: ...ft Reduce Shift Common Preset Stamp Set Numbering Page No Date Time Watermark Watermark Set Numbering Overlay Reg Overlay Reg Overlay Register Annotation Original Setting Direc tion Normal Left Upside...

Page 311: ...Multi Punch Z Fold Original Setting Direc tion Normal Left Upside Down Right Bind Direction Right Left Top Special Normal Mixed 1 1 1 1 2 Z Folded Orig Single Feed 1 1 Original Size Standard Size Cust...

Page 312: ...Direc tion Special Original Size Normal Left Upside Down Right Right Left Top Normal Mixed Z Folded Orig Single Feed Standard Size Cus tom Size Tab Paper Size Size keys Full Area Quality Adj Original...

Page 313: ...Auto Zoom Original Type Back ground Removal Preset Density Manual Setting Enlarge Reduce Preset Zoom Text Photo Dot Matrix Photo Text Lighter Standard Darker Preset Density1 Preset Density2 Zoom Verti...

Page 314: ...ment range of Background Removal from 0 to 4 Simplex Duplex Paper Setting 2 2 2 1 1 2 1 1 Tray1 Tray2 Tray3 Tray4 Bypass Tray Auto Paper Image Rotation Off Quality Adj Original Type Text Photo Dot Mat...

Page 315: ...iginal Type Text Photo Dot Matrix Photo Text Back ground Removal Lighter Standard Darker Preset Density Preset Density1 Preset Density2 Lighter Standard Darker AES Zoom Manual Setting Zoom Vertical zo...

Page 316: ...essage Please open ADF unit displayed 10 Changes to 1 2 mode with original glass scanning mode and Separate Scan mode selected When the ADF is closed the Start key becomes unavailable with the message...

Page 317: ...xt Photo Dot Matrix Photo Text Back ground Removal Lighter Standard Darker Preset Density Preset Density1 Preset Density2 Lighter Standard Darker AES Zoom Manual Setting Zoom 16 18 18 Vertical zoom 16...

Page 318: ...ts Auto Zoom automatically Tray and magnification selections will conform to the specifications for each For Chapters this setting change is made only when Print Insertion is selected 15 Releases Auto...

Page 319: ...ple Fold Staple Multi Half Multi 3 Hold Inside Print Multi 3 Hold Outside Print Multi Punch Z Fold Quality Adj Original Type Text Photo Dot Matrix Photo Text Back ground Removal Lighter Standard Darke...

Page 320: ...N to 1 Offset Sort Offset Group Sort Group Quality Adj Original Type Text Photo Dot Matrix Photo Text Back ground Removal Lighter Standard Darker Preset Density Preset Density1 Preset Density2 Lighte...

Page 321: ...10 Application Functions...

Page 322: ......

Page 323: ...Follow the procedure below to display the Application Screen and select the desired copying features To display Application Screen 1 Touch COPY tab on the Machine Status Screen to display the Copy Scr...

Page 324: ...unctions can be used in combination however if one function on the menu is incompatible with another it will appear dimmed Do you want to restore the previous setting Touch Cancel Do you want to cance...

Page 325: ...to the setting screen or Application Screen for the function without subsequent screen if any setting change is desired Detail The subsequent screen can be directly accessed from the Check Screen to c...

Page 326: ...some subsequent screens such as Front Cover Screen of Insert Sheet or Preset Stamp Screen of Stamp Overlay Touch this key to highlight it if desired so that the screen may be directly accessed from t...

Page 327: ...are compatible Function Description Front Cover Print The first page of the original will be printed onto the front cover When making double sided copies the second page of the original will be printe...

Page 328: ...th and 6th pages of single sided original are copied onto both sides of the insertion which will be the 3rd sheet of copied set With page 6 specified the same result will be obtained 2 2 The 9th and 1...

Page 329: ...ied 1 2 A blank insertion will be added as the 4th sheet of copied set after the 5th and 6th pages of single sided original are duplex copied With page 6 specified the same result will be obtained 2 2...

Page 330: ...at a location while the post inserter can feed up to 20 insertions at a location 1 Position the original 2 Load paper into the tray Load regular sheets insertion sheets and covers into any tray When u...

Page 331: ...nk 9522 10 11 5 Select the desired cover mode To insert a front cover touch Front Cover to display the Front Cov er Screen To insert a back cover touch Back Cover to display the Back Cover Screen Fron...

Page 332: ...ginal To use covers loaded in the post inserter touch With Cover and select either of the tray keys provided on the screen Up to 20 sheets can be attached as covers Touch Set to display the popup menu...

Page 333: ...than one location If another combination is desired make those settings anew as Set 002 and so on Touch the desired tray key from Tray Paper or PI Paper When selecting one from Tray Paper specify the...

Page 334: ...ar to resume the previous screen with Set 002 highlighted Make the next setting as Set 002 if required The settings made can be cleared by each setting number Touch the desired setting number key to h...

Page 335: ...etting and restore the previous setting touch Cancel To release the Insert Sheet function with the current setting re mained touch Function Off To clear all the settings of Insert Sheet touch Clear Al...

Page 336: ...5 as title pages Simplex Duplex Description 1 2 A blank page is automatically added before the 2nd and 5th pages of the original so that they will be printed on the front side of double sided copies...

Page 337: ...9 17 for de tails 0 Title page setting 30 entries at maximum from page 1 to 999 0 The title page can be copied on the sheet from another tray source Print Insertion 0 Use Page No of Stamp together wit...

Page 338: ...ination In this case touching OK on the Booklet Screen will re store the Chapters Screen To change the selection of paper tray for copying title pages touch Print Insertion on the Chapters Screen to e...

Page 339: ...rs function with the current setting remained touch Function Off 6 Touch OK on the Application Screen The Copy Screen will be restored with the Chapters key displayed under the Application key Use thi...

Page 340: ...ecified original binding mar gin Setting item Description 2 in 1 Select this setting to print two original images onto one sheet Left binding Right binding 4 in 1 Select this setting to print four ori...

Page 341: ...Copy Screen 8 in 1 Select this setting to print eight original images onto one page The page arrangement numbering direction can be specified Horizontal order left binding Horizontal order right bindi...

Page 342: ...desired Combine Originals mode Touch 2 in 1 4 in 1 or 8 in 1 in the desired order area referring to the illustrations on previous pages 5 Touch OK to complete the setting To restore the previous setti...

Page 343: ...y dis played under the Application key Use this key to jump to the subsequent screen to make any setting change Auto Zoom is automatically selected When selecting any tray other than the one that is s...

Page 344: ...Separate Scan mode if original count exceeds 100 or if original glass is desired for scanning the original See page 9 17 for de tails 0 Available original sizes are 11 17 w 8 5 14 w 8 5 11 w v and 5...

Page 345: ...ouch Booklet on the Application Screen 5 Touch the desired mode key to highlight it When a cover sheet is required touch Cover Tray Select to select the cover sheet tray source Touch Left Bind or Righ...

Page 346: ...der the Application key Use this key to jump to the subsequent screen to make any setting change Auto Zoom is selected automatically To change the paper size select the desired paper size from the Co...

Page 347: ...t for filing or inserting into a binder Prerequisites 0 Load transparency films in the bypass tray Paper type weight for the by pass tray should be specified as Fine and 92 105 g in Paper Setting 0 Pr...

Page 348: ...er Setting on the Copy Screen The Paper Setting Screen will be displayed 5 Specify the paper type and weight for the bypass tray Select Fine for Paper Type 25 28lb for Weight For details of paper sett...

Page 349: ...rly specified for the bypass tray Make paper setting to select Fine and 92 105 g for the bypass tray It is recommended that this paper type and weight should be registered if you often use the OHP Int...

Page 350: ...under the Application key Use this key to jump to the subse quent screen to make any setting change Auto Zoom is selected automatically To release it select the desired magnification Print quantity is...

Page 351: ...x Duplex Description 1 1 The first scanned image will be inserted after page 2 of the original and the second scanned image will be inserted after page 5 1 2 The first scanned image will be printed on...

Page 352: ...d 1 Load the original in the ADF Be sure to arrange the original in page order and then place it with the first page faceup Up to 100 original sheets can be set If the original count exceeds 100 divid...

Page 353: ...s will be added at the end of the finished set Should the page number be entered from the smaller number Not necessary Insertions occur in sequence even if original page numbers are entered out of seq...

Page 354: ...as desired 9 Press Start on the control panel The machine starts scanning the original loaded in the ADF 10 Place the original of image insertion on the original glass Open the ADF position the inser...

Page 355: ...vision performed and all the original pages will be output in correct order Using Booklet in combination original images are automatically arranged in booklet format in correct order to make a multipl...

Page 356: ...Printed sets will be output from the front cover page divided document pages according to pagination then the back cover page The original should be scanned from the front cover back cover then page...

Page 357: ...the ADF arrange the original in page order and then load it with the first page faceup Up to 100 original sheets can be set If the original count exceeds 100 divide them into blocks not ex ceeding 10...

Page 358: ...ding position of the original by touching Left Bind or Right Bind 5 To make a multiple page signature booklet using Booklet follow the procedure below Touch Booklet on the Book Copy Screen to display...

Page 359: ...as desired Available paper sizes are 8 5 11 v A4 v and B5 v Auto Zoom and Auto Paper are released and 1 0 magnification is selected automatically Be sure not to select Top as binding direction on the...

Page 360: ...ttings on each set re ferred to as JOB then output them all as a complete set Prerequisites 0 Separate Scan mode is automatically selected 0 Output mode and print quantity setting cannot be specified...

Page 361: ...is key can also be used to display the Application Screen for making setting change The Separate Scan key on the Copy Screen appears highlighted to show that the Separate Scan mode is automatically se...

Page 362: ...k 9522 7 Touch Decision to store the current JOB images To delete the scanned images touch Cancel 8 Repeat above steps until all JOB originals are scanned 9 When all originals are scanned touch Separa...

Page 363: ...ation Screen then select the desired output mode This output setting will be applied to all JOBs 11 Enter the desired print quantity from the control panel keypad Entered quantity will be the count of...

Page 364: ...de the borders of the original Prerequisites 0 Scan the original from original glass Be sure to keep the ADF open 0 Original size should be larger than 1 18 1 18 in 10 10 mm 1 Position the original on...

Page 365: ...2 Selecting 1 2 will select Separate Scan automatically 5 Enter the desired print quantity from the control panel keypad then press Start The machine will start printing when ready for output Detail T...

Page 366: ...this function to reverse the positive image to the negative image and vice versa in the selected color mode Procedure 1 Position the original 2 Touch Application on the Copy Screen 3 Touch Neg Positi...

Page 367: ...be restored with the Neg Positive Reverse key displayed under the Application key This key can also be used to display the Application Screen for making setting change 5 Enter the desired print quanti...

Page 368: ...omatically detect the original size image and surrounding blank area also then let the machine determine the number of repeats Prerequisites 0 Scan the original from original glass The ADF cannot be u...

Page 369: ...orner Close the ADF gently When selecting Size Auto Detect open the ADF then place the original facedown on the original glass In this case Non Image Area Erase is automatically selected Be sure to ke...

Page 370: ...rtical to highlight it then enter the desired horizontal vertical width Touch OK to complete the setting and return to the Image Repeat Screen To select Size Auto Detect Touch Auto to highlight it 5 T...

Page 371: ...nter the desired print quantity from the control panel keypad then press Start The machine will start printing when ready for output Detail Using Size Auto Detect mode Image Repeat may perform incorre...

Page 372: ...es 0 Auto Zoom is automatically selected Magnification can be changed manually however Image Rotation is unavailable 0 The scanning area will be a portion of the selected paper size equally di vided a...

Page 373: ...Touch 2 Repeat 4 Repeat or 8 Repeat to highlight it If you want the image upside down on the other side in 2 Repeat mode touch R D Reverse or L U Reverse 5 Touch OK to complete the setting To restore...

Page 374: ...Use this key to jump to the subsequent screen to make any setting change Auto Paper and Rotation are released and Auto Zoom is selected au tomatically Available copy modes are 1 1 and 1 2 Selecting 1...

Page 375: ...er the toner con sumption at the same time Prerequisites 0 Available range for the Frame Erase amount is 1 to 300 mm for the Cent er Erase amount is 1 to 99 mm in 1 mm increments 0 Frame Erase and Cen...

Page 376: ...iginal e g open book do not press it down too hard Keep the ADF open if required 2 Touch Application on the Copy Screen 3 Touch Frame Center Erase on the Application Screen 4 Touch Erase All Sides Era...

Page 377: ...all the frame erase amounts in the illustration are high lighted Use and or touch panel keypad to enter the desired erase amount To specify the erase amount for Erase Each Side Touch the desired side...

Page 378: ...complete the setting To restore the previous setting touch Cancel To release the Frame Center Erase function with the current setting remained touch Function Off 7 Touch OK on the Application Screen...

Page 379: ...glass are available 2 Touch Application on the Copy Screen 3 Touch Image Centering on the Application Screen The incompatible function keys will be dimmed to show inactivity Non Image Area Erase will...

Page 380: ...o Paper are released and 1 0 magnification is se lected automatically Available copy modes are 1 1 and 1 2 Selecting 1 2 will select Separate Scan automatically 5 Enter the desired print quantity from...

Page 381: ...tion Screen The incompatible function keys will be dimmed to show inactivity 4 Touch OK on the Application Screen The Copy Screen will be restored with the All image Area key dis played under the Appl...

Page 382: ...order to cor rect the image dislocation Page Space function is available only when Booklet or 2 Repeat mode of Im age Repeat has been already selected Use this function to make the desired amount of...

Page 383: ...Application Functions 10 VarioLink 9522 10 63 1 Position the original 2 Touch Application on the Copy Screen 3 Touch Page Margin on the Application Screen 4 Touch Shift...

Page 384: ...ided cop ies select Double Sided When Booklet or 2 Repeat mode of Image Repeat has already been selected the Page Space key appears clear on the screen to show its availability To use this function to...

Page 385: ...tility mode For details see POD Administrator s Reference 7 Repeat the steps 5 and 6 when setting the shift amount for front and back sides individually 8 Touch OK to complete the setting To restore t...

Page 386: ...on is available only when Booklet or 2 Repeat mode of Image Repeat has already been selected Use this function to make the desired amount of blank space between the two images on a page Booklet Page s...

Page 387: ...Page Space to make space be tween the two images widening gradually from the inner pages to the out er pages in a folded or folded stapled and trimmed booklet so that the outer margin should be unifo...

Page 388: ...nt image loss when creating a bind ing margin To create a binding margin without reducing the original image see Adjust ing Position of Copy Image Page Margin Shift on page 10 62 Left binding margin R...

Page 389: ...utomatically selected and cannot released Reduction ra tio will depend on the specified shift amount 0 Shift amount 0 to 250 mm in 1 mm increments 1 Position the original 2 Touch Application on the Co...

Page 390: ...desired shift direc tion key to highlight it then use and or touch panel keypad to enter the desired shift amount Setting the shift amount in 0 1 mm increments is also available in the Utility mode 7...

Page 391: ...is function allows you to print onto output copies the desired type of pre set stamp numbering for multiple sets page number for multiple pages date time watermark and watermark numbering The followin...

Page 392: ...s For de tails see page 10 85 Fine adjustment for printed position Start number setting for Set Numbering mode Start number setting for Page No mode Character size type setting for Page No and Date Ti...

Page 393: ...mp onto Copies Preset Stamp Print the desired letter type selected from preset stamps onto the specified position of copies Procedure 1 Position the original 2 Touch Application on the Copy Screen 3 T...

Page 394: ...ouch Print Page to select Cover Only or All Pages 6 Touch OK twice to complete the setting To restore the previous setting touch Cancel To release the Stamp Overlay function with the current setting r...

Page 395: ...2Printing Distribution Number Set Numbering Print a distribution number onto the specified position of copies Procedure 1 Position the original 2 Touch Application on the Copy Screen 3 Touch Stamp Ove...

Page 396: ...Cover Only or All Pages To specify the start number touch Start Number See page 10 86 for details 6 Touch OK twice to complete the setting To restore the previous setting touch Cancel To release the...

Page 397: ...2 10 77 10 18 3Printing Page Number Page No Print a page number onto the specified position of copies Procedure 1 Position the original 2 Touch Application on the Copy Screen 3 Touch Stamp Overlay on...

Page 398: ...Touch Change Character to select the character size and font type See page 10 87 for details To specify the start number touch Start Number See page 10 86 for details 6 Touch OK twice to complete the...

Page 399: ...10 79 10 18 4Printing Date Time Date Time Print date and time onto the specified position of copies Procedure 1 Position the original 2 Touch Application on the Copy Screen 3 Touch Stamp Overlay on t...

Page 400: ...All Pages Touch Date Time to select Current Time or Setting Time If Setting Time is desired use the touch panel keypad to enter the desired time See page 10 89 for details 6 Touch OK twice to complet...

Page 401: ...ark onto Copies Watermark Print the desired letter type selected from preset watermarks in the center of printed page background Procedure 1 Position the original 2 Touch Application on the Copy Scree...

Page 402: ...ils 6 Touch OK twice to complete the setting To restore the previous setting touch Cancel To release the Stamp Overlay function with the current setting re mained touch Function Off 7 Touch OK on the...

Page 403: ...er as Watermark Set Number ing Print a distribution number in the specified form repeatedly over the scanned image Procedure 1 Position the original 2 Touch Application on the Copy Screen 3 Touch Stam...

Page 404: ...ensity keys to highlight it 6 Touch OK twice to complete the setting To restore the previous setting touch Cancel To release the Stamp Overlay function with the current setting re mained touch Functio...

Page 405: ...n printing position of Preset Stamp Set Numbering Page No and Date Time The adjustment range is 0 to 50 mm in lengthwise direction Up or Down and in widthwise direc tion Right or Left Procedure 1 Touc...

Page 406: ...e desired start number Up to four digits can be specified 2 Touch OK to complete the setting and return to the previous screen Setting start number in Page No Touching Start Number on the Page No Scre...

Page 407: ...uch panel keypad to enter the desired start number Up to two digits can be specified 4 Touch Start Chapter under Chapter to highlight it then enter the de sired start chapter 5 Touch OK to complete th...

Page 408: ...sertions if Print Blank Insert Paper mode of Insert Sheet has already been selected Procedure 1 Touch one of the three keys under Cover to highlight it 2 Select one of the keys under Print Insert if...

Page 409: ...print the date and time other than the current date Procedure 1 Touch Setting Time to highlight it 2 Touch Set to highlight it the year month day or time to be changed 3 Enter the desired number from...

Page 410: ...ype specified on the machine 0 The annotation number is counted for each scanned original in scanning order and will continue to the next job even if the machine power is turned off then on However th...

Page 411: ...Application Functions 10 VarioLink 9522 10 91 1 Position the original 2 Touch Application on the Copy Screen 3 Touch Stamp Overlay on the Application Screen 4 Touch Annotation...

Page 412: ...position keys to highlight it If fine ad justment is desired touch Fine Adjustment See page 10 85 for details If Temp No Set key appears on the screen the annotation number setting has been changed t...

Page 413: ...mp to the subsequent screen to make any setting change 9 Enter the desired print quantity from the control panel keypad then press Start The machine will start printing when ready for output Detail Th...

Page 414: ...onto each page copied in the job Procedure 1 Position the overlaying original Position a sheet of original faceup in the ADF or facedown on the original glass 2 Touch Application on the Copy Screen 3...

Page 415: ...hted to show that the Separate Scan mode is automatically selected 7 Select any other copy conditions as desired 8 Press Start on the control panel The original image will be scanned into memory 9 Tou...

Page 416: ...the job See the following Registering Overlay Image to store an overlay image on the HDD or proceed to Recalling Registered Overlay Image to recall a stored image for output 10 21 1Registering Overlay...

Page 417: ...Application Functions 10 VarioLink 9522 10 97 3 Touch Stamp Overlay on the Application Screen 4 Touch Reg Overlay The Image Store Recall Screen will be displayed...

Page 418: ...uto matically 7 Touch OK The Copy Screen to store the overlaying image will be displayed Select copy conditions as desired If a popup menu is displayed to prompt you that the entered image name has be...

Page 419: ...0 99 10 21 2Recalling Registered Overlay Image To overlay stored image onto each page 1 Touch Application on the Copy Screen 2 Touch Stamp Overlay on the Application Screen 3 Touch Reg Overlay The Ima...

Page 420: ...Screen The Copy Screen will be restored with the Stamp Overlay key dis played under the Application key This key can also be used to display the Application Screen for making setting change 7 Position...

Page 421: ...f both OK and Cancel keys are displayed the image with the entered name applied can be overwritten Touch Cancel to overwrite the existing image data To store the new data with a new name touch OK If t...

Page 422: ...Edit Insert Sheet Front Tray Paper 1 1 1 Post Inserter Back Tray Paper 1 1 1 Post Inserter Insert Tray Paper 1 1 1 Post Inserter Chapters 1 1 1 Combine Originals Hori zontal 2 in 1 1 1 1 1 4 in 1 1 1...

Page 423: ...ost Inserter Paper Insert Tray Paper Post Inserter Paper Chapters Combine Originals Hori zontal 2 in 1 4 in 1 8 in 1 Vertical 4 in 1 8 in 1 Booklet Booklet Magazine Binding OHP Interleave Insert Image...

Page 424: ...1 Vertical 4 in 1 1 8 in 1 1 Booklet Booklet 1 1 1 Magazine Binding 1 1 1 OHP Interleave 1 1 1 Insert Image Book Copy 1 3 3 3 3 1 1 Program Job Image Edit Non Image Area Erase 1 1 1 1 1 Neg Positive R...

Page 425: ...essage Use original glass to scan a front cover displayed till the ADF scanning mode is released 4 Selecting With Cover Print and Duplex the Start key becomes unavailable with the message Duplex mode...

Page 426: ...et Common Booklet 3 3 3 3 1 1 1 1 1 1 1 1 1 Magazine Binding 3 3 3 3 1 1 1 1 1 1 1 1 1 OHP Interleave 1 1 1 1 1 1 1 1 1 1 1 1 1 1 1 1 1 1 1 1 Insert Image 3 3 3 3 1 1 1 1 1 1 1 1 1 1 Book Copy 3 3 3 3...

Page 427: ...when the other is selected 7 Automatically selected and unreleasable 8 The Page Space key normally grayed out becomes available only when Booklet Adhesive Binding or 2 Repeat mode of Image Repeat incl...

Page 428: ...n 1 1 1 1 1 1 1 1 1 1 1 1 1 1 1 Booklet Common Booklet 1 1 1 1 1 1 1 1 1 1 1 1 Magazine Binding 1 1 1 1 1 1 1 1 1 1 1 1 OHP Interleave 1 1 1 1 1 1 1 1 1 1 1 Insert Image 1 1 1 1 1 1 1 1 1 1 1 1 1 1 Bo...

Page 429: ...when the other is selected 7 Automatically selected and unreleasable 8 The Page Space key normally grayed out becomes available only when Booklet Adhesive Binding or 2 Repeat mode of Image Repeat incl...

Page 430: ...1 1 1 1 1 1 1 1 1 Booklet Common Booklet 2 Magazine Binding 2 OHP Interleave 1 2 Insert Image 1 2 1 Book Copy 1 2 9 Program Job 1 2 Image Edit Non Image Area Erase 2 Neg Positive Reverse 1 1 1 1 1 1 1...

Page 431: ...when the other is selected 7 Automatically selected and unreleasable 8 The Page Space key normally grayed out becomes available only when Booklet Adhesive Binding or 2 Repeat mode of Image Repeat incl...

Page 432: ...serter Paper Insert Common Tray Paper 1 1 1 1 Post Inserter Paper Chapters 1 1 1 Com bine Origi nals Common Horizon tal 2 in 1 1 1 1 1 4 in 1 1 1 1 1 8 in 1 1 1 1 1 Vertical 4 in 1 1 1 1 1 8 in 1 1 1...

Page 433: ...1 1 1 Com bine Origi nals Common Horizon tal 2 in 1 1 1 1 1 4 in 1 1 1 1 1 8 in 1 1 1 1 1 Vertical 4 in 1 1 1 1 1 8 in 1 1 1 1 1 Booklet Common Booklet 1 1 1 1 1 Magazine Binding 1 1 1 1 1 OHP Interle...

Page 434: ......

Page 435: ...11 Output Setting...

Page 436: ......

Page 437: ...ck sides have the same side up Detail If you want to make right left bound duplex copies front and back sides have the same side up from top bound duplex originals front and back sides have the opposi...

Page 438: ...11 Output Setting 11 4 VarioLink 9522 1 Touch Output Setting on the Copy Screen The Output Setting Screen will be displayed 2 Touch Top in the Bind Direction area to highlight it 3 Touch OK...

Page 439: ...set Group Groups together multiple copies of each original Staple Staples each sorted grouped set with one staple at the corner or two staples along the edge Offset Sort Outputs each sorted set offset...

Page 440: ...ails Finisher FS 611 provides Multi Tri Fold mode to fold copies in three upon exit with printed side selected inside or outside See page 11 15 for de tails Finisher FS 528 FS 611 with Z Folding Unit...

Page 441: ...ction output face and output order settings are also availa ble 2 Reminder If large size paper e g 11 17 w or A3 w delivered to the primary main tray shows excessive curl perform the setting described...

Page 442: ...mode in the Utility mode For details see POD Administrator s Reference Procedure 1 Position the original 2 Touch Output Setting on the Copy Screen The Output Setting Screen will be displayed 3 Select...

Page 443: ...caused 11 2 2 Stapling Output to the Primary Main Tray Copies will be stapled in this mode Follow the procedure below to select the stapling position and number of staples Left Corner Right Corner Co...

Page 444: ...t 6 Touch OK To restore the previous setting touch Cancel To release the Staple function touch Function Off Staple is compatible with Sort or Group while Offset Sort and Off set Group are incompatible...

Page 445: ...selecting the print quantity otherwise unexpected trouble may be caused 11 2 3 Sort Group Output to the Secondary Sub Tray A machine with Finisher FS 528 FS 611 installed is set to output sorted sets...

Page 446: ...Face Up or Face Down and output order key 1 to N or N to 1 as needed Selecting N to 1 automatically selects and limits the output face to Face Up 5 Touch OK on the Output Setting Screen The specified...

Page 447: ...lf Fold 3 sheets 21 lb paper Fold Staple 20 sheets 19 sheets when using a thick cover Multi Half Fold Trimming 3 sheets Fold Staple Trimming 16 sheets 15 sheets when using a thick cover 0 Folding mode...

Page 448: ...elect whether or not to use the Trimming mode 5 Touch OK To restore the previous setting touch Cancel To release the Multi Half Fold Staple function touch Function Off The Output Setting Screen will b...

Page 449: ...s max 0 Paper size 8 5 11 w or A4 w 0 Paper weight 17 to 28 lb 0 Printed side Selectable inside or outside 0 Output tray Folding mode tray 0 Selecting Outside Print automatically sets the printing ord...

Page 450: ...Touch Outside Print or Inside Print to select it 4 Touch OK To restore the previous setting touch Cancel To release the function with current setting remained touch Func tion Off The Output Setting Sc...

Page 451: ...11 17 w 8 46 215 mm or less 8 5 14 w 9 52 241 7 mm or less A3 w 8 23 209 mm or less B4 w 7 13 181 mm or less 0 Z Fold and Staple modes are available in combination for A3 w and A4 v mixed while they c...

Page 452: ...e Copy Screen The Output Setting Screen will be displayed 3 Touch Z Fold to highlight it 4 Touch OK on the Output Setting Screen To restore the previous setting touch Cancel To restore the default set...

Page 453: ...may not be punched in position Prerequisites 0 Number of holes 2 or 3 0 Hole diameter ZU 607 0 315 0 020 8 0 5 mm PK 505 0 315 0 006 8 0 15 mm 0 Hole pitch 2 holes 2 756 0 020 70 0 5 mm 3 holes 4 252...

Page 454: ...main tray The Output mode icon shows the number of punch holes and punch position currently selected If you want to change the number of punch holes and punch posi tion proceed to the following steps...

Page 455: ...Setting Screen The specified output mode icon will be displayed on the Copy Screen 2 Reminder The primary main tray gradually goes down while printed materials are output DO NOT allow any object to i...

Page 456: ...ver with Blank Sheet mode of Booklet and Multi Half Fold Fold Staple with Trimming mode a booklet type cover will be attached to the multiple page signature booklets Prerequisites 0 Paper size Upper t...

Page 457: ...ut Setting 11 VarioLink 9522 11 23 1 Load cover paper into the upper and lower trays of the post inserter 2 Use Insert Sheet or Booklet function to attach covers to the output copies Upper tray Lower...

Page 458: ...11 Post Inserter PI 506 Staple Corner 1 staple 2 staples Finisher FS 611 Post Inserter PI 506 Staple Corner 1 staple 2 staples Fold Staple Multi Tri Fold Finisher FS 528 FS 611 Post Inserter PI 506 Pu...

Page 459: ...les 11 17 w 8 5 11 w A3 w B4 w A4 v B5 v 14 to 24 lb Tray capacity 200 sheets or within 30 mm thick Output tray Primary main tray 0 Specifications for Fold Staple Paper size 11 17 w 8 5 14 w A3 w B4 w...

Page 460: ...mode selection button to turn on the desired mode lamp To select Punch press Punch button to turn on the lamp To use Staple in combination turn on the desired Staple mode lamp To select only the Punc...

Page 461: ...11 VarioLink 9522 11 27 11 9 Using Multi Punch GP 501 Using Multi Punch GP 501 the following six types of punch holes can be made in printed sheets Die set model Hole type DS 501 DS 502 DS 503 DS 504...

Page 462: ...t on be fore turning on the main and sub power switches of the main body 0 The die set model currently mounted on the multi punch cannot be checked from the control panel If required open the front do...

Page 463: ...layed 4 Touch Hole Punch The Hole Punch Screen will be displayed 5 Touch the desired key to select the punch position 6 Touch OK To restore the previous setting touch Cancel To release the Hole Punch...

Page 464: ...11 Output Setting 11 30 VarioLink 9522 7 Touch OK on the Output Setting Screen The specified output mode icon will be displayed on the Copy Screen...

Page 465: ...ont door 2 Turn the knob GP4 clock wise to set the die set punch blade position indi cator to the horizontal posi tion as shown in the illustration Be sure to align the die set punch blade posi tion i...

Page 466: ...11 Output Setting 11 32 VarioLink 9522 4 Take out the desired die set from the rack to replace it with the one currently set Securely set the die set in position...

Page 467: ...Output Setting 11 VarioLink 9522 11 33 5 Put the replaced die set into the rack The replaced die set is supposed to be stored in the rack 6 Close the multi punch front door...

Page 468: ...red to use the tandem mode Contact your service representative if desired Detail Auto Reset Setting may function while tandem mode is selected Initially the tandem mode will be released automatically...

Page 469: ...function while tandem mode is se lected For details see page 11 38 0 This machine is provided with an Distribution Recovery mode which functions when trouble occurs in either the master or tandem mach...

Page 470: ...e during the tandem mode setting Corresponding tray sizes on the master and tandem machines should be the same when using multiple trays for a single job 5 Enter print quantity on the master machine u...

Page 471: ...ed and the Master and Tandem icons will dis appear 2 Note Entering reserve job during Tandem mode copying If scanning of the next reserve job is performed during the tandem mode copying that job will...

Page 472: ...to restart the procedure 2 Reminder The tandem mode cannot be selected continued in the cases shown be low The message Please wait Reserve is not available in Tandem ma chine Tandem machine error Ple...

Page 473: ...em mode How ever if the data transmission has already been completed the tandem job on the tandem machine has to be canceled separately Touch Job List on the touch panel of the tandem machine to displ...

Page 474: ...annot continue with the tandem printing job even when Continue is touched 11 10 3Troubleshooting Copying with the Distribution recovery mode The Distribution recovery mode enables you to complete your...

Page 475: ...e memory be comes available after completing some reserve jobs In this case the Distri bution recovery mode functions to continue the tandem printing job on the master machine until the tandem machine...

Page 476: ...ize Normal Left Upside Down Right Right Left Top Normal Mixed Z Folded Orig Single Feed Standard Size Custom Size Tab Paper Size Size Keys Full Area Output Setting Output Setting with any finishing op...

Page 477: ...tting Output Setting with any finishing option Bind Direction Right Left Top Face Face Up Face Down Order 1 to N N to 1 Output Tray Main Tray Sub Tray Output Offset Sort Offset Group Sort Group Staple...

Page 478: ...any finishing option Bind Direction Right Left 2 2 Top 2 2 Face Face Up 1 1 Face Down Order 1 to N N to 1 Output Tray Main Tray Sub Tray Output Offset Sort Offset Group Sort Group Staple Fold Staple M...

Page 479: ...Post Inserter Tray Paper Post Inserter Tray Paper Post Inserter 2 in 1 4 in 1 8 in 1 4 in 1 8 in 1 Output Setting Output Setting with any finishing option Bind Direction Right Left Top Face Face Up F...

Page 480: ...Face Down Order 1 to N N to 1 6 6 Output Tray Main Tray Sub Tray Output Offset Sort 9 Offset Group 9 1 1 Sort Group 9 1 1 Staple 2 16 16 16 16 16 16 1 1 Fold Staple 6 5 7 5 Multi Half 6 5 7 5 Multi 3...

Page 481: ...Tri Fold all grayed out and selects Sort 6 Grayed out not selectable 7 Releases Fold Staple Multi Half Multi Tri Fold all grayed out grays out Offset Group and Group and selects Sort 9 Selects Sort a...

Page 482: ...atermark Set Numbering Overlay Reg Overlay Reg Overlay Register Annotation Output Setting Output Setting with any finishing option Bind Direction Right Left Top Face Face Up Face Down Order 1 to N N t...

Page 483: ...osition punch position binding direction in duplex copying x Grayed out including automatic release Output Setting Bind Direction Face Order Output Tray Output Right Left Top Face Up Face Down 1 to N...

Page 484: ...inding direction is found staple position punch position binding direction in duplex copying x Grayed out including automatic release Output Setting Output Tandem Multi Punch Multi Half Multi 3 Hold I...

Page 485: ...12 Job Management...

Page 486: ......

Page 487: ...ey turn orange if any suspended job re mains Spool 2 Note The jobs referred here include printer jobs and scanner jobs Follow the procedure below to display the Job List Screen To display the Job List...

Page 488: ...opy or Printer Status Printing or Reserved current status of the job Pages Max 5 digit page count Sets Max 4 digit set count Remain Sheets Max 4 digit pages to be output sheets sets Minute s Time requ...

Page 489: ...rmation To suspend reserve job Touch the desired reserve job key to highlight it then touch Sus pended Printing operation for the selected job will be suspended and kept stored in memory In this case...

Page 490: ...Max 4 digit set count Result Complete or Cancel Time Time when output operation was executed Follow the procedure below to check the settings of output jobs To display output history 1 Touch JOB LIST...

Page 491: ...s transmitted Result Complete Cancel or Error Time Time when data transmission was executed Follow the procedure below to check the settings of transmitted jobs To display send history 1 Touch JOB LIS...

Page 492: ...Full Cancel etc cause for which the job was not completed Follow the procedure below to check the settings of incomplete jobs To check incomplete jobs 1 Touch JOB LIST tab on the screen then touch In...

Page 493: ...set count Remain Sheets Max 4 digit pages to be output Sheets x Sets Minute s Time required for completing each job minute Follow the procedure below to check the settings of each job and re lease co...

Page 494: ...lected job will be output according to the current printing or der To output all suspended jobs Touch All Release All suspended jobs will be output according to the current printing order To check the...

Page 495: ...ob operation To specify the next job to be printed Touch the desired job key to highlight it then touch Print Next The highlighted job will be moved just under the current print job This will not func...

Page 496: ......

Page 497: ...13 Advanced Information...

Page 498: ......

Page 499: ...inals to be scanned from the original glass 1 Position the original then select the desired copy conditions from the Copy Screen If Separate Scan mode is selected press Start to scan all the orig inal...

Page 500: ...4 Change the settings as required Embossed keys are available for setting change and display each exclusive screen when touched with Change Setting in order Additional proof copy is available so that...

Page 501: ...ew the results of the selections This is a convenient and cost effective way for making a large amount of cop ies Prerequisites 0 In this checking procedure all the settings except tray setting can be...

Page 502: ...esired proceed to step 6 4 Change the settings as required Touch the desired key Basic Setting Output Setting Original Set ting Quality Adjustment each application function on the Check Screen to high...

Page 503: ...ch the desired key to highlight it then touch Clear The following application functions have no exclusive screen Program Job Non Image Area Erase Neg Positive Reverse Im age Centering All Image Area O...

Page 504: ...age data will not be deleted from memory The Check Screen will be displayed If any setting change is required proceed to step 4 in the procedure of Proof Copy See page 13 4 If the copy result is satis...

Page 505: ...ted with the following conditions Machine is not operating printing or scanning job Register Overlay is in use The Call for Service message displays or a paper misfeed occurs Already using Interrupt m...

Page 506: ...e mode can be specified 3 Position the original then press Start to start the interrupt copying 4 When Interrupt copying is completed press Interrupt again The Interrupt LED turns out and the Machine...

Page 507: ...he procedure below to store the copy job setting Prerequisites 0 Available settings Basic setting Original Setting Quality Adjustment Application Output Setting print quantity 0 Stored job is given a...

Page 508: ...n Make setting change then restart the operation from step 2 5 Touch the desired job key to highlight it then touch OK The job keys numbered from 01 to 18 are displayed on the screen Touching Next wil...

Page 509: ...eys and to move the cursor and use Shift to enter upper case letters or symbols Touch OK to restore the Mode Memory Screen Check that the job name has been correctly entered If you do not with to ente...

Page 510: ...ry Screen can be displayed only from the Copy Screen If another screen such as Machine Status Screen is displayed pressing Mode Memory will be ignored 1 Touch COPY tab to display the Copy Screen then...

Page 511: ...w you to review the settings Do you want to start copying without reviewing the settings Touch OK instead of Job Check Proceed to step 5 4 Touch OK on the Check Screen The settings of the selected job...

Page 512: ...isites 0 The assignment to the Function key is available only for the job setting stored using Mode Memory 0 Up to 5 function keys are provided for the job setting assignment 0 Function keys are avail...

Page 513: ...rmation 13 VarioLink 9522 13 17 3 Touch the desired function key The copy conditions of Mode Memory assigned to that key will be re called on the screen 4 Enter the desired print quantity then press S...

Page 514: ...have been made last 0 The previous job settings can be recalled even after the machine power is turned off then on 1 Press Mode Memory on the control panel The Mode Memory Screen will be displayed 2...

Page 515: ...vides information on function and operation of the keys on Job List Screen 06 Machine provides information on function and operation of the keys on Machine Status Screen 07 Hard Key provides informati...

Page 516: ...13 Advanced Information 13 20 VarioLink 9522 Pressing Help from the Copy Screen Top Page of the Help Screen This screen will be displayed when Top Menu on the subordinate Help Screen is touched...

Page 517: ...ho have difficulty in touching keys with accuracy Detail The POD Administrator s Reference describes how to set the desired re sponse time Prerequisites 0 Response time can be selected from Normal 0 5...

Page 518: ...d using remote panel can be recorded and replayed The machine operation using touch panel and control panel can be void ed In this case machine operation is available from the remote panel only Remote...

Page 519: ...mote Panel Prerequisites 0 Set the Security Strengthen mode OFF on the machine 0 The machine should be connected with a PC over a network with TCP IP enabled 0 Specify the IP address of the machine 0...

Page 520: ...ote panel can be recorded and re played Click Operation Log On then start the operation To save the operation click a number key under Save to MFP To recall the operation click the desired number key...

Page 521: ...of the main body in the address bar The Web Utilities screen will be displayed 2 Click Remote Monitor on the Web Utilities screen The state of the machine touch panel screen and job condition will be...

Page 522: ...lock screen to enable the machine operation from the Remote Panel Detail For details of the Remote Panel see page 13 23 13 9 3 Monitoring Copier from Browser Multi Monitor Procedure 1 Start the web br...

Page 523: ...C 2 Note The background color of the Remote Monitor varies according to the state of the machine Green IDLING WARMUP ADJUSTMENT Blue OPERATING Yellow JAM Red SC When the Operation Panel Lock function...

Page 524: ......

Page 525: ...14 Index...

Page 526: ......

Page 527: ...ies 11 3 Book Copy 10 35 Booklet 10 24 Bookmark key 10 6 Browser 13 22 Bypass tray 2 4 C Call for Service Screen 5 3 Cartridge housing 2 17 Caution Labels and Indicators 1 14 Change print quantity 8 1...

Page 528: ...ies in Three 11 15 Folding mode outlet 2 15 Folding mode tray 2 15 Frame Center Erase 10 55 Front door 2 4 G Grounding 1 6 Group mode 11 5 H Help key 2 7 Help Mode 13 19 Help Screen 13 19 Hole Punch 1...

Page 529: ...Output paper counter 6 5 Output to the primary main tray 11 5 Output to the secondary sub tray 11 6 Output Z Folded Copies 11 17 Overlay 10 94 Ozone Release 1 11 P Page Margin 10 62 10 68 Page No 10...

Page 530: ...mup 8 15 Setting Print Quantity 8 13 Shift 10 62 Simplex Duplex Setting 9 30 Single Feed 9 10 Sort mode 11 5 Sort Group Output to the Secondary Sub Tray 11 11 Sort Group Offset Sort Offset Group Outpu...

Page 531: ...n 2 35 Using Finisher Manually 11 24 Utility Screen 6 6 Utility Counter key 2 7 V Ventilation 1 8 W Warmup 2 26 Warning and precaution symbols 1 3 Watermark 10 81 Weekly Timer 2 33 When moving the mac...

Page 532: ...Printing for Professionals Beyond the Ordinary...

Reviews: