73
1568911, Edition 2019-04, Version 0
15 Adjustments
EN
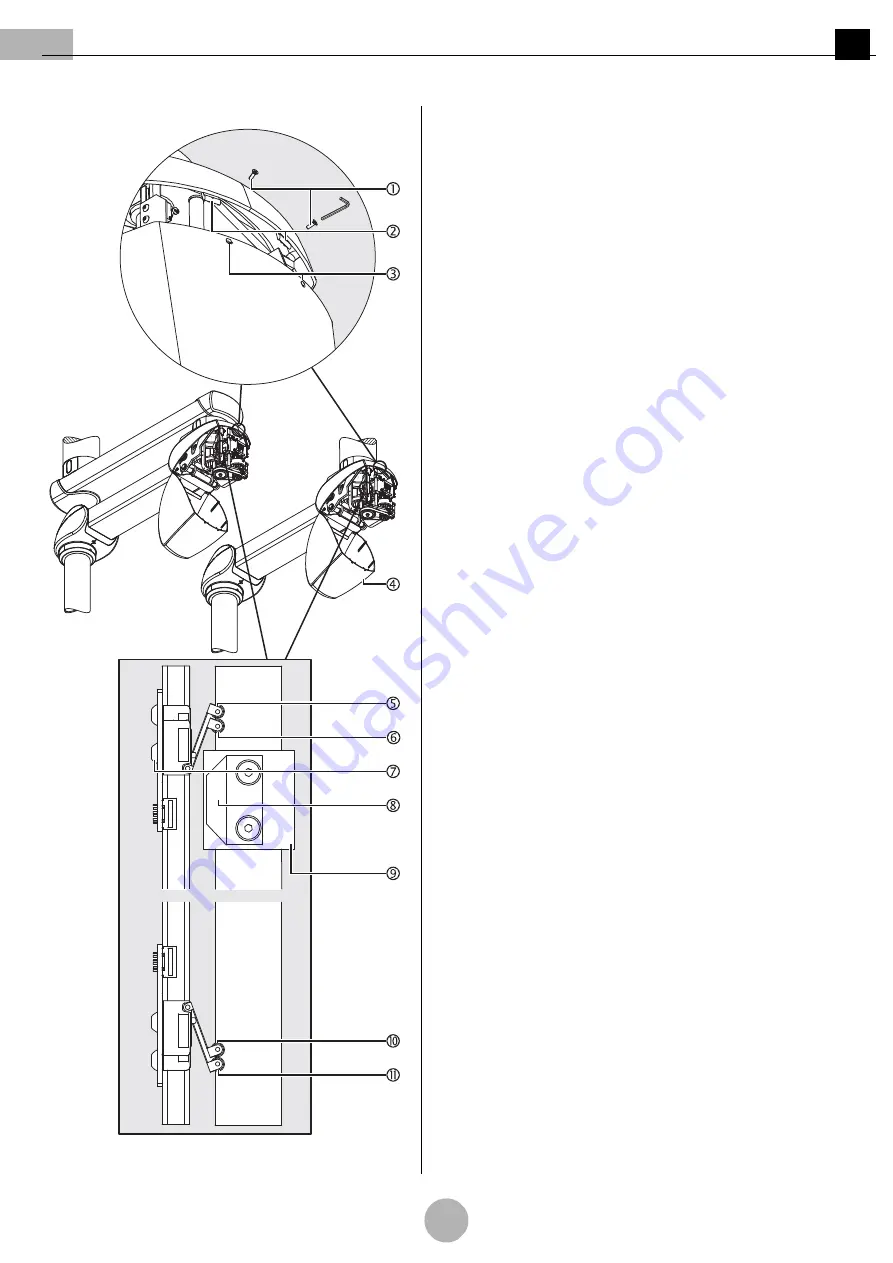
Figure 56: Opening the bottom rear cover
15.3 Adjusting the vertical lift on the motor arm
(See "Figure 56")
The simplified representation illustrates the extension arm and motor arm
without the cables mounted.
The adjustment is identical for all versions.
The motor arm has a vertical lift of + 20 degrees in the upwards direction
and
– 30 degrees in the downwards direction. The vertical lift can be restricted
in both the upwards and the downwards direction.
15.3.1 Functioning of the vertical lift
(See "Figure 56")
1. To adjust the height of the motor arm, the end stop⑧ on the ball
screw nut⑨is routed towards the 2 upper end switches ⑤/⑥ and 2
lower end switches ⑩/⑪ which switch off the motor.
2. The end switch⑥ or ⑩ actuated first by the end stop⑧ ensures a
decelerated starting or braking (SoftStart / SoftStop) of the motor.
The second end switch⑤ or ⑪ switches off the motor.
3. The upper and lower vertical lifts are adjusted separately from each
other and one after the other. To adjust the vertical lift, move the
motor arm to the desired upper or lower height position.
4. Disconnect all poles of the pendant system from the mains and pre
-
vent it from being switched back on again.
15.3.2 Opening the bottom rear cover
(See "Figure 56")
Tool to be used
Use an Allen key (size 2).
5. Follow the general safety instructions prescribed in Chapter 15.1 on
Page 72.
6. Unscrew the 2 Allen countersunk screws M3 x 10mm① from the 2
openings③.
7. Disengage the 2 latches②.
8. Manually route the bottom rear cover④ completely downwards until
it points downwards in a fully vertical position.
•
To remove the cover④, swivel it approx. 45 degrees downwards.
Make sure that this position is passed before releasing the cover④.


