background image


129


7 .


Pl a y b a ck  

There are t w o way s t o  execut e t he playback function:  wit h I nt ernet  Ex plorer 

or w it h t he Pl a y b a ck  Sy s t em  application. 


7 .1


I n t e r n e t  Ex p l o r e r  

7 .1 .1


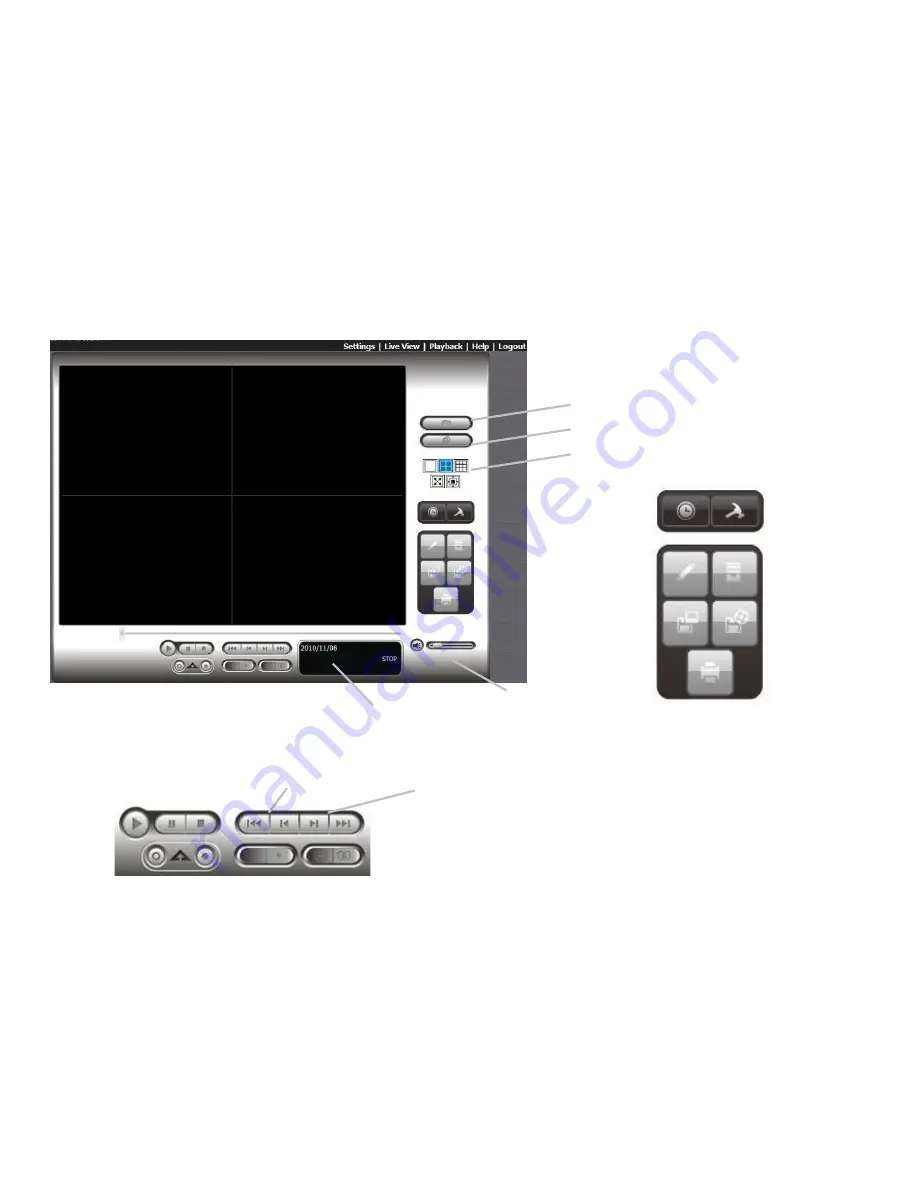
Pl a y b a ck  Co n t r o l  Pan e l  


I n f o r m a t i o n  D i sp l ay  W i n d o w

:  Display s video dat e and t im e, cue- in /  

cue- out  point  t im es, and speed.  


A u d i o  Vo l u m e  Co n t r o l

:  Adj ust  t he sound lev el. 


Scr e e n  D i v i s i o n

:  Allocat e t he sub- screen display by  clicking on  t he 

desired layout  icon. To swit ch t o single cam era display, double click  a 

part icular sub- screen. Double click  t he screen again t o regain previous 

screen division lay out . 


B r o w s e  M o d e

:  Play t he recor ded video when in Search Mode. 

Browse Mode 

Search Mode 

Screen Division 


Audio Volume 
Control 

Information 

Display Window 

Backup 

General Setting 

Open Record 

Export Video / 
Audio 

Print   

Enhancement / 
Post Processing 
Tool 

Save Image 

Previous/Next Interval 

Cue


Step Backward/Forward Frame(s)


Zoom


Speed


Play / Pause / Stop


Summary of Contents for NVRmini 2

Page 1: ...Th e I n t elligent Su r v eillan ce Solu t ion NVRm in i 2 User Manual Ver 2 0 0 140829 00...

Page 2: ...onding Actions Setup 30 2 2 4 I O Box Input and Responding Action Setup 33 2 2 5 System Events and Responding Actions Setup 34 2 2 6 Push Notification 35 2 2 7 SMTP Server Setup 37 2 2 8 Add Event Con...

Page 3: ...ation Default Settings 67 2 7 System 68 2 7 1 View System Information 68 2 7 2 Smart Fan Control 69 2 7 3 Buzzer Configuration 69 2 7 4 UPS Setup 70 2 7 5 Upgrade the System 71 2 7 6 Upgrade Notificat...

Page 4: ...layback 94 3 6 3 Select Period by Data Time through Playback System 94 3 7 Backup Video with POS Data 94 3 7 1 Backup through browser 94 3 7 2 Backup through Playback System 95 3 7 3 Backup through Ba...

Page 5: ...Setting 119 5 2 7 OSD On screen display Setting 120 5 2 8 Monitor Display Setting 120 5 2 9 Notification 121 5 2 10 Set up Joystick Control 122 5 2 11 Set up Remote Live Viewer 123 6 E Map 124 6 1 Int...

Page 6: ...The Backup System Application 147 8 2 Backup the Recorded Video through Windows Explorer 149 8 3 Backup the Recorded Video through FTP 150 8 4 Playback the Backup Records 150 8 4 1 With Playback Appli...

Page 7: ...n to the Unit with Internet Explorer 162 Appendix RAID System 163 I ntroduction to RAID 163 RAID 0 Stripe 163 RAID 1 Mirror 164 RAID 5 Block Striping with Distributed Parity 165 RAID 10 Mirror Stripe...

Page 8: ...for the exact terms and conditions of this license at w w w gnu or g The GPL source code incorporated into the product is available for free download at our web site ht t p w w w n u uo com Subject t...

Page 9: ...and quick start guide The electronic components within the unit can be damaged by Electrostatic Discharge ESD Please take precautions at all times when handling the unit or its sub assemblies To confi...

Page 10: ...St ep 3 Con n ect t o t h e Net w or k 1 Attach one end of the network cable to the RJ45 network connection See the rear view figure 2 Attach the other end of the network cable to your Ethernet hub or...

Page 11: ...eeps one time St ep 5 I n st all t h e So ft w ar e 1 I nsert the CD into your CDROM 2 Double click Set u p ex e to begin installation 3 Follow the instruction of Set u p ex e and click the Fin ish bu...

Page 12: ...figure all settings manually network license camera Date Time upgrade notification and RAID level Add license function is supported in v1 0 0 20 and later version 4 The I n st allat ion W izar d progr...

Page 13: ...ton Obt ain n et w or k set t in gs au t om at ically fr om ex t er n al DHCP ser v er apply all settings which are automatically generated by the DHCP server such as IP subnet mask gateway and DNS Co...

Page 14: ...13 8 Add cameras for this server There are two ways of adding cameras selecting the searched cameras and manually configuring the cameras Click the button after completing camera list...

Page 15: ...time zone date and time and adjust daylight saving changes if needed Once daylight saving function is enabled the time change will activate automatically every year based on the recurrence you set Cl...

Page 16: ...able Upgr ade Not ificat ion box if you want to receive notification when there is a newer FW version Click the button 11 Follow the following instruction and select the RAID type you want to create C...

Page 17: ...gs are correct click the Fin ish button to exit the settings procedure and activate the system Once the FI NISH button is clicked the unit will start working In order to ensure the stability of the un...

Page 18: ...Unhealthy or abnormal temperature status or RAI D volume status abnorm al orange Reset to default setting orange with blinking Off dark HDD St at u s Healthy blue Failed orange No disk dark Rebuildin...

Page 19: ...p of the page Current firmware version and free storage capacity are shown above the function list 2 1 Cam er a Set u p 2 1 1 Add Cam er as by Cam er a Sear ch The function enables user to automatical...

Page 20: ...dd a camera into your camera list 6 After clicking the icon the camera setting page will pop up Click the item to which you want to add a camera 7 I nsert the camera name username and password To have...

Page 21: ...gs tab and the camera list will be displayed on the bottom of the page 4 Click on the camera list for the channel you want to add and enter the camera s information Cam er a n am e The name of the cam...

Page 22: ...indows Chrome or Mac Safari and log in to the unit 2 Click I P Cam er a Cam er a Set t in gs 3 Click the Cam er a Set t in gs tab 4 Click the camera which you want to modify 5 Modify the information o...

Page 23: ...of the camera Resolu t ion Select the resolution of the camera Qu alit y Bit Rat e Select the image quality of the camera Au dio Check the En able Au dio option to view and enable audio recording 2 1...

Page 24: ...select type so far type depends on camera model Len s Enable or disable lens function Cam er a Posit ion Select the position of the camera I f users enable the lens while lens is not installed correc...

Page 25: ...isconnected Connection Status Connecting Connection Button Connected Normal Connected Over Connection Button Disconnected Norm al Disconnected Over Rec St at u s The set recording schedule of this cam...

Page 26: ...indows Chrome or Mac Safari and log in to the unit 2 Click IP Camera Details St r eam 1 The bit rate of stream 2 St r eam 2 The bit rate of stream 3 St r eam 3 The bit rate of stream 3 Tot al Bit Rat...

Page 27: ...e recorded video clips will be kept intact max 365 The privilege of automatically recycle is higher than keep video if you select both 2 2 2 Recor d in g Sch edu le Ev en t Set u p Instead of Alw ay s...

Page 28: ...at the bottom of the page I n ser t Insert new schedules Delet e Delete the selected schedule Con figu r e Modify the schedule and recording mode settings Copy Copy current Day Sch edu le to other cha...

Page 29: ...ngs first 8 Choose the recording mode Alw ay s Recor d Always record Recor d on Ev en t Record when events triggered The event can be triggered by Mot ion or Digit al in pu t When setting the event Mo...

Page 30: ...triggered from other cameras This means that if the system detects motion or digital input from other cameras or I O Box the camera will begin recording There is another way to set the schedule If you...

Page 31: ...on s Set u p 1 Open Internet Explorer Windows Chrome or Mac Safari and log in to the unit 2 Click Recor din g Ev en t Ev en t Act ion Man agem en t 3 Choose the camera and then select one of the event...

Page 32: ...e sure to set up the camera s motion detection function first Besides event log will be recorded only if event is selected on this page 4 Click the Con figu r e button to enable the event and select t...

Page 33: ...l send instant message to the registered mobile client s as a notification Mobile users can check the recording videos on mobile client to watch what just happened Refer to Push Not ificat ion E m ap...

Page 34: ...er connected devices Em ail When an event occurs the system will send Email notifications Make sure to add an Email address first CMS When an event occurs the system will send out a signal to CMS CMS...

Page 35: ...r m al disk st at us When there is no enough disk space for recording or when disk is abnormal for accessing the system will trigger an action Daily sy st em r epor t Enable users to know the system i...

Page 36: ...d Push Notification are the only two actions to the event Daily syst em r epor t Un able t o access FTP Back u p unf in ish ed Pow er on n ot if icat ion and Au t o pow er off n ot if icat ion over h...

Page 37: ...tion for motion detection When motion detected it may trigger several alarms In this case you may not want to receive several push notifications frequently then you can define the suitable rearm inter...

Page 38: ...ing failed that is users have ever logged in to the mobile client by typing both LAN I P and WAN I P of the NVR but only do de registering on one side I f users don t want to sen d notifications to ce...

Page 39: ...sending out an Email enter the username and password for SMTP authentication User n am e Passw or d 4 Click the Send Test Mail button and the system will send a test mail to the sender Check it after...

Page 40: ...of the contact list 2 2 9 Set u p FTP Ser v er 1 Open Internet Explorer Windows Chrome or Mac Safari and log in to the unit 2 Click Recor din g Ev en t FTP Set t ings 3 Set up the FTP server and creat...

Page 41: ...heck the normality of FTP server regularly e g enough space for video system conditions 2 3 RAI D File Set t ing s 2 3 1 Cr eat e a RAI D Volu m e In this system the term RAID volume refers to one or...

Page 42: ...r this volume 6 Click the Cr eat e button 7 A confirmation dialog pops up Check the Yes I w an t t o cr eat e v olu m e w it h t h ose disk s box and click the Yes cr eat e it button 8 Creating RAI D...

Page 43: ...ublic folder via My Network Places before creating new disk volume or modifying volume please delete the invalid volume if any I f you choose Express Mode when using the I n st allat ion W izar d the...

Page 44: ...is existed but unmounted so recording is stopped and you cannot access your data either Capacit y Total free used data capacity of the RAID volume Updat e Tim e The time of volume created updated Dev...

Page 45: ...Det ails Good The disk is healthy and able to work normally Warning The disk is damaged Recommend you to change the disk as soon as possible Abnormal The disk is damaged seriously and it may cause the...

Page 46: ...Healt h SMART to view the details 7 Click on OK button to exit To make sure all the information of hard disk and RAI D volume are correct 8bay RAI D model are not allowed to query status create modify...

Page 47: ...nction is not applied to RAI D 0 since there is no data protection mechanism by its nature I n case of any unexpected damage we recommend users to unplug running HDD by this method which can be viewed...

Page 48: ...A confirmation dialog pops up Check the Yes I w an t t o m odify t h is v olu m e box and click the Yes m odify it button 7 Modifying RAI D volume takes a while depending on the size of disks you choo...

Page 49: ...o the unit 2 Click RAI D File Syst em RAI D Man agem en t 3 Click the Delet e tab 4 Click the option button beside the RAID Volume you want to delete 5 Click the Delet e button 6 A confirmation dialog...

Page 50: ...that format is the only way to clean the RAID information from disks 1 Open Internet Explorer Windows Chrome or Mac Safari and log in to the unit 2 Click RAI D File Syst em RAI D Man agem en t 3 Clic...

Page 51: ...unit through Windows Explorer default disable Ser v er Nam e The name of this unit which is set in the Set u p tab of the Net w or k Set u p function Ser v er Descr ipt ion The name which will be dis...

Page 52: ...e to FTP site There are two steps to enable the function one is Set u p Back u p Sch edu le another is Set u p Back u p Ser v er 2 4 1 Set u p Back u p Sch edu le 1 Open Internet Explorer Windows Chro...

Page 53: ...and FTP server is normal but some problems of FTP causes the system unable to write files on FTP the system would try each file three times before starting to backup the next file I f the connection...

Page 54: ...ation etc I n t er n et Pr ot ocol Choose to obtain an IP address from external DHCP server automatically or configure the IP address manually I P Add r ess IP address of this unit Su bn et Mask Subne...

Page 55: ...vice on router users can do port forwarding for setting page default 80 liveview default 5150 playback default 5160 and CMS default 5170 automatically 1 Open Internet Explorer Windows Chrome or Mac Sa...

Page 56: ...if the ports have been used on router we are unable to know before finding out access failure UPnP port forwarding is for temporarily use only Most of UPnP router will clean up all UPnP ports after ro...

Page 57: ...r eam in g Serv er Port Live streaming transmission port Maximum Connections Maximum connections from remote access Max 64 Play back Ser v er Port Playback transmission port Maximum Users The number...

Page 58: ...16 2 5 5 CMS Ser v ice Set u p 1 Open Internet Explorer Windows Chrome or Mac Safari and log in to the unit 2 Click Net w or k Set u p Net w or k Serv ice 3 Click the CMS Ser v ice tab CMS Ser v er Ch...

Page 59: ...Net w or k Set t in gs RAI D Set t ings and Man agem en t fu n ct ion User User just can change his her password and do the live view and playback functions Gu est u ser User can do live view and play...

Page 60: ...the Modify User s tab 4 Click one of the users in the User List on the bottom of this page 5 Change the group of this user 6 Select the live view cameras which this user can access 7 Select the playba...

Page 61: ...Click the Modify User s tab 4 Click the Delete icon of the user you want to delete 5 In the confirmation box click the OK button 2 6 6 On lin e Licen se Act iv at ion There are two types of license c...

Page 62: ...ion and click the Act iv at e button 4 The license will be updated in License List if activated successfully 2 6 7 Of flin e Licen se Act iv at ion If the device is set up in Intranet Local LAN witho...

Page 63: ...Download dialog pops up Save the request file and take it to other PC which is connected to the Internet Furthermore the PC should be installed OffLin eTool ex e which can be found from NVRmini 2 tool...

Page 64: ...ense file to the unit 8 The license will be updated in License List if activated successfully 2 6 8 On lin e Licen se Tr an sfer There are two ways to transfer license online and offline 1 Open Intern...

Page 65: ...l LAN without Internet connection there is another way to transfer license 1 Open Internet Explorer Windows Chrome or Mac Safari and log in to the unit 2 Click Man agem en t Licen se Man agem en t Tr...

Page 66: ...ineTool exe in that PC with Internet connection and select the request file of flin e r eq 7 The license you are going to transfer is listed Click the Tr an sf er button to finish the transfer process...

Page 67: ...event is selected on Even t Act ion Man agem en t page As for user access information please go to Net w ork Ser vice to check Log Access box to enable this function You may click on to view the even...

Page 68: ...be saved as well 2 6 12 Load Un it Con figu r at ion Defau lt Set t in gs Load configuration can let you apply another unit s settings to the current unit Load Default Settings will revert all of the...

Page 69: ...lead you get the default The original E map POS settings if any are covered and untraceable User accou n t an d pr ivilege will be kept even if loading default settings while camera settings recording...

Page 70: ...dows Chrome or Mac Safari and log in to the unit 2 Click Syst em Sy st em Set t in gs 3 Click the Fan Con t r ol tab 4 Check the En able or Disable option 5 Click the OK button 2 7 3 Bu zzer Con figu...

Page 71: ...n Internet Explorer Windows Chrome or Mac Safari and log in to the unit 3 Click Syst em Set t in gs 4 Click the APU UPS tab 5 Check one of the options Disable Run until the UPS battery is depleted Sy...

Page 72: ...n and upgrading quality from version v1 6 1 users are only allowed to update system as RAI D volume created What s more there must be at least 300MB free space of this volume Please do not power off t...

Page 73: ...option if you agree to be bound by the agreement 5 Click the OK button 2 7 7 Sy st em Dat e an d Tim e Set u p 1 Open Internet Explorer Windows Chrome or Mac Safari and log in to the unit 2 Click Syst...

Page 74: ...v in g ch an ges option and select the time change of daylight saving time in your location Choose the start time and end time of recurrence 6 Click the OK button to restart system to activate the cha...

Page 75: ...2 7 9 Sh u t dow n t h e Un it The only time you need to shut down the unit is to replace the disk drive cooling fan or the power supply During and after the shutdown none of your files will be acces...

Page 76: ...System will begin the shut down process which takes about 30 seconds to few minutes depends on number of recording channels and other factors I f the system is crashed and stocked you can press the p...

Page 77: ...rnal receipt printer is connected by DB9 cable The transaction information delivered in R232 format can be converted to Ethernet through SCB C31A POS data capture converter Defin it ion of Ter m s Ter...

Page 78: ...ne DB 9 female connect to POS system and one DB 9 male connect to the receipt printer Y shape provided by Printer vendor Step 3 Using another DB 9 female connect to SCB C31A POS Data Capture R232 Ethe...

Page 79: ...r 3 1 3 Sof t w ar e I n st allat ion SCB C3 1 A Step 1 Use IE browser to setup SCB C31A the default IP address is 1 9 2 1 6 8 1 1 Step 2 Setup IP address and password in Ser v er page and click the S...

Page 80: ...ep 5 Please r est ar t r eset the box after changing configurations to active setup To reset the unit manually apply power insert a small plastic tool and press lightly depressing reset located betwee...

Page 81: ...ctivate POS license before starting the following settings please refer to Licen se Act iv at ion for details 3 2 2 NVR POS Set t in g 1 Open Internet Explorer Windows Chrome or Mac Safari and log in...

Page 82: ...e setting information of the selected POS on this window Name Name of the POS data source IP IP of the POS data source Serial Box The serial box data source used Tag Filter Tag type to filter the data...

Page 83: ...on 4 Set up Miscellaneous options including Recor d POS Tr an sact ion and Display on Video Pr ev iew Recor d POS Tr an sact ion Select this checkbox to record POS transaction data Users are allowed t...

Page 84: ...r to I n ser t POS Set t in g to modify configuration 3 3 Tag Filt er The original transaction data from POS system is hard to read Users can define filters to make the POS strings meaningful The syst...

Page 85: ...n on the left window I f you don t want the data keep importing when editing filter click Disconn ect button to stop connecting 5 Data Tools Clear Remove data from Original Data window and Filtered Da...

Page 86: ...The replaced text will be shown on the right window Add New Lin e Define the selected text as the symbol for changing to new line The result will be shown on the right window St ar t Define the selec...

Page 87: ...perated earlier Down Move a tag filter down the lower filter will be operated later Delete Remove a filter from this tag filter list 8 Click the OK button to save 3 3 2 Edit Tag Filt er 1 Select Tag F...

Page 88: ...own menu without editing new tag filter 3 4 POS Disp lay Fon t The system allows users to set up the fonts of POS transaction data on live view video and playback video 3 4 1 Liv e View 1 Open Interne...

Page 89: ...ot e Liv e View er 1 Startup NUUO NVRmini 2 Remote Live Viewer 2 Click the Gen er al Set t in g button to open Liv e View Set t in g window 3 Select the font font size font color and background for t...

Page 90: ...hrome or Mac Safari and log in to the unit 2 Click the Play back button 3 Click the Set t in g button to open Set t ing window 4 Select the font font size font color and background for the POS transac...

Page 91: ...UO NVRmini 2 Playback System 2 Click the Set t in g button to open Set t ing window 3 Select the font font size font color and background for the POS transaction data overlaid the video Also select th...

Page 92: ...h key word of all transaction data 3 5 1 Sear ch POS Tr ansact ion Dat a t h r ough Play back 1 Open Internet Explorer Windows Chrome or Mac Safari and log in to the unit 2 Click the Play back button...

Page 93: ...button the results will be shown in Transaction table 9 Select an item from Transaction table the transaction detail will be shown in the table of lower right corner and the recorded video of associa...

Page 94: ...k Vid eo w it h POS Dat a Enable POS overlay in Set t in g window to view recorded video with POS transaction data Refer to POS Display Fon t If the option is enabled the system will auto display tran...

Page 95: ...Startup NUUO NVRmini 2 Playback System 2 Click the Open Recor d button to open Dat a Tim e Sear ch Dialog window 3 Click the Rem ot e Ser v er Sit e icon on the top of the window to select the server...

Page 96: ...ckup process automatically 3 7 2 Back u p t h r ou gh Play back Sy st em 1 Startup NUUO NVRmini 2 Playback System 2 Click the Open Recor d button to select data 3 Click the Back u p button 4 Check the...

Page 97: ...96 Please refer to step 1 to 14 of the content of Back u p an d Delet e Recor ds and check the Back u p POS Tr an sact ion option...

Page 98: ...ned and much more 4 1 2 HW I n st allat ion SCB C24 26 28 must work with SCB C31 Ethernet RS485 converter Further t h e C3 1 Box can n ot be u sed f or POS an d con v er t er at t h e sam e t im e an...

Page 99: ...rmore the default I D for each I O Box is the same Please follow the direction to setup I O Box one by one 4 1 3 Sof t w ar e I n st allat ion SCB C3 1 Step 1 Open Internet Explorer to setup SCB C31 T...

Page 100: ...data transmission one SCB C31 can be paired with one NVR unit only 4 1 4 Sof t w ar e I n st allat ion SCB C2 4 2 6 2 8 The default ID of I O Box is identical To avoid the conflict between Boxes plea...

Page 101: ...Box is discovered click on the item and change the ID from the New Addr ess field Click the Updat e dev ice button to activate the settings 3 Scan again to make sure the configuration is validated In...

Page 102: ...Open Internet Explorer Windows Chrome or Mac Safari and log in to the unit 2 Click POS I O I O Set t in gs I O Box Set t in gs 3 Enter the information of I O box Dev ice No The unique I D system distr...

Page 103: ...ac Safari and log in to the unit 2 Click POS I O I O Set t in gs I O Box Set t in gs 3 Click the I O box which you want to modify from the list 4 Modify the information of this I O box and click the M...

Page 104: ...is 3 sec 60 sec N A stands for unlimited 6 Click the Sav e button I f the box of I O pin is unchecked this pin won t be shown on relative application pages In other words you cannot do any setting op...

Page 105: ...t o Pr eset Point Adjust the camera view and click the button to set up this view as preset point Repeat the process to add more preset points Click the button to see the preset view Zoom Click the or...

Page 106: ...ly adjust the Output Pins by turning it on or off Play back View playback video remotely Au t o Scan Activate auto scan to rotate the channels on the display screen For instance you may select to show...

Page 107: ...s location St r eam Pr ofile Select the stream profiles original low minimum En able Au dio Enable audio on active channel s Sn apsh ot Select the snapshot function to capture a specific video image i...

Page 108: ...amera s from the camera list on the right and then drag it to where you wish the image to be displayed When running I nternet Explorer do not use the function Open in New Window Using this function ma...

Page 109: ...to avoid the tearing problem occurring in video display while increasing the CPU loading 7 Click the OK button 5 1 4 St r eam Pr ofile Set t in g Select the preferred stream type of each camera as def...

Page 110: ...ream profile and click the Copy t o button to apply this profile to other channels 7 Click the OK button 5 1 5 OSD On scr een display Set t in g 1 Open Internet Explorer Windows Chrome or Mac Safari a...

Page 111: ...i and log in to the unit 2 Click the Liv e View button on the top of the page 3 Click the Gen er al Set t ing button 4 Click the Mon it or Display tab 5 Select Pr im ar y ch an n el which will always...

Page 112: ...sound wav and define the cycle 8 Check Popu p sy st em ev ent to pop up system event message dialog as a warning when a system event occurred 9 Click the OK button The playing sound function only acti...

Page 113: ...e drop down menu for the button of the joystick Par am et er Choose the preset point from the drop down menu Def au lt Click to back to default setting I m p or t Click to import the settings Ex por t...

Page 114: ...to zoom in or zoom out the view Min im ize Minimize the Remote Live Viewer window Ex it Shut down the application Play St op Dr op Select a camera video and click this button to play stop disconnect...

Page 115: ...or off Play back View playback video remotely Au t o Scan Activate auto scan to rotate the channels on the display screen For instance you may select to show only 4 split screen on the liveview while...

Page 116: ...ct the stream profiles original low minimum En able Au dio Enable audio on active channel s Sn apsh ot Select the snapshot function to capture a specific video image immediately Toggle Fu llscr een Se...

Page 117: ...Un it Con n ect ion Set t in g 1 Startup NUUO NVRmini 2 Remote Live Viewer 2 Click the Gen er al Set t in g button 3 Click the Serv er tab 4 Insert the unit name 5 Insert the IP address 6 Modify the...

Page 118: ...erv er button to test the connection between the local application and the remote unit 11 Click the Add button to add this unit into your remote server list 12 Click the OK button 5 2 3 Gen er al Set...

Page 119: ...Check Syn ch r on ize v ideo f r am es to avoid the tearing problem occurring in video display while increasing the CPU loading 6 Select monitor s to run LiveView 7 Click the OK button 5 2 4 Cam er a...

Page 120: ...e OK button 5 2 5 Delet e Ren am e Cam er a Gr ou ps 1 Startup NUUO NVRmini 2 Remote Live Viewer 2 Click the Gen er al Set t in g button 3 Click the Gr ou p tab 4 Click the group which you want to mod...

Page 121: ...r 2 Click the Gen er al Set t in g button 3 Click the OSD tab 4 Check the En able cam er a OSD option 5 Set the foreground and background settings of the OSD 6 Select which kinds of information will b...

Page 122: ...scan while select Secondar y ch an n el which has second priority when activating auto scan Enter the time interval for auto scan 6 Select the screen division of NxN type 7 Click the OK button 5 2 9 N...

Page 123: ...pu p sy st em ev ent to pop up system event message dialog as a warning when a system event occurred 8 Click the OK button The playing sound function only activates on event which means you have to se...

Page 124: ...Click to export the settings 4 Click the OK button 5 2 11 Set u p Rem ot e Liv e View er 1 Startup NUUO NVRmini 2 Remote Live Viewer 2 Click the unit you wish to access in your remote server list 3 Cl...

Page 125: ...on the bottom of this E map dialog will be active Users can add edit delete maps and indicators of devices Br ow se Mode Users are not allowed to do any configuration but check the map hierarchies an...

Page 126: ...curs the color of indicator will turn red Digit al I O I n dicat or The indicator of I O devices dragged from Device and Map Tree List to show related information When event occurs the color of indica...

Page 127: ...map or just click the Delet e button 3 Repeat step 2 to delete more map 4 Click the Upload button to activate all the settings 6 1 5 Add Rot at e Dev ice I n dicat or 1 Make sure being in Edit Mode an...

Page 128: ...eft side of the window Click the indicator again to back to the default Max im ize t h e Map Click the icon on the upper right to get the full screen display of E map 6 1 8 Relat iv e Con figu r at io...

Page 129: ...t r ol Pan el Ser v er List Select a server to display the E map of the server The E Map function of Remote Live Viewer is quite similar with the one in Internet Explorer so you can refer to the sect...

Page 130: ...iv ision Allocate the sub screen display by clicking on the desired layout icon To switch to single camera display double click a particular sub screen Double click the screen again to regain previous...

Page 131: ...he control panel Capture Image Save in clipboard the image will be saved in the clipboard and can be pasted to other application software Manually save the image file you can manually select where you...

Page 132: ...video Tim e Table preset recording schedule Click the icon to select all channels click the icon to deselect all channels Finally use the scale bar to modify the scale of the time table Recor d in g T...

Page 133: ...ng the time period You may also utilize the Start Time and End Time in Date Time Period Section after choosing camera In addition modify the scale of the time table with the or icon on the bottom left...

Page 134: ...f unusual events Gen er al Mot ion For eign Obj ect Missin g Obj ect Focu s Lost and Cam er a Occlu sion Gen er al Mot ion Detect all movements in the defined area 1 Define detection zone by dragging...

Page 135: ...e event found 5 Click the Sear ch button Focu s Lost System will inform you when the camera s lose its focus Cam er a Occlu sion Alarms when the camera is blocked 7 1 5 Recor d ed Vid eo En h an cem e...

Page 136: ...on and close the enhancement tool The system will automatically back to the default settings Def au lt Back to the default settings however the enhancement tool still works OK Apply the modifications...

Page 137: ...7 Sav e an I m age 1 Open Internet Explorer and log in to the unit 2 Click the Play back button on the top of the page 3 Click the Open Recor d button 4 The Record Display Window will show the informa...

Page 138: ...ideo clips Select the date you want to search the record from 5 Highlight the video clip you want to review and then click the OK button 6 Choose the camera display from which you want to print pictur...

Page 139: ...the clips 1 Open Internet Explorer and log in to the unit 2 Click the Open Recor d button to select data 3 Click the Back u p button 4 Set the Start Time and End Time you want to backup 5 Select the...

Page 140: ...139...

Page 141: ...s Before using the Play back Sy st em application you need to set a connection to your unit first 1 Startup NUUO NVRmini 2 Playback System 2 Click the Gen er al Set t in g button 3 Click the Serv er t...

Page 142: ...8 Insert the password 9 Check the Sav e Passw or d option 10 Click the Test Serv er button to test the connection between the local application and the remote unit 11 Click the Add button to add this...

Page 143: ...for more details 4 Click the Open Recor d button 5 The Record Display Window will show the information of the available video clips Select the date you want to search the record from Check Sear ch t...

Page 144: ...at of Internet Explorer 7 2 6 Recor d ed Vid eo En h an cem en t 1 Startup NUUO NVRmini 2 Playback System 2 Click the Open Recor d button 3 The Record Display Window will show the information of the a...

Page 145: ...tool still works OK Apply the modifications of the settings 7 2 7 Sav e a Video 1 Startup NUUO NVRmini 2 Playback System 2 Click the Open Recor d button 3 The Record Display Window will show the infor...

Page 146: ...etting a folder where you want to save the images and a format which you want to save the images in 7 2 9 Pr in t an I m age Print the current image of the video you choose 1 Startup NUUO NVRmini 2 Pl...

Page 147: ...o the time slot you set instead of the clips 1 Startup NUUO NVRmini 2 Playback System 2 Click the Open Recor d button to select data 3 Click the Back u p button 4 Set the Start Time and End Time you w...

Page 148: ...e ways mentioned in the previous chapters you can apply the application to backup your files 1 Startup NUUO NVRmini 2 Backup System 2 Click the Rem ot e Ser v er Sit e button to set up remote server 3...

Page 149: ...t into the remote server list 11 Click the OK button 12 Click the button next to Rem ot e Ser v er Sit e button and select one of servers you added 13 Click the New Per iod button to select the record...

Page 150: ...ill add Play back application into the backup folder 21 Click the OK button 8 2 Back u p t h e Recor d ed Vid eo t h r ou g h W in d ow s Ex p lor er 1 Find your unit through Windows Explorer insert p...

Page 151: ...em application to backup your records 2 Check the I n clu de Play back applicat ion option which will add the Play back application into the backup folder 3 Open that folder 4 Double click the Playbac...

Page 152: ...Insert the user name 7 Insert the password 8 Check the Sav e Passw or d option 9 Click the Test Serv er button to test the connection between the local application and the remote unit 10 Click the Ad...

Page 153: ...select the record date 14 Set the Start Time and End Time or highlight the video records which you want to delete 15 Select the cameras you want to delete the records 16 Click the OK button 17 Select...

Page 154: ...153 18 Click the Delet e button 19 Confirm the check dialog...

Page 155: ...rmat will be displayed as 3 File in bmp jpg format will be displayed as 9 1 Ex ecut e Ver ificat io n Tool 1 Startup NUUO NVRmini 2 Verification Tool 2 Verification Tool Overview Add File Insert the s...

Page 156: ...1 Select single or multiple files for verification 2 Click the Ver ify button to start verification 3 The verification result will show on watermark column If a file was tampered with it will show if...

Page 157: ...the quality of other DAS models Please refer to the manual of AXUS FiT Series to create a single volume on DAS We are unable to create a volume on external storage in NVR setting page so do NOT skip t...

Page 158: ...157 Refer to the section of Cr eat e a RAI D Volu m e to create a volume for it...

Page 159: ...158 1 1 Log ou t Click the Logou t button on the top of the page to log out of the system If there is no action in 10 minutes the system will log out automatically to avoid unauthorized access...

Page 160: ...Min im u m Requ ir em en t s Model 2 4 bay OS Su ppor t ed Windows XP 32 bit Windows 7 32 64 bit Windows 8 32 64 bit CPU Intel Core 2 Duo 2 6GHz RAM 1GB User I n t er f ace 1 HTTP Web browser Internet...

Page 161: ...ive See Replace a Failed Disk Dr iv e for details RAI D 0 volumes go offline after a disk drive failure A RAI D 0 Volume cannot be recovery All data of the volume is lost 1 3 3 Respon d t o a File Sy...

Page 162: ...the back of the device 3 Press and hold the reset button for 14 seconds release your hands until the buzzer beeps twice and the System Status LED flashes in orange 4 System will restart and all setti...

Page 163: ...te the process 1 3 7 Can n o t Log in t o t h e Un it w it h I n t er n et Ex p lor er 1 Check the settings of your antivirus software 2 Change to appropriate settings or turn off this antivirus softw...

Page 164: ...nt RAID levels use different organizational models and have varying benefits The following outline breaks down the properties for each RAID level supported on this unit RAI D 0 St r ip e When a RAID V...

Page 165: ...niques where the workload is distributed in the most efficient manner Whichever drive is not busy and is positioned closer to the data will be accessed first With RAID 1 if one disk drive fails or has...

Page 166: ...he smallest disk drive times the number of disk drives minus one Hence a RAID 5 Volume with four 100 GB disk drives will have a capacity of 300 GB A RAID Volume with two 120 GB disk drives and one 100...

Page 167: ...lume you cannot set up a spare drive with RAID 10 Ch oosin g a RAI D Lev el There are several issues to consider when choosing the RAID level The following summarizes some advantages disadvantages and...

Page 168: ...data resides on two different drives Very high disk overhead uses only 50 of total capacity RAI D 5 Adv an t age Disadv an t age High Read data transaction rate Medium Write data transaction rate Goo...

Page 169: ...Appen dix Cam er a I n t egr at ion Cam er a Su p p or t List Any information about camera integration including camera model and its spec please refer to NUUO website http www nuuo com product php id...

Page 170: ...Add C Block 18 Sihyuan St Jhongjheng District Taiwan ROC TEL 886 2 2362 2260 http www nuuo com eHelpdesk php...

Page 171: ......

Reviews: