background image


Note: The device must be switched off before removing the battery. 

8.


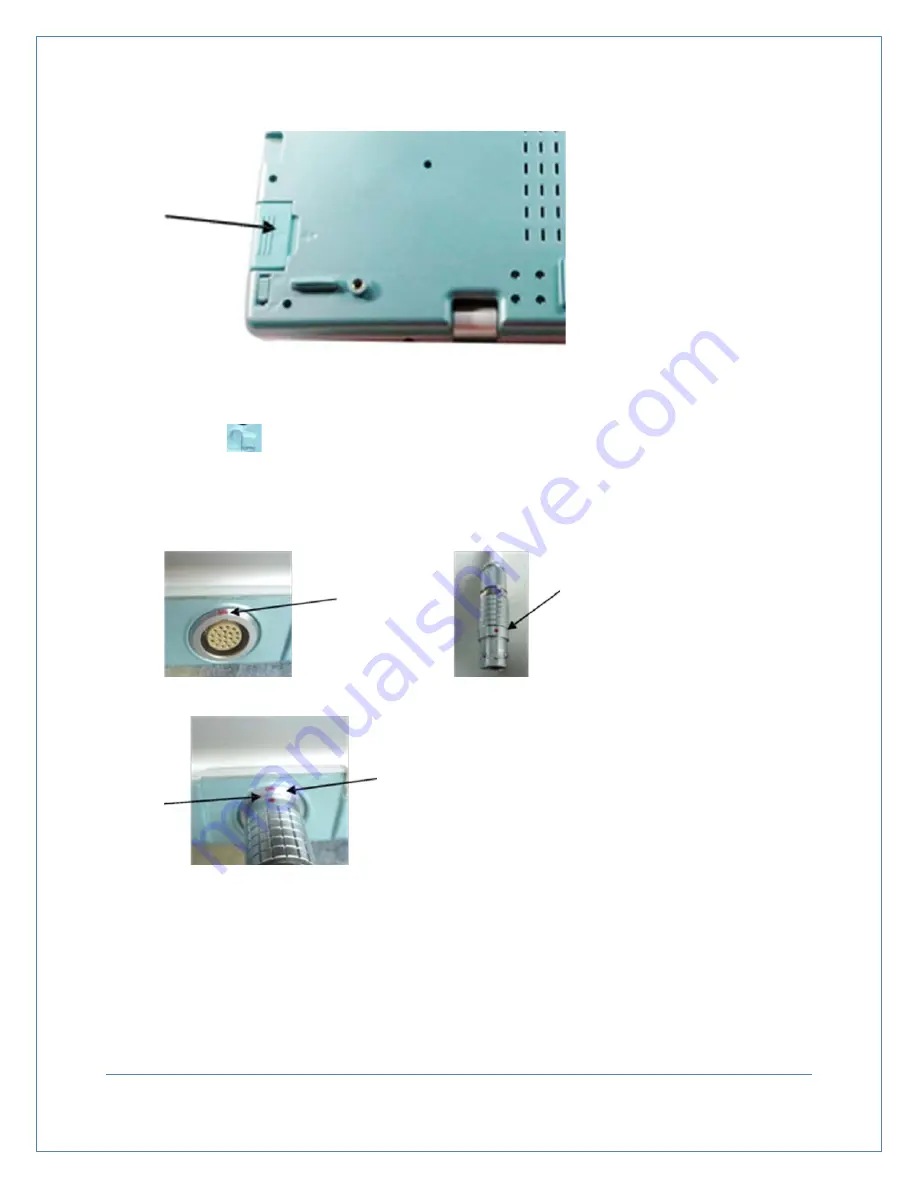
To remove the battery, put the device on a soft, flat surface.  Move the battery lock to the 

unlocked 

 position, and then slowly pull the battery out of the unit. 

9.


To install the probe, find the red dots on the main unit port and on the plug at the end of the 
probe cord.  See Figure 6-3.  Align the two red dots and then plug the probe into the main unit.  
See Figure 6-4. 

Note:  Do not scratch the surface of the probe.  This will result in inaccurate readings.  Only the probe 
supplied by the original manufacturer may be used with this device.  Please contact Life Systems, Inc. 
in the event a replacement probe is needed.   


Figure 6-2 

Back view of main unit 

with battery in place 


Figure 6-3 

Probe Installation 


Figure 6-4 

Probe Installed 


Page 

17


Summary of Contents for PBSV4.1

Page 1: ...USER MANUAL Bladder Scanner...

Page 2: ...n a safe convenient place for future reference No part of this manual should be reprinted or reproduced without written consent from Life Systems Inc distributed by Life Systems Inc maintains the righ...

Page 3: ...ge 8 2 3 Instructions for Environment Test 9 2 4 Sound Output 9 3 System Overview 10 3 1 Primary Components 10 3 1 1 Hardware Components 10 3 1 2 Embedded Software System 10 3 2 Pictures and Descripti...

Page 4: ...29 7 8 The Save Edit Screen 30 7 9 Browsing Historical Records 31 7 9 1 Deleting Stored Records 32 7 9 2 Location Presentation 32 7 10 Printing Results 34 7 11 Exporting Data to a PC 34 7 12 Rechargi...

Page 5: ...1 Warnings 48 B 2 Recharging and Discharging 48 B 3 Storage 49 B 4 Transportation 49 B 5 Other Instructions 49 Appendix C 50 C 1 Pre Scan Image to the Left of Center 50 C 2 Pre Scan Image to the Righ...

Page 6: ...ernal computer and the on board memory can be cleared 1 2 Primary Components The RosieScan consists of a Main Unit Probe standard frequency 2 6MHz two Batteries a USB cable Adapter and Charger 1 3 Int...

Page 7: ...initial use and should not be used in close proximity to other electrical devices or high frequency operational equipment Make sure to turn the RosieScan off after every use Do not leave the RosieScan...

Page 8: ...V Output voltage for charger 8 5V 8 Output screen USB for data storage and software upgrade 9 Readings displayed scan results present location and ultrasound image 10 Measured result scan results are...

Page 9: ...and the announcement exemption for the public in chapter 6 of Requirement of medical ultrasound diagnosis device for its sound output see Figure 2 1 Transducer frequency 2 6MHz Device is in accordance...

Page 10: ...input high speed USB screen and the power battery management system Its composition is shown in Figure 3 1 3 1 2 Embedded Software System The embedded software system is fully designed according to th...

Page 11: ...main unit ultrasonic probe and external thermal printer 1 RosieScan see Figure 3 3 Figure3 2 Software Module Block Diagram Figure 3 3 Device 1 LED Display 2 Control Panel 3 Printer 4 Power Light 5 Pr...

Page 12: ...2 Probe and USB Port see Figure 3 4 3 3D Probe see Figure 3 5 2 1 Figure 3 4 Ports 1 Probe Port 2 USB Port Figure 3 5 Ports 1 Probe Cable 2 USB Plug 3 Probe Perspective Window 1 2 3 Page 12...

Page 13: ...am and Part List Please contact Life Systems Inc for circuit diagram parts list and any other information pertaining to maintenance or repairs THE USER SHOULD NOT DISASSEMBLE OR TRY TO REPAIR THIS DEV...

Page 14: ...Control Panel 4 Control Panel Figure 4 1 Control Panel Page 14...

Page 15: ...dent power supply 7 Images on the display may appear faded if viewed in bright rooms The device should be used in rooms that are clean and pollution free Loud noises may result in inaccurate readings...

Page 16: ...ponds with the arrow on the battery 4 Slide the battery lock into the unlocked position and hold See Figure 6 1 5 Insert the battery into the battery slot while holding the battery lock in the unlocke...

Page 17: ...e plug at the end of the probe cord See Figure 6 3 Align the two red dots and then plug the probe into the main unit See Figure 6 4 Note Do not scratch the surface of the probe This will result in ina...

Page 18: ...r its main system screen If any of the items fails during self checking an alarm will alert you If the alarm sounds press direction key before entering the main system If the printer fails it will not...

Page 19: ...ou may touch with stylist pen or press Power button on the control panel to turn off the device Note The system will automatically power down if you do not press key on the control panel within 20 sec...

Page 20: ...ys one set on the Ready screen and one set on the control panel See Figure 7 4 and 7 5 Press key on the right or touch on the Ready screen to delete the max tested volume without switching off the dev...

Page 21: ...n the status bar have changed If they have refer to Figure 7 3 on page 20 If you have any questions please contact Life Systems Inc 7 4 System Reset Screen Press the key or touch to enter the system r...

Page 22: ...he key to underscore YY MM or DD use the keys to move the underscore among YY MM DD Use to adjust the dates You can also use your stylist to select the date you want to change Touch the desired figure...

Page 23: ...n Then press the key or touch Save Exit on the screen to save and exit this screen 7 4 6 Alarm 1 Press the keys to select Alarm and press the keys to turn alarm on or off You can also use your stylist...

Page 24: ...r touch Volume Calibration to enter password see Figure 7 8 2 Once you have entered the password press or touch to move to the calibration screen see Figure 7 9 3 Press the keys again to set then pres...

Page 25: ...n before scan a Press the key or touch Scanning adjust b Press the key or touch then press the key or touch again before selection c Press the key or touch number character selecting number setting Th...

Page 26: ...isplays a real time image in the pre scan screen The straight red line indicates the center of the area being scanned The dark area represents urine and must cross over this central line in every scan...

Page 27: ...ayed during the course of a scan see Figure 7 12 1 12 means it is scanning the first of 12 images It will then enter Calculating screen after the scan is complete see figure7 13 Calculating 12 mean it...

Page 28: ...ess key or touch to switch between gray scale and 2 color images 5 Press key to print the current image in 2 colors 6 Press key to return to the pre scan screen Then scan by pressing the scan key agai...

Page 29: ...or touch to return to the Ready screen 2 Press key or touch to enter the Save Edit screen 3 Press key or touch to switch to the next page of 6 screens 4 Press key or touch to switch between gray scal...

Page 30: ...Save Edit screen from the Scanned Results screen How to operate in the Saved Edit Screen with functional keys 1 Press the keys to choose the character needed The selected character key will turn whit...

Page 31: ...ngs that may be stored Note Patient ID may be up to 12 characters Gender does not need to be input gender is set in the Ready screen Each patient ID is unique and specific to one individual The same p...

Page 32: ...eady screen 7 Press the key or touch to delete the current record 7 9 1 Deleting Stored Records 1 Press the keys or touch Format 2 Press the key or touch NO 3 Press the keys or touch YES NO again and...

Page 33: ...Page 33...

Page 34: ...cable 2 Check the status bar and confirm that is displayed If this symbol is displayed it indicates that the connection is Ok If the icon is displayed it indicates that the connection is not Ok After...

Page 35: ...per is inserted in the wrong direction Paper dimension is 30x57mm 7 12 Recharging the Battery The battery charger consists of power adaptor and charger 1 Put the battery into the charger and ensure it...

Page 36: ...hours 4 Disconnect the power between power supply and charger before removing the battery Note Do not leave the charger unsupervised while the battery is charging Do not place the battery adapter or...

Page 37: ...tration of dark fluid area of the bladder 5 Press SCAN again to take measurement Press the key to see if both edges of the red line and the dark fluid area in the gray scale image are overlapped If th...

Page 38: ...cans and require the patient to be rescanned Figure 8 1 Too large red edge line Figure 8 2 Too large red edge line Figure 8 3 Too large red edge line Figure 8 4 Too small red line Figure 8 5 Too small...

Page 39: ...will be too high if red edge is too small then its volume will be small if red edge is not in the dark fluid area its measured result will be small and if the red edge is not in the dark fluid area it...

Page 40: ...version and collision during transportation 9 2 Storage Do not store the device for more than six months without removing it from its case and turning it on for at least 4 hours Do not place heavy obj...

Page 41: ...ith a neutral PH balance 6 Softly scrub and sterilize the probe after use before it is put back in its case 7 Do not take the probe off freely once it has been connected to the device This will interf...

Page 42: ...vices maintenance history including the results of past repairs Service will be provided free of charge if the device is still under warranty The device has an estimated life of 6 years excluding the...

Page 43: ...erted properly and has an adequate charge 2 Ensure that the connection between the device and the probe is secure 3 Check the printer s connection and confirm that paper is inserted in the right direc...

Page 44: ...les to midline approximately 1 inch 2 3 cm above pubic symphysis 4 Orient the probe per the pictures on the probe head feet and head 5 Aim towards the Bladder a gentle tilt towards the coccyx 6 Press...

Page 45: ...f the phantom standard phantom 128ml See Figure A 1 Note If you are using a phantom that was not manufactured by the manufacturer of this device please check the standard volume of your phantom before...

Page 46: ...image in pre scan The red line shown in Figure A 3 is the central line of the measurement The object being measured must be across this center line A5 Enter the Scan screen see Figure A 4 by pressing...

Page 47: ...lue calibrating value A8 Select Calibration in the system reset screen for the device calibration A9 Phantom Parameter Phantom Parameter Sound speed of background material 1540m s 10m s 23 3 Attenuati...

Page 48: ...use the battery if a The battery s found to hot emitting strange or unfamiliar odors discolored deformed or other anomalies should appear b Discontinue use immediately if battery is deformed due to a...

Page 49: ...erform any soldering directly on the battery Do not recharge next to fire or any other heat source Do not place the battery in a microwave or high pressure container Do not place the battery in any en...

Page 50: ...Pre Scan Image to the Left of Center If the pre scan image looks like Figure C 1 press the button in the Scanning Adjust section in the system setting screen Input the degree of a as Figure C 4 shows...

Page 51: ...l incorrect please re adjust until it is correct as Figure C 2 shows C 2 Pre Scan Image to the Right of Center If the pre scan image looks like Figure C 3 please press the button in the Scanning Adjus...

Page 52: ...10 When 15 a 30 10 a 20 When 30 a 45 20 a 30 When 45 a 60 30 a 40 Return to pre scan mode to check the red line and the image s position If it is still incorrect please re adjust until it is correct...

Page 53: ...ironment guidance RF emissions CISPR 11 Group 1 The PBSV4 1 bladder scanner uses RF energy only for its internal function Therefore its RF emissions are very low and are not likely to cause any interf...

Page 54: ...pply lines 2 kV for power supply lines Main power quality should be that of a typical commercial or hospital environment Surge IEC 61000 4 5 1 kV line s to line s 2 kV line s to earth 1 kV line s to l...

Page 55: ...itters as determined by an electromagnetic site survey a should be less than the compliance level in each frequency range b Interference may occur in the vicinity of equipment marked with the followin...

Page 56: ...ance according to frequency of transmitter m 150kHz to 80MHz d 1 2 P 80MHz to 800MHz d 1 2 P 800MHz to 2 5GHz d 2 3 P 0 01 0 12 0 12 0 23 0 1 0 38 0 38 0 73 1 1 2 1 2 2 3 10 3 8 3 8 7 3 100 12 12 23 F...

Reviews: