background image


®

XS


240

SELF-PROPELLED TELESCOPIC PLATFORM

8.

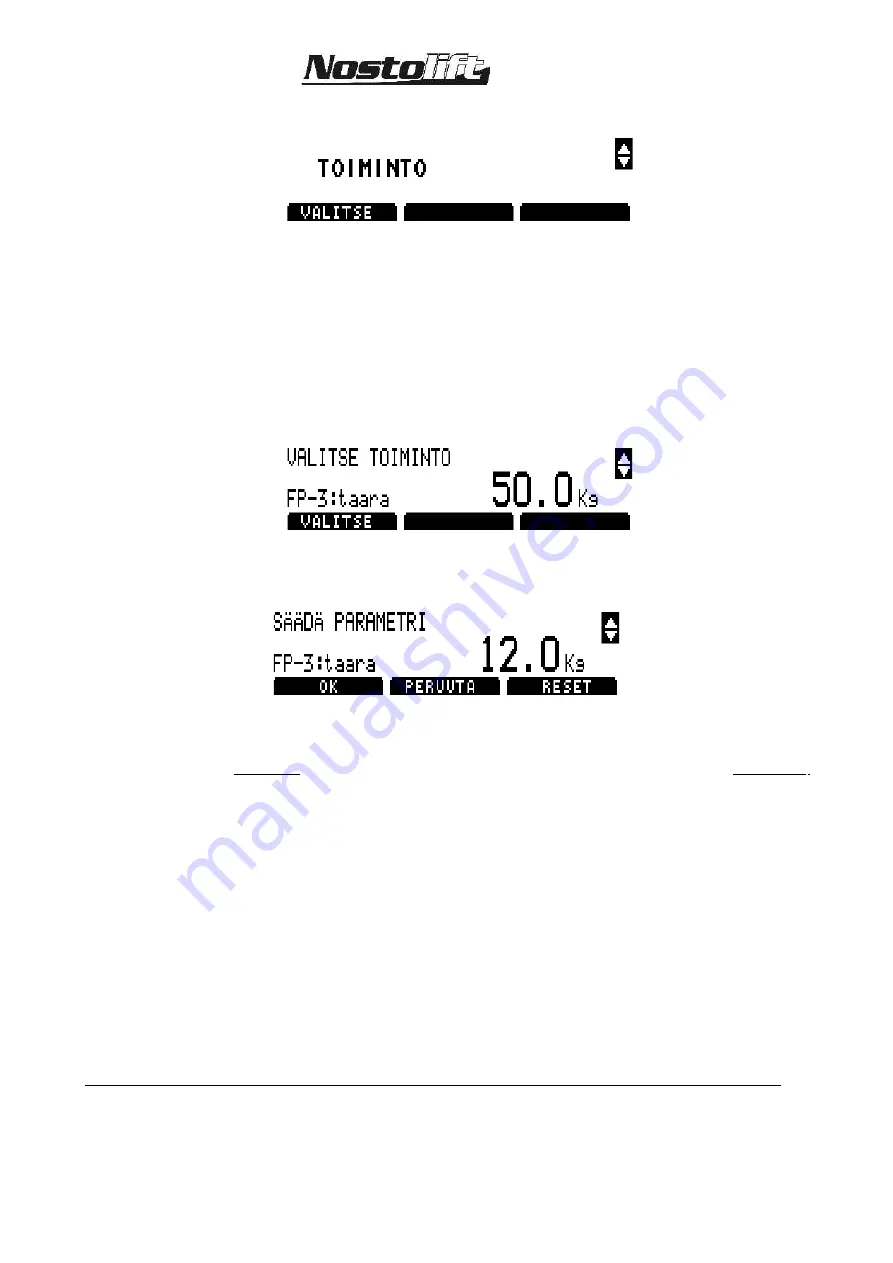
Press 

F1 SELECT

 in the FUNCTIONS menu

9.

Select 

FP-3: tare

 using the arrow keys


10. 

Press F1 SELECT

11. 

12.

Adjust taring value using the arrow keys. If platform load control operates too  
soon, 

reduce 

 the value. If platform load control operates too late, 

increase 

the value

13.

Save the taring by pressing 

F1 OK 

You can cancel the change by pressing 

F2 CANCEL

F3 RESET

 restores the 

manufacturer’s default setting (0.0 kg)

14.

Return to the main display by pressing 

ESC 

twice

15.

Switch off the current, then switch it back on

16.

Check proper operation according to the instructions. Readjust, if needed.

17.

Replace the display cover

The alarm limits have been set by the manufacturer and can not be adjusted separately. 
Adjustment affects all values in the same proportion by increasing or decreasing the  
weigher sensor reading.

33

Summary of Contents for XS240

Page 1: ...XS240 SELF PROPELLED TELESCOPIC PLATFORM OPERATION MAINTENANCE...

Page 2: ...INTO USE 26 14 CHECKING THE VOLUME OF AND ADDING HYDRAULIC OIL 35 15 SOIL TIGHTNESS TABLE 36 16 LOCATION OF SAFETY LIMITS AND ELECTRIC COMPONENTS 37 17 TOWING THE ACCESS PLATFORM 38 18 PROCEDURES BEFO...

Page 3: ...from the platform and from the turntable Due to its telescopic boom Nostolift XS 240 has a wide side reach and the work is also facilitated as the slewing mechanism rotates without limitation The jib...

Page 4: ...ion mm in Dimension mm in A 7150 281 5 K wide tyre 340 13 4 B depending on tyres 2335 91 9 K all terrain tyre 270 10 6 C 355 14 0 L wide tyre 750 29 5 D 430 16 9 L all terrain tyre 760 29 9 E 2290 90...

Page 5: ...TELESCOPIC PLATFORM 3 LIFTING THE ACCESS PLATFORM WITH LIFTING HOOK Figure 2 Lifting the Access Platform with lifting hook m ft E Distance of centre of gravity 1 25 F Distance of centre of gravity 1 0...

Page 6: ...XS 240 SELF PROPELLED TELESCOPIC PLATFORM 4 SPECIFICATION Figure 3 Specification 5...

Page 7: ...the rear edge of the turntable under a cover 18 Equipment case place for manual ground fault circuit interrupter 220 V 50 Hz 19 Main power switch at the rear edge of the turntable 20 Lifting cylinder...

Page 8: ...lowed slope of the ground 7 Max allowed inclination of the chassis 1 Transport length 7 15 m 23 5 Transport width 2 07 m 6 9 Transport height depending on the tyres 2 335 m 7 Ground clearance under bo...

Page 9: ...5 8 gal Combustion engine Kubota V1505 BB EC 1 Kubota V1505 BB EC 1 Output at rotation speed 2400 rpm 30 hp 22 kW Max torque at 2400 rpm ISO 3046 90 Nm Fuel light fuel oil diesel oil ASTM D 975 1D 2D...

Page 10: ...XS 240 SELF PROPELLED TELESCOPIC PLATFORM 5 1 NOSTOLIFT XS 240 BOOM GEOMETRY 9...

Page 11: ...XS 240 SELF PROPELLED TELESCOPIC PLATFORM 10...

Page 12: ...chapter Use of emergency lowering system in this manual 5 Avoid rising near live electrical conductors The minimum safe distance to cables with different voltage is shown on a sticker on the platform...

Page 13: ...d with a mains current pump unit for operation indoors 18 Do not use the Access Platform as a crane for transporting goods or persons between different levels or floors 19 Do not deactivate a safety d...

Page 14: ...ecord form is enclosed to this manual Alterations and repairs their location on the Access Platform date and identity of the person s carrying out repairs and alterations shall be marked in the inspec...

Page 15: ...SELF PROPELLED TELESCOPIC PLATFORM 7 MAXIMUM SLOPE Figure 4 Maximum slope WARNING MAKE SURE THAT THE ACCESS PLATFORM DOES NOT SLIDE ON SLOPING GROUND IF NEEDED ATTACH ADDITIONAL CALKS ON THE SOLE PLA...

Page 16: ...turntable on the front part of the engine guard When the outriggers are in the support position and the engine has been started from the ground it is possible to slew raise and telescope the boom and...

Page 17: ...ack to the upper position This is done by turning the button slightly clockwise whereby it will pop up If the emergency stop push button on the platform or on the ground operating point is pressed dow...

Page 18: ...oo high when starting the movement the control system will limit the speed to a safe range This control has an impact on the movement speeds only when using ground operation Glow indicator light No 7...

Page 19: ...drive switch 1 2 3 4 3 Hydraulic differential gear 13 Steering mode selector rear wheels wheels in different directions crab steering 0 1 2 4 Sound signal 14 Horizontal position lights 4 5 Automatic...

Page 20: ...o position slow drive 3 If you wish to use a higher driving speed choose fast drive position 4 In driving situations requiring great precision choose crawling position 2 Use the left hand side joystic...

Page 21: ...the middle position In slippery conditions engage the hydraulic differential gear from switch 3 The differential gear is automatically disengaged within 1 minutes or by pressing the button again The s...

Page 22: ...and side joystick Choose the outrigger s to be operated by moving the joystick in accordance with the diagram below The outrigger s can be raised by pressing the thumb switch 9 see the diagram The out...

Page 23: ...manual setting carry out the setting of horizontal position on the basis of the horizontal position lights The lights indicating the higher sides of the Access Platform will be lit After this raise t...

Page 24: ...the Access Platform must be stopped and the platform load must be reduced If however the platform load is increased platform load control interrupts all movements In this case the display shows text o...

Page 25: ...f the engine rises to the maximum revolution speed adjusted When the joysticks or control switches are released the revolution speed of the engine decreases automatically to the minimum revolution spe...

Page 26: ...OF SUPPLY CURRENT ON THE PLATFORM Connect the supply current 220V 50Hz 16A to the outlet beside the equipment case on the chassis The platform has two earthed outlets for hand tools The electric line...

Page 27: ...d engine oil volume X hydraulic oil volume X electronic control fuel volume X hydraulic oil leaks X condition of hydraulic hoses X tyre pressures X visual inspection of bolt connections and load beari...

Page 28: ...ontrol cuts the movement Make sure that the painted mark on the middle boom is visible see figure 12 This is the way to verify the functioning of the safety limit of telescoping and at the same time t...

Page 29: ...ure 13 Checking the lifting radius Figure 14 Point B check mark 1 While operating the Access Platform from the ground operating point raise the boom with an empty platform and jib extended all the way...

Page 30: ...n engine This safety limit switch is located alongside the actual safety limit on the right side of the telescopic cylinder when seen from the platform In normal conditions the backup safety limit is...

Page 31: ...ge of the platform the engine should not turn off but the actual load control must prevent any movements which increase the lifting radius 13 6 CHECKING AND ADJUSTMENT OF PLATFORM LOAD CONTROL Figure...

Page 32: ...nufacturer Checking and adjustment Checking and adjustment Check platform load control as follows 1 Set the Access Platform to be supported by the outriggers and lift the boom from the transport suppo...

Page 33: ...operly grease the bearings 3 of the cranks 2 8 in all and repeat the check If needed adjust according to the following instructions Adjustment 1 Remove the display cover 2 Switch on the current with t...

Page 34: ...by pressing F1 OK You can cancel the change by pressing F2 CANCEL F3 RESET restores the manufacturer s default setting 0 0 kg 14 Return to the main display by pressing ESC twice 15 Switch off the cur...

Page 35: ...witches of ground sensors allowing the use of the boom even if the support of some outrigger is relieved In this case there should be a sound alarm on the platform Test the alarm as follows 1 Set the...

Page 36: ...slightly raised and the telescope slightly extended that no movement is creeping and that the platform does not move downwards when the controls are in the middle position Load the platform with a pr...

Page 37: ...t add oil straight from an oil can 15SOIL TIGHTNESS TABLE 280 380 Figure 18 Figure 19 Sole of outrigger Sole area A A 0 38m x 0 28m 0 106 m kpa m N essure 350 106 0 37000 Pr 2 ON ICY BASE USE EXTRA CA...

Page 38: ...r additional plates 16LOCATION OF SAFETY LIMITS AND ELECTRIC COMPONENTS The figure below shows the location of safety limits and electric components Figure 20 Location of safety limits and electric co...

Page 39: ...the fast drive speed range Do not exceed a towing speed of 5 km h 3 If needed the brakes can be released as follows disconnect the hydraulic hoses of the brake cylinder Then replace the nipple by scre...

Page 40: ...al carefully before using the Access Platform If you feel uncertain about carrying out maintenance do not hesitate to contact a service shop specialized in Access Platforms for the maintenance work an...

Page 41: ...es Test all directions of functions 50h intervals Lubricate all bearings and sliding surfaces Check the condition of telescope sliding pads and surfaces lubricate and adjust if needed 500h intervals C...

Page 42: ...rference noise Check the colour of exhaust gas Stop the engine if the exhaust gas suddenly turns black Stop the engine if the indicator light for oil pressure or overheating of coolant are lit while t...

Page 43: ...gine Figure 22 Changing oil and oil filter of Kubota D905 E motor Being an often repeated operation the change of motor oil and the filter is handily done without lowering the motor by following these...

Page 44: ...ing 19 6 LUBRICATION SCHEME Figure 23 Lubrication scheme Lubricate the following points every fifty 50 operating hours 1 Articulation bearings for platform slewing 2 Bearing surfaces joints and diaphr...

Page 45: ...16 Articulation bearings of platform inclining cylinder 17 Platform load control linkage 19 7 SELECTION OF LUBRICANTS OIL VOLUMES 19 7 1 Kubota V1505 Oil volume 6 0 l with filter SAE 30 or SAE10W 30 S...

Page 46: ...ive and run the Access Platform slightly forward or backward using the emergency lowering pump This will pressurize the brakes and leave them open until the control valves are opened NOTE Once the Acc...

Page 47: ...akes 1 Set the Access Platform to be supported by the outriggers with the wheels removed 2 Start the engine and engage fast drive 3 Lock the drive joystick to its extreme position or ask an assistant...

Page 48: ...r the like 6 Drive the Access Platform at a fast speed 7 Release the drive joystick quickly to the middle position 8 Adjust the stopping distance of the Access Platform to approx 1 m by valves A and B...

Page 49: ...e retraction chain of the outermost extension which makes the outermost extension move inwards If the gap is smaller than 10 mm loosen nuts 6 and 7 of the retraction chain and tighten nuts 6 and 7 of...

Page 50: ...ve the booms with the lifting cylinder 3 Adjust all four extension chains so that after a slight retraction there will be 1 3 mm between the boom and the chain measured at the middle of the free chain...

Page 51: ...PLATFORM Check that the ignition keys are in the ignition lock of the platform combustion engine has been started from the platform Check that the outriggers are in the support position lower position...

Page 52: ...accordance with these instructions at least once a year and if needed more frequently The inspection interval must not exceed 12 months from the commissioning of the Access Platform If uncertain conta...

Page 53: ...ause the lost information can if needed be replaced with new one available on the manufacturer s plate The calculated weight for the first person is 80 kg and for the next one 80 kg leaving 70 kg for...

Page 54: ...marked Projecting parts are the extremities which reach outside the actual chassis like outriggers and the platform Being most easy to see yellow black diagonals are used for marking General about th...

Page 55: ...ining slewing or moving of the platform has to be avoided The screws nuts joint pins and fixing organs must be secured or locked reliably Also use a cotter pin in double nut securing fixing of chain e...

Page 56: ...ergency lowering system is used power must be switched on 21 5 GENERAL CONDITION OF THE ACCESS PLATFORM Visual inspection of condition 21 5 1 Chassis Corrosion damage Welds there must be no visible br...

Page 57: ...s Primarily carry out the test operation or test loading overloading in accordance with the manufacturer s instructions If there are no instructions we recommend carrying out the test operation by usi...

Page 58: ...en releasing the push button The engine must not restart when releasing the emergency stop button The emergency stop must be easily distinguishable from the other operating switches Never use the emer...

Page 59: ...acceleration and deceleration required by safe load management When several different types of movements such as lifting lowering slewing transfer must be carried out with the test load they must be c...

Page 60: ...e covered by the warranty 6 Should the warranty claim concern a defective part already removed from the Access Platform that is to be replaced with a corresponding faultless part the replacement shall...

Page 61: ...een installed in the Access Platform or permitted pressure settings of hydraulic equipment preset by Nostolift Oy have been changed without written permission of Nostolift Oy 12 The warranty will appl...

Page 62: ...__ Damage date d m y ___ ___200___Repaired on d m y ___ ___200________________ Repaired by___________________ Job No ____________________________________ The damaged parts were returned to Nostolift O...

Page 63: ...______________________Telephone___________________________ __________________________________ __________________________________Seller_______________________________ __________________________________...

Page 64: ...______________________________Seller________________________________ 25WARRANTY _______ ______200_________ SERIAL NUMBER______________________________________________________ SELLER __________________...

Page 65: ...the machine EU declaration of conformity directive 89 392 EEC as amended as well as the national Council of State Decision VNp 1314 94 CE marking directive 93 68 EEC Protection against electromagneti...

Page 66: ...national implementing legislation Council of State Decision on machine safety Vnp 1314 94 European standards EN 280 EN50081 1 EN50082 2 200 14 EC EN418 EN60204 1has been applied to the design of the m...

Page 67: ...XS 240 ENGINE TYPE KUBOTA V1505 MANUFACTURING NUMBER ________________SERIAL NUMBER _______________ SELLER ________________________________________________________________ CUSTOMER ___________________...

Page 68: ...s 2 Width of support WS 5 20x4 50 m Extra load ________________________________ Transport width TW 2 07 m Combustion engine petrol LPG diesel Transport length TL 7 15 m Lowest operating temperature 25...

Page 69: ...pe boom AT Articulated telescope boom S Scissor FM Fixed mast TM Telescope mast OUTRIGGERS HT Hydr turning HE Hydr extending M Mechanical NO No outriggers ISSUES TO BE INSPECTED OK In order NO To be r...

Page 70: ...BOOM A Articulated boom TB Telescope boom AT Articulated telescope boom S Scissor FM Fixed mast TM Telescope mast OUTRIGGERS HT Hydr turning HE Hydr extending M Mechanical NO No outriggers ISSUES TO B...

Page 71: ...or platform MP Mast platform CHASSIS T Truck MS MEWP self prop TT Trailer towed M Monkey BOOM A Articulated boom TB Telescope boom AT Articulated telescope boom S Scissor FM Fixed mast TM Telescope ma...

Page 72: ...___ TYPE OF MEWP BC Boom platform SC Scissor platform MP Mast platform CHASSIS T Truck MS MEWP self prop TT Trailer towed M Monkey BOOM A Articulated boom TB Telescope boom AT Articulated telescope bo...

Page 73: ...Scissor platform MP Mast platform CHASSIS T Truck MS MEWP self prop TT Trailer towed M Monkey BOOM A Articulated boom TB Telescope boom AT Articulated telescope boom S Scissor FM Fixed mast TM Telesco...

Page 74: ..._________________________________________________________________________ ______________________________________________________________________________________ Observed defects repaired on d m y ___...

Page 75: ...XS 240 SELF PROPELLED TELESCOPIC PLATFORM 74...

Reviews: