49
EN
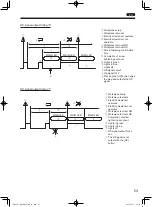
Output signal
Signal timing
Remarks
Channel switching signal
ON
OFF
ON for 0.1 sec. when the channel is switched
Count (torque-up) signal
ON
OFF
ON for 0.1 sec. at count (torque-up)
Using the workpiece signal
CAUTION
z
z
A 2-wire sensor cannot be used.
A 2-wire sensor has a flow of fine current even while OFF, and could cause a malfunction.
z
z
For the sensor, use a PNP output type 3-wire sensor.
z
z
Depending on the sensor installation environment, a malfunction could occur due to noise.
Make sure to take sufficient noise measures such as setting up grounding. For details, read the instruction
manual of the sensor to be used.
By using the workpiece signal, it is possible to prevent human errors and improve work quality.
1
Turn off the power of the electric screwdriver
2
Connect (wire) the I/O signal
Referring to the connection example of I/O signal (p. 46), connect the external power supply and sensor, etc.
Connected signal
Pin No.
Wiring color
+24 DC power
1
Red
Workpiece signal
2
White
0 VDC
12
Black
3
Turn ON the power of the electric screwdriver
4
Press and hold the [MEMORY] button and [SELECT] button
The mode enters function setting mode.
5
Use the [UP] or [DOWN] button to set the workpiece signal to “1: Input”
6
Press and hold the [MEMORY] button to save the setting
TV07521-1_DLV30S12P-AYK_en.indb 49
2017/02/10 15:56:37


