background image

D T 7 3 0 G   C O L O R   M I C R O B R O W S E R   A N D   E N H A N C E D   P R O G R A M M A B L E   K E Y S

Using the Microbrowser

10-232

DT700 Phone User Guide

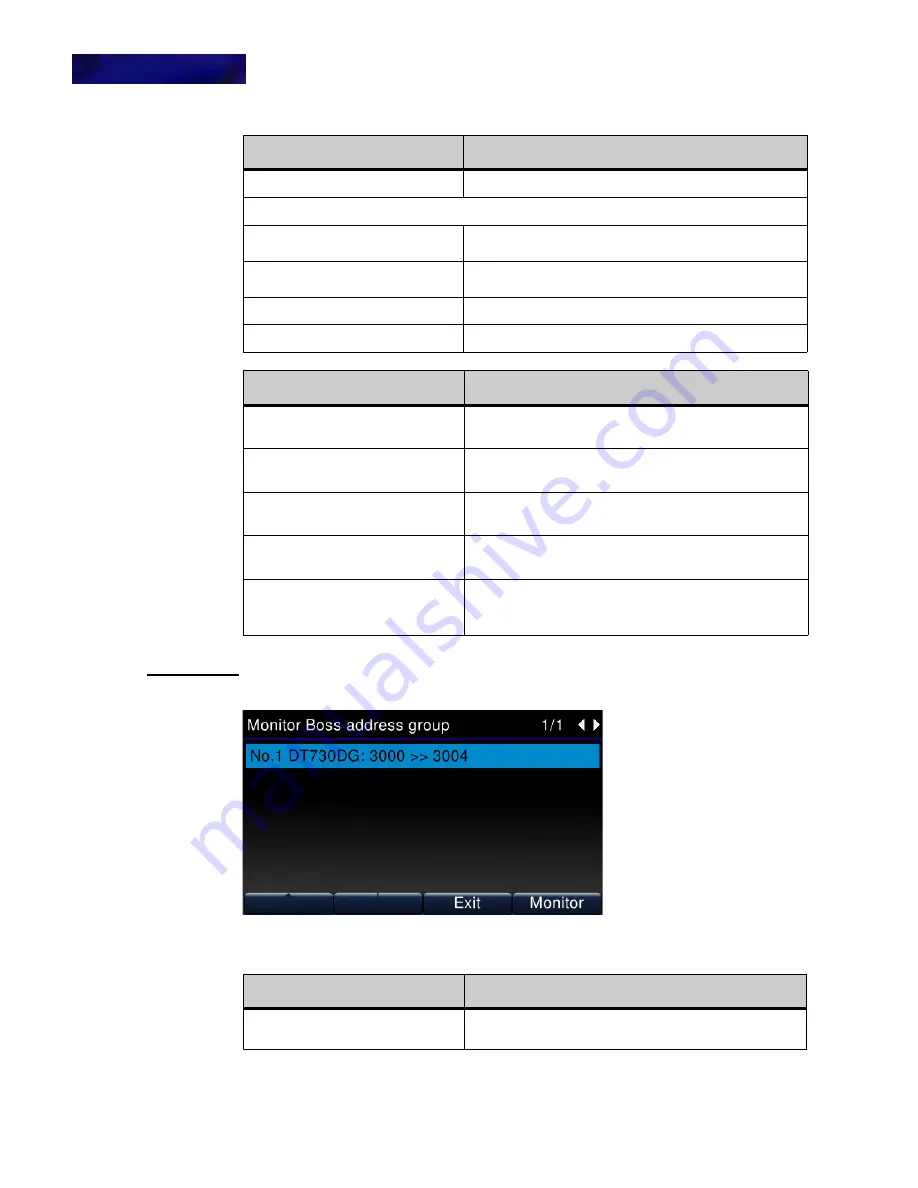
After you select a group, a screen appears listing the active calls from that group:

Figure 10.21

Group detail screen

This screen handles the following events:

OK

Return to the Call Control screen.

When you have Supervise privileges:

d

Move to previous menu item.

b

Move to next menu item.

Exit

Return to the Call Control screen.

Select

Select the highlighted menu item.

Hard Key Features:

Explanation

4-way scroll BACK key
(Redial key)

Return to the Home page.

4-way scroll FORWARD key
(Directory key)

Opens the Address Group detail screen.
If you do not have Supervise privileges, no operation.

(Volume UP Key)
4-way scroll UP key

Move to previous menu item. 
If you do not have Supervise privileges, no operation.

4-way scroll DOWN key
(Volume DOWN Key)

Move to next menu item.
If you do not have Supervise privileges, no operation.

ENTER key

Opens the Address Group Detail screen.
If you do not have Supervise privileges, return to the 

appropriate call control screen.

Soft Key Features:

Explanation

d

Move to previous menu item (does not show if first menu 

item is selected).

Soft Key Features:

Explanation

Summary of Contents for UNIVERGE DT700

Page 1: ...DT700 Phone User Manual For UNIVERGE 3C Communications and SIP Net Platforms ...

Page 2: ......

Page 3: ...SIP Net Platforms H T T P W W W C O M P A N Y N A M E C O M P A R T N U M B E R 6 1 0 2 1 0 R 9 D T 7 0 0 F I R M W A R E V E R S I O N 2 3 D T 7 3 0 G F I R M W A R E V E R S I O N 3 0 3 C U N I F I E D C O M M U N I C A T I O N S Y S T E M V E R S I O N 8 5 3 ...

Page 4: ...subsidiary of NET Other products mentioned in this document are the property of their respective owners and are also subject to copyright trademark and intellectual property protection as applicable by law NEC Enterprise Communication Technologies Inc is a wholly owned subsidiary of NEC Corporation Japan All Rights Reserved Sphere Sphericall Sphericall Voice Mail Sphericall Desktop PhoneHub COHub ...

Page 5: ... 2 0 x and later 610 210r5 February 2012 Revisions for phone firmware version NEC Std SIP 2 1 x and later 610 210r6 May 2012 Revisions for phone firmware version NEC Std SIP 2 2 x and later 610 210r7 March 2013 Revisions for DT700 phone firmware version NEC Std SIP 2 3 x and later DT730G phone firmware version NEC Std SIP 3 x and later 3C Unified Communication System 8 1 3 7 and later 610 210r8 No...

Page 6: ... ________________________________________________________ System Release Version ________________________________________________________ RE G I O N AL C O N T A CT S NEC HEADQUARTERS AS IA OPERATIONS NEC Corporation 7 1 Shiba 5 chome Minato ku Tokyo 108 8001 Japan Telephone 81 3 3454 1111 Fax 81 3 3798 1510 Website www nec co jp EU RO PE M IDD LE EAS T AN D A F RI CA NEC Enterprise Solutions The ...

Page 7: ...ghway 161 Irving TX 75039 2402 Telephone 1 800 240 0632 800 2400 NEC Fax 1 888 318 7932 Authorized Associates and Resellers Phone 1 800 752 6275 Fax 214 262 5566 Website www necam com W O RLD W I D E O F F I C E S For the latest information on offices in your area visit www nec com and select your area ...

Page 8: ...viii P N 610 210r9 DT700 Phone User Guide ...

Page 9: ...ort 2 39 DCL 60 Console Type A 2 39 Jabra Headset Support 2 41 3 Installation 3 43 Before You Begin 3 43 Adjusting Angle of Tilt Leg 3 43 To raise tilt leg 3 43 To lower tilt leg 3 44 To remove tilt leg 3 44 To attach tilt leg 3 45 Connecting the Phone 3 46 To attach the handset 3 46 To connect LAN cable to the phone 3 47 To connect a headset Optional 3 48 To connect a computer Optional 3 49 Insta...

Page 10: ...ble an external headset 4 67 To set external headset ringing Optional 4 68 To set the Call Waiting volume 4 69 To set the Hold Reminder volume 4 70 To change the Display Language 4 71 To set the Date Format 4 72 To set the Time Format 4 73 To adjust the LCD contrast 4 74 To change the LCD Backlight Timeout 4 75 To enable or disable the Backlight Fade DT730G ITL 12CG only 4 76 To edit the Dial Pref...

Page 11: ...t 7 108 To transfer the current call to your headset 7 109 Call Waiting Concurrent Calls 7 109 To answer the other incoming call Call Waiting 7 109 To place a second call Concurrent call 7 110 To switch between calls 7 111 Call Transferring and Conferencing 7 111 Conferencing Calls 7 111 To conference two calls 7 112 To hold resume a conference call 7 113 To call another party while on a conferenc...

Page 12: ... Dial Key without a Personal Directory entry 8 136 To add a Programmable Key as a Speed Dial Key with a Personal Directory entry using the Feature Key 8 141 To add a Programmable Key as a Speed Dial Key with a Personal Directory Entry from the Personal Directory 8 145 To add a Speed Dial Key to an existing Personal Directory entry 8 150 To configure a Programmable Key as a Speed Dial Key for a sta...

Page 13: ...group 9 201 To pick up a ringing call to a member of your workgroup 9 201 To transfer a call to a member of your workgroup 9 201 To pickup a held call from a member of your workgroup 9 201 To place a call to a member of your workgroup 9 202 To pick up a ringing call to a member of your workgroup 9 203 To transfer a call to a member of your workgroup 9 203 Park Extension Key 9 204 To park a call to...

Page 14: ...irectory 10 239 Enhanced Programmable Keys 10 243 Enhanced Programmable Key Support by phone model 10 243 Enhanced BLFs 10 244 To place a call to a member of your workgroup 10 245 To pick up a ringing call to a member of your workgroup 10 245 To transfer a call to a member of your workgroup 10 245 To pickup a held call from a member of your workgroup 10 246 To place a call to a member of your work...

Page 15: ...70 To access the Personal Directory 11 270 To view a specific Personal Directory entry 11 272 Presence Monitor Settings and the Personal Directory 11 273 Incoming Call Display and the Personal Directory 11 274 Searching for an Entry in the Personal Directory 11 275 To search the Personal Directory 11 275 Dialing from the Personal Directory 11 276 To dial a number from the Personal Directory 11 276...

Page 16: ... on Hold The call does not terminate 12 302 Phone Keypad 12 303 The dial pad and or buttons are not working 12 303 I want to enter specific characters or letters in Speed Dials and Personal Directory Entries 12 303 Phone Softkeys 12 304 The phone softkeys are not working 12 304 I cannot see a particular softkey on my phone 12 304 LCD Screen Display 12 305 The LCD is too light or dark 12 305 I want...

Page 17: ...e for a Jabra Bluetooth headset at the phoneset device D 330 Enable all phones for a Jabra Bluetooth headset using the XML configuration file D 330 Headset Base Station Setup D 331 Enable the Headset port on your phone D 331 To set external headset ringing Optional D 332 Connect Phone to Headset Base Station D 333 Using the Jabra Headset D 338 To adjust the headset ringing volume D 338 To adjust t...

Page 18: ...ution Conditions E 341 libSRTP Redistribution Conditions E 342 NetBSD Foundation s TNF License E 343 BSD license E 343 Audio Coding Licenses E 344 Notice to the user E 344 Important safety information E 344 Use of an external AC adapter E 344 Use of an IEEE802 3af power supply E 345 Power Consumption E 345 Declaration of Conformity E 346 WEEE Product Disposal Information E 349 ...

Page 19: ...s DT700 SIP Phones UNIVERGE 3C or SIP Net systems All acronyms abbreviations or descriptive terms imply general adherence under the UNIVERGE 3C product brand and serve as easy to use terminology throughout the system For a reference of system features and terms for the UNIVERGE 3C system please see the appendices of this manual SUPPORTED PHONE MODELS This document details the entire line of phones...

Page 20: ...O VE R VI E W 1 2 DT700 Phone User Guide ...

Page 21: ...pen SIP firmware and either the 3C system or SIP Net platform For general information on using the phone see the Quick Reference Guide for the specific phone model For information on functionality specific to the 3C system platform see Appendix A 3C System Features For information on the functionality specific to the SIP Net platform see Appendix B SIP Net System Features NE C IP PHONE LINE UP Thi...

Page 22: ...pgradeable DESI Less programmable keys on full dot grayscale LCD DT730 ITL 12D IP Value 12 programmable keys Full dot grayscale LCD Cursor pad Backlit LCD Backlit keypad Full duplex hands free Number of programmable keys is upgradeable DT730 ITL 24D IP Value 24 programmable keys Full dot grayscale LCD Cursor pad Backlit LCD Backlit keypad Full duplex hands free Number of programmable keys is upgra...

Page 23: ...ITL 12CG 12 programmable keys WQVGA LCD 4 3 inch Full color with Backlight no touch panel Gigabit ethernet support USB power port 5V 500mA Cursor pad Backlit LCD Backlit keypad Full duplex hands free DT730 ITL 24CG 24 programmable keys WQVGA LCD 4 3 inch Full color with Backlight no touch panel Gigabit ethernet support USB power port 5V 500mA Cursor pad Backlit LCD Backlit keypad Full duplex hands...

Page 24: ...e has been left 2 Color LCD The color LCD Liquid Crystal Display provides call status activity information plus date time and softkey operation 3 Exit key This key allows you to exit from the Menu or Help mode and go back to the telephone main screen 4 Softkeys The softkeys show the available features for your current activity Any feature shown at the bottom of the LCD is available The appropriate...

Page 25: ... key to answer an incoming call If you have a headset attached to the phone the audio will go through the headset If you do not have a headset attached to the phone the audio will go through the speaker on the phone You can also press this key to answer a waiting call 10 Mic key Press key to mute the microphone The LED on this key flashes when the microphone is muted Press the key again to un mute...

Page 26: ...hone Also if you have Voice Mail service the Lamp lights steadily when a message has been left 2 Color LCD The color LCD Liquid Crystal Display provides call status activity information plus date time and softkey operation 3 Exit key This key allows you to exit from the Menu or Help mode and go back to the telephone main screen 4 Softkeys The softkeys show the available features for your current a...

Page 27: ...atforms See the Hold key 9 Answer key Press this key to answer an incoming call If you have a headset attached to the phone the audio will go through the headset If you do not have a headset attached to the phone the audio will go through the speaker on the phone You can also press this key to answer a waiting call 10 Mic key Press key to mute the microphone The LED on this key flashes when the mi...

Page 28: ... the phone Also if you have Voice Mail service the Lamp lights steadily when a message has been left 2 LCD The LCD Liquid Crystal Display provides call status activity information plus date time and softkey operation 3 Exit key This key allows you to exit from the Menu or Help mode and go back to the telephone main screen 4 Softkeys The softkeys show the available features for your current activit...

Page 29: ...t Platforms See the Hold key 9 Answer key Press this key to answer an incoming call If you have a headset attached to the phone the audio will go through the headset If you do not have a headset attached to the phone the audio will go through the speaker on the phone You can also press this key to answer a waiting call 10 Mic key Press key to mute the microphone The LED on this key flashes when th...

Page 30: ... the phone Also if you have Voice Mail service the Lamp lights steadily when a message has been left 2 LCD The LCD Liquid Crystal Display provides call status activity information plus date time and softkey operation 3 Exit key This key allows you to exit from the Menu or Help mode and go back to the telephone main screen 4 Softkeys The softkeys show the available features for your current activit...

Page 31: ...t Platforms See the Hold key 9 Answer key Press this key to answer an incoming call If you have a headset attached to the phone the audio will go through the headset If you do not have a headset attached to the phone the audio will go through the speaker on the phone You can also press this key to answer a waiting call 10 Mic key Press key to mute the microphone The LED on this key flashes when th...

Page 32: ... H E D T 7 0 0 A N D D T 7 3 0 G PH O N ES DT700 and DT730G Series Phones 2 14 DT700 Phone User Guide ITL 32D DT730 SERIES PHONE LAYOUT AND PARTS Figure 2 5 ITL 32D DT730 Series Phone Layout 1 2 4 5 12 13 14 15 11 16 10 9 8 7 6 3 ...

Page 33: ...rammable keys not used as Line Keys can be programmed as Speed Dial Keys by the user or system administrator Numbers up to 24 digits can be assigned to Speed Dial Keys The numbers may be a telephone number or star hash codes 7 Feature key This key displays a set of menu options that provide additional capabilities such as speed dial key programming and microbrowser applications 8 Recall key 3C sys...

Page 34: ...er which can be used for Hands Free dialing and conversations The LED on this key lights when the speaker is active 15 Cursor pad Use this key to navigate to various features The up and down keys on the cursor pad can be used to adjust the volume of the phone 16 Programmable Keys Additional Programmable line keys Programmable Key numbering starts with Key 25 at the top and to key number 32 for the...

Page 35: ...rammable keys not used as Line Keys can be programmed as Speed Dial Keys by the user or system administrator Numbers up to 24 digits can be assigned to Speed Dial Keys The numbers may be a telephone number or star hash codes 7 Feature key This key displays a set of menu options that provide additional capabilities such as speed dial key programming and microbrowser applications 8 Recall key 3C sys...

Page 36: ...TS Figure 2 7 ITL 12D DT730 Series 14 Speaker key Controls the built in speaker which can be used for Hands Free dialing and conversations The LED on this key lights when the speaker is active 15 Cursor pad Use this key to navigate to various features The up and down keys on the cursor pad can be used to adjust the volume of the phone 1 2 4 5 12 13 14 15 11 10 9 8 7 6 3 ...

Page 37: ...grammable keys not used as Line Keys can be programmed as Speed Dial Keys by the user or system administrator Numbers up to 24 digits can be assigned to Speed Dial Keys The numbers may be a telephone number or star hash codes 7 Feature key This key displays a set of menu options that provide additional capabilities such as speed dial key programming and microbrowser applications 8 Recall key 3C sy...

Page 38: ...ND P AR T S Figure 2 8 ITL 8LD DT730 Series 14 Speaker key Controls the built in speaker which can be used for Hands Free dialing and conversations The LED on this key lights when the speaker is active 15 Cursor pad Use this key to navigate to various features The up and down keys on the cursor pad can be used to adjust the volume of the phone 1 2 4 5 12 13 14 15 11 10 9 8 7 6 3 16 ...

Page 39: ...mable keys not used as Line Keys can be programmed as Speed Dial Keys by the user or system administrator or Microbrowser keys Numbers up to 24 digits can be assigned to Speed Dial Keys The numbers may be a telephone number or star hash codes 7 Feature key This key displays a set of menu options that provide additional capabilities such as speed dial key programming and microbrowser applications 8...

Page 40: ...e Layout 14 Speaker key Controls the built in speaker which can be used for Hands Free dialing and conversations The LED on this key lights when the speaker is active 15 Cursor pad Use this key to navigate to various features The up and down keys on the cursor pad can be used to adjust the volume of the phone 16 Scroll key Press this key to scroll to the next page of Programmable Keys 1 2 4 5 12 1...

Page 41: ...grammable keys not used as Line Keys can be programmed as Speed Dial Keys by the user or system administrator Numbers up to 24 digits can be assigned to Speed Dial Keys The numbers may be a telephone number or star hash codes 7 Feature key This key displays a set of menu options that provide additional capabilities such as speed dial key programming and microbrowser applications 8 Recall key 3C sy...

Page 42: ...A RTS Figure 2 10 ITL 2E DT710 Series Phone Layout 14 Speaker key Controls the built in speaker which can be used for Hands Free dialing and conversations The LED on this key lights when the speaker is active 15 Cursor pad Use this key to navigate to various features The up and down keys on the cursor pad can be used to adjust the volume of the phone 1 11 12 13 14 2 3 4 5 6 7 8 9 10 ...

Page 43: ...tion on the ITL 2E phone 5 Redial Key Press this key to redial the last number that was dialed 6 Conf Key Press key to establish a 3 way conference call The LED on this key lights when are establishing a 3 way conference call and turns off when you end the conference call 7 Answer key Press this key to answer an incoming call The audio will go through the speaker on the phone When LED on this key ...

Page 44: ...dset volume Press UP or DOWN key during conversa tion Ring Volume Press UP or DOWN while on hook Soft Ring Volume Press UP or DOWN key while Soft Ring is playing 2 Redial Key Pressing this key redials the last number dialed 3 Directory Key Pressing this key opens the Personal Directory menu 4 Enter Key When in the menu screens go to the screen corresponding to the highlighted menu item Up Move the...

Page 45: ...lay line known as the title bar The title bar is configurable as either white icons and text on a black background or black icons and text on a white background The default is black icons and text on a white background Figure 2 12 DT730 and DT730G Black and White Icon Display Figure 2 13 DT710 ITL 6DE Icon Display Figure 2 14 DT730G Color Icon Display Right Go to the screen which corresponds to th...

Page 46: ... the network or try connecting to another active LAN port on the network Dialing This icon appears when you are dialing a number If you have Call Pickup on your system this icon also appears when you are in Pickup mode Call Pickup is only available on 3C systems Ringing Incoming Indicates an incoming telephone call Ringing Outgoing Indicates that the number you have dialed is ringing This icon onl...

Page 47: ...ult Indicates that you are transferring the call into a held state Conference With Hold primary and consult Indicates that you are connecting to a conference that is in a held state Transfer Conference Shuttle Primary Call Focus is on the primary call Transfer Conference Shuttle Secondary Call Focus is on the secondary call Call Conferencing This icon indicates that you have two other callers in a...

Page 48: ...G To switch between keypad entry modes press the key on the telephone keypad Keypad in all lowercase entry mode This icon indicates that the keypad generates all lowercase characters when entering data Example abc d efg To switch between keypad entry modes press the key on the telephone keypad Keypad in numeric entry mode This icon indicates that the keypad generates numeric characters when enteri...

Page 49: ...pplication features such as Personal Directory Call History and User Settings TLS SRTP Feature Icon Description Black and White Color Handset Ringing Volume Shows the ringing volume of the handset for incoming calls Soft Ring Volume Shows the soft ring volume of the handset for incoming calls Headset Call Volume Shows the volume level of the headset when you are on a call Handset Call Volume Shows...

Page 50: ...ily For example the following operations show alternate ways to access the Personal Directory Menu Items Description 1 Personal Directory Opens the Personal Directory 2 Call History Invokes Call History You can view infor mation about Missed Calls Placed Calls and Received Calls 3 User Settings Invokes User Settings including headset options date time options LCD contrast settings and language opt...

Page 51: ...nes provide a set of functions on the LCD that adapts to the changing state of the phone The softkeys at the bottom of the LCD display the names of available functions names of user assigned functions and names of functions assigned by a specific softkey pattern Displayed softkeys can vary depending on the state of the phone and your network settings Note Softkey functionality is only available fo...

Page 52: ...tes dial tone for a call Voicemail Automatically dials the voice mail extension on your system This feature may not be available on all systems Pickup Answers calls to other users in your Pickup group from your phone This feature may not be available on all systems EndCall Terminates the current call Conference Conf Initiates completes a conference Resume Takes the call off Hold status Dial Dials ...

Page 53: ...s or your selection Save Press this to save the changes you have made to the Personal Directory or Speed Dial Delete In the Call History Personal Directory and Speed Dial screens press this softkey to delete the currently highlighted information Options In the Call History menus press this softkey to view the options for the entry including dialing and Personal Directory options Note Not all softk...

Page 54: ... d Up bDown keys on the cursor pad to scroll through the help information if needed Figure 2 26 Delete softkey Help screen 4 Press the Exit softkey to return to the previous screen Note Help screens may not be available for all the softkeys on your phone OPTIONAL EQUIPMENT KEY MO DU LES AN D K E Y KITS The DT700 may be equipped with several different modules containing keys the Key Kit the Interna...

Page 55: ...igure the number of programmable keys when the Internal Key Module is upgraded The following table describes different phone models their supported Key Kit types and Internal Key Module configurations Table 2 17 Supported Key Kit types Model Name Commercial Name Key Kit Type Supported Internal Key Modules Factory Installed Upgrade Part Options DT710 ITL 2E IP Economy Kit 10 Line 2 N A DT710 ITL 6D...

Page 56: ...key numbers 2 to 12 on the phone key numbers 25 to 32 on the 8LK L module GIGABIT E THE RNE T ADAP TER All DT710 and DT730 phones support an optional GBA L Gigabit Ethernet adapter that cradles the DT700 and features two Gigabit ports and one 10 Mbps 100 Mbps port The DT700 s Ethernet port connects to the GBA L s 10 Mbps 100 Mbps port DT730G CG and DG modules do not support the GBA L Gigabit Ether...

Page 57: ...nected from the GBA L PC port Therefore EAP Logoff is not supported when the DT700 is equipped with a GBA L Gigabit Ethernet adapter SIDE 2 CONNE CTOR MODE SUP PORT Not all DT700 phones have access to Side 2 Connector mode options Also different models of phones may have different levels of support for the available options Table 2 18 Side 2 Connector Support by phone model DCL 60 CONS OLE TYP E A...

Page 58: ...starting from the first key on the module so if all keys on the phone need to be updated for an event there may be a delay between the time the first key is updated and the time when the last key is updated Each key on the DCL 60 Console has two LEDs situated at each corner of the key The LED on the left is red and the LED on the right is green Figure 2 28 Left LED Figure 2 29 Right LED If the lin...

Page 59: ... supported by the DT700 For more information on using the Bluetooth headset with your DT700 phone see Appendix D Jabra Bluetooth Headset Support for DT700 Phones Phone Model Bluetooth Headset Support Jabra Headsets Connection Module DT710 ITL 2E No N A N A ITL 6DE No N A N A DT730 ITL 8LD Yes Jabra PRO 9400 series Jabra GO 6470 LINK 14201 XX ITL 12D Yes Jabra PRO 9400 series Jabra GO 6470 LINK 142...

Page 60: ...I N T RO D U C T I O N T O T H E D T 7 0 0 A N D D T 7 3 0 G PH O N ES Optional Equipment 2 42 DT700 Phone User Guide ...

Page 61: ...tion on configuring a DT700 phone for connection to the network contact your system administrator Read through the installation procedures and assemble any equipment required to install the phone 10 BASE T 100 BASE T TX LAN cable power adapter tapered rod screwdrivers etc ADJUSTING ANGLE OF TILT LEG The angle of the tilt leg can be adjusted in four levels Figure 3 1 Tilt Levels To raise tilt leg 1...

Page 62: ...ter of the stopper adjust the tilt leg in the direction of the arrow until you hear it click Figure 3 3 Lower Tilt Leg To remove tilt leg 1 Turn the phone upside down 2 Lower the tilt leg to first level 3 Remove the indicated portions a and b of the stopper from grooves A and B on the tilt leg and then widen the tilt leg Tilt Leg Tilt Leg Stopper ...

Page 63: ...eg downward Remove the tilt leg from the terminal Figure 3 5 Remove Tilt Leg To attach tilt leg 1 Turn the phone upside down 2 Align the hooks c through h of the tilt leg over the appropriate slots C through H of the phone 3 Slide the tilt leg upward until the hooks c and b click into place b a Stopper A B Tilt Leg Hook Hook ...

Page 64: ...stopper into grooves A and B on the tilt leg Figure 3 7 Tilt Leg Attach CONNE CTING THE PHONE To attach the handset 1 Insert the coiled cord plug into the HANDSET connector on the back of the phone until you hear a click 2 Thread the coiled cord through the groove as shown in the figure below c g f d h E C F D H G b a A B ...

Page 65: ...ble to the LAN port on the DT700 phone and to an open port on a device such as a Hub or PoE Power Over Ethernet switch on the local area network 2 Thread the LAN cable through the groove on the back of the phone Figure 3 9 Phone LAN Connection 3 If you have not connected the DT700 phone to a PoE jack connect the AC DC adapter to the phone as shown below Phone Modular Plug Coiled Cord Groove HANDSE...

Page 66: ...our phone see Appendix D Jabra Bluetooth Headset Support for DT700 Phones There is no connector for a headset on the DT710 ITL 2E phone 1 Press the Menu key on the phone 2 Select 3 User Settings 3 Select 2 Headset Figure 3 11 Select Headset 4 Select 1 Enable Disable Figure 3 12 Headset Options 5 Select 2 Enable AC Adapter Plug Phone Groove AC Adapter Cord Connector for AC Adapter ...

Page 67: ...evices connected to the phone s PC port will momentarily disconnect from the network when the phone is rebooted or if disconnect if there is a loss of power to the phone You can connect a computer to the network through the phone using a LAN cable if there are a limited number of available ports on your local area network Note If a device that is connected through the PC port on the back of the ph...

Page 68: ...onnection Installing a Directory Card Optional A directory card also known as an abbreviated dialing table can be attached to the phone The directory card can be used to record often dialed numbers or other important information Directory cards are available as options 1 Remove the protective sheet from the cover 2 Attach the cover to the directory card and then attach it to the directory card hol...

Page 69: ...To remove Line Key Panel Button Panel 1 Carefully insert a tapered rod or a standard screwdriver between the right side of the Line Key Panel and the base of the phone to loosen the panel 2 Lift out the line key panel and remove it from the phone 3 If you also need to remove the Button Panel repeat steps 1 and 2 with the Button Panel on the phone 4 Remove the Line Key Card Figure 3 19 Line Key Car...

Page 70: ...in the Button Panel with the telephone keypad buttons on the phone and then push the four corners of the panel until the panel clicks into place Figure 3 20 Line Key Card Install WALL MOUNTING OPTIONAL A separate wall mount unit is used to mount the phone to the wall This unit connects to the back of the phone CAUTION BE CAREFUL NOT TO DROP THE PHONE WHILE MOUNTING IT ON THE WALL IT CAN CAUSE INJU...

Page 71: ...for the phone with the DT730 ITL 24D shown as an example Figure 3 21 Wall Mounting Clearance Diagram To mount the phone on the wall 1 Remove the handset from the handset cradle 2 Remove the hanger piece from the handset cradle flip it over and then turn it upside down and then insert it into the hanger slot until the hanger clicks 25 mm 25 mm 35 mm 15 mm ...

Page 72: ... Secure the wall mount unit with the six screws included with the phone or hang the wall mount unit on the wall with two screws inserted into the wall Figure 3 23 Wall Mount Install When attaching wall mount unit to the wall plate 6 Attach wall mount unit to posts on the wall plate as shown in the figure below Figure 3 24 Wall Mount Install 7 Insert the four tabs on the wall mount unit in the tab ...

Page 73: ... AND THE AC DC ADAPTER FROM THE PHONE TERMINAL TO POWER OFF THE TERMINAL DURING THE INSTALLATION PROCEDURE To install the 8LK L Module 1 Remove the left side panel from the phone 2 Attach the 8LK L module to the phone using the provided screws Figure 3 26 Securing the 8LK L with Screws 3 On the back of the phone press the tab on the port cover on the left side of the back of the phone to release t...

Page 74: ...TYP E A INSTALLATION WARNING TO PREVENT POSSIBLE DAMAGE TO THE DCL 60 CONDOLE OR THE PHONE TERMINAL DURING INSTALLATION OR REMOVAL DISCONNECT THE LINE CORD LAN CABLE AND THE AC DC ADAPTER FROM THE PHONE TERMINAL TO POWER OFF THE TERMINAL DURING THE INSTALLATION PROCEDURE Note Do not disconnect the module from a phone while the phone is powered on If you need to disconnect the module power off the ...

Page 75: ...ess the Exit softkey 10 Press the Yes softkey to restart the phone Note You must restart the phone to fully enable the DCL 60 connector mode 11 After the phone finishes rebooting disconnect the phone from power 12 Remove the side panel from the phone Figure 3 30 Remove Side Panel from Terminal 13 Attach the connection bracket to the phone using 3 of the provided screws Side Panel ...

Page 76: ...Press the cable into groove Connect the DCL 60 Console to the phone 1 Press the tab on the port cover on the left side of the back of the phone to release the protective cover that is over the SIDE 2 port Remove the cover Figure 3 33 Remove SIDE 2 port cover 2 Slide the supplied DCL 60 module on to the connection bracket attached to the phone 3 Use 2 of the supplied screws to connect the bracket t...

Page 77: ...e multiline terminal 7 Attach the side panel to the side of the DCL 60 8 Connect the AC Adapter cable to the DCL 60 9 Reattach the side panel to the phone 10 Connect power to the phone To install DCL 60 Line Key Card Optional 1 From the bottom use an object to gently pry off the button panel for the DCL 60 module 2 Align the holes in the Line Key Card with the buttons on the phone 3 Align the hole...

Page 78: ...I N S TA L L AT I O N 3 60 DT700 Phone User Guide ...

Page 79: ...s are capable of showing five lines of information Most screen examples in this guide are for DT730 phones Figure 4 1 Main Menu Display for ITL 6DE The Up and Down softkeys on the phone indicate to the user when there are more options than displayed on the LCD screen Figure 4 2 Up and Down softkeys on Change or Select Monitor Menu Display for DT710 ITL 6DE Phones User actions Keys Digit key Select...

Page 80: ...keys on the cursor pad Figure 4 4 DT710 ITL 6DE and DT730 ITL 12D ITL 24D and ITL 32D Cursor Pad Up Down Keys To adjust the ringing volume Press the d Up b Down key on the Cursor pad while on hook You must press the dUp b Down key multiple times and cannot press and hold to adjust the volume Figure 4 5 Adjust Handset ringing volume To adjust the Soft Ring volume SIP Net Platforms Press the d Up b ...

Page 81: ...annot press and hold to adjust the volume Figure 4 7 Adjust Headset ringing volume To adjust the call volume handset Press the d Up b Down key on the Cursor pad during call operation You must press the dUp b Down key multiple times and cannot press and hold to adjust the volume Figure 4 8 Adjust Handset call volume To adjust the call volume headset Press the d Up b Down key on the Cursor pad durin...

Page 82: ...TUP WITH THE MENUS AND CURSOR PAD The Menu Key and cursor pad on the DT710 ITL 6DE DT730 ITL 8LD ITL 12D ITL 24D and ITL 32D and DT730G ITL 12CG ITL 12DG phones lets you access additional settings and features for your phone Figure 4 11 Menu Key DESI less Display LCD Settings The LCD settings for the ITL 8LD apply to both the main LCD screen and the DESI less display screen simultaneously You cann...

Page 83: ... ringtone and plays the ringtone currently configured for the received event To stop playing a ringtone and listen to another ringtone use the and keys to scroll to another ringtone To select a new ringtone scroll to the ringotne or press the number for that ringtone then press the OK soft key or the ENTER key b If you select a new ringtone this ringtone will be applied to your next incoming call ...

Page 84: ... soft ring when it is playing this ringtone it stops playing the ringtone and plays the ringtone currently configure for the received event To stop playing a ringtone and listen to another ringtone use the and keys to scroll to another ringtone or use the phone keypad to select a specific ringtone To select a new ringtone scroll to the ringotne or press the number for that ringtone then press the ...

Page 85: ... for a headset on the DT710 phones 1 Connect the headset to the phone a Insert the headset cord plug into the HEADSET connector on the back of the phone until you hear a click b Thread the cord through the groove as shown in the figure below Figure 4 18 Headset Connection 2 Press the Menu key on the phone 3 Select 3 User Settings 4 Select 2 Headset Figure 4 19 Select Headset 5 Select 1 Enable Disa...

Page 86: ...rnal headset ringing Optional You can set your phone to ring only through your external headset The phone will not ring from the telephone speaker when you have it set to ring to the headset Note Hold reminder tone soft ring ringer volume and preview of the User Adjustable Ringtones on selection may not be supported by the headset They are only played on the DT700 speaker when Headset Ringing is s...

Page 87: ...e OK softkey to accept the setting You can also press the Cancel softkey to exit without making any changes Note The setting defaults to 1 Phone To set the Call Waiting volume The Call Waiting Volume settings allow you to specify the call waiting tone volume for the headset The range is 0 no tone to 19 maximum tone volume The default is 19 Upon entering this screen the keypad is locked in numeric ...

Page 88: ...nter b on the cursor pad or the OK softkey to accept the setting You can also press the Cancel softkey to exit without making any changes Note The setting defaults to 19 maximum tone volume To set the Hold Reminder volume The Hold Reminder Volume settings allow you to specify the hold reminder volume for the headset The range is 0 no tone to 19 maximum tone volume The default is 19 Upon entering t...

Page 89: ...Volume Figure 4 31 Hold Reminder volume 6 To change the volume level press the Delete softkey and use the telephone keypad to enter new volume level Figure 4 32 Adjust Hold Reminder Volume 7 Press Enter b on the cursor pad or the OK softkey to accept the setting You can also press the Cancel softkey to exit without making any changes Note The setting defaults to 19 maximum tone volume To change th...

Page 90: ...e language you have selected You do not need to restart the phone to change the language You can also press the Cancel softkey to exit without making any changes Note The default language on the phone is English To set the Date Format Determines whether time is displayed with a 12 hour or 24 hour clock format 1 Press the Menu key 2 Select 3 User Settings 3 Select 4 Date Time Figure 4 34 Select Dat...

Page 91: ...e Time Format Determines whether time is displayed with a 12 hour or 24 hour clock format 1 Press the Menu key 2 Select 3 User Settings 3 Select 4 Date Time Figure 4 36 Select Date and Time options 4 Select 2 Time Format No Menu Items 1 Mon Jan 1 Selects Mon Jan 1 date format 2 Mon 1 Jan Selects Mon 1 Jan date format 3 Jan 1 Mon Selects Jan 1 Mon date format 4 1 Jan Mon Selects 1 Jan Mon date form...

Page 92: ...cursor pad or the OK softkey to accept the setting You can also press the Cancel softkey to exit without making any changes Figure 4 38 Select Time options Note The setting that highlighted is the setting that is currently enabled To adjust the LCD contrast 1 Press the Menu key 2 Select 3 User Settings 3 Select 5 LCD Settings Figure 4 39 LCD settings 4 Select 1 LCD Contrast Figure 4 40 LCD Contras...

Page 93: ...xit without making any changes To change the LCD Backlight Timeout You can adjust the timeout of the LCD backlight on your phone You can specify a value between 0 None to 255 seconds 1 Press the Menu key 2 Select 3 User Settings 3 Select 5 LCD Settings Figure 4 42 LCD settings 4 Select 2 LCD Backlight Timeout Figure 4 43 LCD Backlight Timeout settings 5 The default backlight timeout in seconds for...

Page 94: ...ing the Backlight Timeout to 0 zero disables the timeout and the LCD Backlight will remain lit at all times To enable or disable the Backlight Fade DT730G ITL 12CG only You can enable or disable low power mode on the main screen of the color DT730G CG phones Note Although this setting is available on DT730G DG phones it does not have any impact on the main screen of DT730G DG phones 1 Press the Me...

Page 95: ... confirm the number when dialing Personal Directory Speed Dial or Call History entries For example if you dial external numbers from your Call History often you can set your dial preferences to edit before dialing so you can enter the outside line access code when your phone dials If you dial mostly internal numbers or use Personal Directory entries that have the outside line access code already p...

Page 96: ...For more information on the Personal Directory see The Personal Directory on page 11 270 For more information on Speed Dials see Speed Dial and Programmable Keys on page 8 124 CL EAR USER SETTING S The following menus are used to delete information from the Flash memory Selecting Clear User Settings restores all user settings to their default value Selecting Clear Personal Directory erases all Per...

Page 97: ...enu item may differ based on the Edit Before Dialing settings on your phone 3 Select 2 Clear Personal Directory Softkey Feature Description Cancel Discard changes and return to Clear Settings OK Restore all User settings to their default values Acceptable User Actions Keys Description The following section describes behavior on certain specific user actions key events pertaining to this screen Dig...

Page 98: ...tory from any other phone applications 1 Press the Menu key User Settings Softkey Feature Description Cancel Discard changes and return to Clear Settings OK Erase all Personal Directory entries and Speed Dial Key information on the phone Acceptable User Actions Keys Description The following section describes behavior on certain specific user actions key events pertaining to this screen Digit key ...

Page 99: ...ctions keys Note There are no menu items associated with Confirm Menu settings Softkey Feature Description Cancel Discard changes and return to Clear Settings OK Clear all Call History information on the phone Acceptable User Actions Keys Description The following section describes behavior on certain specific user actions key events pertaining to this screen Digit key No Operation 4 way scroll BA...

Page 100: ...restarts and re registers on the network Note If you cannot restart the phone using the Menus unplug the phone from power and the network for ten seconds then reconnect the telephone to your network and power to perform a restart VIEWING PHONE SETTINGS If you are having problems with your phone you may want to view the hardware version firmware version or network information for your phone This me...

Page 101: ... firmware information for your phone 1 Press the Menu key 2 Select 6 Status 3 Select 1 Terminal Information 4 Use the cursor pad or Up Down softkeys to scroll to the Firmware Version screen Figure 4 55 Firmware version 5 Press the Exit softkey to return to the Status menu Note You cannot change these settings on your phone To change any of these settings contact your system administrator If you ne...

Page 102: ...e settings on your phone To change any of these settings contact your system administrator To view the maximum numbers of calls you can handle on your phone The maximum number of calls you can handle concurrently is determined by your system administrator but you can view the maximum number of calls that are allowed concurrent on your phone from the Status menu 1 Press the Menu key 2 Select 6 Stat...

Page 103: ...vailable on your DT700 phone AL P HA BE T I C CH A RA CT E R S When entering the name you can enter uppercase and lowercase standard and European characters The keypad is in upper case entry mode upon entering the screen You can switch between upper and lower case character sets by pressing the key An icon in the title bar will show which entry mode uppercase lowercase or numeric set is selected T...

Page 104: ...RA CT E R S E T When in numeric character entry mode you can use the numbered keys on the phone to enter numbers and the key to enter special characters Æ Œ Ç Ø 2 6 i 1 Lowercase Characters 1 2 3 4 5 6 7 8 9 0 a d g j m p t w 0 Spac e b e h k n q u x c f i l o r v y à è ì 5 ñ s ù z á é í ò ß ú 9 â ê î ó 7 û ã ë ï ô ü ä 3 4 õ 8 å ö æ œ ç ø 2 6 i 1 Uppercase Characters 1 2 3 4 5 6 7 8 9 0 ...

Page 105: ...e in a field that also allows alphabetic input If you are not in a field that allows for alphabetic input the only special characters you can enter are and Table 4 10 Numeric Character Set Table 4 11 Character entry mode Icon Displays Numeric Characters 1 2 3 4 5 6 7 8 9 0 1 2 3 4 5 6 7 8 9 0 _ Feature Icon Keypad in first letter uppercase entry mode Keypad in all uppercase entry mode Keypad in al...

Page 106: ...B A S I C SE T TI N G S C O N F I G U R AT I O N Speed Dial and Personal Directory Character Sets 4 88 DT700 Phone User Guide ...

Page 107: ...played on the LCD screen above the button on the phone Figure 5 1 DT730 ITL 8LD softkeys User actions Keys Digit key Select corresponding menu Item 4 way scroll BACK key c Redial key Return to User Settings menu 4 way scroll FORWARD key a Directory key Select highlighted menu item 4 way scroll UP key d Volume UP key Move to previous menu item 4 way scroll DOWN key b Volume DOWN key Move to next me...

Page 108: ...e keys on 4 pages using the Scroll key to navigate between pages Figure 5 2 Scroll key The Page Icon indicates the currently displayed page You can change pages using the Scroll key The display offers the following Programmable Keys on the four pages available on the display The name or number assigned to each configured key is shown If Presence Monitoring is configured for the key an icon shows t...

Page 109: ...Guide 5 91 Figure 5 3 ITL 8LD a Monitor Icons Table 5 1 Monitor Presence Icons for ITL 8LD phones Type Status Programmable Key LED LED DESI Less Icon Line Key Registered LED is not lit Unregistered LED is not lit Speed Dial Key No Monitoring Not Available LED is not lit a b c b a ...

Page 110: ... phones BLF Idle LED is not lit Ringing SIP Net Blinking Red Ringing 3C system Blinking Green Subscription Failed LED is not lit Online 3C system only Green On the Phone Red Held Blinking Red Busy Red Key Type Description Line Key Default line text Programmed Speed Dial Key Speed Dial name Empty Programmable Key No information is shown Type Status Programmable Key LED LED DESI Less Icon ...

Page 111: ... the DESI Less display For example if the icon for page 3 is flashing to indicate an event on that page you would press the Scroll Key twice to scroll from the first page to the third page of the DESI Less display Figure 5 4 Page Scrolling Example Page Number Programmable Keys Behavior 1 Programmable Keys 2 9 Key 1 is the Line Key A black background on a page number indicates the currently display...

Page 112: ...D phones see Speed Dial Key Programming Examples on page 8 135 Speed Dial Key Numbering for ITL 8LD Phones For details on the Speed Dial Key numbering for the ITL 8LD phone see the example below Figure 5 5 DT730 ITL 8LD Speed Dial Key Numbering 2 3 4 5 6 7 8 9 10 11 12 13 14 15 16 17 18 24 23 22 21 20 19 Page 1 Line Key Page 1 Page 2 Page 2 Page 3 Page 3 25 26 28 27 Page 4 29 30 32 31 Page 4 ...

Page 113: ... secure when both the signaling and the media are secure Different icons are used to indicate the security of the phone s signaling and the security of the media Secure Signaling A lock symbol appears in the registration icon when secure signaling is used such as a TLS connection Table 6 1 Secure Registration Icon Secure Media A locked or unlocked icon is displayed adjacent to the call appearance ...

Page 114: ... Secure Media Icon is displayed only if all call legs are secure 80 2 1 X AU TH ENTIC AT IO N 802 1x Authentication Status Screens The LCD Display indicates the status of 802 1x authentication along with a counter that indicates the time in seconds since the supplicant initiated the authentication process when the phone is negotiating security This counter stops incrementing if the 802 1x authenti...

Page 115: ...d when the DT700 receives an EAPOL Failure from the authenticator in response to the EAP Response Identity message This case happens when the authenticating server or the supplicant have incorrect credentials Figure 6 4 Acquired connection The Acquired screen is displayed intermittently when the DT700 has received an EAPOL Request Identity before it attempts to send an EAPOL Response Identity mess...

Page 116: ...ficate Certificate revoked Certificate expired Certificate unknown Illegal parameter Unknown CA Access denied Decode error Decrypt error Export restriction Protocol version Insufficient security Internal error User cancelled If any of the above errors are encountered an error message displays on the phone The most common error messages are Table 6 4 TLS Errors Error Message Cause s TLS Bad Certifi...

Page 117: ...ed on the Network Information status screen Menu Status Network Information If 802 1x status enabled the phone displays the current Authentication state as Authenticated Held or Connecting as displayed in the screen below Figure 6 6 Authenticated TLS Unknown CA Unknown CA TLS Unknown Certificate Certificate unknown TLS Unsupported Cert Unsupported certificate Error Message Cause s ...

Page 118: ...D T 7 0 0 S E C U R I T Y F E A T U R E S 6 100 DT700 Phone User Guide ...

Page 119: ... s directional cursor pad and key pad Note The softkeys are buttons that change function depending on the situation Each softkey s current function is displayed on the LCD screen above the button on the phone Figure 7 1 DT730G Color screen softkeys ITL 12CG User actions Keys Digit key Select corresponding menu Item 4 way scroll BACK key c Redial key Return to User Settings menu 4 way scroll FORWAR...

Page 120: ...s three lines of information while the DT730 and DT730G phones are capable of showing five lines of information Most screen examples in this guide are for DT730 phones Figure 7 4 Main Menu Display for ITL 6DE The Up and Down softkeys on the phone indicate to the user when there are more options than displayed on the LCD screen Figure 7 5 Up and Down softkeys on Change or Select Monitor Menu Displa...

Page 121: ... then use one of the methods listed above to answer the call Note If you are changing any settings on your phone or adding a Personal Directory or Speed Dial entry your changes will be discarded if you press the Line Key to view the incoming call To reject an incoming call Press the Reject softkey Figure 7 7 Reject softkey The call will be routed in accordance with your defined forwarding conditio...

Page 122: ...rnal call Calls made to numbers that are outside of your system usually require an outside line access code 1 Lift the handset press the Speaker key or press the NewCall softkey to receive dial tone Figure 7 8 NewCall softkey 2 Enter the outside line access code using the keypad 8 for example if required then enter the telephone number of the outside party You can use the Delete softkey to delete ...

Page 123: ...er key or press the NewCall softkey to receive dial tone Figure 7 11 NewCall softkey 2 Enter the internal extension number You can use the Delete softkey to delete the last digit backspace Figure 7 12 Enter number internal call 3 Press the Dial softkey to initiate the call or wait a few seconds for the call to be automatically dialed Figure 7 13 Dial softkey The call proceeds to the dialed party N...

Page 124: ...w time to verify the dialed digit Note PIN code masking is not used when entered Speed Dial Keys or Personal Directory entries CALL DURATION DT710 ITL 6DE phone Call duration is displayed in MM SS format for the first hour of a call and then HH MM format for the remainder of the call Figure 7 14 Call timer for DT710 ITL 6DE phone DT730 ITL 8LD ITL 12D ITL 24D ITL 32D and DT730G ITL 12DG ITL 12CG p...

Page 125: ... on hold Figure 7 19 Hold Key If the SIP server supports music on hold the other party hears music on hold 2 To resume the held call press the Hold key or press the Resume softkey Figure 7 20 Call on Hold and Resume softkey DT710 ITL 6DE Phones On hold duration is displayed in MM SS format for the first hour and then HH MM for the remainder of the call The maximum duration is 99 59 59 DT730 ITL 8L...

Page 126: ... seconds for the call to be automatically dialed Note You can also dial the number then press the Headset softkey to initiate a call 4 A Headset icon displays on the LCD along with the call information Figure 7 21 Headset icon and Headset softkey 5 If you want to transfer the call to your telephone handset pick up the telephone handset to continue the call If you want to transfer back to the heads...

Page 127: ...en place the telephone handset back on hook Figure 7 24 Headset icon and Headset softkey 2 A Headset icon displays on the LCD If you want to transfer the call to your telephone handset pick up the telephone handset again Note While you are on a call if you press the Headset softkey while the telephone handset is on hook your call will be dropped Make sure you pick up the telephone handset to conti...

Page 128: ...ginal call 4 Press the Hold key or the Resume softkey to resume the original call Figure 7 26 Hold key To place a second call Concurrent call If it is enabled by your system administrator you can place a new call while you are on another call They will be treated as two separate phone calls and you cannot conference the calls or transfer one call to the other call For information on conferencing t...

Page 129: ...oftkey or press the switch hook to end the call and return to your original call 5 Press the Hold key or the Resume softkey to resume the original call Figure 7 30 Hold key CONCURRENT CAL L SHUTTLE To switch between calls Using the Shuttle softkey you can switch between two concurrent calls Press the Shuttle softkey to switch between the calls Figure 7 31 Shuttle Calls Press the Shuttle softkey ag...

Page 130: ...press the Conf key or press the Conf or Conference softkey Figure 7 32 Conf key on DT710 ITL 2E phone Figure 7 33 Conf softkey on DT710 ITL 6DE phone Figure 7 34 Conference softkey on DT730 ITL 8LD ITL 12D ITL 24D and ITL 32D phones 2 Use the key pad to dial the telephone number of the party to be joined in the conference 3 Press the Dial softkey to initiate the call or wait a few seconds for the ...

Page 131: ...ile on a conference call press the Hold key or press the Hold softkey to put the call on hold The other parties in the conference call will hear music on hold 2 Press the NewCall softkey to start a new phone call Figure 7 37 Start a new call 3 Use the key pad to dial the telephone number of the party to be joined in the conference 4 Press the Dial softkey to initiate the call or wait a few seconds...

Page 132: ...on hold while you are on the other call before you join the calls in a conference Note You cannot shuttle between calls after you have joined two calls in a conference call To switch between two calls 1 While on a call press the Conf key or press the Conf or Conference softkey Figure 7 39 Conf key on DT710 ITL 2E phone Figure 7 40 Conf softkey on DT710 ITL 6DE phone Figure 7 41 Conference softkey ...

Page 133: ...e connected in a blind transfer call Note Do not hang up the telephone handset or press the Speaker key unless you want the two calls to be connected in a blind transfer call You can hang up the telephone handset or press the Speaker key after you connect with all the callers To end a three party conference call press the EndCall softkey or hang up the telephone handset You will disconnect from bo...

Page 134: ...cted from both calls Blind transfer A blind transfer is when the call transfers immediately to the dialed extension without waiting to see if the extension rings or is picked up If the other caller does not answer or rejects the call the call is routed to voice mail or according to forwarding conditions If there is no voice mail or forwarding conditions set for the line you transfer to the call wi...

Page 135: ...ler does not answer or rejects the call the call is routed to voice mail or according to forwarding conditions If there is no voice mail or forwarding conditions set for the line you transfer to the call will continue to ring 1 While on a call press the Transfer key Figure 7 47 Transfer Key This puts the current call on hold so you can start to transfer the call 2 Use the key pad to dial the telep...

Page 136: ...e when you have started a transfer and then want to keep each call as a separate call After you split the calls you will not be able to continue a transfer between the two callers 1 While on a call press the Transfer key Figure 7 50 Transfer Key 2 Use the key pad to dial the telephone number of the party to be transferred then press Dial softkey or wait a few seconds for the call to be automatical...

Page 137: ... screens Depending on your system configuration you may also see an indication of how many messages you have Figure 7 52 Message Waiting icon AC CES SIN G VOIC E MAIL Note This feature may not be available on all systems To access the voice mail box for your system from the phone do one of the following DT710 ITL 2E phone Press the Message key on your phone Figure 7 53 Message key DT730 ITL 8LD IT...

Page 138: ...BASIC PH ON E OPERAT ION Advanced Messaging Features 7 120 DT700 Phone User Guide Figure 7 55 Voicemail softkey from Call screen ...

Page 139: ...able options The following symbols represent the DT700 s directional cursor pad and key pad Note The softkeys are buttons that change function depending on the situation Each softkey s current function is displayed on the LCD screen above the button on the phone Figure 8 1 DT730 and DT730G softkeys User actions Keys Digit key Select corresponding menu Item 4 way scroll BACK key c Redial key Return...

Page 140: ... in this guide are for DT730 phones Figure 8 3 Main Menu Display for ITL 6DE The Up and Down softkeys on the phone indicate to the user when there are more options than displayed on the LCD screen Figure 8 4 Up and Down softkeys on Change or Select Monitor Menu Display for DT710 ITL 6DE Phones THE HELP KEY Note This feature is not available on DT710 ITL 2E model phones Using the Help key You can u...

Page 141: ...Up bDown keys on the cursor pad to scroll through the help information if needed Figure 8 7 Delete softkey Help screen 4 Press the Exit softkey to return to the previous screen Note Help screens may not be available for all the softkeys on your phone THE MENU KEY The Menu Key and cursor pad on the DT710 ITL 6DE DT730 ITL 8LD ITL 12D ITL 24D and ITL 32D and DT730G ITL 12CG ITL 12DG phones lets you ...

Page 142: ... left is the Line Key The key on the right is a programmable key can be used as a Speed Dial Key This Speed Dial Key can only be programmed by your system administrator Figure 8 9 DT710 ITL 2E Programmable Key DT 71 0 I T L 6 DE AN D D T 7 30 P RO G R AM M A BL E K E Y S The DT710 ITL 6DE DT730 and DT730G phones have multiple Programmable Keys but in all cases the key on the upper left represents ...

Page 143: ...mmable Keys and the key on the upper left represents the Line Key All other keys can be programmed as Speed Dial Keys Figure 8 11 DT730G Programmable Keys 1st Line Key 1st Programmable Key Speed Dial Key 2 2nd Programmable Key Speed Dial Key 3 23rd Programmable Key Speed Dial Key 24 31rd Programmable Key Speed Dial Key 32 etc etc 1st Line Key 1st Programmable Key Speed Dial Key 2 2nd Programmable ...

Page 144: ...d to the UART Side 2 Connector port to add an additional 60 line keys on the phone Each of these keys can be programmed as a Speed Dial key programmable Key or Enhanced Programmable Key Record Park Hot Desk key etc Speed Dial keys can be configure on the DCL 60 Console to allow the phone to monitor the status or presence of other users Note Only one connection to the Side 2 connector port is avail...

Page 145: ...ing red green color and steady blinking flashing light DCL 60 WITH A ITL 8L D PHONE The DCL 60 console can be connected to an ITL 8LD phone but the lower LCD on the phone only shows information for the first 32 programmable keys that are on the phone The display does not show any information about programmable keys on the DCL 60 console SP EED DIAL KE Y CONFIGURATION Speed Dial Keys can be configu...

Page 146: ...ogrammable keys not used as Line Keys can be configured as Speed Dial Keys Each Speed Dial Key can be configured with a number and optional name The number may be a star code Speed Dial Key Numbering Speed Dial Key numbering starts at number 2 with the first Programmable Key on the DT700 phone If that Programmable Key is not programmed as a Line Key it can be programmed as Speed Dial Key number 2 ...

Page 147: ...mbering Figure 8 16 12 Key Phone Speed Dial Key Numbering Figure 8 17 DT710 ITL 6DE Speed Dial Key Numbering Speed Dial Key Numbering for ITL 8LD Phones For details on the Speed Dial Key numbering for the ITL 8LD phone see the example below 2 3 4 5 6 7 8 9 10 11 12 13 14 15 16 17 18 24 23 22 21 20 19 10 2 3 4 5 6 7 8 9 10 11 12 2 3 4 5 6 ...

Page 148: ...s If you have Visual monitor settings for a Speed Dial entry the presence Available Busy or Offline of the line is shown by the LED Color Table 8 2 Monitor Presence LED Colors for Speed Dial Keys Module Phone Speed Dial Key Numbers 8LK L 12 Key Phone 13 to 20 24 Key Phone 25 to 32 DCL 60 12 Key Phone 13 to 72 24 Key Phone 25 to 84 32 Key Phone 33 to 92 ITL 8LD 33 to 92 Type Status Programmable Key...

Page 149: ...ple entries with the same number and different names are allowed and multiple entries with the same name and different numbers are allowed Multiple entries with the same name and same number are not allowed An error is displayed if you create an entry with the same name and same number as an existing entry Figure 8 19 Directory Duplicate Not Allowed Menu Display Speed Dial Key No Monitoring Not Av...

Page 150: ...re key splash screen You can still answer incoming calls while your phone is in the programmable mode using the telephone handset or by pressing the Speaker or Answer key on your telephone You phone will exit the programmable mode when you answer the call or press the Line Key to view the caller information To exit the programmable mode press the Exit softkey Feature Key on a system with Microbrow...

Page 151: ...key To view Speed Dial Key information for Programmed Speed Dial Keys 1 Enter the programmable mode for your phone The Feature key LED lights a steady red Figure 8 24 Feature Key Note For information on how to enter the programmable mode for your phone see Using the Feature Key on page 9 382 2 Press the programmable key that you want to view The programmable key LED flashes Figure 8 25 Programmabl...

Page 152: ...number configured for that Speed Dial Key is dialed If you need to edit the number before dialing you can use the Dial softkey to allow edit the number before dialing if you have Edit Before Dialing Enabled on the phone This allows you to add a prefix to the number such as an outside service or access code before dialing To originate a call from Speed Dial Keys Using the handset Lift the handset a...

Page 153: ...ed Dial Key 2 Press the Dial softkey Figure 8 29 Dial softkey 3 Use the Cursor Pad and phone keypad to edit the number as needed then press the OK softkey Figure 8 30 Edit the Number Note Any changes made to the number are only used for dialing one time They are not saved in the selected Speed Dial Key configuration Note To change the options about being prompted to confirm the number before your ...

Page 154: ...y use the Feature Key to program the Speed Dial To add a Programmable Key Speed Dial Key without a Personal Directory entry 1 Enter the programmable mode for your phone The Feature key LED lights a steady red Figure 8 31 Feature Key Note For information on how to enter the programmable mode for your phone see Using the Feature Key on page 8 132 2 Do one of the following ITL 24CD ITL 12CG ITL 24DG ...

Page 155: ...ry press To enter special characters press the 1 key For a list of special characters see Speed Dial and Personal Directory Character Sets in the DT700 Phone User Guide To move the cursor position in the LCD screen use the right and left cursor pad keys 4 Use the telephone keypad to enter a phone number for the entry and press Enter b on the cursor pad or the OK softkey Figure 8 36 Enter Telephone...

Page 156: ...ot monitor external or outside lines Figure 8 38 Monitor Settings Valid options for monitoring are 1 None Do not monitor presence state changes for this Speed Dial Key 2 Visual Presence state is shown visually using the LED on the Speed Dial Key and a Presence icon is shown in the Personal Directory 3 Visual and Soft Ring Presence state is shown visually using the LED on the Speed Dial Key and a P...

Page 157: ...n Directory and press the OK softkey Figure 8 39 Do Not Show in Directory You can also press the Cancel softkey to return to the previous screen 8 Press the Save softkey to save the entry Type Status Icon Line Key Registered Unregistered Speed Dial Key No Monitoring Not Available BLF Idle Ringing SIP Net Ringing 3C system Subscription Failed Online 3C system Phone is Online On the Phone Phone is i...

Page 158: ...elect 3 Speed Dial and enter a new Speed Dial Key number 9 A confirmation displays telling you the speed dial has been updated Press Enter b on the cursor pad or the OK softkey Figure 8 42 Speed Dial Edit Confirmation 10 To return to the main phone screen press the Exit softkey or the Feature key Figure 8 43 Exit softkey SPEED DIAL KEYS WITH PERSONAL DIRECTORY ENTRIES To program a Speed Dial Key t...

Page 159: ...44 Feature Key 2 Do one of the following ITL 24CD ITL 12CG ITL 24DG ITL 12DG ITL 32D ITL 24D ITL 12D and ITL 6DE Phones Press the programmable key that you want to set as a Speed Dial Key The programmable key LED flashes Figure 8 45 Programmable Key LED ITL 8LD Phones Press the Scroll Key to scroll to the desired page then press the Speed Dial Key that you want to edit The programmable key LED fla...

Page 160: ...r position in the LCD screen use the right and left cursor pad keys 4 Use the telephone keypad to enter a phone number for the entry and press Enter b on the cursor pad or the OK softkey Figure 8 49 Enter Telephone Number Up to 24 characters may be entered for the number Only digits and may be entered To move the cursor position in the LCD screen use the right and left cursor pad keys You can also...

Page 161: ...onitoring are 1 None Do not monitor presence state changes for this Speed Dial Key 2 Visual Presence state is shown visually using the LED on the Speed Dial Key and a Presence icon is shown in the Personal Directory 3 Visual and Soft Ring Presence state is shown visually using the LED on the Speed Dial Key and a Presence icon is shown in the Personal Directory When a call is ringing on the monitor...

Page 162: ...can also press the Cancel softkey to return to the previous screen 8 Press the Save softkey to save your changes Figure 8 53 Save softkey If the Speed Dial number is already used for another entry you will see an error when you try to save the entry Speed Dial Key No Monitoring Not Available BLF Idle Ringing SIP Net Ringing 3C system Subscription Failed Online 3C system Phone is Online On the Phon...

Page 163: ...e speed dial has been updated Press Enter b on the cursor pad or the OK softkey Figure 8 55 Speed Dial Edit Confirmation 10 To return to the main phone screen press the Exit softkey or the Feature Key Figure 8 56 Exit softkey To add a Programmable Key as a Speed Dial Key with a Personal Directory Entry from the Personal Directory 1 Press the Menu key or cursor pad to access the Personal Directory ...

Page 164: ... special characters see Speed Dial and Personal Directory Character Sets in the DT700 Phone User Guide To move the cursor position in the LCD screen use the right and left cursor pad keys 4 Use the telephone keypad to enter a phone number for the entry and press Enter b on the cursor pad or the OK softkey Figure 8 59 Enter Telephone Number Up to 24 characters may be entered for the number Only dig...

Page 165: ...de lines Figure 8 61 Monitor Settings Valid options for monitoring are 1 None Do not monitor presence state changes for this Speed Dial Key 2 Visual Presence state is shown visually using the LED on the Speed Dial Key and a Presence icon is shown in the Personal Directory 3 Visual and Soft Ring Presence state is shown visually using the LED on the Speed Dial Key and a Presence icon is shown in the...

Page 166: ... Color Table 8 6 Monitor Presence LED Colors for Speed Dial Keys Speed Dial Key No Monitoring Not Available BLF Idle Ringing SIP Net Ringing 3C system Subscription Failed Online 3C system Phone is Online On the Phone Phone is in use Held 3C system Busy Type Status Programmable Key LED Line Key Registered LED is not lit Unregistered LED is not lit Speed Dial Key No Monitoring Not Available LED is n...

Page 167: ... Cancel softkey to return to the previous screen 8 Press the Save softkey to save your changes Figure 8 62 Save softkey 9 Press Enter b on the cursor pad or the OK softkey to return to the Personal Directory or press the Exit key to return to the main phone screen BLF Idle LED is not lit Ringing SIP Net Blinking Red Ringing 3C system Blinking Green Subscription Failed LED is not lit Online 3C syst...

Page 168: ...layed if you create an entry with the same name and same number as an existing entry Figure 8 64 Directory Duplicate Not Allowed Menu Display To change the name or number select 1 Name or 2 Number to edit the field before trying to save the entry again If the Speed Dial number for a new Personal Directory entry is already used for another entry you will see an error when you try to save the Person...

Page 169: ...he Delete softkey to delete the last character entered or press the Cancel softkey to return to the previous screen 6 Select the monitor settings for this entry and press Enter b on the cursor pad or the OK softkey Note Monitoring can only be done on other lines that are internal to your system You cannot monitor external or outside lines Figure 8 68 Monitor Settings Valid options for monitoring a...

Page 170: ...rectory Table 8 7 Monitor Presence Icons If you have Visual monitor settings for a Speed Dial entry the presence Available Busy or Offline of the line is shown by the LED Color Table 8 8 Monitor Presence LED Colors for Speed Dial Keys Type Status Icon Line Key Registered Unregistered Speed Dial Key No Monitoring Not Available BLF Idle Ringing SIP Net Ringing 3C system Subscription Failed Online 3C...

Page 171: ... Cancel softkey to return to the previous screen 7 Press the Save softkey to save your changes Figure 8 69 Save softkey 8 Press Enter b on the cursor pad or the OK softkey to return to the Personal Directory or press the Exit key to return to the main phone screen BLF Idle LED is not lit Ringing SIP Net Blinking Red Ringing 3C system Blinking Green Subscription Failed LED is not lit Online 3C syst...

Page 172: ...To change the name or number select 1 Name or 2 Number to edit the field before trying to save the entry again If the Speed Dial number for a new Personal Directory entry is already used for another entry you will see an error when you try to save the Personal Directory entry Select 3 Speed Dial to edit the Speed Dial number before trying to save the entry again Figure 8 72 Speed Dial In Use Menu ...

Page 173: ...ed Dial Key The programmable key LED flashes Figure 8 74 Programmable Key LED ITL 8LD Phones Press the Scroll Key to scroll to the desired page then press the Speed Dial Key that you want to edit The programmable key LED flashes and the Speed Dial information for the key is shown Figure 8 75 Scroll Key Figure 8 76 Programmable Key LED Note If the Speed Dial has already been programmed the name and...

Page 174: ...luding any outside access code and additional digits for the entry and press Enter b on the cursor pad or the OK softkey Example Enter 72818475559876 to set up a Speed Dial that forwards to the external telephone number 1 847 555 9876 Forwarding star code 72 Outside Access Code if required 8 External telephone number 1 847 555 9876 72818475559876 Figure 8 78 Enter Forwarding Star Code Up to 24 cha...

Page 175: ...r press the Cancel softkey to return to the previous screen 6 Since you can only set presence monitoring for a Speed Dial that is an internal line select 1 None then press Enter b on the cursor pad or the OK softkey Figure 8 80 Monitor Settings You can also press the Cancel softkey to return to the previous screen 7 For a star or hash code sequence you probably do not want the entry to show up in ...

Page 176: ...ed Dial to edit the Speed Dial number before trying to save the entry again Figure 8 83 Speed Dial In Use Menu Display 9 A confirmation displays telling you the speed dial has been updated Press Enter b on the cursor pad or the OK softkey Figure 8 84 Speed Dial Edit Confirmation 10 To return to the main phone screen press the Exit softkey or the Feature Key Figure 8 85 Exit softkey Once the Speed ...

Page 177: ...enter the programmable mode for your phone see Using the Feature Key on page 8 132 2 Do one of the following ITL 24CD ITL 12CG ITL 24DG ITL 12DG ITL 32D ITL 24D ITL 12D and ITL 6DE Phones Press the programmable key that you want to set as a Speed Dial Key The programmable key LED flashes Figure 8 87 Programmable Key LED ITL 8LD Phones Press the Scroll Key to scroll to the desired page then press t...

Page 178: ... b Press Enter b on the cursor pad to edit the field 5 Edit the desired field s 1 Name a To edit the name use the telephone keypad and cursor pad Use the left cursor key on the cursor pad to backspace and then press the Delete softkey to delete the character that is before the cursor Or To delete the entire name entry press the Delete softkey Figure 8 92 Edit Name Up to 24 characters may be entere...

Page 179: ...umber Up to 24 characters may be entered for the number Only digits and may be entered To move the cursor position in the LCD screen use the right and left cursor pad keys You can also press the Delete softkey to delete the last character entered or press the Cancel softkey to return to the previous screen b Press Enter b on the cursor pad or the OK softkey 3 Speed Dial a To delete the speed dial ...

Page 180: ...esence state is shown visually using the LED on the Speed Dial Key and a Presence icon is shown in the Personal Directory for entries that also have an associated Personal Directory entry 3 Visual and Soft Ring Presence state is shown visually using the LED on the Speed Dial Key and a Presence icon is shown in the Personal Directory for entries that also have an associated Personal Directory entry...

Page 181: ...ne is shown by the LED Color Table 8 10 Monitor Presence LED Colors for Speed Dial Keys BLF Idle Ringing SIP Net Ringing 3C system Subscription Failed Online 3C system Phone is Online On the Phone Phone is in use Held 3C system Busy Type Status Programmable Key LED Line Key Registered LED is not lit Unregistered LED is not lit Speed Dial Key No Monitoring Not Available LED is not lit Type Status I...

Page 182: ...alid options are 1 Do Not Show in Directory This information is saved as a Speed Dial Key only and the entry is not saved to the Personal Directory If you receive an incoming call from this number it will not show the name or number from the saved Speed Dial 2 Show in Directory This information is saved to the Personal Directory in addition to the saved Speed Dial key When you browse the Personal ...

Page 183: ...case insensitive Multiple entries with the same number and different names are allowed and multiple entries with the same name and different numbers are allowed Multiple entries with the same name and same number are not allowed An error is displayed if you create an entry with the same name and same number as an existing entry Figure 8 98 Directory Duplicate Not Allowed Menu Display If the Speed ...

Page 184: ...s associated with Personal Directory Entries Delete just the Speed Dial information from a Personal Directory entry Delete the entire Speed Dial and Personal Directory entry Speed Dials that are not associated with Personal Directory entries Delete the Speed Dial entry If you are unsure if a Speed Dial is associated with a Personal Directory entry check the Personal Directory for the entry informa...

Page 185: ... Key Note For information on how to enter the programmable mode for your phone see Using the Feature Key on page 8 132 2 Do one of the following ITL 24CG ITL 12CG ITL 24DG ITL 12DG ITL 32D ITL 24D ITL 12D and ITL 6DE Phones Press the programmable key that you want to delete The programmable key LED flashes Figure 8 103 Programmable Key LED ITL 8LD Phones Press the Scroll Key to scroll to the desir...

Page 186: ...eted as a Speed Dial but the Personal Directory information will not be deleted 7 Press Enter b on the cursor pad or the OK softkey Figure 8 109 Speed Dial Edit Confirmation Note For Speed Dial entries that are set as read only by your system administrator an error is displayed and the entry is not deleted 8 Do one of the following To delete more Speed Dial entries press the Speed Dial Key for tha...

Page 187: ... been deleted and the Monitor setting is now None Figure 8 111 Personal Directory Entry detail To delete an entire Speed Dial and Personal Directory entry 1 Press the Menu key 2 Select 1 Personal Directory 3 Use the cursor pad or the Up and Down softkeys to scroll to the entry you want to delete 4 Press the More softkey and then the Delete softkey Figure 8 112 More and Delete softkeys 5 Press the ...

Page 188: ...l see that the entire entry has been deleted Figure 8 115 Personal Directory detail To delete a Speed Dial only entry For Speed Dial entries that do not have a Personal Directory entry you can delete the Speed Dial entry 1 Enter the programmable mode for your phone The Feature key LED lights a steady red Figure 8 116 Feature Key Note For information on how to enter the programmable mode for your p...

Page 189: ...8 118 Scroll Key Figure 8 119 Programmable Key LED 3 Press the Delete softkey Figure 8 120 Delete softkey 4 Press the Enter b on the cursor pad or the OK softkey to confirm Figure 8 121 Delete Entry Confirm The entry will be deleted as a Speed Dial 5 Press Enter b on the cursor pad or the OK softkey Figure 8 122 Delete Entry Complete Menu Display Note For Speed Dial entries that are set as read on...

Page 190: ...ogrammable Keys 8 172 DT700 Phone User Guide To delete more Speed Dial entries press the Speed Dial Key for that entry and repeat steps 3 through 5 To return to the main phone screen press the Exit softkey or the Feature Key Figure 8 123 Exit softkey ...

Page 191: ...y on the telephone is used to program Speed Dial Keys and access the Microbrowser on your phone Figure 9 1 Feature Key Pressing the Feature key opens a screen that lets you enter the programmable mode on your phone or go to the Microbrowser on your phone After you press the Feature key press the Program soft key to enter your phone s programmable mode or press the Home soft key to go to the Microb...

Page 192: ...by pressing the Speaker or Answer key on your telephone Your phone will exit the Microbrowser when you answer the call or press the Line Key to view the caller information To exit the Microbrowser press the Exit key on your phoneset To return to the Microbrowser s home page press the Home softkey HO ME PAG E The home URL displays the Microbrowser Home page To view the Microbrowser Home page 1 Pres...

Page 193: ...ey Volume UP Key Move to previous menu item 4 way scroll DOWN key Volume DOWN Key Move to next menu item ENTER key Select highlighted menu item Menu Items Explanation Hot Desking Login OR Hot Desking Logout Hot Desking Login Opens the Hot Desking Login screen This option does not display if you are Hot Desked to the phone Hot Desking Logout Opens the Hot Desking Logout screen This option only disp...

Page 194: ...e Hot Desking menu item does not appear if your phone is not enabled for Hot Desking To Login using Hot Desking 1 Press the Feature Key 2 Press the Home soft key or wait 2 seconds to connect to the microbrowser home page 3 Select Hot Desking Login Soft Key Features Explanation Dial Phonebook Dial the highlighted entry Back Return to the last viewed page Details Show details about the highlighted m...

Page 195: ...he Hot Desking Extension and Password fields accept a maximum of 24 characters The Hot Desking Login page handles the following events Soft Key Features Explanation Delete Deletes previously entered character Back Return to the microbrowser Home page Exit Exit the microbrowser to the appropriate call status screen OK Sends contents of extension and password fields to the Web Server Hard Key Featur...

Page 196: ...y Volume DOWN Key Move between Extension and Password fields ENTER key Sends contents of extension and password fields to the Web Server Soft Key Features Explanation Back Return to the microbrowser Home page OK Exit the microbrowser to the appropriate call status screen Hard Key Features Explanation 4 way scroll BACK key Redial key Return to the microbrowser Home page 4 way scroll FORWARD key Dir...

Page 197: ... out of your Hot Desking session Figure 9 10 Hot Desking logged out This page handles the following events Soft Key Features Explanation Back Return to the microbrowser Home page OK Exit the microbrowser to the appropriate call status screen Hard Key Features Explanation 4 way scroll BACK key Redial key Return to the microbrowser Home page 4 way scroll FORWARD key Directory key No operation 4 way ...

Page 198: ... 3C system client applications to access advanced call forwarding settings HA N DS E T C AL L F O R W A RD I NG S ET T I NG S O N T HE 3C SYSTEM Note Handset Forwarding settings for the 3C system are not mutually exclusive and can be added cumulatively You can select a forwarding setting and enter any phone number internal or external for the condition and then activate the new setting Handset for...

Page 199: ...Dutch NLD English UK English USA French France German Italian Portuguese Brazil Spanish Mexico Spanish Spain and Swedish Note BE H A V IO R To set a Handset Forwarding Condition 1 Press the Feature Key 2 Press the Home soft key or wait 2 seconds to connect to the microbrowser home page 3 Select Handset Forwarding Figure 9 11 Handset Forwarding This menu handles the following events Soft Key Featur...

Page 200: ...progress Figure 9 13 Busy forwarding 4 way scroll FORWARD key Directory key Select highlighted menu item 4 way scroll UP key Volume UP Key Move to previous menu item 4 way scroll DOWN key Volume DOWN Key Move to next menu item ENTER key Select highlighted menu item Option Description Forward immediately The incoming call will be forwarded to destination s immediately Forward when busy The incoming...

Page 201: ...dles the following events Hard Key Features Explanation 4 way scroll BACK key Redial key Return to the microbrowser Home page 4 way scroll FORWARD key Directory key Select the highlighted item and proceed to the settings screen to enter phone number s if applicable 4 way scroll UP key Volume UP Key Remain on existing screen move cursor up 4 way scroll DOWN key Volume DOWN Key Remain on existing sc...

Page 202: ...ays the success or failure of the operation Figure 9 16 Handset forwarding added success The Handset Status screens handles the following events OK Sends contents of number field to the Web Server to set handset forwarding Hard Key Features Explanation Digit key Enter numeric digits 4 way scroll BACK key Redial key Remain on existing screen move cursor to left 4 way scroll FORWARD key Directory ke...

Page 203: ...nabled for your phone To enter additional numbers hang up the phone and then lift the handset to enter an additional number example 62 forwarding number hang up 62 another forwarding number hang up To set Conditional Handset forwarding Busy using star codes 1 Lift the handset from the phone 2 Dial 63 forwarding number When your phone is Busy all other calls will forward to the configured number s ...

Page 204: ...eted To clear Handset forwarding using star codes 1 Lift the handset from the phone 2 Dial 73 All handset forwarding settings that are applied to the phone are cleared Soft Key Features Explanation Move to previous menu item does not show if first menu item is selected Move to next menu item does not show if last menu item is selected Exit Exit the microbrowser to the appropriate call status scree...

Page 205: ...s the Record key while an an On Demand recording is active to stops recording SUPERVISE A CALL SU PER VISE A CALL BARG E MONI TOR The 3C system allows users to be granted rights to supervise an address group If a user has supervisor rights they can monitor or barge into a call in progress on any address in the group Selecting Supervise invokes the following XML page allowing the user to select an ...

Page 206: ...the Call Control screen When you have Supervise privileges d Move to previous menu item b Move to next menu item Exit Return to the Call Control screen Select Select the highlighted menu item Hard Key Features Explanation 4 way scroll BACK key Redial key Return to the Home page 4 way scroll FORWARD key Directory key Opens the Address Group detail screen If you do not have Supervise privileges no o...

Page 207: ... Group screen 4 way scroll FORWARD key Directory key Set up a monitor call to the selected extension Volume UP Key 4 way scroll UP key Move to previous menu item 4 way scroll DOWN key Volume DOWN Key Move to next menu item ENTER key If no calls are being monitored Set up a monitor call to the selected extension If a call is being monitored Shows the details for the monitored call Off Hook handset ...

Page 208: ...es Explanation Record Toggles call recording If not currently recording starts recording If currently recording stops recording Barge record Audio is recorded from both participants in the call and from your phone line Monitor record Audio is recorded from both partici pants in the call but not from your phone line Exit Exit the microbrowser to the appropriate call status screen Barge Opens the Ba...

Page 209: ...calls or the last 7 days of calls whichever comes first To view call logs via the Microbrowser 1 Press the Feature key 2 Press the Home soft key or wait 2 seconds to connect to the microbrowser home page 3 Select View System Call History Figure 9 22 View System Call History Selecting the View System Call History item invokes the following XML page Off Hook handset If speaker is ON turn speaker OFF...

Page 210: ...selected b Move to next menu item does not show if last menu item is selected Exit Exit the microbrowser and return to the appropriate call screen Dial Dial the highlighted number Hard Key Features Explanation 4 way scroll BACK key Redial key Return to microbrowser home page 4 way scroll FORWARD key Directory key Dial the highlighted number 4 way scroll UP key Volume UP Key Move to previous entry ...

Page 211: ...ts Soft Key Features Explanation d Move to previous menu item b Move to next menu item Details Opens the Conference Bridge details page Exit Exit the microbrowser and return to the appropriate call status screen Hard Key Features Explanation 4 way scroll BACK key Directory key Return to the microbrowser home page 4 way scroll FORWARD key Directory key Show the details for the highlighted menu item...

Page 212: ...tion Back Return to the previous screen Exit Exit the microbrowser and return to the appropriate call status screen Join Dial the conference bridge address in the title bar and display the call status screen Hard Key Features Explanation 4 way scroll BACK key Redial key Return to the previous screen 4 way scroll FORWARD key Directory key Dial the conference bridge address in the title bar and disp...

Page 213: ...ay join the conference SE ARCH DIRECTORY CORP ORATE DIRECTORY S E AR C H D IR E C T O R Y Selecting the Search Directory item invokes the following XML page allowing the user to enter a string to search the 3C System Directory Note that the 3C System Directory is different than the Personal Directory maintained by the phone To Search the 3C System Directory 1 Press the Feature key 2 Press the Home...

Page 214: ...The search string field has focus upon entering this page The keypad is in lower case character entry mode by default when entering the Search Directory page To toggle to numeric entry mode press the key Uppercase character mode is not supported Searches are not case sensitive Table 9 1 Supported search characters Lowercase characters 1 2 3 4 5 6 7 8 9 0 a d g j m p t w Space b e h k n q u x 0 c f...

Page 215: ... 1 2 3 4 5 6 7 8 9 0 Soft Key Features Explanation Delete Deletes previously entered character Back Return to the Home page Exit Exit the microbrowser to the appropriate call status screen OK Sends contents of search string field to the Web Server Hard Key Features Explanation Digit key Enter digits numeric digits only key Toggles between lower case character and numeric entry modes 4 way scroll B...

Page 216: ...ble Key functionality of DT700 The following features have been implemented as Enhanced Programmable Keys Speed Dial Key User defined Speed Dial Keys Context Sensitive Enhanced BLF Key Call Call Back Transfer Pickup Monitor Send To Voice Mail Key Park Extension Key DND Key Call Forward Key Soft Key Features Explanation Back Return to the previous screen OK Exit the microbrowser and return to the a...

Page 217: ...ng table lists the combinations of Line Key Modules supported by the DT700 and whether the Microbrowser feature is supported Table 9 2 DT700 Enhanced Programmable Keys Support Product Name Model Number Supported Key Modules Enhanced Programmable Keys Support DT710 ITL 2E 1 None Partial Supported Programmable Keys Enhanced BLFs Record Call Send to Voice Mail ParkExt Do Not Disturb The following add...

Page 218: ...system Transfer Transfer allows the phone user to perform a transfer of the connected call or held call that is in focus to the Subscribed Address A Transfer operation on a non connected call or held call that is not in focus has no operation Call Back Call Back functionality allows the phone user to set call back on a Subscribed Address When that address becomes idle the phone notifies the user b...

Page 219: ... press the key for the workgroup member to continue the call on your phone To pick up a ringing call to a member of your workgroup If you are set up for a workgroup you will see a flashing green LED when there is a ringing call on any other workgroup member s phone While your phone is idle and the other workgroup member s phone is ringing do one of the following To place a hands free or headset ca...

Page 220: ... the other workgroup member s phone is idle do one of the following To place a hands free or headset call 1 Press the key for the workgroup member you want to call An outbound call is made to the workgroup member 2 Use your headset or the phone s speaker to continue the call on your phone To use your phone handset for the call 1 Pick up your phone handset 2 Press the key for the workgroup member A...

Page 221: ... the workgroup member then use your headset or the phone s speaker to continue the call on your phone To use your phone handset for the call Pick up your phone handset then press the key for the workgroup member to pick up the call Non idle call states If you are on a call and want to pick up the ringing call for the workgroup member press the key for the workgroup member to automatically put your...

Page 222: ... complete the transfer Figure 9 35 Transfer Key Non idle call states If the other workgroup member s line is currently connected to another call you will also have the option to monitor the current call for that user if you have Supervise privileges Figure 9 36 Monitor soft key If the other workgroup member has a call on hold you will also see an option to pickup the call that user has on hold Fig...

Page 223: ...ey is also set with presence monitoring information Using the Call Back Key Press the Call Back key to set call back to the last dialed number If the number can be monitored for presence the key will show presence information for the number The key stays configured for call back to that number until the number is dialed or call back is manually cleared If you attempt to place a new call to another...

Page 224: ...ave Supervise rights over The workgroup member s LED on your phone will display stead red to show they are currently on a call 1 Press the key for the workgroup member 2 Press the Monitor soft key Figure 9 41 Monitor soft key You can then press the Barge or Record soft key to barge on the call or start a recording of the call Press Exit to exit this screen without starting a Barge session or recor...

Page 225: ...d on the call state SEND TO VM KEY Send to Voice Mail While your phone is ringing press the Send to VM key The call will be sent directly to your voice mail box and the phone will stop ringing Event Record Key LED Icon Call Control and Desi less Secondary Screen Description On Demand recording Steady Red Indicates that the call is being recorded by On Demand Recording On Demand recording On Hold l...

Page 226: ...en The LED on the Hot Desk key turns off when you exit this screen Note Due to system polling it may take up to 5 minutes before your name and extension are shown on the phone after you log in To log out of your Hot Desk session 1 While you are in a Hot Desk session press the Hot Desk Key You are logged out off the phone and the following screen is shown Figure 9 44 Hot Desking logout successful 2...

Page 227: ...g a Speed Dial key or a Personal or Corporate directory to dial the number is not supported If you use a Speed Dial key or navigate to a Personal or Corporate directory entry it overrides Trunk dialing and the call is placed as a normal outbound call to the configured number DND KEY The DND key can be used to enable and disable Do Not Disturb on your phone If configured for your system it can also...

Page 228: ... off and the DND icon is removed from the call control home screen You will now receive incoming calls on your phone Note When DND is disabled the DT700 may continue to play the stutter dial tone if configured on your system depending on the state of Message Waiting Indicator MWI and Call Forwarding features HANDSE T FORWARDING KEY Note See Handset Forwarding on page 9 180 for information on confi...

Page 229: ...gs Note When Forwarding is disabled the DT700 may continue to play the stutter dial tone if configured on your system depending on the state of Message Waiting Indicator MWI and Call Forwarding features LED Call Control Home Screen and DESI Less Icon State Comments LED is not lit No Icon No Handset Forwarding settings are enabled on the phone Red Immediate Handset Forwarding is enabled While your ...

Page 230: ...D T 7 0 0 M I C R O B R O W S E R A N D E N H A N C E D P R O G R A M M A B L E K E Y S Using Enhanced Programmable Keys 9 212 DT700 Phone User Guide ...

Page 231: ... The Feature key on the telephone is used to program Speed Dial Keys and access the Microbrowser on your phone Figure 10 1 Feature Key Pressing the Feature key opens a screen that lets you enter the programmable mode on your phone or go to the Microbrowser on your phone After you press the Feature key press the Program soft key to enter your phone s programmable mode or press the Home soft key to ...

Page 232: ... press the Line Key to view the caller information To exit the Microbrowser press the Exit key on your phoneset To return to the Microbrowser s home page press the Home softkey CO LOR MICR OB RO WSER NA VIGA TION Navigation of the microbrowser is done with the cursor keys Available cursor options are indicated by the cursor icon Use the forward back soft keys to navigate between the pages in the h...

Page 233: ...ions Exit Exit the microbrowser to the appropriate call status screen Select Select highlighted menu item Hard Key Features Explanation These are the general navigation options from the cursor keys on the phone Depending on the option that is currently selected not all available navigation options are available Available navigation options are shown by the cursor icon on the phone s display screen...

Page 234: ...his opens the Hot Desking Logout screen Forwarding Opens the Handset Call Forwarding screen Recording Start OR Recording Stop Recording Start Opens the Start Recording screen This option only displays if you have a call that is available for recording Recording Stop Opens the Stop Recording screen This option only displays when you have a call that is currently recording Supervise Opens the Superv...

Page 235: ...d for Hot Desking To Login using Hot Desking 1 Press the Feature Key 2 Press the Home soft key or wait 2 seconds to connect to the microbrowser home page 3 Select Hot Desking On Figure 10 6 Hot Desking Login 4 Use the keypad to enter your Extension and Password then click the OK soft key Select Select the highlighted menu item Delete Delete the previous character Exit Exit the Microbrowser and ret...

Page 236: ...em Web Server the Web Server attempts to validate your login and displays a success or failure page Soft Key Features Explanation Delete Deletes previously entered character Back Return to the microbrowser Home page Exit Exit the microbrowser to the appropriate call status screen OK Sends contents of extension and password fields to the Web Server Hard Key Features Explanation Digit key Enter nume...

Page 237: ...s the following events Soft Key Features Explanation Back Return to the microbrowser Home page OK Exit the microbrowser to the appropriate call status screen Hard Key Features Explanation 4 way scroll BACK key Redial key Return to the microbrowser Home page 4 way scroll FORWARD key Directory key No operation 4 way scroll UP key Volume UP Key Remain on existing screen move cursor up 4 way scroll DO...

Page 238: ...Desking session 1 Press the Feature Key 2 Press the Home soft key or wait 2 seconds to connect to the microbrowser home page 3 Select Hot Desking Off Figure 10 10 Hot Desking Logout 4 The phone will log out of your Hot Desking session Figure 10 11 Hot Desking logged out ENTER key Exit the microbrowser to the appropriate call status screen Hard Key Features Explanation ...

Page 239: ... FORWARDING Note Conditional handset forwarding requirements set from the phoneset apply to address based users only 72 73 Handset Forwarding and Handset Forwarding options from the phoneset are not supported for User Centric enabled users User Centric enabled users must use supported 3C system client applications to set forwarding conditions The Handset Call Forwarding pages allow you to set chan...

Page 240: ...warding condition in one forwarding profile will also update the view in all other profiles If the primary address of the phone has any other forwarding conditions the handset forwarding conditions are pre pended to all profiles All forwarding conditions are evaluated by the MGC when processing a call regardless of where they are invoked S E R V I C E C O N D I T I O N S Multiple Handset Forwardin...

Page 241: ...t the microbrowser to the appropriate call status screen Select Select highlighted menu item Hard Key Features Explanation 4 way scroll BACK key Redial key Exit the micro browser to the appropriate call status screen 4 way scroll FORWARD key Directory key Select highlighted menu item 4 way scroll UP key Volume UP Key Move to previous menu item 4 way scroll DOWN key Volume DOWN Key Move to next men...

Page 242: ...arding To set busy forwarding Busy forwarding will forward calls to the destination number when your phone is busy there is a call in progress Figure 10 14 Busy forwarding To set forwarding after 30 seconds Forwarding after 30 seconds will forward the call only after it has rung on your phoneset for 30 seconds Forward after 30 seconds The incoming call will be forwarded to destination s if it is n...

Page 243: ...16 Enter number Hard Key Features Explanation 4 way scroll BACK key Redial key Return to the microbrowser Home page 4 way scroll FORWARD key Directory key Select the highlighted item and proceed to the settings screen to enter phone number s if applicable 4 way scroll UP key Volume UP Key Remain on existing screen move cursor up 4 way scroll DOWN key Volume DOWN Key Remain on existing screen move ...

Page 244: ...digit number If the first digit is not 1 then the first 7 digits are assumed to be a 7 digit number A page displays the success or failure of the operation Soft Key Features Explanation Delete Deletes previously entered character Back Return to the previous screen Exit Exit the microbrowser to the appropriate call status screen OK Sends contents of number field to the Web Server to set handset for...

Page 245: ... to the configured number s Multiple handset forwarding conditions may be enabled for your phone To enter additional numbers hang up the phone and then lift the handset to enter an additional number example 72 forwarding number hang up 72 another forwarding number hang up To set Conditional Handset forwarding No Answer using star codes 1 Lift the handset from the phone Soft Key Features Explanatio...

Page 246: ...et forwarding conditions may be enabled for your phone To enter additional numbers hang up the phone and then lift the handset to enter an additional number example 63 forwarding number hang up 63 another forwarding number hang up To clear Handset Forwarding Conditions Note This clears all handset forwarding conditions that are applied to the phoneset You cannot clear only a subset of the forwardi...

Page 247: ...recording is not enabled for you at the system level any Start Recording requests will fail and an error message is displayed Contact your system administrator if you need call recording enabled STA RT R E CO RD ING CA LL Selecting the Start Recording Call item invokes the Start Recording page This screen handles the following events Exit Exit the microbrowser to the appropriate call status screen...

Page 248: ...Features Explanation 4 way scroll BACK key Redial key Return to the Home page 4 way scroll FORWARD key Directory key No operation 4 way scroll UP key Volume UP Key No operation 4 way scroll DOWN key Volume DOWN Key No operation ENTER key Exit the microbrowser to the appropriate call status screen Soft Key Features Explanation Back Return to the microbrowser home page OK Exit the microbrowser to th...

Page 249: ...hown Calls made to a secondary address are shown as if they were made to the primary address Conference calls cannot be supervised When you select Supervise one of the following occurs If you do not have Supervise privileges the following error is shown Figure 10 19 No Supervise Privileges If you have Supervise privileges the Supervise page from the web server is shown listing the address groups a...

Page 250: ... Hard Key Features Explanation 4 way scroll BACK key Redial key Return to the Home page 4 way scroll FORWARD key Directory key Opens the Address Group detail screen If you do not have Supervise privileges no operation Volume UP Key 4 way scroll UP key Move to previous menu item If you do not have Supervise privileges no operation 4 way scroll DOWN key Volume DOWN Key Move to next menu item If you ...

Page 251: ...y key Set up a monitor call to the selected extension Volume UP Key 4 way scroll UP key Move to previous menu item 4 way scroll DOWN key Volume DOWN Key Move to next menu item ENTER key If no calls are being monitored Set up a monitor call to the selected extension If a call is being monitored Shows the details for the monitored call Off Hook handset If speaker is ON turn speaker OFF move audio to...

Page 252: ...reen Barge Opens the Barge page and starts a Barge session on the call where you can speak to all parties on the call Hard Key Features Explanation 4 way scroll BACK key Redial key Returns to the Select Call screen 4 way scroll FORWARD key Directory key No operation 4 way scroll UP key Volume UP Key No operation 4 way scroll DOWN key Volume DOWN Key No operation ENTER key No operation Off Hook han...

Page 253: ...ot be identical to the call logs maintained by the phone s Call History For example the 3C system may choose to present call logs for all extensions assigned to the terminal Note The Microbrowser only displays the last 32 calls or the last 7 days of calls whichever comes first To view call logs via the Microbrowser 1 Press the Feature key 2 Press the Home soft key or wait 2 seconds to connect to t...

Page 254: ...ces Soft Key Features Explanation d Move to previous menu item does not show if first menu item is selected b Move to next menu item does not show if last menu item is selected Exit Exit the microbrowser and return to the appropriate call screen Dial Dial the highlighted number Hard Key Features Explanation 4 way scroll BACK key Redial key Return to microbrowser home page 4 way scroll FORWARD key ...

Page 255: ...e List Conferences page handles the following events Soft Key Features Explanation d Move to previous menu item b Move to next menu item Details Opens the Conference Bridge details page Exit Exit the microbrowser and return to the appropriate call status screen Hard Key Features Explanation 4 way scroll BACK key Directory key Return to the microbrowser home page 4 way scroll FORWARD key Directory ...

Page 256: ... way scroll DOWN key Volume DOWN Key Move to next menu item ENTER key Opens the Conference Bridge details page Soft Key Features Explanation Refresh Refresh the conference status information Back Return to the previous screen Exit Exit the microbrowser and return to the appropriate call status screen Join Dial the conference bridge address in the title bar and display the call status screen Hard K...

Page 257: ...E C T O R Y Selecting the Search Directory item invokes the following XML page allowing the user to enter a string to search the 3C System Directory Note that the 3C System Directory is different than the Personal Directory maintained by the phone To Search the 3C System Directory 1 Press the Feature key 2 Press the Home softkey or wait 2 seconds to connect to the microbrowser home page 3 Select S...

Page 258: ...h Directory search string can be a name or a number The search string field has focus upon entering this page The keypad is in lower case character entry mode by default when entering the Search Directory page To toggle to numeric entry mode press the key Uppercase character mode is not supported Searches are not case sensitive Table 10 1 Supported search characters Lowercase characters 1 2 3 4 5 ...

Page 259: ... Key Features Explanation Delete Deletes previously entered character Back Return to the Home page Exit Exit the microbrowser to the appropriate call status screen OK Sends contents of search string field to the Web Server Hard Key Features Explanation Digit key Enter digits numeric digits only key Toggles between lower case character and numeric entry modes 4 way scroll BACK key Redial key Remain...

Page 260: ...3C System Directory match the search string an error appears Figure 10 31 No search results The error screen handles the following events 4 way scroll UP key Volume UP Key No operation 4 way scroll DOWN key Volume DOWN Key No operation ENTER key Sends contents of search string field to the Web Server Soft Key Features Explanation Back Return to the previous screen OK Exit the microbrowser and retu...

Page 261: ...l Keys Context Sensitive Enhanced BLF Key Call Call Back Transfer Pickup Monitor Send To Voice Mail Key Park Extension Key DND Key Call Forward Key Call Back Key Shortcut keys to access microbrowser web pages from the 3C System Web Server Hot Desk Login Logoff Record Call Monitor Supervise Call Handset Call Forwarding ENHANCED PROGRAMMABLE KE Y SUP PORT BY P H O N E M O D E L The following table l...

Page 262: ...dules Enhanced Programmable Keys Support DT710 ITL 2E 1 None Partial Supported Programmable Keys Enhanced BLFs Record Call Send to Voice Mail ParkExt Do Not Disturb The following additional Enhanced Programmable Key functions require a display Monitor ITL 6DE None Full DT730 ITL 12D 8LK L Full ITL 24D 8LK L Full ITL 32D 8LK L Factory installed Full ITL 8LDa a On the ITL 8LD the microbrowser utiliz...

Page 263: ...keypad SINGLE PRESS BEHAVIOR To place a call to a member of your workgroup You can use a programmed key to directly place calls to other workgroup members While your phone and the other workgroup member s phone is idle do one of the following To make a hands free or headset call Press the key for the workgroup member you want to call then use your headset or the phone s speaker to continue the cal...

Page 264: ...call to a member of your workgroup You can use a programmed key to place calls to other workgroup members While your phone and the other workgroup member s phone is idle do one of the following To place a hands free or headset call 1 Press the key for the workgroup member you want to call An outbound call is made to the workgroup member 2 Use your headset or the phone s speaker to continue the cal...

Page 265: ...group member to automatically put your current call on hold and pick up the ringing call If you are on a call and want to pick up the ringing call for the workgroup member place your current call on hold and then press the key for the workgroup member to pick up the ringing call To transfer a call to a member of your workgroup 1 While on a call press the key for the workgroup member you want to tr...

Page 266: ... handset then press the Park Extension key to pick up the call from that address MONITOR S UPE RVISE KE Y To Monitor a Call Workgroup scenario If you have Supervise rights over other users you can listen monitor or join barge calls for users you have Supervise rights over The workgroup member s LED on your phone will display stead red to show they are currently on a call 1 Press the key for the wo...

Page 267: ...og on to the phone The following screen is shown 3 Press the OK to exit the screen The LED on the Hot Desk key turns off when you exit this screen Note Due to system polling it may take up to 5 minutes before your name and extension are shown on the phone after you log in Event Record Key LED Icon Call Control Screen Description On Demand recording Steady Red Indicates that the call is being recor...

Page 268: ...k the phone will allow you to dial a number to place a call If the trunk is not available the phone will not enter the dialing state You must wait for the trunk to become available or use another Trunk Dial key to access different trunk You can enter the number using the keypad Note Using a Speed Dial key or a Personal or Corporate directory to dial the number is not supported If you use a Speed D...

Page 269: ...e DND icon is removed from the call control home screen You will now receive incoming calls on your phone Note When DND is disabled the DT700 may continue to play the stutter dial tone if configured on your system depending on the state of Message Waiting Indicator MWI and Call Forwarding features HANDSE T FORWARDING KEY Note See Handset Forwarding on page 10 221 for information on configuring the...

Page 270: ...orwarding settings Note When Forwarding is disabled the DT700 may continue to play the stutter dial tone if configured on your system depending on the state of Message Waiting Indicator MWI and Call Forwarding features LED Call Control Home Screen Comments LED is not lit No Icon No Handset Forwarding settings are enabled on the phone Red Immediate Handset Forwarding is enabled While your phone is ...

Page 271: ...and softkeys to see all available options The following symbols represent the DT700 s directional cursor pad and key pad Note The softkeys are buttons that change function depending on the situation Each softkey s current function is displayed on the LCD screen above the button on the phone Figure 11 1 DT730 ITL 8LD ITL 12D ITL 24D ITL 32D softkeys User actions Keys Digit key Select corresponding ...

Page 272: ... information Most screen examples in this guide are for DT730 phones Figure 11 3 Main Menu Display for ITL 6DE The Up and Down softkeys on the phone indicate to the user when there are more options than displayed on the LCD screen Figure 11 4 Up and Down softkeys on Change or Select Monitor Menu Display for DT710 ITL 6DE Phones THE HELP KEY Note This feature is not available on DT710 ITL 2E model ...

Page 273: ...Down softkeys or the d Up bDown keys on the cursor pad to scroll through the help information if needed Figure 11 7 Delete softkey Help screen 4 Press the Exit softkey to return to the previous screen Note Help screens may not be available for all the softkeys on your phone THE MENU KEY The Menu Key and cursor pad on the DT710 ITL 6DE DT730 ITL 8LD ITL 12D ITL 24D and ITL 32D and DT730G ITL 12CG I...

Page 274: ...appears on the display for 2 seconds before it is changed to an x to allow time to verify the dialed digit Note PIN code masking is not used when entered Speed Dial Keys or Personal Directory entries U S E R P O R T A B I L I T Y A ND T HE C AL L HI S T O RY If User Portability is enabled on your system and you log on to a phone that supports User Portability the phone downloads a copy of your Use...

Page 275: ...elect 2 Call History Figure 11 10 Call History from the Menu key Access Call History using the Cursor Pad 1 Press the Directory key right cursor pad key Figure 11 11 Directory Key on the Cursor Pad 2 Select 2 Call History Figure 11 12 Call History from the Cursor Pad CALL HISTORY AND PERSONAL DIRECTORY ENTRIES When the DT700 receives a call it will search the Personal Directory for the calling par...

Page 276: ...any outside access codes or star hash code information in a Personal Directory number the incoming call display won t recognize the incoming phone number as an exact match to the Personal Directory M I S S E D C A L L S When you have missed any calls the Missed Calls icon and a message display on the LCD Figure 11 14 Missed Calls icon and message To clear the Missed Calls icon and Message To clear...

Page 277: ...splaying the newest entries first If you have a Personal Directory entry matches a number in your Call History the name from the Personal Directory is shown Figure 11 17 Missed Call Information Example 5 Press the Exit softkey to return to the Call History menu After viewing your Call History the View Missed Calls message is removed from the main LCD screen RE C E I V E D C AL L S To view Received...

Page 278: ...formation for the most recent 50 calls displaying the newest entries first For multiple phone calls from the same telephone number the most recent time and date information for that number is shown If you have a Personal Directory entry that matches a number in your Call History the name from the Personal Directory is shown 5 Press the Exit softkey to return to the Call History menu OU TGO I NG PL...

Page 279: ...R OM THE CALL HIST ORY To dial an internal number from the Call History using the handset 1Press the Menu key 2Select 2 Call History 3Select either 1 Missed Calls 2 Received Calls or 3 Placed Calls to view a call history list 4Use the cursor pad or the Up and Down softkeys to scroll to the number you want to call 5To dial the call directly lift the telephone handset or press the Speaker key initia...

Page 280: ...om the Call History The phone dials the telephone number Note To change the options about being prompted to confirm the number before your phone dials external numbers see To edit the Dial Preference on page 4 77 AD D C A L L HI S T O RY I N F O R MA T I O N T O T H E P E R S O N A L DIR E CT OR Y Note For more information on the Personal Directory see The Personal Directory on page 11 270 To add ...

Page 281: ... to 24 characters may be entered for the name Press the Delete softkey to delete the last character entered or press the Cancel softkey to return to the previous screen To switch between first letter uppercase all uppercase all lowercase and numbers for keypad entry press the key on the keypad To add a space to an entry press To enter special characters press the 1 key For a list of special charac...

Page 282: ...y be done on other lines that are internal to your system You cannot monitor external or outside lines Valid options for monitoring are 1 None Do not monitor presence state changes for this Speed Dial Key 2 Visual Presence state is shown visually using the LED on the Speed Dial Key when a Speed Dial is assigned to the entry and a Presence icon is shown in the Personal Directory and on the DESI Les...

Page 283: ...ne of the line is shown by the LED Color Table 11 2 Monitor Presence LED Colors for Speed Dial Keys BLF Idle Ringing SIP Net Ringing 3C system Subscription Failed Online 3C system Phone is Online On the Phone Phone is in use Held 3C system Busy Type Status Programmable Key LED Line Key Registered LED is not lit Unregistered LED is not lit Speed Dial Key No Monitoring Not Available LED is not lit T...

Page 284: ...f the Call History entry is already in your Personal Directory you can edit the entry information For information on editing a Personal Directory entry see Adding or Editing a Personal Directory Entry on page 11 277 Figure 11 29 Confirm Personal Directory Addition 9 Press Enter b on the cursor pad or the OK softkey to return to the Personal Directory or press the Exit key to return to the main pho...

Page 285: ...e network You can still use the phone to delete specific Call History entries or all Call History information To delete a specific entry from the Call History 1 Press the Menu key 2 Select 2 Call History 3 Select either 1 Missed Calls 2 Received Calls or 3 Placed Calls to view a call history list 4 Use the cursor pad or the Up and Down softkeys to scroll to the number you want to delete 5 Press th...

Page 286: ...3 Select 4 Delete Figure 11 33 Delete Call History Information 4 Select either 1 Delete Missed Calls 2 Delete Received Calls or 3 Delete Placed Calls Figure 11 34 Delete Call Options The call information is deleted from the call history 5 Press Enter b on the cursor pad or the OK softkey to return to the Call History menu or press the Exit key to return to the main phone screen Figure 11 35 Call H...

Page 287: ...ry 3 Select 4 Delete Figure 11 37 Delete Calls 4 Select 4 Delete All Calls Figure 11 38 Delete All Call Information Figure 11 39 Calls Deleted All information for the Missed Outgoing and Incoming Call Histories is deleted 5 Press Enter b on the cursor pad or the OK softkey to return to the Call History screen or press the Exit key to return to the main phone screen ...

Page 288: ...tem administrator ACCES SING THE P ERS ONAL DIRECTORY AND ENTRY DETAILS Cursor Pad movement in the Personal Directory When viewing a Directory use the cursor pad for the following movements through the screens To access the Personal Directory 1 Do one of the following Using the Menu Key System Without Corporate Directory a Press the Menu key b Select 1 Personal Directory Using the Menu Key System ...

Page 289: ...thout Corporate Directory a Press the Directory key right cursor pad key Figure 11 41 Directory Key from the Cursor Pad b Select 1 Personal Directory Using the cursor pad System With Corporate Directory a Press the Directory key right cursor pad key Figure 11 42 Directory Key from the Cursor Pad b Select 1 Directory c Select 1 Personal Directory Figure 11 43 Directory Entries Menu Display ...

Page 290: ...e Exit softkey or press the Exit key to return to the main phone screen Figure 11 44 Exit softkey Figure 11 45 Exit Key To view a specific Personal Directory entry 1 While in the Personal Directory scroll to the entry you want to view and do one of the following Press Enter b on the cursor pad Or Press the More softkey twice and then the Detail softkey to view the details for that entry Figure 11 ...

Page 291: ...to the Personal Directory Figure 11 48 Exit softkey Figure 11 49 Exit Key Presence Monitor Settings and the Personal Directory If you have Visual Monitor Settings for an entry in the Directory that also has an assigned Speed Dial the presence Available Busy or Offline of the line is shown in the Directory Table 11 3 Monitor Presence Icons Type Status Icon Line Key Registered Unregistered Speed Dia...

Page 292: ...Incoming Call Name from the Personal Directory Display Note Incoming call information must match the Personal Directory entry s Number information exactly as it is entered in the Personal Directory for it to show up as a match when you receive an incoming call For example if you have any outside access codes or star hash code information in a Personal Directory number the incoming call display won...

Page 293: ...he Search softkey Figure 11 53 Search Menu Display Up to 24 characters may be entered for the name Press the Delete softkey to delete the last character entered or press the Cancel softkey to return to the previous screen To switch between first letter uppercase all uppercase all lowercase and numbers for keypad entry press the key on the keypad To add a space to an entry press To enter special ch...

Page 294: ...pad or the Up and Down softkeys to scroll to scroll to the entry you want to dial 3 Do one of the following To dial the number directly Lift the telephone handset or press the Speaker key or press Enter b on the cursor pad The number will be dialed exactly as it is entered in the Personal Directory If you are dialing an outside number you may need to enter an outside access code before the call ca...

Page 295: ...ctory entry you may need to add the outside access code to the number before it is dialed depending on the configuration of your system Figure 11 58 Dial the number from the Personal Directory The phone dials the telephone number Note To change the dialing preferences for dialing numbers from the Personal Directory see To edit the Dial Preference on page 4 77 AD DIN G OR E DIT IN G A PERS ON AL DI...

Page 296: ...try with the same name and same number as an existing entry Figure 11 59 Directory Duplicate Not Allowed Menu Display To add an entry to the Personal Directory 1 Press the Menu key or cursor pad to access the Personal Directory 2 Press the More softkey and then the Add softkey Figure 11 60 More Soft and Add softkeys 3 Use the telephone keypad to enter the name and press Enter b on the cursor pad o...

Page 297: ...o return to the previous screen 5 6 Use the telephone keypad to enter a Speed Dial number if desired for the entry and press Enter b on the cursor pad or the OK softkey Note For more information on Speed Dial Keys see Speed Dial and Programmable Keys on page 8 124 Speed Dial entries can be internal or external numbers Figure 11 63 Select Speed Dial Number The number of available Sped Dial Keys and...

Page 298: ...ate is shown visually using the LED on the Speed Dial Key when a Speed Dial is assigned to the entry and a Presence icon is shown in the Personal Directory and on the DESI Less display of the ITL08LD phone When a call is ringing on the monitored terminal play a soft ring tone Note Option 3 Visual and Soft Ring is only valid for SIP Net platforms Contact your system administrator to determine if So...

Page 299: ...Offline of the line is shown by the LED Color Table 11 5 Monitor Presence LED Colors for Speed Dial Keys BLF Idle Ringing SIP Net Ringing 3C system Subscription Failed Online 3C system Phone is Online On the Phone Phone is in use Held 3C system Busy Type Status Programmable Key LED Line Key Registered LED is not lit Unregistered LED is not lit Speed Dial Key No Monitoring Not Available LED is not ...

Page 300: ...entry If you want to change any of the information use the cursor pad or the Up and Down softkeys to scroll to that item then press the More softkey and then press the Edit softkey 9 Press the Save softkey to save your changes Figure 11 65 Save softkey 10 Press Enter b on the cursor pad or the OK softkey to return to the Personal Directory or press the Exit key to return to the main phone screen B...

Page 301: ...s an existing entry Figure 11 67 Directory Duplicate Not Allowed Menu Display If the Speed Dial number for a new Personal Directory entry is already used for another entry you will see an error when you try to save the Personal Directory entry Press the OK softkey then select 3 Speed Dial and press the More softkey and then the Edit softkey to edit the Speed Dial number before trying to save the e...

Page 302: ... field you want to edit b Press the More softkey and then the Edit softkey to edit the field Figure 11 70 More and Edit softkeys Use the Cursor Pad a Use the d Up and b Down keys on the Cursor pad to scroll to the field you want to edit b Press Enter b on the cursor pad to edit the field 5 Edit the desired field s 1 Name a To edit the name use the telephone keypad and cursor pad Use the left curso...

Page 303: ...n the DT700 Phone User Guide To move the cursor position in the LCD screen use the right and left cursor pad keys b Press Enter b on the cursor pad or the OK softkey 2 Number a To delete the entire number entry press the Delete softkey Or To edit the entry use the left cursor key on the cursor pad to backspace and then press the Delete softkey to delete the number that is before the cursor Use the...

Page 304: ...ancel softkey to return to the previous screen b Press Enter b on the cursor pad or the OK softkey 4 Monitor Note Monitoring can only be done on other lines that are internal to your system You cannot monitor external or outside lines a If you have a Speed Dial number assigned for this entry or are adding a Speed Dial number for the entry you can select the monitor status you want for the entry Fi...

Page 305: ...s shown in the Directory Table 11 6 Monitor Presence Icons If you have Visual monitor settings for a Speed Dial entry the presence Available Busy or Offline of the line is shown by the LED Color Table 11 7 Monitor Presence LED Colors for Speed Dial Keys Type Status Icon Line Key Registered Unregistered Speed Dial Key No Monitoring Not Available BLF Idle Ringing SIP Net Ringing 3C system Subscripti...

Page 306: ...ote For entries that are set as read only by your system administrator an error is displayed and the entry is not changed Entries are uniquely defined by the combination of number and name For the purpose of uniquely defining an entry the name is case insensitive Multiple entries with the same number and different names are allowed and multiple entries with the same name and different numbers are ...

Page 307: ...ing to save the entry again Figure 11 77 Speed Dial In Use Menu Display Note For more information on Speed Dial Keys see Speed Dial and Programmable Keys on page 8 124 7 A confirmation displays telling you that the entry has been updated Press Enter b on the cursor pad or the OK softkey Figure 11 78 Edit Entry Successful DE LETING A PE RSONAL DIRE CTORY ENTRY Deleting Personal Directory entries wi...

Page 308: ...r Personal Directory and if there is a Speed Dial Key associated with the entry it is also deleted 5 Press Enter b on the cursor pad or the OK softkey to return to the Personal Directory Figure 11 81 Delete Entry Complete Menu Display Note For Personal Directory entries that are set as read only by your system administrator an error is displayed and the entry is not deleted To remove Personal Dire...

Page 309: ... flashes and the Speed Dial information for the key is shown Figure 11 83 Programmable Key LED 3 Press the Edit softkey Figure 11 84 Edit softkey 4 Select the 5 Directory Entry 5 Select 1 Do Not Show in Directory and press the OK softkey Figure 11 85 Remove Directory Entry 6 Press the More softkey then press the Save softkey to save your changes Figure 11 86 Save softkey Figure 11 87 Edit Confirma...

Page 310: ... location or for your entire company depending on the configuration by your system administrator VIEWIN G THE CORP OR ATE DIRECTORY AND ENTRY DETAILS To access the Corporate Directory 1 Do one of the following Using the Menu Key a Press the Menu key b Select 1 Directory c Select 2 Corporate Directory Figure 11 88 Main Menu Display Using the cursor pad a Press the Directory key right cursor pad key...

Page 311: ...l screen 3 Use the Up and Down softkeys or the d Up b Down keys on the cursor pad to scroll through the Corporate Directory search entries 4 Press the Exit softkey or press the Exit key to return to the main phone screen Figure 11 91 Exit Key To dial a number from the Corporate Directory Pres the Dial softkey If you are dialing an external number and the outside access code is not programmed into ...

Page 312: ...rectory If you have Visual Monitor Settings for an entry in the Directory that also has an assigned Speed Dial the presence Available Busy or Offline of the line is shown in the Directory Table 11 8 Monitor Presence Icons Figure 11 93 Presence Icons in the Corporate Directory Type Status Icon Line Key Registered Unregistered Speed Dial Key No Monitoring Not Available BLF Idle Ringing SIP Net Ringi...

Page 313: ...ftkeys that are displayed on your phone 1 Press the Help key Figure 12 1 Help key 2 Press the softkey for which you want to see Help information Figure 12 2 Press a softkey for Additional Help 3 You can use the Up and Down softkeys or the d Up bDown keys on the cursor pad to scroll through the help information if needed Figure 12 3 Delete softkey Help screen ...

Page 314: ...etwork for loose connections Try using another network cable to connect your phone to the network 3 Contact your system administrator to verify that there are no problems with your local network If you are having problems with your computer network it may impact the function of your phone 4 If you cannot make outside calls contact your system administrator to verify that there is not a problem wit...

Page 315: ...your phone and you cannot get a dial tone on your phone there may be a problem with the phone s connection to the network Figure 12 8 Searching for DHCP server Figure 12 9 Unregistered Phone icon The Unregistered phone icon indicates that the phone has not successfully connected to the network It is normal to see this icon momentarily after your phone resets while the phone reconfigures its connec...

Page 316: ... the administrative settings on your phone For information on doing a Data Clear of the Terminal Data see the DT700 Administrator Guide Note A Data Clear of the Terminal data resets ALL administrative settings but does not delete any Personal Directory or Speed Dial information that the user has entered on their phone I cannot connect to the network through the PC port on the back of the phone 1 V...

Page 317: ...does not power up Power supply 1 Verify that the power supply is firmly plugged into the AC outlet If possible try plugging the power supply into another AC outlet 2 The problem may be with the power cord Try a new power cord 3 If possible try plugging the phone into a PoE jack on your network 4 If you are still having problems with your phone contact your system administrator C A L L I N G If you...

Page 318: ... Contact your system administrator 3 Restart the phone a Press the Menu key b Select 5 Reboot c Press the OK softkey or b Enter key on the cursor pad to restart the phone Note If you cannot restart the phone using the Menus unplug the phone from power and the network for ten seconds then reconnect the telephone to your network and power to perform a restart 4 If you are still having problems with ...

Page 319: ... numbers before they are dialed If you are trying to dial from the Call History and numbers require an outside access code you may want to set your Dial Preferences so you can edit numbers before they are dialed If you only use Personal Directory entries that are programmed with the outside access code you can set your phone so you do not need to confirm when a number is dialed 1 Press the Menu ke...

Page 320: ...DND softkey To disable DND press the DND softkey You should also any desktop application for your phone if available to verify that DND is not enabled through the application To disable DND using star codes dial 79 from the phone 4 Restart the phone a Press the Menu key b Select 5 Reboot c Press the OK softkey or b Enter key on the cursor pad to restart the phone Note If you cannot restart the pho...

Page 321: ...tor 3 Restart the phone a Press the Menu key b Select 5 Reboot c Press the OK softkey or b Enter key on the cursor pad to restart the phone Note If you cannot restart the phone using the Menus unplug the phone from power and the network for ten seconds then reconnect the telephone to your network and power to perform a restart I want to enter specific characters or letters in Speed Dials and Perso...

Page 322: ...or pad to restart the phone Note If you cannot restart the phone using the Menus unplug the phone from power and the network for ten seconds then reconnect the telephone to your network and power to perform a restart 4 If you are still having problems with your phone contact your system administrator I cannot see a particular softkey on my phone 1 If the More softkey appears on the LCD press the s...

Page 323: ...DISPLAY The LCD is too light or dark Press the Menu key and select 3 User Settings 4 LCD Settings 1 LCD Contrast then use the softkeys to adjust the LCD contrast I want to adjust the time the LCD stays lit You can adjust the timeout of the LCD backlight on your phone You can specify a value between 0 None to 255 seconds 1 Press the Menu key 2 Select 3 User Settings 3 Select 5 LCD Settings Figure 1...

Page 324: ...ation of your system 1 Press the Menu key 2 Select 3 User Settings 3 Select 3 Language Figure 12 21 Select Language options 4 Select the desired language and press Enter b on the cursor pad or the OK softkey to accept the setting The new menu screens will now display in the language you have selected You do not need to restart the phone to change the language You can also press the Cancel softkey ...

Page 325: ...ck on the back of the telephone Figure 12 22 Handset Connection 2 Make sure the switch hook is working correctly when you lift the headset 3 Make sure the Speaker key on the telephone is not on The LED on the Speaker key is green when the Speaker is active When the Speaker is active there is no audio to your telephone handset Figure 12 23 Speaker is on 4 Make sure you do not have a headset enabled...

Page 326: ... Headset softkey verify that the Headset is enabled for your phone a Press the Menu key b Select 3 User Settings c Select 3 Headset d Select 1 Enable Disable e Select 2 Enable and press the OK softkey or b Enter key on the cursor pad 5 Try the telephone handset to verify if the problem is with the headset If you can hear audio through the telephone handset try another known working headset with th...

Page 327: ...le A 1 Commonly used terms in the UNIVERGE 3C documentation Product Name Hereinafter referred to as UNIVERGE 3C Administrator application 3C Administrator application software application 3C Administrator feature permissions setting Other aspects of the 3C management 3C Call Recording 3C Console 3C Database 3C Media Server Sphericall Services Windows services 3C system administrator person managin...

Page 328: ... 6DE DT730 ITL 8LD ITL 12D ITL 24D ITL 32D and DT730G ITL 12DG ITL 12CG phones 1 When a new call arrives press the Pickup softkey Figure A 1 Pickup softkey 2 Depending on the type of call you want to pick up do one of the following To answer a call ringing on a specific extension a Press the Extn softkey UNIVERGE 3C Voice Mail 3C Voice Mail UNIVERGE UNIVERGE 3C Web Administration application UNIVE...

Page 329: ...to pick up Figure A 3 Enter extension c Press the Pickup softkey d You will connect to the call To answer a call from a Pickup Zone a Press the Zone softkey Figure A 4 Zone softkey b Enter the zone number from which you want to pick up the call Figure A 5 Enter Zone number c Press the Pickup softkey d You will connect to the call ...

Page 330: ... a You will return to the main display screen The call displays as being connected to the picked up calling party of the ringing extension 3C VOICE MAIL DT710 ITL 2E phone 1 Press the Message key on your phone Figure A 8 Message key 2 When prompted enter your extension followed by the key 3 When prompted enter your password followed by the key DT710 ITL 6DE DT730 ITL 8LD ITL 12D ITL 24D ITL 32D an...

Page 331: ...mmands to set features and perform functions from any telephone Note Not all star codes may be enabled for your system or your model of DT700 phone Table A 2 System Star Code Commands Action Analog Star Code SIP Star Code Explanation Blind Transfer FLASH 96 extension Hold 96 extension dial Completes a blind transfer to another extension Note A confirmation tone will sound after applying this star ...

Page 332: ...ion remains active until the star code is deactivated Conditional Handset Forwarding Busy 63 number 63 number Incoming calls are forwarded to another extension when a call is already in progress Note Supported SIP phones may play an audible indication that this star code is active Depending on the system configuration this indication remains active until the star code is deactivated Cancel Call Wa...

Page 333: ...dded and enabled Only a single handset entered forwarding number is entered at a time Calls may be forwarded to multiple numbers example 72 extension hang up 72 another extension hang up Note A confirmation tone will sound after applying this star code command Note Calls can be forwarded to one or more internal addresses or one or more external addresses Note User centric users cannot use this sta...

Page 334: ...ll detail record 75 Password client assigned account code 75 Password client assigned account code The phone system sends call detail information to the call detail record Note Codes are custom assigned by the 3C system administrator Intercom from non intercom phone to intercom enabled phone 76 extension 76 extension Callers without intercom can enter this star code to intercom a phone equipped wi...

Page 335: ...n If used during a conference call the last caller who was added to the conference is dropped from that conference call Note A confirmation tone will sound after applying this star code command Note Only available with specific phones Ask your system administrator Pickup 93 extension 93 extension Retrieves a ringing call or an on hold call at the entered extension Group Pickup 92 92 Retrieves a ri...

Page 336: ...3 C S Y S T E M F E A T U R E S A 318 DT700 Phone User Guide ...

Page 337: ...ion and Status Monitoring can be done for the following functions Follow me Automatic Ring Back Call Forwarding on Busy Extension Night Extension absence presence Executive Secretary absence presence Group absence presence Don t disturb Call Pickup Pressing the key activates the function The corresponding LED is switched ON Pressing the key once more de activates the function The LED is switched O...

Page 338: ...ave Figure B 1 Message Waiting icon The SIP Net system can send a count of messages waiting if the voice mail system it is connected to supports message counts DE SK SHARING AND USE R P ORTABILITY When Desk Sharing is enabled for users on the system they can log on to any terminal that is enabled for Desk Sharing and their User Profile settings are applied to the phone To log on to a Desk Sharing ...

Page 339: ...ld dial 911234 2 After the Confirmation Tone is given end the call You should now be logged off to the terminal and the terminal should display the default terminal name and number All User Settings Personal Directory Speed Dial key settings and Call History information should return to the values for the phoneset terminal User Settings Personal Directory Call History Ringtone settings Headset set...

Page 340: ...S I P N E T S Y S T E M F E A T U R E S B 322 DT700 Phone User Guide ...

Page 341: ...pports the charging function The other USB functions are not supported Note There may cases where a USB Device does not charge even if it meets the specifications described in this manual Figure C 1 USB Port Location To Connect a USB Device Note Before connecting USB Devices connect the terminal to the system 1 Lift the USB Port Cover Figure C 2 Open USB Port Back of phone USB Port ...

Page 342: ...e inserting the plug with the correct orientation and push the USB connector into the port until it stops 3 The USB Device is now connected Figure C 4 Connected USB Device To Remove a USB Device The USB device does not need to be un mounted from the phone since the USB Port only supports the charging function Disconnect the USB connector from the phone ...

Page 343: ...ort Cover can be removed 1 Open the USB Port Cover Figure C 5 Open USB Port 2 Lift up the USB Port Cover and pull it while sliding it to the left Figure C 6 Remove USB Port cover Note Do not pull the cover upward If the USB Port Cover is pulled upward the cover may rip apart from the connector ...

Page 344: ...he USB Device and reset the terminal according to the following procedure To restart USB Port Power Supply For PoE Terminals Disconnect and then and reconnect the LAN cable from the back of the phone Note When the LAN cable is reconnected verify that the cable is connected to the LAN port and not the PC port Feature Icon Description Black and White Color USB Port Drain Note This feature is only av...

Page 345: ... from the back of the phone 2 Disconnect the AC adapter cable from the back of the phone 3 Reconnect the LAN cable to the back of the phone Note When the LAN cable is reconnected verify that the cable is connected to the LAN port and not the PC port 4 Reconnect the AC adapter cable to the back of the phone ...

Page 346: ...D T 7 3 0 G U S B P O R T C 328 DT700 Phone User Guide ...

Page 347: ... ITL 6DE models of phones do not have a headset jack therefore they do not support headset connections Supported Headsets EHS Adapter Using the Jabra LINK 14201 31 EHS Adapter you can connect one of the following Jabra headset to a supported phone Jabra PRO 9XXX series Jabra GO 6XXX JABRA HEADSET SUPPORTED F EATURES The following features are supported using the headset Headset audio stream contro...

Page 348: ...single phone for a Jabra Bluetooth headset at the phoneset device 1 Press the Menu key 2 Select 4 Admin Settings 3 Use the keypad and cursor key to enter the User Name and Password to access the Admin menu 4 Select 3 Maintenance 5 Select 4 Side 2 Connector Mode Figure D 1 Side 2 Connector Mode 6 Select 3 Jabra Headset Kit Figure D 2 Enable Jabra Headset 7 Press the OK softkey 8 Press the Exit soft...

Page 349: ...or for the Jabra Headset Kit The Side 2 connector on all phones in your network will be enabled for the Jabra Headset Kit Headset Base Station Setup Follow the manufacturer s instructions for assembling your headset and base station Do not connect the power adapter to the headset base station yet If you have already connected the power adapter unplug it from the wall outlet and the headset base st...

Page 350: ...setting To set external headset ringing Optional You can set your phone to ring only through your external headset The phone will not ring from the telephone speaker when you have it set to ring to the headset Note Hold reminder tone soft ring ringer volume and preview of the User Adjustable Ringtones on selection may not be supported by the headset They are only played on the DT700 speaker when H...

Page 351: ...adset To enable ringing on the headset and the phoneset select 3 Phone and Headset Figure D 8 Enable Headset ringing 6 Press Enter b on the cursor pad or the OK softkey to accept the setting You can also press the Cancel softkey to exit without making any changes Note The setting defaults to 1 Phone Connect Phone to Headset Base Station 1 Press the tab on the port cover on the left side of the bac...

Page 352: ...et D 334 DT700 Phone User Guide Figure D 9 Remove SIDE 2 port cover 2 Attach the cover of the Jabra EHS Adapter to the back of the phone Figure D 10 Attach Jabra EHS Adapter cover 3 Connect the 10 pin connector of the Jabra EHS Adapter to the SIDE 2 port on the back of the phone Side port cover ...

Page 353: ...E S Jabra Headset DT700 Phone User Guide D 335 Figure D 11 Connect Jabra EHS Adapter to Side 2 Connector 4 Close the cover the back of your phone Figure D 12 Close cover 5 Connect the network cable end of the Jabra EHS Adapter to the AUX port on the back of the headset base station ...

Page 354: ...ide Figure D 13 Jabra EHS Adapter connection to Side 2 Connector port and Jabra headset base station AUX port 6 Insert the telephone cable plug into the HEADSET port on the back of the phone until you hear a click 7 Connect the other end of the telephone cable to the Telephone port on the back of the headset base station ...

Page 355: ... perform a restart 9 Connect the power adapter to the handset base station in accordance with the manufacturer instructions then run the desk phone setup wizard Settings Advanced Setup Desk Phone on the headset base station a When prompted to connect to a desk phone select Yes We recommend using the Guided setup a If prompted about equipment for Remote Call Control select Yes b If prompted select ...

Page 356: ...base of your wireless headset See the documentation for your headset for more information To adjust the call volume headset Press the d Up b Down key on the Cursor pad during call operation You must press the dUp b Down key multiple times and cannot press and hold to adjust the volume Figure D 16 Adjust Headset call volume In addition to the call volume setting on your phone you may also need to a...

Page 357: ...Select 1 Headset d Select 1 Enable Disable e Select 2 Enable f Press Enter b on the cursor pad or the OK softkey to accept the setting Contact your system administrator to verify that the Side 2 Connector is enabled on your phone The headset is not working correctly Make sure the headset base is receiving power Verify the headset is charged On a Call Terminate a Call Multifunction button Tap Once ...

Page 358: ...ake sure that the phone has an active connection to the phone network i e its handset is off the hook or its headset button is pressed Re run the desk phone set up wizard Settings Advanced Setup Desk Phone Make sure you select IQ for the adapter type After enabling phones for the Jabra Headset Kit some phones can no longer use their expandable Key Kits on their phones The DCL 60 Line Key Module mo...

Page 359: ...ibution Conditions Redistribution and use in source and binary forms with or without modification are permitted provided that the following conditions are met 1 Redistributions of source code must retain the above copyright notice this list of conditions and the following disclaimer 2 Redistributions in binary form must reproduce the above copyright notice this list of conditions and the following...

Page 360: ... Copyright 2001 2005 Cisco Systems Inc All rights reserved libSRTP Redistribution Conditions Redistribution and use in source and binary forms with or without modification are permitted provided that the following conditions are met Redistributions of source code must retain the above copyright notice this list of conditions and the following disclaimer Redistributions in binary form must reproduc...

Page 361: ...AGES INCLUDING BUT NOT LIMITED TO PROCUREMENT OF SUBSTITUTE GOODS OR SERVICES LOSS OF USE DATA OR PROFITS OR BUSINESS INTERRUPTION HOWEVER CAUSED AND ON ANY THEORY OF LIABILITY WHETHER IN CONTRACT STRICT LIABILITY OR TORT INCLUDING NEGLIGENCE OR OTHERWISE ARISING IN ANY WAY OUT OF THE USE OF THIS SOFTWARE EVEN IF ADVISED OF THE POSSIBILITY OF SUCH DAMAGE XML PARSER XML c implementation file for ba...

Page 362: ...2 1 Annex C licensed from Polycom NOTICE TO THE USER The terminal described in this manual is intended to be connected to a wired 10 100 Base T local area network LAN by means of the cable that comes with the product To take advantage of all features of this terminal connection to a system supporting the 3C system or SIP Net from NEC is recommended For an overview of the supported features refer t...

Page 363: ...h the product After network power has been applied the terminal will start operating POWER CONSUMPTION Table E 1 DT710 Minimum Maximum Power Consumption Table E 2 DT730 Minimum Maximum Power Consumption Table E 3 DT730G Minimum Maximum Power Consumption by available options Phone Model DT710 ITL 2E ITL 6DE Power Consumption Min to Max with options installed 0 40W 3 84W 0 40W 3 84W Phone Model DT73...

Page 364: ...htlinie 1999 5 EG befindet http www nec unified com doc EESTI Käesolevaga kinnitab NEC Unified Solutions seadme DT700 vastavust direktiivi 1999 5 EÜ põhinõuetele ja nimetatud direktiivist tulenevatele teistele asjakohastele sätetele http www nec unified com doc EN GLISH Hereby NEC Unified Solutions declares that this DT700 is in compliance with the essential requirements and other relevant provisi...

Page 365: ...r šo NEC Unified Solutions deklarē ka DT700 atbilst Direktīvas 1999 5 EK būtiskajām prasībām un citiem ar to saistītajiem noteikumiem http www nec unified com doc L I E T U V IŲ Šiuo NEC Unified Solutions deklaruoja kad šis DT700 atitinka esminius reikalavimus ir kitas 1999 5 EB Direktyvos nuostatas http www nec unified com doc MAL TI Hawnhekk NEC Unified Solutions jiddikjara li dan DT700 jikkonfo...

Page 366: ...fied com doc SLOVENSKO NEC Unified Solutions izjavlja da je ta DT700 v skladu z bistvenimi zahtevami in ostalimi relevantnimi določili direktive 1999 5 ES http www nec unified com doc SLOVENSKY NEC Unified Solutions týmto vyhlasuje že DT700 spĺňa základné požiadavky a všetky príslušné ustanovenia Smernice 1999 5 ES http www nec unified com doc SU OM I NEC Unified Solutions vakuuttaa täten että DT7...

Page 367: ... recycling In case your electrical and electronic products need to be disposed of please refer to your supplier or the contractual agreements that your company has made upon acquisition of these products At www nec unified com weee you can find information about separate disposal and environmentally sound recycling F O R C O U N T R I E S O U T S ID E T H E E U R O P E A N U N I O N Disposal of el...

Page 368: ...n und NEC Unified Solutions wenden Sie sich bitte an lokale Behörden für weitere Informationen PRODUKT BORTSKAFFEL SES INFORMAT ION DA F O R L A ND E I D E N E U R O P Æ I S K E U N IO N Det her viste symbol er anbragt på produktet for at informere om at affald af elektrisk og elektronisk udstyr ikke må bortskaffes sammen med usorteret kommunalt affald Elektrisk og elektronisk udstyr inklusive kab...

Page 369: ...ene la dispersión de sustancias no deseadas en la cadena de reciclaje municipal lo cual contribuye a la protección de la salud humana y del medio ambiente Le informamos que la eliminación de residuos de productos eléctricos o electrónicos a través del sistema municipal de recogida de basuras puede acarrear multas Para poder facilitar la recolección de residuos y su posterior reciclaje se ha llegad...

Page 370: ...le et le recyclage Dans le cas où vos produits électriques et électroniques doivent être enlevés vous êtes priés de consulter votre fournisseur ou le contrat relatif à l acquisition de ces produits Vous pourrez trouver des informations quant au tri sélectif et au recyclage sur www nec unified com weee POU R LES PA YS E N DE HORS DE LA CO MMUNAUTÉ EUROPÉENNE L enlèvement des déchets électriques et ...

Page 371: ...ktrische en elektronische producten niet bij het huisvuil mag terechtkomen Elektrische en elektronische producten inclusief de aansluitkabels stekkers en accessoires moeten apart worden ingezameld zodat dit afval op een verantwoorde manier kan worden verwerkt Deze producten moeten worden ingeleverd bij speciale inzamelpunten waar milieu verantwoorde recycle technieken worden toegepast Aparte inzam...

Page 372: ...uisição desses produtos Em www nec unified com weee pode encontrar informação sobre eliminação selectiva e reciclagem ambiental P A R A P A Í S E S F O R A D A U N I Ã O E U R O P E I A A eliminação de produtos eléctricos e electrónicos em países fora da união europeia deve ser feita de acordo com as normas locais Caso não exista um acordo com o seu fornecedor por favor contacte as autoridades loc...

Page 373: ...kan du hitta information om sopsortering och miljövänliga återvinningsåtgärder F Ö R L Ä ND E R U T A NF Ö R D E N E U RO P E IS K A U N I O NE N Avfallshantering av elektriska och elektroniska produkter i länder utanför den Europeiska Unionen skall ske i enlighet med de lokala föreskrifterna Om inget avtal är tecknat med den egna leverantören vänligen kontakta den lokala myndigheten för vidare in...

Page 374: ...N O T I C E S WEEE Product Disposal Information E 356 DT700 Phone User Guide ...

Page 375: ...61 from Cursor pad 11 257 from Menu Key 11 257 Incoming Received Calls 11 259 Outgoing Placed Calls 11 260 troubleshooting 12 306 Call Indicator Lamp ITL 2E 2 25 ITL 6DE 2 23 ITL 12CG 2 8 ITL 12D 2 19 ITL 12DG 2 12 ITL 24CG 2 6 ITL 24D 2 17 ITL 24DG 2 10 ITL 32D 2 15 ITL 8LD 2 21 Call Pickup A 310 ITL 2E A 310 Pickup Group A 312 Pickup Zone A 311 specific extension A 310 Call Recording icon 2 30 C...

Page 376: ...layout and parts 2 8 2 12 2 18 ITL 24D layout and parts 2 10 2 16 ITL 32D layout and parts 2 14 ITL 8LD layout and parts 2 20 E edit Personal Directory entry 11 283 Speed Dial Key 8 159 EndCall softkey 2 34 7 106 ending calls 7 106 Enter Key 2 26 Exit Key 2 35 Exit key ITL 6DE 2 23 ITL 12CG 2 8 ITL 12D 2 19 ITL 12DG 2 12 ITL 24CG 2 6 ITL 24D 2 17 ITL 24DG 2 10 ITL 32D 2 15 ITL 8LD 2 21 Exit softke...

Page 377: ...eys and parts 2 12 to 2 13 ITL 24CG keys and parts to 2 7 ITL 24D features 2 4 2 5 keys and parts 2 16 to 2 18 layout 2 10 2 16 Speed Dial Key Numbering 8 129 ITL 24DG keys and parts 2 10 to 2 11 ITL 32D features 2 4 keys and parts 2 14 to 2 16 layout 2 14 ITL 8LD DESI Less Display 5 90 features 2 4 keys and parts 2 20 to 2 22 layout 2 20 Speed Dial Key Numbering 5 94 8 129 8 130 J Jabra Bluetooth...

Page 378: ...ging 4 61 viewing 4 82 Pickup A 310 ITL 2E A 310 softkey 2 34 A 310 Pickup Group A 312 Pickup Zone A 311 Placed Calls 11 260 add to Personal Directory 11 262 delete 11 268 dialing 11 261 Placing Calls 7 104 power supply AC adapter 3 47 12 298 E 344 IEEE802 3af 3 47 E 345 presence monitoring Personal Directory 8 138 8 143 8 147 8 152 8 162 11 264 11 273 11 280 11 287 11 294 Speed Dial Keys 8 130 8 ...

Page 379: ...e call 7 113 transferred call 7 118 Split softkey 7 114 Star Code Commands 3C System A 313 Supported Key Kit types 2 37 T Telephone set star codes A 313 Terminal Information 4 83 Tilt Leg 3 43 lower 3 44 raise 3 43 remove 3 44 Time Format 4 72 4 73 timeout backlight 4 75 Transfer icon 2 29 transfer attended 7 115 blind 7 116 shuttle 7 117 split 7 118 unattended 7 117 Transfer key ITL 2E 2 25 ITL 6...

Page 380: ...e call handset 4 63 headset 4 63 D 338 speaker 4 64 call icon 2 31 handset ringing icon 2 31 headset icon 2 31 ringing headset 4 62 4 63 D 338 soft ring icon 2 31 speaker icon 2 31 W Wall Mounting 3 52 clearance requirements 3 53 WEEE E 349 to E 355 ...

Page 381: ......

Page 382: ......

Reviews: