background image

Making Copies


2.2. Setting The Original Document 

2.2.1. Using the Automatic Document Feeder(ADF) 

The Automatic Document Feeder feeds originals placed into the Document Feed Tray. 

Please follow the instructions provided when using this device. Failure to follow these 

instructions may cause a misfeed or other complications. 


Originals should meet these specifications: 

Type of Paper: Plain paper (50-110 g/m2) 
Paper Size:   A4-A5, Legal L - Half Letter L 


Originals that are not compatible with the Automatic Document Feeder: 


Typing paper, paraffin paper and other thin paper types 


Thick paper 


Sizes that are larger than Legal L or smaller than Half Letter L 


OHP transparencies, tracing paper or other transparent paper types 


Wrinkled, folded, curled or tome originals 


Originals that are stapled or are attached with paper clips 


Carbon paper or paper with coated surfaces 


To produce copies from an original document described above, place it on the 

Original Glass.  P 2-5  


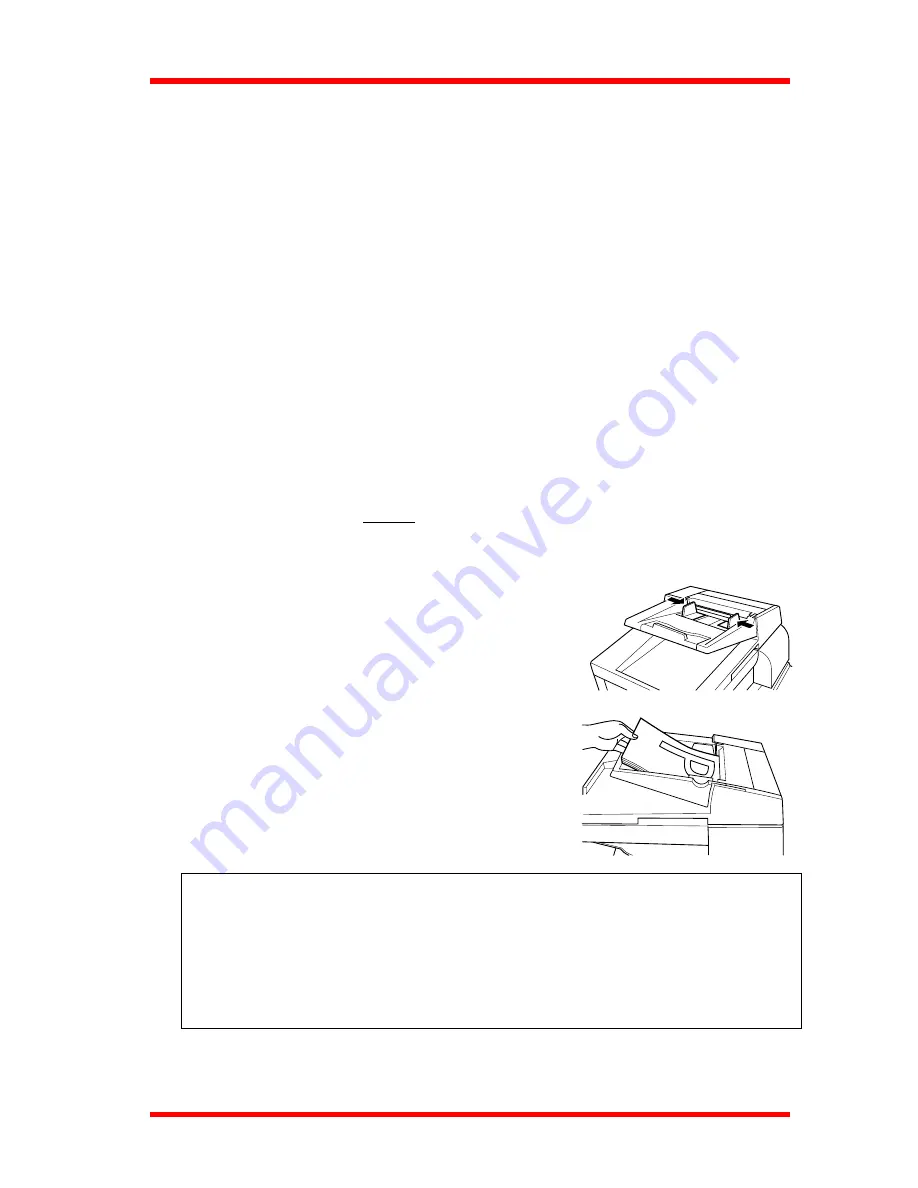
How to using the Automatic Document Feeder 

1. Adjust the Document Guide Plates to the size of the 

document. 


2. Set the document so that the side that you wish to 

copy is facing up. 


NOTE: 

• 

The maximum number of originals that can be loaded is 50 pages. 

• 

Make sure that the top level of the stack does not exceed the 

 mark. 

• 

Be sure to place the original document as shown in the diagram (step 2).  

• 

Adjust the Document Guide Plates so that they make contact with the sides of 

the stack. The stack may not feed properly if the Document Guide Plates do 
not secure the stack in place. 


2-4

Summary of Contents for NEFAX 805

Page 1: ...FACSIMAL OPERATION MANUAL ...

Page 2: ...NEC FACSIMILE OPERATION MANUAL ...

Page 3: ...y Efficiency For Users In Other Countries This machine meets the EPA s Energy Star Guidelines for Energy Efficiency The U S Environmental Protection Agency What is an Energy Star Machine Energy Star Machines have a feature that allows them to automatically turn off or go to sleep after a period of inactivity ensuring night and weekend shut off I ...

Page 4: ...t of Health and Human Services DHHS Radiation Performance Standard according to the Food Drug and Cosmetic Act of 1990 This means that the FAX does not produce hazardous laser radiation CDRH Regulations The Center for Devices and Radiological Health CDRH of the U S Food and Drug Administration implemented regulations for laser products on August 2 1976 Compliance is mandatory for products marketed...

Page 5: ...ian for help This device must be used with shielded interface cables The use of non shielded cables is likely to result in interference with radio communications and is prohibited under FCC rules The design and production of this unit conforms to FCC regulations and any changes or modifications must be registered with the FCC and are subject to FCC control Any changes made by the purchaser or user...

Page 6: ...s is subject to state tariffs Contact your state public utility commission or corporation commission for information CUSTOMER INFORMATION FOR PRIVATELY OWNED COIN PHONES To comply with state tariffs the telephone company must be given notification prior to connection In some states prior approval of connection must be obtained from the state Public Utility Commission Public Service Commission or s...

Page 7: ...elephone extension cord The customer should be aware that compliance with the above conditions may not prevent degradation of service in some situations Repairs to certified equipment should be made by an authorized Canadian maintenance facility designated by the supplier Any repairs or alterations made by the user to this equipment or equipment malfunctions may give the telecommunications company...

Page 8: ...ing Your Fax Number User Fax Number 1 20 1 4 2 3 Setting Your Name User Name 1 21 1 5 Connecting to the Telephone Line 1 22 1 6 Connect to Private Branch Exchange PBX 1 24 2 Making Copies 2 1 2 1 How to Copy Documents basic 2 1 2 2 Setting The Original Document 2 4 2 2 1 Using the Automatic Document Feeder ADF 2 4 2 2 2 Using the Plate Scanning 2 5 2 3 Selecting Paper Tray 2 6 2 3 1 Overview of th...

Page 9: ...3 2 3 1 Receiving a Document in the Fax Mode Auto RX Mode 3 22 3 2 3 2 Receiving a Document in the Tel Mode Manual RX Mode 3 22 3 3 How to Use Your Fax as a Telephone Set 3 23 3 3 1 Making a Telephone Call 3 23 3 3 2 Receiving a Telephone Call 3 23 4 Basic FAX Operation 2 4 1 4 1 Transmitting a Document Using Memory Memory TX 4 1 4 2 Retrying the Same Destination Redial TX 4 2 4 3 Verifying Audibl...

Page 10: ... 6 3 Setting of TX Operations 6 19 6 3 1 Closed Network TX 6 19 6 3 2 Header 6 20 6 4 Setting of RX Operations 6 21 6 4 1 Memory RX Mode 6 21 6 4 1 1 Programming for Memory RX Mode 6 21 6 4 1 2 Printing the Document Received by Memory RX Mode 6 23 6 4 1 3 Memory Substitution Reception 6 23 6 4 2 Two Page Print 6 24 6 4 3 Closed Network RX 6 25 6 4 4 Footer 6 26 7 Using the Enhanced Utilities 2 7 1...

Page 11: ...ting 7 21 7 5 1 Setting LINE MONITOR 7 21 8 Using the Confirm Utilities 8 1 8 1 TX RX RESULT 8 1 8 2 MACHINE COUNTER 8 2 8 3 PRINT REPORT 8 4 9 Printing Reports 9 1 9 1 About the Reports 9 1 9 1 1 One Touch List 9 2 9 1 2 Speed Dial List 9 3 9 1 3 Key Setting List 9 4 9 1 4 Machine Status List 9 5 9 1 5 TX Result Report 9 7 9 1 6 RX Result Report 9 9 9 1 7 Activity Report 9 11 9 1 8 Reservation Re...

Page 12: ...e the imaging cartridge 11 6 11 5 How to replenish the paper trays 11 8 11 5 1 For Paper Tray TRAY 1 11 8 11 5 2 For Paper Feed Unit TRAY 2 11 10 11 6 Clearing paper misfeeds 11 11 11 6 1 Paper Tray misfeed 11 11 11 6 2 Paper Feed Unit misfeed 11 12 11 6 3 Separator Jam Fuser Jam 11 13 11 6 4 Original Document Jam 11 16 11 7 When PAPER SIZE ERROR occurs 11 17 11 8 How to reset the machine 11 19 12...

Page 13: ...Chapter 1 First Things to Know About Your Machine ...

Page 14: ...F position during communication 1 1 1 Turning the Machine power ON Press the power switch to the ON position Power switch turn to When the machine is turned ON the message PLEASE WAIT appears on the Message Display The machine is ready for transmitting or receiving documents now Half Tone Resolution Super Fine Standard Auto RX Memory TX Confirm PC Utility Error Fine Sort 2in1 Paper Yes Zoom Delete...

Page 15: ...the Power Save mode or turn the mode OFF through the Utility key 1 1 2 Turning the Machine Power OFF 1 Check that the memory volume display on the Message Display shows 100 If the percentage shown is less than 100 it means that there are documents stored in memory which have not been transmitted In this case perform the following steps to retain these documents When the memory contains a document ...

Page 16: ... W X 24 14 N E O 15 F Y 25 Z 26 P 16 G Q 17 H Photo Sort Auto RX N1 WXYZ Panel Reset Yes No 09 27 R 18 I Zoom Space Delete C 0 Start Stop PQRS GHI 4 7 1 6 5 OPER 8 9 TUV 2 JKL 3 ABC Fax Copy MNO DEF Speed Dial Funtion Phone Book Pause Redial Book TX Speaker Auto 2I 2in1 7 9 4 6 5 3 2 1 27 28 29 26 25 24 23 19 20 22 21 16 18 15 17 12 11 14 10 13 8 Key Functions 1 Start key Start copying Start trans...

Page 17: ...er or character Others Depend on LCD message 8 No Clear key Clear inputted number or character Back to the previous display Others Depend on LCD message 9 Copy Fax Switching key Switch to Fax screen from Copy screen Switch to Copy screen from Fax screen 10 Zoom key Enter setting zoom ratio with numeric keys Select the fixed zoom ratio 11 Paper key Select paper source 12 Auto Photo key Switch 3 den...

Page 18: ...ransmission 20 Memory TX key Switch memory TX ADF TX 21 Utility key Set machine status initial setting for copy Fax operations and register dials 22 Confirm key Display communication result Display machine counter Print report 23 One touch keys One touch dial 01 27 Group dial 01 27 Program dial 24 27 Input character and symbol in registration of name Input in registration dial number 24 Speed Dial...

Page 19: ...nd Speed Dial For details on entering names follow the procedure for each registration method Initial user Data P 1 18 One Touch Dial P 6 5 WXYZ 9 PQRS 7 7 OPER 0 TUV 8 MNO 6 JKL 5 GHI 4 DEF 3 ABC 2 1 Speed Dial P 6 5 2 One Touch Keys The One Touch keys have the following two functions 1 One Touch Dial function Press the key to dial the registered destination and start transmitting the document 1 ...

Page 20: ...ey 27 as many times to display the desired symbols x N times 27 N Symbol N Symbol N Symbol N Symbol 1 7 13 19 2 8 14 20 3 9 15 21 4 10 16 22 5 11 17 23 6 12 18 24 When the desired symbol appear press the key to input this symbol EUROPEAN SYMBOLS Press the 4 key as many times to display the European symbols x N times 7 N symbol N symbol N symbol 1 Ä 9 é 17 ç 2 ä 10 í 18 Æ 3 Ö 11 ó 19 Ñ 4 ö 12 ú 20 ...

Page 21: ...le Fax screen Lights green when the transmission or reception operation is available Lights orange when the transmission reservation is not available B Copy Lights in Copy screen C Fax Lights in Fax screen D 2in1 copy Lights when 2in1 Copy screen is selected E Sort copy Lights when Sort Copy screen is selected When ADF is not installed LED is always off F Standard Lights when the document for tran...

Page 22: ...e machine completes warming up the initial screen appears on the Message Display This initial screen serves as the basis for all later operations Paper Size see below 2 Paper Source see below 1 Density Level Copy Quantity Copy mode Zoom Ratio Message Area see below 3 TEXT 1 WARM UP FAX SCREEN You can press the Copy Fax key switch to the Fax screen Message Memory available Time Date JAN 01 15 38 10...

Page 23: ... size CARD Tray 2 Plain paper A4 A4 Letter LT 3 Message area In Copy screen message description 0 100 Memory remaining volume This message appears when the machine scans the original for the Sort copy A4 ÆA5 LG ÆLT Zoom ratio examples Copy function EMPTY Selected paper tray has no paper Fax Ò The machine responds for reception Fax The machine calls the transmission Fax The machine is sending the f...

Page 24: ...components on the LCD display and show you the ways to scroll through the functions and select the desired setting Example Press Utility key the display shows the message MACHINE SETTING Utility 1 Press the or key scroll to another menu MACHINE SETTING OK YES or 1 7 2 Press Yes key to enter MACHINE SETTING item 3 Press Numeric keys 1 to 7 to select a sub item in MACHINE SETTING 1 Using the or key ...

Page 25: ... Numeric keys to select an item DEF 3 For example Press 3 to select the third function of the MACHINE SETTING Another screen s selection Select the choice by or key and then press Yes key Press the Yes key to validate the selection of the item currently marked with Making a selection from 2 selections press or key will toggle between the two selections The item with an asterisk is currently select...

Page 26: ...ustom size for bypass copy When the size of copy paper for the Manual Bypass Tray is custom size when size was set with the numeric keys Input custom size for bypass copy While inputting the custom size with the numeric The X and Y direction of copy paper is expressed Input Fax number When inputting a dial number for Fax communication dial registration or user Fax number Number of scanning pages M...

Page 27: ...selected The further left the line is placed the lighter the density becomes The further right the line is placed the darker the density becomes Off hook in Dialing state Transmission Receive calling in Dialing state Reception Transmitting Transmission Blink 1 2 Blink 1 2 1 2 3 4 Blink in turn 1 14 ...

Page 28: ...llowed Pause When Pause key is pressed in inputting Fax number P is inputted in the place of cursor Combination dial User Fax number Press One touch 27 Symbol key an even number of times while inputting the Fax number is inputted in the place of cursor Dial registration User Fax number When One touch 27 Symbol key is pressed an odd number of times when inputting Fax number is inputted in the place...

Page 29: ...ax communication Follow the procedure given below to ensure that you make the correct settings 3 Using the or key adjust the brightness of the display LIGHT DARK YES Press the key to make the display lighter Press the key to make the display darker 4 Press Yes key to validate the brightness setting Yes MACHINE SETTING OK YES or 1 7 5 Press the No Clear key to leave the MACHINE SETTING C No 1 4 Ini...

Page 30: ... is shown Copy screen Fax screen JAN 01 15 38 100 SET DOC FACE UP COMM SETTING OK YES or 1 3 COMM SETTING OK YES or 1 3 TEXT 1 Utility 2 Press the Utility key 6 times to enter the COMM SETTING x 6 3 Press 1 of the Numeric keys it will show 1 TONE PULSE on the display briefly TONE PULSE YES 1 TONE PULSE 1 4 Using the or key select either TONE or PULSE according to the telephone system connection to...

Page 31: ...P COMM SETTING OK YES or 1 3 10pps 20pps YES If you don t want to change this setting press the No Clear key C No Then press the Yes key to stop the setting the message COMM SETTING appears again Yes C No 6 Press the No Clear key return to the initial screen Copy screen Fax screen TEXT 1 1 4 2 Setting the Initial User Data 1 Check that the initial screen is shown Copy screen Fax screen TEXT 1 1 18...

Page 32: ...ing Date Time 1 1 Press 1 of the Numeric keys to show DATE TIME on the display 2 Set the current time with the Numeric keys For example 8 00 AM OPER 0 OPER 0 OPER 0 TUV 8 If a wrong time has been entered press the key the cursor position moves back one position Enter the correct time again 3 In the same way enter the current year month and date For example 2000 10 6 MNO 6 1 OPER 0 OPER 0 OPER 0 OP...

Page 33: ...ting Your Fax Number User Fax Number ABC 2 1 Press 2 of the Numeric keys to show 2 USER FAX NO on the display 2 Using the Numeric keys enter your fax number Up to 20 digitals can be entered for a fax number For example 03 5423 7801 1 2 ABC 3 DEF 4 GHI 5 JKL 8 TUV 7 PQRS OPER 0 0 OPER 3 DEF If a wrong number has been entered press the key The cursor position moves back one position Enter the correc...

Page 34: ...n consist of up to 32 characters and symbols Selecting Characters and Symbols using the following matrix enter the characters of your name by pressing the corresponding One Touch keys and some functions keys How to input characters I want Use which key Letters ABCDEFGHIJ XYZ One Touch keys 1 26 P 1 6 Symbols One Touch key 27 P 1 7 European symbols Ä ä Ő ő Ű ű key P 1 7 Numeral 1234567890 Numeric k...

Page 35: ...1 3 3 For example TOKYO C No If the wrong letter has been entered press the No Clear key Enter the correct name again Yes 4 Check your data entry and press the Yes key to accept the name setting C No 5 Press the No Clear key to back the initial screen Copy screen Fax screen TEXT 1 1 5 Connecting to the Telephone Line Arrangement 1 22 ...

Page 36: ...or a specific country For example Germany 4 A standard telephone can be connected if necessary 5 See the user instructions for the UK U K version Basic Connection Procedure 1 Connect the plug of the cord to the telephone jack of the telephone line 2 Connect the other plug of the cord to the line connection on the backside of the machine 3 Connect the currently used telephone cord to the TEL connec...

Page 37: ...a pause you can avoid the dial error caused by the PBX system The number you dial to access the outside line differs for different PBX systems How to operate 0_ TX START 0P_ TX START 0P54321_ TX START 0P54321 TX START OPER 0 1 Enter the access number used by your PBX For example 0 2 Press the Redial Pause key after 0 for wait about 2 5 seconds when connect to the PSTN line Redial Pause 3 Use the N...

Page 38: ...3 Use the or key to select either PSTN or PBX and press Yes key Yes 4 If you select PBX you should enter the prefix number the prefix can be up to 4 digit length For example 0 OPER 0 5 Then press Yes key Yes When you are in the PBX mode press key causes the machine to dial the programmed access number s If you are dialing within a PBX then the symbol is displayed Phone Line Telephone Number LCD Di...

Page 39: ...Chapter 2 Making Copies ...

Page 40: ...TE The default paper tray zoom ratio and auto exposure settings are automatically selected in the Initial state How to operation 1 Be sure that the message display is in copy screen as blow shown Metric Inch TEXT 1 TEXT 1 If not press the Copy Fax key to switch 2 Setting the original document by two alternative ways Open the cover and set the document face down onto the glass P 2 5 Set the documen...

Page 41: ...or customer zoom ratio using the and Key 5 Selecting the Copy Density P 2 16 Press the Exposure Control Keys to specify the desired level of density For example press the key for the lighter density Photo Auto Photo Auto Press the Auto Photo Exposure Mode Key to specify the desired level of density 2in1 6 Select the 2in1 function P 2 18 Sort 7 Select the Sort function P 2 20 2 2 ...

Page 42: ... number of copies or groups of documents to be copied Up to 100 copies can be specified WXYZ 9 PQRS 7 OPER 0 TUV 8 MNO 6 JKL 5 GHI 4 DEF 3 ABC 2 1 Press the No Clear key to clear this entry C No 9 Generating copies Press the Start key Start Press the Stop key to stop the operation if necessary Stop 2 3 ...

Page 43: ...es tracing paper or other transparent paper types Wrinkled folded curled or tome originals Originals that are stapled or are attached with paper clips Carbon paper or paper with coated surfaces To produce copies from an original document described above place it on the Original Glass P 2 5 How to using the Automatic Document Feeder 1 Adjust the Document Guide Plates to the size of the document 2 S...

Page 44: ...h as the pages of a book do not close the cover of the machine Do not place documents that exceed 3kg onto the Original Glass Do not lean heavily upon original documents once they have been placed on top of the Original Glass as damage may result A bright beam of light will be emitted through the Original Glass during operation 2 For Transparent Documents when setting documents that are on OHP tra...

Page 45: ...elect will display on the message display as below If A4 size paper TEXT 1 WARM UP Selected Tray Selected tray display Paper Tray Tray 1 Paper Feed Unit Tray 2 Manual Bypass Tray Useful Tips The Paper Tray is prioritized when the Initial state is enabled The Paper Feed Unit Tray 2 can be prioritized in the Initial state through the Utility settings P 7 9 Should the paper supply run out while copie...

Page 46: ...ansparencies and post cards Paper Size Maximum 216mm 356mm Minimum 86 mm 148mm How to operate 1 Loading the paper of standard size A4 Letter When setting documents of plain or thick paper types 1 Set the original document using the ADF or Plate scanning Example ADF 2 Adjust the Document Guide Plates to the original document Insert the record paper face up into the tray until it stops NOTE Be sure ...

Page 47: ...tric For Inch 1 Initiate screen 2 Press the Paper key 3 The display appears as below 4 Press the Yes key to accept the standard paper size used for Manual Bypass Tray 5 The display appears the Manual Bypass Tray you selected with the standard paper size A4 Letter TEXT 1 TEXT 1 Paper TEXT 1 YES NO TEXT 1 YES NO TEXT 1 TEXT 1 4 Press the Start key to perform the copying Start 2 8 ...

Page 48: ...lates to the original document Insert the record paper face up into the tray until it stops NOTE Be sure to feed the paper one sheet at a time Curl the edges of the paper upwards before setting the paper into the machine 3 Select the Manual Bypass Tray For Metric For Inch 1 Initial screen 2 Press the Paper key switch to Manual Bypass Tray TEXT 1 TEXT 1 Paper more 2 9 ...

Page 49: ...lection Description PLAIN Regular paper OHP OHP transparencies A4 Letter CARD Thick paper 7 Press the Yes key to accept the selection 8 The display appears the selection of paper size selection meaning LT Letter LG Legal HL Half Legal TEXT 1 YES NO Manual Bypass Tray TEXT 1 YES NO Manual Bypass Tray No C PLAIN OHP CARD YES PLAIN OHP CARD YES LT LG HL OK YES FREE SIZE A4 A5 B5 B6 OK YES FREE SIZE m...

Page 50: ... message according to the selected paper tray OK Display of paper type if A4 size Display of paper type if Letter size PLAIN A4 PLAIN LT OHP A4 OHP OHP LT OHP CARD A4 CARD CARD LT CARD B For select the Free size 1 After you press the key the display appears as below TEXT 1 Manual Bypass Tray Paper size A4 Paper type Plain TEXT 1 Manual Bypass Tray Paper size Letter Paper type Plain Input here Feed...

Page 51: ... input the y direction length of paper again 5 After you press the Yes key the display appears as below OK Display of paper types free size Paper type Display PLAIN CARD CARD y 215mm 128 215 x OK YES y 198mm 128 215 x OK YES TEXT 1 Manual Bypass Tray Paper type Plain Free paper size TEXT 1 NOTE For OHP paper you can only select paper size of A4 or Letter Be sure to set the paper type properly when...

Page 52: ...erated can be specified by using the Numeric Keys Example Specifying 23 copies 1 Be sure the display is appears as the Copy screen as shown TEXT 1 If not press the Copy Fax Key to switch Copy Fax ABC 2 DEF 3 2 Press 2 and 3 from the numeric keys and the display appears 23 copies equipped 23 copies TEXT 23 NOTE Press the No Clear key if the wrong number of copies is entered C No 2 13 ...

Page 53: ... the Preset Zoom Ratio Ratio message Zoom ratio TEXT 1 You can select a often used preset zoom ratio by press the Zoom key The order of changing zoom ratio metric inch Zoom ratio Ratio message Zoom ratio Ratio message 1 00 none 1 00 none 1 15 B5 A4 1 29 HL LT 1 41 A5 A4 1 54 HL LG 0 70 A4 A5 0 64 LT HL 0 81 B5 A5 0 78 LG LT _ _ _ 0 5 2 0 _ _ _ 0 5 2 0 2 14 ...

Page 54: ...atio will increase key or decrease key 0 01 continuously When approaching the desired zoom ration use the or key to specify the exact setting Press the Panel Reset key return to the default setting 100 Use the numeric keys Example Specify a zoom ratio of 1 23 1 Press the Zoom key as many times until the Zoom ratio appears on the display change to _ as shown TEXT _ 1 0 5 2 0 2 Use the numeric keys ...

Page 55: ...ess the Auto Photo key The settings of Auto Manual density adjustment Density adjustment Display indication TEXT mode with Auto density PHOTO mode with Manual density TEXT mode with Manual density Useful Tips The Auto Photo Mode is designed to provide optimal density ratios for most applications however lighter and darker setting adjustments are possible The Auto Photo Mode is a default setting fo...

Page 56: ...T mode with manual density and PHOTO mode For example To adjust the density to a lighter level press the key Photo Auto TEXT 1 23 1 The indicator moves to a lighter level The indicators appear as follows to indicate the selected density level Level Darker Level 4 Display Indicator Darker Level 3 Darker Level 2 Darker Level 1 Normal Lighter Level 1 Lighter Level 2 Lighter Level 3 Lighter Level 4 Wh...

Page 57: ...ator would lights up The default setting is OFF This setting is effective till the Panel Reset is performed ON OFF 2in1 2in1 NOTE Initial setting value is changeable in 2in1 priority of Utility function P 7 14 How to operation the 2in1 function 1 For ADF scanning 1 Turn on the 2in1 function by press the 2in1 key then the 2in1 indicator would lights up and the message display appears as below 2in1 ...

Page 58: ...ar left corner of the first page original document with the scale marker 3 Scan this original document by press the Start key 1 Start 2 4 As the first page scan the second page of the original document Then the machine prints the 2in1 page of first and second original document 2 1 5 For more pages repeat the procedure from step 2 to 4 NOTE If you have a document with odd pages after scanned the la...

Page 59: ... copy 3 non Sort 3 2 1 2 2 2 3 2 1 3 3 3 Sort mode and Non Sort mode can be switched by press the Sort key if Sort mode is selected then the Sort indicator would lights up The default setting is Sort mode This setting is effective till the Panel Reset is performed ON OFF Sort Sort How to operate the Sort function 1 Set the original document on the ADF 2 Turn ON Sort function by press the Sort key ...

Page 60: ...Chapter 3 Basic Fax Operation 1 ...

Page 61: ...or memory communication Features of direct communication You can transmit long documents without concern about memory capacity In memory communication transmission or reception of a document is not available when there is not enough memory for the document Features of memory communication Since the machine scans the contents of all pages of a document at high speed before starting a transmission y...

Page 62: ...uper Fine Standard Fine Super Fine Half Tone Offering better resolution than fine super fine is suitable for smaller type and very detailed illustrations it take longer to transmit NOTE The better resolution you select the longer it takes to transmit and the more it will cost in phone charge About Half Tone mode Suitable for documents with half tone photo illustrations and for colored documents Th...

Page 63: ...ACE UP If not press the Copy Fax key to switch 2 Press the Resolution key to select the desired resolution Each time the key is pressed a new resolution is selected Resolution Standard Fine Super Fine Half Tone 3 When the document has been transmitted the initial setting of Standard is automatically reset to the default resolution Standard Fine Super Fine Half Tone For example Standard resolution ...

Page 64: ... Half Tone Resolution Standard Fine Super Fine Half Tone Standard Fine Super Fine Half Tone 3 1 2 Loading the Document Documents Suitable for Transmission Type Sheet 1 sided only Standard A4 Letter Legal Government Legal Width 148 216 mm Size Non standard Length 100 1000 mm weight 50 110g m2 Loaded pages Up to 50 sheets Effective scanning area When preparing a document allow a blank margin of this...

Page 65: ...t you make a phone call to tell the other party that you are sending the document How to load the Document This machine scans the data on the front side of the document This means that you should place the document face up on your You can transmit the document with the date printed at the top of the document by the Header function P 6 20 To use the Header function properly load the document top ed...

Page 66: ...r skewing could result For multi page documents may sure to remove any staples paper clips tape etc Transmitting documents without removing these items can cause misfeeds or damage to machine 3 Place the document face up and turn the top edge of the document into feeder Slide the document along the Document Feeding Tray into the feeder until it is stops 3 6 ...

Page 67: ...s to dial is the most basic method Load your document enter the fax number of the destination with the Numeric keys and press the Start key JAN 01 15 38 100 SET DOC FACE UP 1 Check that the message display is shown Fax screen WXYZ 9 PQRS 7 7 OPER 0 TUV 8 MNO 6 JKL 5 GHI 4 DEF 3 ABC 2 1 If not press the Copy Fax key 2 Place the document face up and put it on the Document Feeding Tray and side it in...

Page 68: ...If you want access to a PC that is connected to the destination Fax To input Sub Address press the key once Then the display shows meaning that the input of Sub Address is ready If you have entered a wrong number press the key which will bring the cursor back one position then enter the correct number 5 Press the Start Key Start The machine automatically starts dialing the number and starts feedin...

Page 69: ...en successfully transmitted to the other party To obtain detailed results of a transmission print the Activity Report P 9 11 If the Line is Busy If the line of the receiving party is the busy Auto Redial function is automatically activated and the machine repeats dialing the number If the Transmission Fails If the transmission fails a buzzer sounds intermittently for 2 sec and the Error Indicator ...

Page 70: ...ures see Dial Registration P 6 5 1 Check that the message display is shown Fax screen JAN 01 15 38 100 SET DOC FACE UP TX CANCEL YES CONTINUE NO If not press the Copy Fax key to switch H 08 2 Place the document into the Document Feeding Tray 3 Press the One Touch key in which the desired party has been programmed For example One Touch key 08 OSAKA The machine now starts dialing the fax number and ...

Page 71: ...Function The Speed Dial function allows you to transmit a document to a particular party by just entering a 2 digit number assigned to that party To use this function however you must first program each Speed dial NO 2 digits with fax number and other data Up to 100 different parties can be registered for Speed Dial Speed dial NO 00 to 99 For more details of registering procedure see Dial Registra...

Page 72: ...DEF 3 5 The machine now starts dialing the fax number and starts feeding the document If you want to stop the transmission press the Stop key and then the Yes key Stop Yes 6 When transmission is completed a buzzer sounds and the message TX COMPLETE is shown for 2 sec indicating that the document has been successfully transmitted to the other party Then the initial screen reappears To obtain detail...

Page 73: ...ber or Speed Dial number For example register a Speed dial as a Combination Dial Utility 1 Press Utility key 3 times x 3 DIAL REGISTRATION OK YES or 1 5 2 Press 2 of Numeric keys then the message 2 SPEED DIAL appears briefly 2 SPEED DIAL ABC 2 SPEED DIAL _ 3 Input the Speed Dial No SPEED DIAL 12 _ 12345_ OK YES SUB For example 12 ABC 2 1 4 Input the Fax number by press the Numeric keys For example...

Page 74: ...eset key back to the initial state For details about registering procedure see Dial Registration P 6 5 How to use Combination Dial Example Use a Combination Dial that is registered in Speed Dial 12 1 Place the document into the Document Feeding Tray 2 Check that the Fax screen is shown If not press the Copy Fax key to switch Speed Dial 3 Press Speed Dial key Enter the NO which registered as a Comb...

Page 75: ...ch Dial or Speed Dial as a Combination Dial For any registered Dial No when it is changed or deleted it will delete from the registration of Transmission Calling Stand by job and Program key An error occurs and transmission becomes impossible when combined numbers are registered to the Combination Dial or when the total number of digits in a fax number exceeds 30 If you use the combination dial in...

Page 76: ...Copy Fax key to switch 3 Press the Phone Book key Phone Book Yes Make sure that LIST is selected then press the Yes key 4 Press the or key to search for the party to whom you are going to transmit a document 5 Once the desired destination is displayed press the Start key Start The machine now starts dialing the fax number and it starts feeding the document Press the Stop key if you want to stop th...

Page 77: ...en reappears If you want to know the result of the transmission check it either by using the Confirm function or by printing the Activity Report P 9 11 ACTIVITY REPORT NO SESSION DATE TIME TX RX DESTINATION STATION PAGE DURATION MODE RESULT 01 0014 SEP 17 09 30 TX OSAKA 03 345 0987 1 00 H 01 25 ECM OK TX 1 00 H 01 25 TOTAL RX 0 00 H 01 25 Phone Book Search 1 Check that the Fax screen is shown If n...

Page 78: ...ric keys enter the name or beginning portion of the name of the party for witch you want to search Example Search for the destination name having TOKYO at the beginning of the name Selecting Characters Enter the characters of the name or beginning of the name by pressing the corresponding One Touch Key Do the same for the destination you wish to locate 3 18 ...

Page 79: ...ocument has been successfully transmitted to the other party If you want to know the result of the transmission check it either by using the Confirm function P 8 1 or by printing the Activity Report P 9 11 3 2 How to Receive a Document Basics Overview of the Basic Reception Procedure A document can be received in several different ways This section explains how to receive a document and directly p...

Page 80: ...f the paper CUT The machine will automatically cut off the remainder of the document if it is less than 18mm If the remainder exceeds 18mm it will be printed on a second page How to select the Printing mode Utility 1 Press the Utility key 5 times into the RX OPERATION mode x 5 ON OFF CUT YES RX OPERATION YES or 1 8 4 REDUCTION RX RX OPERATION OK YES or 1 8 GHI 4 2 Press 4 of the Numeric keys to sh...

Page 81: ...chine mainly as a fax machine When a document comes in your machine rings several times before starting an automatic reception The number of rings can be set as required see 7 4 1 Setting No of Rings P 7 21 TEL mode Manual RX mode Select this mode when you use your machine mainly as a telephone To receive a fax document pick up the Handset if you hear a fax tone press the Start Key and hang up to ...

Page 82: ...f rings is detected The number of rings before the machine answers is programmable P 7 21 3 When all pages of the document are received a buzzer sounds notifying that the communication has been completed 3 2 3 2 Receiving a Document in the Tel Mode Manual RX mode 1 When using a telephone unit the telephone also rings indicating that a fax call is coming in 2 You pick up the telephone This stops th...

Page 83: ...nter the telephone number of the receiving party 4 The telephone unit now operates as a normal telephone JAN 01 15 44 100 SET DOC FACE UP Once the voice call is completed hang up the telephone 3 3 2 Receiving a Telephone Call 1 When using as a telephone the telephone rings indicating that a call is coming in Pick up the telephone Now you can talk to the calling party over the phone TALKING NOTE Wh...

Page 84: ...Chapter 4 Basic Fax Operation 2 ...

Page 85: ...lected This function is used to set the TX mode of the machine two options are available Choices Available Description Memory TX When set in this mode documents are scanned into memory for transmission and dialing starts after the first page is scanned Quick TX ADF TX Direct Transmission When set in this mode documents are scanned for transmission after connection has been made to the receiving un...

Page 86: ... press STOP Key to cancel the transmission but your machine would not print out an error report In Direct transmission mode if the redials all fail your machine would not print out an error report too 4 2 Retrying the Same Destination Redial TX Redial TX would display the destination that the machine has previously dialed but not connected to The following two sub features are available 1 Auto Red...

Page 87: ...wn 3 If the destination is you want press the Start key to start transmission The machine starts to feed the documents and redialing this fax number When the line is connect the machine start the transmission And the message would show as below Feeding and scanning the documents 012345678 98 SET DOC FACE UP 012345678 98 SET DOC FACE UP MEMORY 98 012345678 3 Dialing the fax number Transmitting the ...

Page 88: ...OMPLETE 01234567 3 JAN 04 02 30 100 SET DOC FACE UP After you cancel a transmission it will print the TX RESULT REPORT TX RESULT REPORT SET DOC FACE UP 4 When the transmission is complete the display appears the message as shown And then appear the initial screen 4 3 Verifying Audible Signal Before TX Manual Communication This function is available when a telephone is connected to the fax Manual C...

Page 89: ...elephone Pick up this phone TX CANCLED YES CONTINUE NO TALKING And the display appears TALKING as shown 3 Dial the other party When the line is connected the dial tone changes to a calling tone 4 When you hear a fax answer tone press the Start key The fax then starts feeding the document for transmission Start If you want to stop the transmission press the Stop key Stop 4 5 ...

Page 90: ... RESULT REPORT SET DOC FACE UP 5 When the transmission is complete the display appears the message briefly And then return to the initial screen TX COMPLETE 01234567 3 JAN 04 02 30 100 SET DOC FACE UP 4 3 2 Manual Reception Example 1 When using a telephone the telephone also rings indicating that a call has been received 2 Pick up the telephone Make sure that you hear a fax answer tone from the sp...

Page 91: ... to transmit can not use the ADF for example a magazine Then the transmission must be performed by Book Transmission A combination with other fax functions It is possible to use with combination each function of the Broadcast Timer Transmission expect Timer Polling Reception Mailbox Transmission Polling and Relay Broadcast instruction 1 Press the Book TX key Book TX ENTER FAX NO or FUNCTION 012345...

Page 92: ...rt to scan the original documents right now If you want to change the original document size press the No Clear key No C The display shows the selections Metric Inch Press the or key the select the desired paper size Then press the Yes key to accept the selection and the display will show the selected paper size Yes SCAN BOOK A4 SCAN YES SIZE NO Selected paper size 6 Put the book on the scanning p...

Page 93: ...e other pages to be scanned change the book page and press the Yes key If you want to change the original document size press the No key C No Do this procedure until all pages you want to transmit are scanned 9 After you scanned all the pages press the Start key to transmit these pages Start 10 When the transmission is complete the display appears the message TX COMPLETE briefly And then appears t...

Page 94: ...Chapter 5 Using the Function Utilities ...

Page 95: ...ed until a password is entered µ P 5 16 5 POLLING TX Scans the document into memory and after the machine upon receiving a polling transmission command from the other party the machine transmits the documents to them µ P 5 21 6 POLLING RX Gives a polling transmission command to another fax which enables it to transmit a document previously stored in memory µ P 5 23 7 RELAY INITIATE RelayTX allows ...

Page 96: ...e are two method to select the Function utilities 1 Press the Numeric keys Key Function BROADCAST TIMER TX MAILBOX TX PRINT MAILBOX RX POLLING TX POLLING RX RELAY INITIATE CANCEL RESERV For example when you press the 3 of numeric keys the display would show MAILBOX TX 2 Press the Function key You can press the Function key again then the display shows the first Function utility Function 1 2 ABC 3 ...

Page 97: ...either press the Function key or press the and key Here is the procedure of these operation 1 BROADCAST 2 TIMER TX 3 MAILBOX TX 4 PRINT MAILBOX RX 5 POLLING TX 6 POLLING RX 7 RELAY INITIATE 8 CANCEL RESERV Function Function Function Function Function Function Function Function ...

Page 98: ... this activity It also can reduce the wear made byfeeding the document since the machine needs to scan it once only How to use the Broadcast function 1 Put the original document into the document feeding tray 2 Press the Function key 3 Press 1 of the Numeric keys to select BROADCAST 4 Specify the receiving destinations as these methods shown 1 One Touch Dial keys 2 Speed Dial 3 Combination Dial 4 ...

Page 99: ... If you want to continue selecting the receiving destinations using the One Touch keys repeat steps 1 to 2 2 Using the Speed Dial to specify the destinations 1 Press the Speed Dial key 2 From the Numeric keys enter the Speed Dial number in which the receiving party has been registered For example To select Speed Dial 23 Yokohama for Broadcast 001 Press Speed Dial key then press 2 and 3 of the Nume...

Page 100: ...ing Speed Dial repeat steps 2 and 3 3 Using the Phone Book List to specify the destinations 1 Press the Phone Book key 2 Press the or key to select LIST then press the Yes key 3 Using the or key search for the receiving destination you want to select For example To select the receiving destination Osaka listed in the Phone Book for Broadcast 001 4 When the desired destination is displayed press th...

Page 101: ...Search to specify the destinations 1 Press the Phone Book key the display appears as below 2 Press the key to select the SEARCH 3 Press the Yes key 4 Using the One Touch keys and Numeric keys enter the name or initial portion of the destination you want to find For example JAPAN 5 Press the Yes key The machine now searches for the exact name or names beginning with the letters entered Search for t...

Page 102: ...elect the next receiving destination If you select an incorrect destination pressing the No Clear key will cancel the inclusion of this destination in the broadcast The previous screen will reappear If you want to continue selecting the receiving destinations using Phone Book repeat step 1 to 8 5 Using the Numeric keys to specify the destinations 1 Transmit a document to a destination which is not...

Page 103: ...eys repeat the operation of step 1 and 2 4 When all the receiving parties have been selected for a broadcast press the Start key Checking the Selected Destinations The receiving parties you have selected can now be checked to ensure that the correct destinations have been selected 1 Press the Yes key Or you can skip checking the destinations selected by pressing the Start key which will begin the ...

Page 104: ...adcast number is advanced by one Repeat steps 1 through 3 to continue checking destinations selected 5 When you complete or have skipped checking the selected destinations press the Start key to begin the Broadcast transmission 6 The document in the document feeding Tray is scanned into the memory of the fax If the Reserv Report available from the REPORTING utilities has been set to ON the machine...

Page 105: ... 2 Timer TX Overview of the Timer TX function Timer TX lets the machine scan the document into memoryand transmit it to a destination at a specified time This feature enables the transmission of a document at times when special telephone discount rates maybe applicable This can contribute to reductions in communication costs The timer can be set up to 24 hours in advance How to use the Timer TX fu...

Page 106: ...he Number µ P 3 7 Speed Dial µ P 3 11 Combination Dial µ P 3 13 Phone Book µ P 3 15 Numeric key Dialing µ P 3 7 6 When the receiving destination has been specified the document placed on the Document Feeding Tray is feed in and the machine starts scanning it into memory After scanning the document the machine shows the initial screen on the Message Display and entering the standby state for Timer ...

Page 107: ... and Speed Dial key before starting the Timer transmission the changed destination is deleted from the destinations to which you want to perform the Timer transmission If you want to perform the Timer transmission to the changed destination you need to set the Timer TX again For example 1 At time 12 00 you set the Timer transmission by the Broadcast Transmission time 23 00 Transmission party One T...

Page 108: ...document to a particular person without allowing any other people to read it A mailbox transmission is initiated only after the ID entered on the transmitting end matches the mailbox ID on the receiving end This ensures that a confidential document will not be transmitted to the wrong person The transmitted document is stored in the mailbox of the memory in the receiving fax machine Unless the rec...

Page 109: ...the Numeric keys enter the 4 digit mailbox ID The mailbox ID is the number registered for the mailbox of the receiving fax machine For example Mailbox ID Press 3 8 5 and 0 in order If you have entered the wrong number press the No Clear key The ID you inputted would be canceled then enters the correct number 5 Check the mailbox ID setting and if it is correct press the Yes key to validate the mail...

Page 110: ...the machine receive and print a document from a particular person transmitted confidentially by Mailbox TX It is convenient when you want to receive a confidential or private document from a particular person without any other people reading it A mailbox transmission is started only after the ID entered on the transmitting end matches the mailbox ID on the receiving end This ensures that a confide...

Page 111: ...y key 5 times the display appears the below message 2 Press 5 of the Numeric keys to select MAILBOX RX 3 Enter the number 0 9 to take your mailbox number For example press 9 4 The display prompts you to input the ID of Mailbox 9 For example 1234 If you want to correct this entry press the No Clear key And input the ID again 5 Press the Yes key now you complete the registration of Mailbox Utility x...

Page 112: ... to change a Mailbox ID 1 Press the Utility key 5 times 2 Press 5 of the Numeric keys to select MAILBOX RX 3 Select a Mailbox number to delete with the Numeric keys For example Delete the ID of number 9 Mailbox 4 Then the message appears as below 5 Press the No Clear key to delete the registered ID then the display appears the message as below Utility x 5 5 JKL 9 WXYZ No C ...

Page 113: ... the ID 7 Press the Yes key If the ID you entered is correct then the ID of this mailbox is deleted The display returns to the display of step 3 If the entered ID does not correspond to a mailbox this ID cannot be deleted The display returns to the display of step 5 8 If you had complete this operation exit this setting by the flowing procedure Press the No Clear key Press the Yes key Press the No...

Page 114: ...s been received by Mailbox RX 2 Press the Function key 3 Press 4 of the Numeric keys to select PRINT MAILBOX RX 4 Using the Numeric keys enter the 4 digit mailbox ID which has previously been programmed for the mailbox involved and which has been given to the other party For example Mailbox ID Press 3 5 8 and 0 in that order If you have entered the wrong number press the No Clear key and input the...

Page 115: ... 5 Polling TX Overview of the Polling TX function Polling TX allows you to set a document to be retrieved by a remote fax machine Your machine will automatically send the stored document in response to polling requests from remote devices You can set a 4 digit ID to distinguish polling document Polling TX offers Single and Multi Modes Single Mode The specified file will be deleted after it has bee...

Page 116: ...ge appears briefly to confirm your selection 4 Enter the 4 digit Polling ID if you need For example 1234 5 Press Yes key 6 Press the or key to select SINGLE or MULTI 7 Press Yes key to start the Polling session Your document is scanned into memory ready for it to be polled The P in the Message Display indicates that the Polling Document is in memory 5 JKL 2 ABC 3 DEF 4 GHI 1 Yes Yes Polling docume...

Page 117: ... Polling RX To receive poll the document you need to enter the correct polling ID number At one operation you can poll up to 143 destinations by following operations One Touch 27 Seed Dial 100 by numeric keys 16 143 How to use the Polling RX function 1 Check there is no document on the document feeding tray 2 Press the Function Key 3 Press 6 to select the POLLING RX The following message appears b...

Page 118: ... all the polling RX destinations have been specified 6 Press the Start key to finish the input operation Then the message asks if you want to check these destinations If you want to check the destinations you inputted press the Yes key The display appears the first destination Press Yes key to accept this entry then the display shows the next destination If you want to delete this destination pres...

Page 119: ...lows the operator to make one long distance call to a remote unit and the remote unit will relay the message to one or more fax units in the local area With this function you can save valuable time and telephone charges This function can also instruct the remote fax machine to send an TX Result report to one of its Speed Dial locations How to use the Relay Initiate function 1 Put the original docu...

Page 120: ...s One Touch key appears to confirm this is the location you intended to poll 5 Press Yes key to accept this selection The display prompts the message to ask you the relay group number registered in the Initial station 6 Using numeric keys to input the two digit One Touch number in the remote fax machine that represents the end locations to which you wish to transmit You can set 01 64 For example G...

Page 121: ...mber that should receive the TX Results Report You can set 00 99 For example 88 9 Press Yes key to begin transmitting Your document is scanned into memory and sent to the Relay station 5 8 Cancel Reserve Overview of the Cancel Reserve function Cancel Reserve cancels a transmission reservation for a document previously stored in memory for Timer TX Broadcast TX and Polling TX How to use the Cancel ...

Page 122: ...List µ P 9 13 Go over the list and identify the documents reserved for transmission and the particular FUNCTION features specified Print a Memory Image Print if you want to check for the contents of a particular reserved document µ P 9 14 2 Canceling the Document Reserved for Transmission 1 Press the Function key 2 Press 8 of the Numeric keys to select CANCEL RESERV Confirm x 3 Yes Function 8 TUV ...

Page 123: ...1 Session number 2 Communication start time 3 Function TIMER POLL TX B CAST MEMORY Memory reservation M B TX RELAY POLL RX 4 Press Yes to delete this transmission 5 Press the key to see more details as below If single location If multi location Press the or key to see other location For example Press the key 3 Press the or key to select the item you want to cancel 4 Then press the Yes key If the d...

Page 124: ...Chapter 6 Using the Enhanced Utilities 1 ...

Page 125: ...SAVE MODE OFF timer P 7 4 3 POWER SAVE OFF Disable Enable P 7 5 4 PRINT DENSITY Dark to Light 7 step P 7 5 5 LCD CONTRAST Dark to Light 4 step P 7 6 6 BUZZER VOLUME High Low OFF P 7 7 7 REMOTE MONITOR ON OFF P 7 8 8 TRAY1 PAPER SIZE A4 A5 or LT LG HL P 7 8 1 MACHINE SETTING 9 PAPER SOURCE Select paper source P 7 9 1 DENSITY PHOTO Auto Manual Photo P 7 11 2 AUTO DENSITY Dark to Light 3 step P 7 12 ...

Page 126: ...ter the most frequently dialed fax numbers in the 27 one touch keys 2 SPEED DIAL You can program 100 speed dial locations transmit your documents quickly and easily by pressing the Speed Dial key with a Speed Dial number 3 GROUP DIAL Destinations registered in One Touch Dial keys Speed Dial keys and the Phone Book can be registered together as a Group in a Group Dial key This feature then allows y...

Page 127: ...timer or password The timer print command causes the machine to start printing the document stored in memory when the specified time arrives The password print command on the other hand causes the machine to start printing when a password is input This feature provides a means of controlling the documents received through the fax 3 TWO PAGE PRINT Prints two copies of a received document automatica...

Page 128: ...TION 6 COMM SETTING 7 REPORT 8 INITIAL USER DATA For example Select the TX OPERATION Press the Utility key 4 times Utility x 4 2 Using the Numeric keys select the feature you want to make a setting for 1 SCAN CONTRAST 2 REGISTRATION 3 PAGE COUNT TX 4 CLOSED NETWORK 5 DEFAULT TX 6 HEADER 4 TX OPERATION 7 OT DIAL IN COPY For example To select HEADER Press Numeric key 6 ON OFF YES 6 HEADER MNO 6 The ...

Page 129: ... P 3 11 6 2 1One Touch Dial and Speed Dial 6 2 1 1 Set the Fax number 1 For ONE TOUCH DIAL Utility 1 Press the Utility key 3 times scroll to the DIAL REGISTRATION x 3 SELECT REGIST KEY REGISTERED KEEP OK YES EDIT DEL NO 1 ONE TOUCH DIAL DIAL REGISTRATION OK YES or 1 5 1 2 Press 1 of the Numeric keys to select the ONE TOUCH DIAL registration 3 To register data for One Touch Dial select a One Touch ...

Page 130: ...the Yes key 4 The message prompts you to input the Fax No For example 12345 If you need to input SUB address press the key 5 Press Yes key go to the next procedure Set the Name P 6 8 2 For SPEED DIAL 1 Press the Utility key 3 times scroll to the DIAL REGISTRATION 2 Press 2 of the Numeric keys to select the SPEED DIAL registration JKL 5 GHI 4 DEF 3 ABC 2 1 ABC 2 x 3 Utility SPEED DIAL _ 3 Enter the...

Page 131: ...LETE Then the following message appears C Use or key to select EDIT or DELETE EDIT To edit the setting select EDIT and press the Yes key DELETE If you want to delete the registered contents select DELETE and press the Yes key The destination registered for this Speed Dial is deleted and shows the message briefly Back to step 3 and select a Speed Dial again 4 The display prompts you to input the Fa...

Page 132: ... Timer you need to reset each function again For example At 12 00 you register a Group dial contain One Touch Dial 01 02 03 At 15 00 you register the One Touch Dial 01 again The result is Group dial becomes to contain only One Touch 02 and 03 One Touch Dial 01 is automatically deleted from the Group transmission 6 2 1 2 Set the Name 1 Using the One Touch keys enter the name of the destination A na...

Page 133: ...is case use or key to select 33 6Kbps 14 4Kbps or 9 6Kbps Yes 2 Check the setting and if it is correct press Yes key to validate the modem speed setting 3 Now you have already completed the registration of One Touch Dial or Speed Dial 6 2 1 4 Print the telephone Number List 1 When you have completed programming other parties for One Touch Dial and Speed Dial the machine can print a Telephone Numbe...

Page 134: ...a Group Dial to enable transmission to the entire Group using a single key All of One Touch keys can be used for Group Dial NOTE Registering a Group Dial into a One Touch key in which One Touch Dial or Program Dial or another Group Dial has previously been assigned overwrites the original data 6 2 2 1 Register the Group Dial Utility 1 Press the Utility key 3 times x 3 The display shows the message...

Page 135: ...oup A name can consist of up to 20 characters 7 If a wrong character has been entered press key The cursor position moves back one position Enter the correct character again 8 Check the group name entered and if it is correct press the Yes key to validate the group name setting 9 Specify the parties you want to register into that group One Touch Dial Speed Dial or Phone Book may be used to select ...

Page 136: ... Press the Yes key if the party has been correctly selected The Message Display now prompts you to select the next party If you want to continue selecting destinations for Group Dial using Speed Dial repeat steps 14 and 15 14 Selecting Destinations Using Phone Book List Search for the party you want for Group Dial in the Phone Book List For example To select the destination OSAKA listed in the Pho...

Page 137: ... the name or initial by pressing the corresponding Numeric keys and One Touch keys the required number of times Do the same for the destination you want to search for 22 If a wrong character has been entered press key The cursor position moves back one position Enter the correct character again 23 Press the Yes key The machine now a search for the exact name or possible names beginning with the na...

Page 138: ...r 6 2 2 2 Using the Group Dial 1 Place the document on the Document Feeding Tray 2 Press the One Touch key in which the desired Group Dial has been registered For example One Touch key 17 JAPAN group The document placed on the Document Feeding Tray is fed in and the machine starts scanning it When the machine completes scanning the document into memory it starts dialing the destinations one by one...

Page 139: ...cator lights up It then prints a TX RX Result Report automatically For details see TX RX Result Report REDIAL ALL FAILED TOKYO Then it will redial to the destination again until it successful transmits or it had already redials 9 times 6 2 3 Program Dial The Broadcast Timer TX Mailbox TX Polling RX or Relay Initiate function can be registered in Program Dial Program Dial allows you to transmit a d...

Page 140: ...TION SEL 1 2 3 6 7 GHI 4 2 Press 4 of the Numeric keys 3 Press One Touch key 24 25 26 or 27 whichever you want to program the function in For example Using One Touch key 27 4 Using the following chart press one number of the Numeric keys corresponding to the desired transmission function Ente the necessary data for the function selecte r d Numeric key Transmission function BROADCAST TIMER TX MAILB...

Page 141: ...OPER 0 DEF 3 ABC 2 1 Yes Use the numeric keys to input the Fax number and then press Yes key Or use Function utilities 6 This completes the programming procedure for Program Dial 7 To exit from the registering of Program Dial press the No Clear key twice Then the initial screen appears C No If you want to continue registering for Program Dial press another unused One Touch ey from 24 25 26 and 27 ...

Page 142: ...eys to batch documents automatically By assigning a batch time to a programmed one touch key you can eliminate dialing the same number several times a day Your FAX unit calls the other unit at a preset time and transmits all documents stored in memory during the same call How to set up the BATCH TX 1 Press Utility key 3 times Utility x 3 JKL 5 2 Press 5 of the Numeric keys the following message ap...

Page 143: ...etwork TX provides a means of controlling machine communications and when transmitting an important document avoiding transmission to the wrong destination On the other hand you can not dial the FAX NO directly from the numeric keys 1 Press the Utility key 4 times Utility x 4 The display changes to the TX Operation mode GHI 4 2 Press 4 of the Numeric keys The display now changes to the Closed Netw...

Page 144: ...XXXXXXXXXXXXXXXXXXXXXXXXXXX 6 HEADER ON OFF YES NOTE The header is printed on the area 4 mm from the leading edge of the paper Therefore make sure that the area 4 mm from the leading edge is blank so the content of the document can be fully transmitted For U S A user this function is always ON Utility 1 Press the Utility key 4 times x 4 The display changes to the TX OPERATION TX OPERATION OK YES o...

Page 145: ...ation with a password print command When a print timer command has previously been defined and if you want a printout before the set time you can enter the password to let the machine print the document earlier than the set time if a password print command has also been set 6 4 1 1 Programming for Memory RX Mode Utility 1 Press the Utility key 5 times 1 MEMORY RX MODE ON OFF YES ON OFF YES ON TIME...

Page 146: ...999 For example 6237 Note If ON time is the same as OFF time then this machine is always in the MEM RX mode 8 Make sure that the correct password has been set and then press the Yes key No If you want to change the password to another press the No Clear key and enter a new password C The initial display is changed to the memory reception display M RX 100 SET DOC FACE UP NOTE How to change the Time...

Page 147: ...XT 1 Mem RX 2 Press the Utility key 5 times Utility x 5 The display changes to the RX OPERATION 1 3 press 1 of the Numeric keys The display changes to the MEMORY RX MODE 4 Press the or key to select OFF press Yes key It will print out the document stored in memory if no password has been set If a password has been set Enter the set password from the Numeric keys For example 6237 5 Making sure that...

Page 148: ...e printing trouble is corrected 6 4 2 Two Page Print Overview of the Two page Print function Two Page Print prints two copies of a document received automatically If you frequently make copies of documents received it s a good idea to turn ON this feature Two sub features are available 1 ON 2 ON SORT Feature Description ON Received Copies of Print ON Sort Received Copies of Print OFF Received Copi...

Page 149: ...eive a document from any party registered in One Touch Dial Speed Dial and Phone Book Closed Network RX provides a means of controlling machine communications and avoiding unnecessary direct mail Utility x 5 1 Press the Utility key 5 times The display changes to the RX OPERATION 2 Press 6 of the Numeric keys The display now changes to Closed Network mode 3 Press the or key to turn ON or OFF the CL...

Page 150: ...r of the transmitter 4 Session number 5 Page number XXXXXXXXXXXXXXXXXXXXXXXXXXXXXXXXXXXXXXXXXXXXXXX XXXXXXXXXXXXXXXXXXXXXXXXXXXXXXXXXXXXXXXXXXXXXXX XXXXXXXXXXXXXXXXXXXXXXXXXXXXXXXXXXXXXXXXXXXXXXX XXXXXXXXXXXXXXXXXXXXXXXXXXXXXXXXXXXXXXXXXXXXXXX MAY 29 2000 07 57 RECEIVED FROM 1234567890 0020 009 1 2 3 4 5 8 FOOTER NOTE The footer is printed on the area 4mm from the trailing edge of the paper Any da...

Page 151: ...ey to turn ON or OFF the Footer function ON OFF YES 4 Check that the setting has been made correctly then press the Yes key Yes Panel Reset 5 This completes the setting for Footer TEXT 1 Press the Panel Reset key Then the initial screen appears 6 27 ...

Page 152: ...Using the Enhanced Utilities 2 Chapter 7 ...

Page 153: ...ER SIZE A4 A5 or LT LG HL P 7 8 1 MACHINE SETTING 9 PAPER SOURCE Select paper source P 7 9 1 DENSITY PHOTO Auto Manual Photo P 7 11 2 AUTO DENSITY Dark to Light 3 step P 7 12 3 MANUAL DENSITY Dark to Light 9 step P 7 13 4 DENSITY ADF Mode1 Mode2 P 7 13 5 2in1 MODE On Off P 7 14 2 COPY SETTING 6 SORT MODE Sort Non Sort P 7 15 1 ONE TOUCH DIAL One touch dial P 6 5 2 SPEED DIAL Speed dial P 6 5 3 GRO...

Page 154: ...On Off P 6 25 7 RX MODE Auto Manual P 3 21 5 RX OPERATION 8 FOOTER On Off P 6 26 1 TONE PULSE Tone Pulse 10pps 20pps P 1 17 2 LINE MONITOR High Low Off P 7 21 6 COMM SETTING 3 PSTN PBX PSTN PBX Pre Fix No P 1 24 1 ACTIVITY REPORT On Off P 8 4 2 RESERV REPORT On Off P 8 4 3 TX RESULT REPORT On Off P 8 4 7 REPORTING 4 RX RESULT REPORT On Off P 8 4 1 DATE TIME Date Time P 1 19 2 USER FAX NO User Fax ...

Page 155: ...then the message MACHINE SETTING appears Utility 1 2 Press 1 of Numeric keys Then the following message appears briefly to confirm your selection 3 Press or key to select ON or OFF as the default setting and press Yes key Yes If you select ON the display prompt the message asks for your select of the reset time interval minutes Press or key to select the desired interval and then press the Yes key...

Page 156: ...ress 2 of Numeric keys Then the following message appears briefly to confirm your selection ABC 2 MACHINE SETTING OK YES or 1 7 The setting of POWER SAVE OFF would make a different message appear P 7 5 For DISABLE For ENABLE Press the or key to select Power Save Mode ON or OFF Then press the Yes key to accept this selection For ON For OFF 3 Enter the time period you wish the machine to enter Power...

Page 157: ...E SETTING OK YES or 1 7 DEF 3 2 Press 3 of Numeric keys Then the following message appears briefly to confirm your selection 3 Press or key to select Disable or Enable as the default setting Then press Yes key Yes 4 Press No Clear key back to the initial state No C MACHINE SETTING OK YES or 1 7 7 1 4 Setting PRINT DENSITY Set the print density according to your needs There are seven density levels...

Page 158: ...G OK YES or 1 7 C 4 Press No Clear key back to the initial state 7 1 5 Setting LCD CONTRAST Set the displaying of LCD contrast according to your needs There are four density levels ranging from Light to Dark 1 Press the Utility key Then the message MACHINE SETTING appears Utility 2 Press 5 of Numeric keys Then the following message appears briefly to confirm your selection JKL 5 MACHINE SETTING OK...

Page 159: ...ETTING appears Utility 2 Press 6 of Numeric keys Then the following message appears briefly to confirm your selection MACHINE SETTING OK YES or 1 7 MNO 6 3 Press or key to select either HIGH LOW or OFF and press Yes key Yes No C 4 Press No Clear key back to the initial state MACHINE SETTING OK YES or 1 7 Choices Available Description HIGH Buzzer Volume is set at the loudest setting available LOW B...

Page 160: ...hen the following message appears briefly to confirm your selection PQRS 7 3 Press or key to select ON or OFF as default setting and press Yes key Yes 4 The message prompt you to enter the 4 digit password For example 1234 5 Press No Clear key back to the initial state No C 7 1 8 Setting TRAY 1 PAPER SIZE When optional Paper Feed Unit is installed This function allows you to choose the paper size ...

Page 161: ...e default setting For USA Canadian marketing area Press or key to select Letter Legal or Half Letter as the default setting Half Letter is available when Tray 2 is installed Yes Press Yes key MACHINE SETTING OK YES or 1 9 4 Press No Clear key back to the initial state 7 1 9 Setting PAPER SOURCE This function allows you to specify the paper source for COPY operation and FAX operation When optional ...

Page 162: ...printer card is equipped Yes Press Yes key the next selection allows you to specify the paper source 4 Press or key to select Tray 1 or Tray 2 as the paper source for COPY and FAX operation For PRINTER operation the following selections are available Choices Available Description AUTO When tray 1 has legal size this setting make your machine print out the paper according the received document size...

Page 163: ...ing by the other tray if there is paper in the other tray NOTE Continuous Setting appears when paper size of Paper Tray TRAY 1 is A4 Letter Yes Then press Yes key 6 Press No Clear key back to the initial state MACHINE SETTING OK YES or 1 9 No C 7 2 Copy Setting This section describes the choice available in COPY SETTING menu 7 2 1 Setting DENSITY PHOTO Set initial value of adjustment way of copy d...

Page 164: ...s 4 Press No Clear key back to the initial state 7 2 2 Setting AUTO DENSITY Set density level of Automatic Density adjustment 1 Press the Utility key 2 times then the message COPY SETTING appears 2 Press 2 of Numeric keys Then the following message appears briefly to confirm your selection 3 Press or key to select the desired density as default setting and press Yes key No C Utility x 2 ABC 2 COPY...

Page 165: ...ity as default setting and press Yes key Yes COPY SETTING OK YES or 1 6 4 Press No Clear key back to the initial state No C 7 2 4 Setting DENSITY ADF Adjust the copy image density level when optional Automatic Document Feeder is installed This setting varies the gamma curve setting according to the type of originals frequently used Setting Description Default MODE 1 When the standard original text...

Page 166: ...ress No Clear key back to the initial state 7 2 5 Setting 2in1 MODE Set the initial value of 2in1 function It is possible to set when additional memory is installed 1 Press the Utility key 2 times then the display appears the message COPY SETTING 2 Press 5 of Numeric keys Then the following message appears briefly to confirm your selection 3 Press or key to select ON or OFF as default setting and ...

Page 167: ...tility x 2 COPY SETTING OK YES or 1 6 MNO 6 2 Press 6 of Numeric keys Then the following message appears briefly to confirm your selection 3 Press the or key to select SORT or NON SORT as the default setting Yes Then press Yes key 4 Press No Clear key back to the initial state No C 7 3 More about TX Operation This section describes the choice available in TX operation menu 7 3 1 Setting SCAN CONTR...

Page 168: ...r selection 3 Press ot key to select the desired contrast as the default setting Then press Yes key Yes TX OPERATION OK YES or 1 7 4 Press No Clear key back to the initial state No C 7 3 2 Setting RESOLUTION To assure the best quality document please set scanning resolution and contrast according to the requirements of your original documents Utility 1 Press the Utility key 4 times then the displa...

Page 169: ... the Yes key to accept this selection 4 Press No Clear key back to the initial state No C 7 3 3 Setting PAGE COUNT TX When Page Count TX is set to ON before transmit the original documents are scanned into memory and judged whether the page count is correct or not This function is used to ensure the original documents are not misfed in Document Feeding Tray Utility 1 Press the Utility key 4 times ...

Page 170: ...the Fax screen Then the display would shows the message TX PAGE 3 Enter the page of the transmission document and press Yes key 1 ABC 2 For example If you want to transmit 12 pages Yes 4 Then display prompt you to input the remote Fax number 5 Input the Fax number and then press the Start key to perform transmitting Before dialing the number the machine scanning the documents into memory and count...

Page 171: ...ory for transmission and dialing starts after the first page is scanned Quick TX ADF TX Direct Transmission When set in this mode documents are scanned for transmission after connection has been made to the receiving unit When the available memory is insufficient please select ADF TX for a successful transmission If line is not available the message LINE IS BUSY will be displayed The facsimile wil...

Page 172: ...g transmitted when one touch key is pressed this function should be set to Disable 1 Press the Utility key 4 times then the display appears the message TX OPERATION Utility x 4 TX OPERATION OK YES or 1 7 DEF 3 2 Press 3 of Numeric keys Then the following message appears briefly to confirm your selection 3 Press or key to select Disable or Enable as default setting and press Yes key Yes 4 Press No ...

Page 173: ... he following message appears briefly to confirm your selection NO of RINGS 2 1 16 OK YES ABC 2 2 NO of RINGS 3 Enter the desired number of rings as the default and press Yes key Yes 4 Press No Clear key back to the initial state No C NOTE No of Rings is limited by country standard 7 5 Communication Setting This section describes the choice available in Comm Setting menu 7 5 1 Setting LINE Monitor...

Page 174: ...at the loudest setting available LOW Speaker Volume is set at the lowest available OFF No sound will be heard Then press Yes key Yes COMM SETTING OK YES or 1 3 No C 4 Press No Clear key back to the initial state TEXT 1 NOTE If the machine is in Copy screen it wouldn t sounds even the setting of line monitor is HIGH or LOW In the other hand line monitor just available in Fax screen NOTE About Setti...

Page 175: ...Chapter 8 Using the Confirm Utilities ...

Page 176: ...ey into TX RX RESULT selection Destination Fax No Communication result Transmission TX or Reception RX Communication Date Session Number 49 JAN 02 21 30 RX V 0123456 OK W 3 You can press the key to display the previous communication record and the key to display the next communication record For example Press the key to display previous communication report The display would switch between these t...

Page 177: ...chine has been installed are counted PM COUNTER Total printed pages since PM part transfer roller and fuser unit has been changed are counted Pick up mistake is not counted Separator Jam and Fuser Jam are counted TX PAGES Total transmitted pages since the fax kit option has been installed are counted RX PAGES Total received pages since the fax kit option has been installed are counted How to displ...

Page 178: ...it shows the first counter of machine 5 You can use the or key to display other counters For example Press the key to display TOTAL SCAN counter TOTAL SCAN 000050 V CHECK FINISH YES W Yes 6 After checked these counters press Yes key to exit MACHINE COUNTER V OK YES W No C 7 Then press No Clear key back to the initial screen TEXT 1 8 3 ...

Page 179: ...olling RX Memory Image Print Prints the part of the image of a document stored in memory which has yet to be transmitted One Touch List Prints a list of destinations that have been programmed for One Touch Dial Keys Speed Dial List Prints a list of the destinations which have been programmed for the Speed Dial Keys Key Setting List Prints a list of the settings made for Group Dial and Program Dial...

Page 180: ...he Confirm Utilities 3 Press the Confirm key to see the next report do it until the ACTIVITY REPORT appears Confirm ACTIVITY REPORT OK YES NEXT CONF Yes Then press the Yes key to print out Activity Report 8 5 ...

Page 181: ...Chapter 9 Printing Reports ...

Page 182: ... P 9 9 Prints out a list of the results when receiving a confidential or multi polling document or when errors occur during reception P P Activity Report P 9 11 Prints a list of results of the last 60 communications P P Reservation Reports P 9 12 Prints a list of the contents of reservations of Broadcast transmission and multi polling reception P Memory Data List P 9 13 Prints a list of the docume...

Page 183: ... ONE TOUCH LIST NAME JONES TEL 886 3 4733507 DATE DEC 20 2000 15 00 OT NO DESTINATION STATION DESTINATION NUMBER BATCH TIME SPEED SET DATE OT 01 TECOGER 002 44 3 5416789 16 00 14 4 JAN 20 2000 OT 02 JONES OSAKA 0P00277 06 763 3118 SUB 1234 7 16 00 33 6 FEB 20 2000 OT 03 JONES USA 0P00277 0722 953559 16 00 33 6 JUN 20 2000 OT 04 PASSWORD 021234569 14 4 JUL 20 2000 OT 05 PA GROUP 5678 14 4 AUG 20 20...

Page 184: ...istered 2 Not to report blank number following last registered number SPEED DIAL LIST NAME JONES TEL 886 3 4733507 DATE APR 10 2000 12 00 SP No DESTINATION STATION DESTINATION NUMBER SPEED SET DATE SP OO SP 01 12345678901234567890 ABC OSAKA 886 3 4733122 SUB 3522 4 0P 0077 06 763 3118 14 4 33 6 JAN 20 2000 FEB 20 2000 SP 02 SP O3 ABC TOKYO MLT SENRI CENTER 0P 03 3475 5228 OP 0077 06 874 1331 14 4 ...

Page 185: ...ON Function name as below BROADCAST TIMER TX MAILBOX TX POLLING RX RELAY INITIATE 4 No Location number sequence 5 DESTINATION STATION Destination name destination number KEY SETTING LIST NAME JONES TEL 3 4733507 DATE APR 10 2000 15 00 KEY NO TIMER FUNCTION No DESTINATION STATION 01 OT 00 JONES TAIPEI 886 3 4562345 5623095866 02 OT 02 JONES TAINAN 02 4833445 03 OT 03 NBC HONGKONG 002 85 3 4562345 O...

Page 186: ...INE SETTING 1 AUTO RESET ON 1 min 0 5 4 POWER SAVE MODE SET TIME 015 min 1 120 POWER SAVE OFF DISABLE PRINT DENSITY DARK LIGHT LCD CONTRAST DARK LIGHT BUZZER VOLUME LOW REMOTE MONITOR OFF TRAY1 PAPER SIZE LETTER COPY PAPER SOURCE TRAY1 CONTINUOUS FAX PAPER SOURCE TRAY1 FIXED PRINTER PAPER SOURCE AUTO COPY SETTING 2 DENSITY PHOTO AUTO AUTO DENSITY NORMAL MANUAL DENSITY DARK LIGHT DENSITY ADF MODE 1...

Page 187: ... none MAILBOX RX 4 ID none 9 ID none CLOSED NETWROK RX OFF RX MODE AUTO FOOTER OFF COMM SETTING 6 TONE PULSE TONE LINE MONITOR LOW PSTN PBX PSTN REPORTING 7 ACTIVITY REPORT ON RESERVATION REPORT OFF TX RESULT REPORT OFF RX RESULT REPORT OFF INITIAL USER DATA 8 SET DATE JAN 30 2000 23 01 USER FAX NO USER NAME OTHER STATUS 9 COPIER MEMORY 40 M FAX MEMORY 3 M PRINTER CARD none PRINTER MEMORY none TX ...

Page 188: ...er 5 DATE TIME Communication date time 6 PAGE Total page number 7 DURATION Communication interval 8 MODE ECM mode or G3 mode 9 RESULT Communication result for each tries 4 Print out format ADF Report without image appended at the report page MEMORY Print 1st page at upper half page with vertical reduction followed by reports Please reference Memory Image Print P 9 14 1 IF TX COMPLETED TO SIGNLE LO...

Page 189: ...PEI 3 4733126 APR 18 18 00 010 00h02min21s G3 OK NG PAGE 1 3 5 7 TX RESULT REPORT Report error message ERROR code Remote side sent out RTN signal page number up to 32 4 IF TX COMPLETED FOR MULTI LOCATION NAME JONES TEL 886 3 4733509 DATE APR 10 2000 12 00 SESSION FUNCTION No DESTINATION STATION DATE TIME PAGE DURATION MODE RESULT 001 JONES TAIPEI 2 4231236 APR 18 20 02 003 00h02min21s ECM OK 002 J...

Page 190: ...CM mode or communication speed 9 RESULT Communication result This items same as TX result report 1 IF RX COMPLETED REPOERT RX RESULT REPORT NAME JONES TEL 2770777 DATE DEC 10 2000 12 00 SESSION FUNCTION No DESTINATION STATION DATE TIME PAGE DURATION MODE RESULT 0002 RX 01 JONES 886 3 4733126 APR 18 17 02 002 00h02min21s ECM OK 1 2 3 4 5 6 7 8 9 2 IF RX ERROR RX RESULT REPORT NAME JONES TEL 886 3 4...

Page 191: ... RESULT REPORT NAME JONES TEL 886 3 4733507 DATE APR 10 2000 12 00 SESSION FUNCTION No DESTINATION STATION DATE TIME PAGE DURATION MODE RESULT 0001 RX 01 JONES TAIPEI APR 18 18 00 010 00h02min21s ECM NG NG PAGE 1 3 5 7 Page number that error line over pre defined percentage 9 10 ...

Page 192: ... RESULT Communication result ACTIVITY REPORT NAME JONES TEL 886 3 4733507 DATE APR 10 2000 12 00 No SESSION DATE TIME TX RX DESTINATION STATION PAGE DURATION MODE RESEUL T 01 0001 SEP 17 07 23 TX JONES OSAKA 886 3 4733507 002 00h01min25s ECM OK 02 0002 SEP 17 08 36 TX JONES TOKYO 03 3351 3514 011 00h21min07s ECM OK 03 0003 SEP 18 10 54 RX MLT 0258 36 5874 005 00h05min10s ECM OK 04 0004 SEP 19 15 2...

Page 193: ...DATE APR 10 2000 12 00 SESSION FUNCTION NO DESTINATION STATION DATE TIME PAGE 001 OT 01 JONES TAIPEI 2 4543298 002 OT 02 JONES USA 00214089450587 003 0T 03 JONES TOKYO 002 81 3 4321325 004 OT 04 MLT OASAKA 002 81 2 34528951 0001 BROADCAST 005 OT 05 JONES TAIPEI 2 4543298 SEP 10 20 00 003 1 2 3 4 5 6 7 2 POLLING RESERVATION REPORT POLLING RESERVATION REPORT NAME JONES TEL 886 3 4733507 DATE APR 10 ...

Page 194: ...ported for polling operation NOTE This report is not printed when no job in memory display NONE on LCD MEMORY DATA LIST NAME JONES TEL 886 3 4733507 DATE APR 10 2000 12 00 SESSION FUNCTION TIME No DESTINATION STATION PAGE 001 SP 22 JONES TAIPE 02 3465890 SUB 12345678 002 SP 03 JONES TAINAN 03 4523859 0001 BROADCAST 18 00 003 SP 10 NBC 02 4575349 012 0002 TX 18 30 SP 33 SOMETHING GOOD USER 002 46 5...

Page 195: ... The reduction ratio is base on document length II Report items 1 SESSION Session number 2 FUNCTION Function 3 No Total location number for this session 4 DESTINATION STATION Destination name telephone number 5 DATE Setup up date date to dial 6 TIME Time to transmission 7 PAGE Total page number for this session 8 POLLING ID Password for polling TX file in memory NOTE Reduction for the image part i...

Page 196: ...TEL 886 3 4733507 DATE APR 12 2000 21 04 SESSION FUNCTION No DESTINATION STATION DATE TIME PAGE 001 OT 01 JONES TAIPEI 886 2 3456305 4569 002 OT 03 JONES TAINAN 03 4733495 0001 BROADCAST 003 OT 04 NBC 02 9945762 OCT 26 20 02 003 1 2 3 4 5 6 7 9 15 ...

Page 197: ...inting Reports WHEN FUNCTION IS POLLING TX Image MEMORY IMAGE PRINT NAME JONES TEL 886 3 4733507 DATE APR 12 2000 21 04 SESSION FUNCTION NO POLLING ID DATE PAGE 8001 POLLING TX 001 1234 OCT 26 003 8 9 16 ...

Page 198: ...OW REMOTE MONITOR OFF MACHINE SETTING DATA TRAY1 PAPER SIZE A4 DENSITY PHOTO AUTO AUTO DENSITY NORMAL MANUAL DENSITY NORMAL DENSITY ADF MODE 1 2in1 MODE OFF COPY SETTING DATA SORT MODE SORT ONE TOUCH DIAL BATCH TX LOST SPEED DIAL LOST DIAL REGISTRATION PROGRAM DIAL LOST SCAN CONTRAST NORMAL RESOLUTION STARDARD PAGE COUNT TX OFF CLOSED NETWORK OFF DEFAULT TX MEM TX HEADER ON TX OPERATION DATA OT DI...

Page 199: ... After you turn on the machine it will print out RX Lost Report for data lost the print out formats as same as Activity Report P 9 11 1 Lost Report for TX LOST REPORT WARNING MESSAGE System power off time JAN 01 2000 20 00 System power on time JAN 01 2000 21 00 The DRAM is lost during the period of power off time The TX job or report in memory That may be lost So you need to TX the document again ...

Page 200: ...rt ok or NG low line report error code RELAY BROADCAST REPORT INITIATE STATION NAME TECO TEL 886 3 4733509 RELAY STATION NAME TECO TEL 886 3 4733509 DATE APR 10 2000 12 00 SESSION FUNCTION No DESTINATION STATION DATE TIME PAGE RESULT 001 TECO TAIPEI 2 4231236 APR 18 20 02 003 OK 002 TECO TAOYUAN 3 4211232 APR 18 20 05 003 OK 003 IBM IPO 02 8324126 APR 18 20 07 003 NG 0021 004 TECO TAIPEI 2 4231236...

Page 201: ... Prints a list of the result of a transmission after it has been completed Prints out a list of confidential or multi polling document or when errors occur during reception Activity Report f results of the last 60 communications Reservation Report tion TX Result Report RX Result Report the results when receiving a NOTE There is no need to set auto printing for following reports that are automatica...

Page 202: ...EF 3 REPORTING OK YES or 1 4 2 Press 3 of numeric keys Then the following message appears briefly to confirm your selection 3 Press or key to select ON as the default setting and press Yes key Yes 4 Press Panel Reset key back to the initial state Panel Reset 9 2 2 Manual Report Print The Confirm utilities allow users to print some reports at anytime when needed Refer to 8 3 PRINT REPORT P 8 4 9 21...

Page 203: ...Chapter 10 Connect to PC ...

Page 204: ...erface A serial port RS232C connection is required for this to work auto baud rate between PC and the machine is 19200 or 38400 bps PC end in conformance with your PC The machine end 9 pin D SUB male 2 Installing the TWAIN Driver Insert the driver disk in the disk drive Click setup exe to start the installation follow the directions by steps when the driver has been installed restart your PC 3 Lay...

Page 205: ...Baud rate 19 200 for lower communication speed Help Click the help to display information about this product and access the on line help window About Click here to display the driver version Scan Click to start the scanning process Close Click this button to close the scanner control panel 4 How to start scanning 1 In the PC software program Imaging Photoshop etc click File 2 Click Select Source 3...

Page 206: ...1 fax modem for any IBM compatible computer sending and receiving fax messages directly from your computer You can also use the interface to scan and print fax resolution quality documents The interface works with the following fax software 1 WinFax Pro 2 LaserFax Class 1 It is possible to user other Class 1 computer software but no guarantee for their operation Note For software installation and ...

Page 207: ... male 2 Setting up Class 1 To ensure your machine can work with the Class 1 software correctly make sure the No of rings setting in your machine is greater then the setting in Class 1 soft ware Most Class 1 software setting the number of rings 2 so you have to set your machine a greater number of rings For example 6 Refer Setting No of Rings P 7 21 10 4 ...

Page 208: ...Chapter 11 Troubleshooting ...

Page 209: ...ion or reception Forgot to hang up the telephone Hang up the telephone connected with the machine MEMORY SET DOC FACE UP No documents have been set before you enter the fax number for transmission Set the documents in ADF MEM FULL TX CANCEL Memory is full Remove some documents for transmission Or Add extented memory FILE FULL TX CANCEL An attempt was made 640 or more memory files Limit the number ...

Page 210: ...F then ON If this error is displayed again contact your service agency REDIAL ALL FAILED The document is not transmitted to the other party even through repeated auto redial Press the Stop key then try another transmission sequence At transmission Press the Stop key and then the Yes key Then try another transmission sequence COMM ERROR An error has occurred and communication was unsuccessful At re...

Page 211: ...entered through your fax machine does not match the mailbox ID of the other party Check for the correct mailbox ID of the other party then retry transmission Or cancel Mailbox TX and retry transmission P 5 14 WRONG MAILBOX ID At Mailbox RX The mailbox ID specified by the other party does not match the mailbox ID programmed in your fax Advise the other party of the correct mailbox ID and ask them t...

Page 212: ...p Replace the paper A darker density level for the Auto Density Mode has been specified Adjust the auto density level priority to lighter See 7 2 2 Setting AUTO DENSITY P 7 12 A darker density level for the Manual Density Mode has been specified Adjust the density level to darker using the density adjustment keys Auto Photo The surface of the original glass is dirty Wipe the original glass clean w...

Page 213: ...The original pad is dirty Wipe the original pad clean with a soft cloth The selected paper size is larger than the original document Specify a paper size that is appropriate to the original document The original document is not placed in the proper orientation on the Place the original document correctly on the original glass Unintended markings appears along the edge of the copy The zoom ratio se...

Page 214: ...he obstruction and wipe the original glass clean with a soft cloth 11 4 How to replace the imaging cartridge When the following message appears CAUTION TONER EMPTY NOTE Be careful not to touch the areas marked CAUTION HOT with bare hands 1 Pull the Lock Release Lever and fold open the Upper Half of Machine 11 6 ...

Page 215: ...e arrows to distribute the toner evenly 4 Install this new imaging cartridge into machine Useful Tip The imaging cartridge can easily be installed by aligning the front of the cartridge with the marker provided within the machine NOTE The metal parts within the machine are hot Avoid placing your hands in direct contact with the metal fittings within the machine to avoid injury 11 7 ...

Page 216: ... use replacement imaging cartridges that were designed for use specifically with this machine Use of other imaging cartridges may result in irregular machine performance 11 5 How to replenish the paper trays 11 5 1 For Paper Tray TRAY 1 When the following message appears 1 Remove the Manual Bypass Tray 2 Open the Document Guide Plates 11 8 ...

Page 217: ...S THE START KEY TO RESUME Start NOTE The paper should be loaded no higher than the Max Level Indicator 4 edges of the paper stack 5 Replace the Manual Bypass Tray 6 u to press the Start key to resume printing Slide the Document Guide Plates up against the Then the message prompts yo 11 9 ...

Page 218: ...r Drawer and press down the aper Lifting Plate 2 Load the paper stack into the Paper Drawer so that its front side faces up Make sure that the paper stack rests under the two catches of the Paper Drawer P NOTE The paper should be loaded no higher than the Max Level Indicator on the Edge Guide 3 Gently slide the Paper Drawer back in 11 10 ...

Page 219: ... resume printing 11 6 C 1 6 1 Paper Tray misfeed When the following message appears 1 Remove the Manual Bypass Tray and remove e misfeed 2 Remove the paper and reset it back into the aper Tray 3 Return the Manual Bypass Tray PRESS TH TO RESUME Start E START KEY learing paper misfeeds 1 th P 11 11 ...

Page 220: ...to open and close the Upper Half of the Machine 5 Then the message prompts you to press the tart key to resume printing 1 6 2 Paper Feed Unit misfeed When the following message appears 1 Press in the tray stoppers and then remove the aper Drawer 2 Remove the misfeed sheet of paper S Start 1 P 11 12 ...

Page 221: ... open and close the Upper Half of the Machine NOTE Be careful not to touch the areas marked CAUTION SEPARATOR JAM CAUTION HOT with bare hands 6 Then the message prompts you to press the Start key to resume printing 11 6 3 Separator Jam Fuser Jam When the following message appears For Separator For Fuser Jam Jam PRESS TH TO RES Start UME E START KEY 11 13 ...

Page 222: ...s in direct contact with the metal e to avoid injury 3 a pen the Guide Plates Remove the misfeed sheet of paper b aper jammed in the Transport Section by pulling it from the bottom of the h CAUTION HOT The metal parts within the machine are hot fittings within the machin For Separator Jam O For Fuser Jam Remove the p Fusing Unit 11 14 ...

Page 223: ... machine 5 Close the Upper Half of machine 6 Then the message prompts you to press the tart key to resume printing Useful Tip The imaging cartridge can easily bye installed by ligning the front of the cartridge with the marker a PRESS THE START KEY TO RESUME S Start 11 15 ...

Page 224: ...rom the Document eed Tray 2 pen the Paper Misfeed Guide and gently remove the paper misfeed 3 Open the Automatic Document Feeder and gently move the paper misfeed 4 Close the paper misfeed guide 5 Place the original document that was removed in step CAUTION GINAL DO COPY CANCELED ORI C JAM F O re 11 16 ...

Page 225: ...der again 11 7 When PAPER SIZE ERROR occurs During copying hen the message appears 1 he paper of which the error occurred o paper size in Utility function P 7 8 1 W Replace t 2 ress any key then the mess Press the Start key to resume operation eturn the last scanned document to ADF again Then press the Start key to resume operation P age may appears Start Start 11 17 ...

Page 226: ...cedure TEXT 12 2 In Reporting or Printing reception Before PAPER SIZE ERROR occurs the display may display as below For example During the machine printing the reception data When the PAPER SIZE ERROR occurs 1 Replace the paper of which the error occurred or reset the paper size in Utility function P 7 8 2 Then the machine will resume printing automatically Without pressing the Start key 11 8 How ...

Page 227: ...eshooting NOTE Should a CXXXX trouble code continue to appear in the display after resetting the machine please contact your technical representative Turn the Power Switch to OFF and then turn ON again 11 19 ...

Page 228: ...Chapter 12 General Specification ...

Page 229: ...7 MB Transmission Transmission Speed 3 sec ITU T No 1 33 6k with JBIG 143 locations per session Function Location One touch Key 27 Speed Dial 100 On the fly Ten key 16 Broadcasting Total 143 Memory TX Yes Quick memory TX Yes ADF TX Yes Manual TX Yes Timer TX Yes Polling TX Yes 50 files Mailbox TX Yes Closed Network TX Yes Relay Initiate Yes Relay Broadcast Yes Batch TX Yes 203 x 98 dpi 203 x 196 d...

Page 230: ... Last Redial Yes Chain dial Yes Combination dial Yes Phone Book Yes On hook Dial Yes Reports TX confirmation report Yes TX error report Yes RX Result report Yes Activity report Yes Memory data list Yes Key setting list Yes Broadcast Result report Yes Relay broadcast report Yes Mailbox RX report Yes Machine status list Yes Lost report Yes Backup RAM lost report Yes Reservation report Yes RTC backup...

Page 231: ...NEC America Inc 1555 W Walnut Hill Lane ND 21972 E Irving TX 75038 3796 ISSUE 1 TEL 972 751 7000 2000 NEC CORPORATION CC28OO1 ...

Reviews: