3-28 Administrator’s Handbook
2.
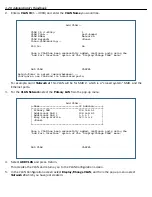
Enter a
VLAN ID
(1 – 4094) and enter the
VLAN Name
you would like.
For example, call it
Network A
. This VLAN will be for SSID 2, which is a "closed system" SSID, and the
Ethernet por ts.
3.
For the
VLAN Network
select the
Primary LAN
from the pop-up menu.
4.
Select
ADD VLAN
and press Return.
This creates the VLAN and returns you to the VLAN Configuration screen.
5.
In the VLAN Configuration screen select
Display/Change VLAN
, and from the pop-up menu select
Network A
(which you have just created).
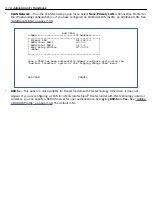
Add VLAN...
VLAN ID (1-4094): 1
VLAN Type... port-based
VLAN Name: Network A
VLAN Network: <None>
Inter-VLAN-Routing...
802.1x: No
Once a VLAN has been successfully added, configure ports using the
"Add Port Interface" option of the "Display/Change VLAN" menu.
ADD VLAN CANCEL
Return/Enter to select <among/between> ...
Configure a new VLAN and its associated ports.
Add VLAN...
+-Name---------------------------IP Address------+
+------------------------------------------------+
| Primary LAN 192.168.1.1 |
| Additional LAN 1 192.168.2.1 |
| Additional LAN 2 1.1.1.1 |
| Easy Setup Profile 127.0.0.2 |
| <None> |
| |
+------------------------------------------------+
Once a VLAN has been successfully added, configure ports using the
"Add Port Interface" option of the "Display/Change VLAN" menu.
ADD VLAN CANCEL
Summary of Contents for Netopia Embedded Software
Page 10: ...x Administrator s Handbook ...
Page 16: ...1 6 Administrator s Handbook ...
Page 44: ...2 28 Administrator s Handbook ...
Page 108: ...3 64 Administrator s Handbook ...
Page 176: ...5 34 Administrator s Handbook ...
Page 202: ...6 26 Administrator s Handbook ...
Page 244: ...7 42 Administrator s Handbook ...
Page 340: ...Index 6 ...


