13-25
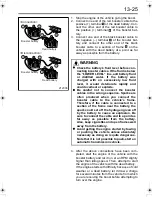
1. Stop the engine of the vehicle giving the boost.
2. Connect one end of the red booster cable to the
positive (+) terminal of the dead battery. Con-
nect the other end of the red booster cable to
the positive (+) terminal of the booster bat-
tery.
3. Connect one end of the black booster cable to
the negative (–) terminal of the booster bat-
tery and connect the other end of the black
booster cable to a section of frame on the
vehicle with the dead battery at a point as far
away as possible from the battery.
4. After the above connections have been com-
pleted, start the engine of the vehicle with the
booster battery and let it run at an RPM slightly
higher than idling speed. Then, attempt to start
the engine of the vehicle with the dead battery.
If the engine starts with difficulty because of cold
weather or a dead battery, let it draw a charge
for several minutes from the vehicle from which
you are receiving the boost before attempting to
turn over the engine.
WARNING
•
Check the battery’s fluid level before con-
necting booster cables. If the fluid is below
the “LOWER LEVEL” line, add battery fluid
or distilled water. If the battery was
charged with an excessively low fluid
level, it would deteriorate rapidly and
could overheat or explode.
•
Be careful not to connect the booster
cables in the wrong sequence. Sparks are
often produced when you connect the
booster cable to the vehicle’s frame.
Therefore, if the cable is connected to a
section of the frame near the battery, the
spark could set off the hydrogen given off
by the battery to cause an explosion. Be
sure to connect the cable end to a point as
far away as possible from the battery.
Also, keep cigarettes and open flames well
away from the battery.
•
Avoid getting the engine started by towing
or pushing the vehicle unless absolutely
necessary as doing so is quite dangerous.
Note that it is not possible to push-start an
automatic transmission vehicle.
<Connection>
Booster battery
<Disconnection>
Booster battery
Dead battery
Dead battery
Z12096
FKFM.book Page 25 Wednesday, June 6, 2007 11:43 AM
Summary of Contents for Fuso FK 2008
Page 1: ......
Page 3: ......
Page 7: ......
Page 18: ...2 1 Locations in cab 2 3 Locations outside cab 2 4 2 Warning labels...
Page 23: ......
Page 36: ...3 13 Pull latch and push it outward to open Rear quarter window Z14188...
Page 37: ......
Page 38: ...4 1 Seats 4 2 Seat belts 4 5 Steering wheel 4 9 4 Seat and steering wheel adjustments...
Page 47: ......
Page 101: ......
Page 118: ...8 1 Anti lock brake system ABS 8 2 ABS warning lamp 8 4 8 ABS driving hints...
Page 123: ......
Page 124: ...9 1 Heater 9 2 Air conditioner 9 7 9 Heating and air conditioning...
Page 145: ......
Page 272: ...15 1 Maintenance schedule 15 2 Lubrication schedule 15 11 15 Maintenance schedule...
Page 284: ...16 1 16 Alphabetical index...
Page 287: ......
Page 289: ......
Page 291: ......


