background image

12-45

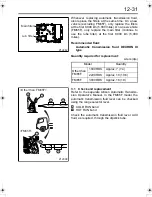
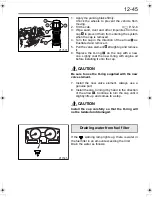
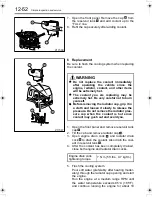
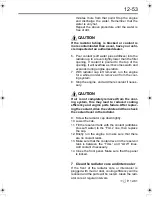
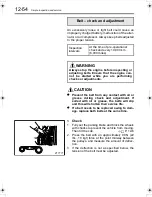
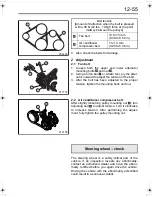
1. Apply the parking brake firmly. 

Chock the wheels to prevent the vehicle from

moving.

2. Tilt the cab.

 P. 12-6

3. Wipe sand, dust and other impurities from the

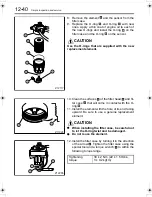
cap   to prevent them from entering the system

when the cap is removed.

4. Turn the cap in the direction of the arrow   as

illustrated and remove it.

5. Pull the valve element   straight up and remove

it.

6. Replace the O-ring   on the cap with a new

one. Lightly coat the new O-ring with engine oil

before installing it onto the cap.

      CAUTION

Be sure to use the O-ring supplied with the new

valve element.

7. Install the new valve element. Always use a

genuine part.

8. Install the cap, turning it by hand in the direction

of the arrow  . Continue to turn the cap until it

slightly lifts up and comes to a stop.

      CAUTION

Install the cap carefully so that the O-ring will

not be twisted and damaged.

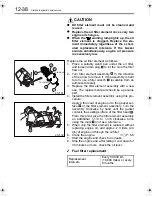
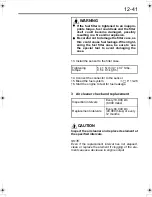
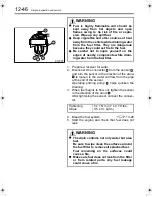
If the 

 warning lamp lights up, there is water in

the fuel filter in an amount exceeding the limit. 

Drain the water as follows:

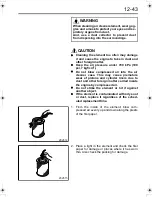
Draining water from fuel filter

Z17501

Z17345

FKFM.book  Page 45  Wednesday, June 6, 2007  11:43 AM

Summary of Contents for Fuso FK 2008

Page 1: ......

Page 2: ...OWNER AND VEHICLE INFORMATION OWNER NAME USER COMPANY NAME MAILING ADDRESS CITY STATE ZIP VEHICLE IDENTIFICATION NUMBER DATE OF DELIVERY WARRANTY START DATE MO DAY YR SELLING DEALER IMPRINT HERE...

Page 3: ......

Page 4: ...e your vehicle safely and comfortably As improper use of the vehicle may result in a breakdown or cause an accident we urge you to read this manual thoroughly before operating the vehicle Please keep...

Page 5: ...the following four headings which identify the nature of the instructions and infor mation Q California Proposition 65 Warning DANGER Precautions that should be taken when handling danger ous substanc...

Page 6: ...1 7 Starting and driving 7 1 8 ABS driving hints 8 1 9 Heating and air conditioning 9 1 10 Interior equipment and accessories 10 1 11 In cold weather 11 1 12 Simple inspection and service 12 1 13 Use...

Page 7: ......

Page 8: ...engine numbers 1 2 Powerline label 1 2 Vehicle identification number VIN 1 3 Maintenance 1 4 Fuels 1 5 Handling of the new vehicle 1 8 Reporting safety defects 1 9 Obtaining service 1 9 1 Recommendat...

Page 9: ...s indicated on the left side of the crankcase The powerline label located in the position shown indicates the vehicle model chassis number and information relevant to the vehicle s power trans mission...

Page 10: ...ic F 26 001 to 33 000 lbs Full air H 19 501 to 26 000 lbs Full air Line F FK61F J FM65F K FK62F L FK65F Series Wheel base F 3 5 to 3 79 m 11 48 to 12 43 ft J 4 4 to 4 69 m 14 43 to 15 38 ft K 4 7 to 4...

Page 11: ...n and adjustments to compensate for the initial run in of various parts When the distance has been reached have your vehicle inspected by an autho rized dealer by showing them this Owner s Manual 2 Pr...

Page 12: ...putable fuel oil supplier Both fuel suppliers and users are responsible for keeping fuel clean 2 Diesel fuel to be used in your engine Use only a ultra low sulfur diesel fuel with a sulfur content of...

Page 13: ...the engine will result due to a reduced cetane number CAUTION The lower the cetane number the more likely internal engine damage will occur If dirt blocks the fuel tank breather air hole the tank may...

Page 14: ...pty tank could cause damage to the fuel injection sys tem NOTE Air will be present in the fuel system after the engine has run out of fuel This air will prevent the engine from restarting even after i...

Page 15: ...re to give the dealer this manual at that time During the initial run in period oil is quickly contam inated Replace the following oils at the time of the new vehicle inspection At 4 000 km 2 500 mile...

Page 16: ...cle safety from the Vehicle Safety Hotline For further information please visit the following NHTSA website http www safercar gov At Mitsubishi Fuso Truck of America Inc MFTA we are proud of the quali...

Page 17: ...er the completion of Step 1 and in the event that your nearest Authorized Dealer has been unable to satisfactorily resolve the problem please contact MFTA s Customer Service Representative at 1 877 71...

Page 18: ...2 1 Locations in cab 2 3 Locations outside cab 2 4 2 Warning labels...

Page 19: ...nform an authorized dealer The warning and caution labels apply only to the vehicle itself not to any equipment mounted on the vehicle For information on cau tion and warning labels that apply to equi...

Page 20: ...Starting the engine while the cab is tilting Automatic transmission Towing Automatic transmission vehicles Parking brake To shift into the P position Automatic transmission vehicles DPF system DPF sy...

Page 21: ...ls Locations outside cab Clutch fluid Manual transmission vehicles Tilting the cab Wiper linkage Fuel Fuel High voltage Tilting the cab Engine oil Connectors for body lights and van body dome lights N...

Page 22: ...mission oil cooler Battery FK FM Battery Air cleaner Starting the engine Starting the engine High current fuses High current fuses FM65F automatic transmission vehicles Other than FK61F Brake chamber...

Page 23: ......

Page 24: ...3 1 Starter key 3 2 Doors 3 2 Central door locks 3 4 Keyless entry system 3 5 Entering and leaving the vehicle 3 10 Door window glass 3 11 Rear quarter window 3 13 3 Opening and closing...

Page 25: ...rs are com pletely closed before starting Exercise caution when opening a door in strong wind Otherwise the wind could catch the door and suddenly blow it open Exercise caution when opening a door on...

Page 26: ...e button close the door NOTE When you lock the driver s door using the starter key or by lowering the lock knob the passen ger s door is automatically also locked When you leave your vehicle be sure t...

Page 27: ...side of the switch is pressed both doors are locked When the UNLK side of the switch is pressed both doors are unlocked When the lock knob on the driver s door is lowered the passenger s door is also...

Page 28: ...CC Rules Operation is subject to the following two conditions This device may not cause harmful interference This device must accept any interference received including interference that may cause und...

Page 29: ...FCC Rules Operation is subject to the following two conditions This device may not cause harmful interference This device must accept any interference received including interference that may cause un...

Page 30: ...int the remote control switch toward the cen ter of the cabin Operate the remote control switch within 3 m 9 8 ft from the center of the cabin Press the LOCK button to lock all doors Press the UNLOCK...

Page 31: ...e remote control switch or the switch does not work please contact an autho rized dealer to obtain a spare remote control switch The remote control switch does not work under the following conditions...

Page 32: ...er and keep it away from dirt and dust Otherwise the switch could fail 1 Use a crosshead screwdriver to turn the screw and remove the cover If the cover is difficult to open insert a flat blade screwd...

Page 33: ...sy you could slip when climbing down from the vehicle or when operating the brake or clutch pedal Wipe any oil and grease off the soles of your shoes before entering or leaving the vehicle When puttin...

Page 34: ...a window or let anyone in your vehicle do so Serious injury could result from exter nal objects or in the event of sudden brak ing Be particularly careful when carrying a child in your vehicle Always...

Page 35: ...tant driver s window Press the switch to open the window Raise the switch to close the window 2 Power window lock switch Press the power window lock switch to prevent the assistant driver s window fro...

Page 36: ...3 13 Pull latch and push it outward to open Rear quarter window Z14188...

Page 37: ......

Page 38: ...4 1 Seats 4 2 Seat belts 4 5 Steering wheel 4 9 4 Seat and steering wheel adjustments...

Page 39: ...ctly P 4 5 Adjust the steering wheel to a position at which you can operate it comfortably with your arms slightly bent P 4 9 Seats WARNING Avoid adjusting the seat while the vehicle is moving since t...

Page 40: ...ll the reclining lever and set the seatback at the desired angle 2 3 Seat height adjustment The seat rises or lowers by one step every time you pull up or push down the height adjustment lever To rais...

Page 41: ...3 Assistant driver s seat To adjust the angle of the seatback of the assistant driver s seat move reclining lever NOTE The forward backward adjusting feature is not adjustable on the assistant driver...

Page 42: ...n Unless seated and properly belted up the risk of injury is greatly increased Seat belts should be worn as low as possi ble over the hips Wearing a seat belt across the abdomen could be dangerous sin...

Page 43: ...operly tightened the risk of it slip ping off in a collision is reduced Fastening 1 Hold tang and gently extend the belt If the belt locks or is difficult to extend let it retract and pull it gently a...

Page 44: ...Pull the belt end to shorten or the tongue to lengthen the belt as desired 3 Children and babies When carrying children or babies they must be restrained properly to minimize the risk of injury in the...

Page 45: ...mage that could stop the seat belts from functioning properly Replace seat belt unit if there is any malfunction or damage Replace any webbing that is cut rayed or other wise damaged Replace any seat...

Page 46: ...adjustments firmly push the lock lever down to lock the steering wheel in position Steering wheel WARNING After every adjustment try to move the steering wheel back and forth to make sure that it is s...

Page 47: ......

Page 48: ...als 5 13 Gearshift lever 5 14 Allison automatic transmission 1000RDS 2200RDS 5 15 Allison automatic transmission 3000RDS series 5 19 Parking brake 5 22 Combination switch 5 24 Van body dome light swit...

Page 49: ...Combination switch Van body dome light switch Brightness control switch Cruise control main switch Power mode switch other than FM65F Height control switch Air suspension vehicle Oil level check switc...

Page 50: ...r If the engine stops while the vehicle is on the road turning the starter switch to the S position will have no effect Starter switch WARNING Never turn the starter switch to any position other than...

Page 51: ...lamp personal lamp horn and central door lock can be used ACC The engine is shut off or is not running in this position The turn signal lamp wipers washer power windows and cigarette lighter can be u...

Page 52: ...monox ide CO which if breathed can cause unconsciousness or death If you smell exhaust gases inside the cab inspect the exhaust pipe and check whether exhaust gases are leaking through holes or crack...

Page 53: ...start in cold weather check if the preheating circuit fuse has blown P 13 10 On a vehicle that has not been operated for a long period or after replacement of engine oil or engine oil filter element...

Page 54: ...n only when absolutely necessary for example if the engine stops while the vehicle is on a level crossing In an automatic transmission vehicle of the FM65F the engine cannot be started unless the rang...

Page 55: ...hod to distribute oil throughout the engine CAUTION For safety apply the parking brake fully and chock the wheels to prevent the vehicle from moving Cranking the engine as described here is essential...

Page 56: ...ck that the gear shift lever is in the neutral position With an automatic transmission vehicle other than FM65F check that the range selector lever is in the P position With the FM65F automatic transm...

Page 57: ...or entering or leaving a garage do not run the engine for longer than is nec essary as the accumulation of exhaust gas in closed areas is very dangerous Exhaust emissions contain carbon monox ide CO w...

Page 58: ...after the engine is started The exhaust smells irritating with a vinegar like odor 1 When the engine has started remove your foot from the clutch pedal 2 Continue warming up the engine until the water...

Page 59: ...e posi tion between the ACC and LOCK posi tions marked with a 1 Apply the parking brake while depressing the brake pedal 2 Manual transmission vehicle Place gearshift lever in the neutral position Aut...

Page 60: ...s dangerous for a floor mat to cover the accelerator pedal or for floor mats to be laid in multiple layers since the acceler ator pedal may be prevented from returning when released WARNING Do not all...

Page 61: ...has come to a complete stop When backing up always double check to make sure that there is nothing in your path When the gearshift lever is in the neutral position never keep your hand on it Such for...

Page 62: ...rdrive off indicator lamp Transmission fluid temperature warning lamp Transmission warning lamp Shift lock release button 1 How to use the range selector lever Allison automatic transmission 1000RDS 2...

Page 63: ...lever in the P posi tion proceed as follows Depress the foot brake pedal to bring the vehicle to a halt then apply the parking brake Move the range selector lever from either the forward or reverse r...

Page 64: ...engine braking and long uphill driving The transmission will operate in the 4 speed mode 3 Power mode switch A choice of two driving modes is available to suit the road conditions and the load being c...

Page 65: ...p This lamp illuminates when there is something wrong in the transmission s electronic control system If it illuminates when the starter key is moved to the ON position but then goes out after a few s...

Page 66: ...l temperature warning lamp Transmission warning lamp 1 How to use the range selector lever Range selector lever position Corresponding range gear in manual mode P Park R Reverse N Neutral D Fixed in 3...

Page 67: ...ever to the D or R position while the engine is running faster than a regular idling speed or the vehicle is in motion the safety system may cause the transmis sion to remain in neutral If this happen...

Page 68: ...ection 1 Check that the electric fans on both sides of vehicle are operating 2 If the fan is not operating check the fuse replace it if blown Check the oil cooler for mud or other dirt and clean it if...

Page 69: ...ing lamp does not go out or if it keeps illuminating from time to time the system needs repairing Contact an authorized dealer 1 Parking brake lever FK61F To set for parking The parking brake is activ...

Page 70: ...ng brake control valve All models except FK61F To set for parking Pull knob of the parking brake control valve the rear wheels are blocked and the indicator lamp lights up To release Make sure that th...

Page 71: ...on for a long period without the engine running can drain the bat tery making the engine impossible to start NOTE Even when the vehicle is operated with the lighting switch in the OFF or position the...

Page 72: ...left turn the switch automatically moves back to the neutral position and the lamp stops flashing After making a moderate turn however the switch will some times not return automatically In this case...

Page 73: ...parking The indicator however is not illu minated Pushing the lever forward activates the exhaust brake While the exhaust brake activated indicator lamp stays illuminated The exhaust brake is temporar...

Page 74: ...to the wind shield The wiper blades could get damaged and the wiper motor could fail When the wipers are not used for a long time dust sand and other substances can collect between the wiper blades an...

Page 75: ...e washer fluid reservoir if the fluid level is low P 12 75 If there is washer fluid in the reservoir but none is sprayed when you operate the washer the nozzles may be blocked Clean the nozzles using...

Page 76: ...ul for freeway driving that involves almost no chances of pulling over and stopping NOTE For the sake of safety do not use the cruise control in the following driving conditions In heavy traffic which...

Page 77: ...return to a previously memorized speed Cruise control indicator lamp If the cruise control is activated this lamp illumi nates during driving NOTE The indicator lamp will light up when the starter sw...

Page 78: ...ission vehicle the selector lever must be in the D position Before pressing the ON side of the main switch to set a desired speed make sure the exhaust brake switch is in the OFF position You will not...

Page 79: ...t speed 3 To decrease the set speed in cruise con trol mode Turn the SET RESUME switch to the SET posi tion The vehicle will decelerate When the desired speed is reached release the switch The vehicle...

Page 80: ...ng driving because engine braking will no longer be possi ble It will also cause malfunction of the auto matic transmission 6 To reactivate the temporarily deacti vated cruise control To reactivate th...

Page 81: ...ehicles It is possible to lower the cargo bed while the vehi cle is stationary This function can be used with the starter switch in ON or ACC position NOTE The height control switch should be turned o...

Page 82: ...re per formed during the lowering process the cargo bed will automatically return to driving height The height control switch will automatically return to OFF The parking brake is released The starter...

Page 83: ...ration is impossible this is called automatic DPF regeneration However the automatic DPF regeneration cannot work in such cases as extremely slow driving and fre quently repeated engine start and shut...

Page 84: ...g sound and when your vehicle is in park a rise in idling speed to approx 700 to 800 rpm accompanied by exhaust brake valve operation These do not indicate any abnormalities Exhaust temperature is hig...

Page 85: ...e indicator lamp to perform the manual DPF regeneration in order to remove the PM inside the DPF by oxidation Fast flashing 0 3 second interval You must bring the vehicle to a stop in a safe place as...

Page 86: ...mission or place the selector lever in the P position other than FM65F or N position FM65F if your vehicle is equipped with an automatic transmission Do not depress the accelerator pedal If you are in...

Page 87: ...regeneration complete the remaining part of the sequence without delay by performing the above steps again 4 If the red warning lamp is illumi nated The red warning lamp will be illuminated if you con...

Page 88: ...rrangement of instruments and warning lamps 6 2 Speedometer 6 2 Tachometer 6 3 Air pressure gauge 6 3 Water temperature gauge 6 4 Fuel gauge 6 4 Warning indicator lamps 6 5 6 Instruments and warning l...

Page 89: ...eter or TRIP trip meter reading Each time the trip knob is pushed the indica tion switches as shown in the illustration ODO odometer Indicates the total distance covered by the vehicle in miles TRIP t...

Page 90: ...ake line air pressure and the lower gauge indicates the rear brake line pressure Red zone indicates that air pressure is either too low or too high If the needle deflects into the red zone warning lam...

Page 91: ...tting it run at a speed slightly above the idling RPM until the coolant cools down Turning off the engine immediately after stopping will cause the coolant temperature to rise quickly and may cause th...

Page 92: ...red warning lamps if illuminated warn you of vehicle component failures and possible dan ger of accident Never drive the vehicle while a red warning lamp is illuminated If any of them light up stop th...

Page 93: ...operated 12 25 Brake warning lamp FK61F Brake fluid at an excessively low level Excessive brake shoe clearance 6 9 Air pressure warning lamp Low air pressure in air tank 6 10 Transmission fluid tempe...

Page 94: ...Parking brake activated 5 22 Exhaust brake indicator lamp Exhaust brake activated 5 26 Engine preheat indicator lamp Engine being preheated 5 7 Overdrive OFF indicator lamp Allison automatic transmis...

Page 95: ...down and then take necessary action against overheating P 13 9 CAUTION Be sure to stop the engine only after letting it run at a speed slightly above the idling RPM until the coolant cools down Turnin...

Page 96: ...dealer 4 If fluid leaks are not detected fill with fluid to the normal level 5 If the lamp illuminates even when the brake fluid level is correct or after fluid has been added have the brakes inspect...

Page 97: ...t if the engine is started 1 Let the engine run at an intermediate RPM until the warning lamp goes out 2 Check piping and its connections for air leaks 3 If the lamp does not go out or goes on again s...

Page 98: ...ter warning lamp lights up when the oil filter element is clogged or the engine oil pressure becomes abnormally low Pull off the road as soon as it is safe to do so stop the engine and perform the fol...

Page 99: ...ger and then restart the engine If the lamp stays off there is no problem If the lamp illuminates again stop the engine and contact the nearest authorized dealer The red lamp is also illuminated if yo...

Page 100: ...s started if there are no problems 8 Vehicle control warning lamp The vehicle control warning lamp lights up when problems occur in the vehicle s electrical control system If it lights up pull off the...

Page 101: ......

Page 102: ...ions when driving a manual transmission vehicle 7 5 Precautions when driving an automatic transmission vehicle 7 6 Tips for improving fuel economy 7 7 Braking 7 7 On uphill and downhill roads 7 9 On r...

Page 103: ...y engaging the clutch Sudden starts place undue strain on the vehicle and should be avoided Also avoid slipping the clutch for extended periods since this can damage it In an automatic transmission ve...

Page 104: ...neces sary measures Contact an authorized dealer if the cause of the problem is unclear or if the problem requires complex repair work P 6 5 Precautions for driving WARNING Never place the starter sw...

Page 105: ...ing attention to safety ahead of the vehicle Continuous high speed driving burdens the engine and other vehicle parts Allow yourself enough time that you do not need to push the vehicle too hard Perfo...

Page 106: ...ion from the vehicle and from the vehicle and from the road ahead resulting in an accident Operate the radio and other items of equipment in the cab when the vehicle is stationary It is dangerous to o...

Page 107: ...tion to D On FM65F it is also possible to pull away using the range selector lever in the same way as a manual gearshift lever starting in 1 then upshifting position by position to D Do not push the r...

Page 108: ...ting RPM 1 400 rpm Moreover unnecessary acceleration and deceleration wastes fuel Do not keep the exhaust brake switch in the activation position at all times Frequent use of the exhaust brake reduces...

Page 109: ...the point at which you wish to come to a halt Do not pump the brake pedal as doing so reduces the air pressure which in turn could reduce braking power Using the exhaust brake on a wet frozen snow co...

Page 110: ...slightly to stop the vehicle 1 Uphill roads Downshift early when the speed begins to drop to minimize the load on the engine With an automatic transmission vehicle down shifting can be performed eithe...

Page 111: ...2 or 1 position On slippery roads avoid sudden engine braking since this could cause a skid Never coast downhill with the gearshift lever in neutral manual transmission vehicles or the range selector...

Page 112: ...ilure Use a low gear and try to drive at a constant speed when driving on gravel roads or muddy roads Do not race the engine when attempting to move out of mud Racing the engine is useless and even wo...

Page 113: ...while paying careful attention to sur rounding traffic and keeping light pressure on the brake pedal to dry the brake shoes and drums Avoid driving when the road is covered with much water because of...

Page 114: ...shift lever while sleep ing Also you could suffer carbon monox ide poisoning from exhaust gases if the vehicle is parked in a closed space Never leave lighters cans of carbonated drink and spectacles...

Page 115: ...out of the P posi tion and back to other ranges CAUTION Do not park the vehicle only by setting the range selector lever to the P position Be sure to also apply the parking brake at the same time On a...

Page 116: ...may exceed the GVWR For example a vehicle with a GVWR of 23 000 lb 10 430 kg has a front GAWR of 7 935 lb 3 600 kg and a rear GAWR of 15 800 lb 7 165 kg Added together the GAWRs total 23 735 lb 10 765...

Page 117: ...nt cargo from falling strap it down securely and cover it with a tarpaulin Secure the tarpaulin ends neatly so they do not flap WARNING When roping up cargo or covering it with a tarpaulin make sure t...

Page 118: ...8 1 Anti lock brake system ABS 8 2 ABS warning lamp 8 4 8 ABS driving hints...

Page 119: ...he vehicle ahead regardless of whether your vehicle is equipped with an ABS or not Also the braking distance of an ABS equipped vehicle on gravel or heavily snow covered roads may be longer than that...

Page 120: ...in a way which requires quick operation of the steering wheel There is likelihood of skidding due to the effect of engine braking on slippery surfaces when the vehicle carries little or no load In su...

Page 121: ...d not oper ate properly If illuminated this lamp indicates that there is a mal function in the anti lock brake system ABS Should this lamp illuminate during driving stop the vehicle in a safe place an...

Page 122: ...faulty have the sys tem repaired by an authorized dealer as soon as possible NOTE Even with the ABS faulty and the warning lamp remaining lit the normal brake system is still func tioning satisfactor...

Page 123: ......

Page 124: ...9 1 Heater 9 2 Air conditioner 9 7 9 Heating and air conditioning...

Page 125: ...ailable until the coolant temperature becomes sufficiently high 1 Control panel Fan speed dial Temperature control dial Mode selector dial Air selector switch Fan speed dial Fan speed dial allows you...

Page 126: ...just the air flow by moving the lever right or left or shut off the airflow by moving the lever to the position Lever posi tion Air outlets Purpose B Fresh air to head B A Warm air to feet and relativ...

Page 127: ...you want to heat the cab quickly or the outside air is dusty or polluted If the air selector switch is left too long in the recirculation position the windshield and win dows will fog up so set the s...

Page 128: ...of the air from both outlets 4 Defrosting Warm air is directed toward the windshield and door windows Select the high blower speed if you need to defrost quickly To remove frost or ice on the outside...

Page 129: ...e heater is not used turn the fan speed dial to the 0 position Pressing the air selector switch to ON the indicator comes on will prevent dust from enter ing the cab 7 Cleaning the air filter Clean th...

Page 130: ...ioner WARNING Never leave children alone in the vehicle In hot weather or when the vehicle is parked under the sun the temperature inside the vehicle may become extremely high and can cause heat strok...

Page 131: ...ir conditioner switch turns on the air con ditioner for cooling and dehumidifying When the air conditioner is on the indicator lamp inside the switch stays illuminated To turn off the air conditioner...

Page 132: ...ust the air flow by moving the lever right or left or shut off the airflow by moving the lever to the position Lever posi tion Air outlets Purpose B Fresh air to head B A Warm air to feet and relative...

Page 133: ...de air position during normal driving You can also select the recirculation position when parking to stop dust from getting inside the cab 2 Cooling Press the air conditioner switch then turn the temp...

Page 134: ...ector switch to ON the indicator comes on 4 Heating Warm air is directed to your feet If you want to heat the cab quickly or if the air outside is dusty or polluted press the air selec tor switch to O...

Page 135: ...rom both outlets 6 Defrosting Warm air is directed toward the windshield and door windows For quicker defrosting press the air conditioner switch and select the highest fan speed To remove frost or ic...

Page 136: ...e air conditioner press the air con ditioner switch Check that the indicator lamp in the switch goes out When the heater is not used turn the fan speed dial to the 0 position Pressing the air selector...

Page 137: ...r conditioner compres sor Check the refrigerant level if the air conditioner stops working efficiently To protect the environment your vehicle s air conditioning system uses refrigerant HFC 134a which...

Page 138: ...10 1 Cigarette lighter 10 2 Ashtrays 10 3 Sun visors 10 3 Interior personal lamp 10 4 Small article compartments 10 4 Using the radio 10 6 Accessories 10 7 10 Interior equipment and accessories...

Page 139: ...r pushed in Doing so could result in a fire Do not allow a child to touch the cigarette lighter The child could get burned Do not touch the metallic parts of the ciga rette lighter You could get burne...

Page 140: ...put out cigarettes and match sticks before putting them in the ashtrays Close ashtrays completely Put only cigarette stubs and matchsticks in the ashtray Empty the ashtray before it becomes full comp...

Page 141: ...ch is placed in the posi tion the lamp comes on when a door is opened and goes out when all the doors are closed The lamp always stays off when the lamp switch is in the OFF position CAUTION Leaving t...

Page 142: ...or holding highway toll cards etc Center console box Open the lid by lifting the black knob with your fin ger After closing press down lightly on the lid to lock it Pocket Use this pocket to store sma...

Page 143: ...cab WARNING Keep the lid closed while driving Do not keep anything heavy or that can roll easily in the glove compartment Oth erwise the object may open the lid and fall out while driving possibly in...

Page 144: ...r smoke or an abnormal smell is emitted by the audio system immediately stop using the audio system and have it inspected by an authorized dealer See an authorized dealer if you are considering adding...

Page 145: ......

Page 146: ...11 1 Coolant 11 2 Engine oil 11 2 Fuels 11 3 Other recommendations for cold weather operation 11 3 Installing tire chains 11 4 11 In cold weather...

Page 147: ...the FUSO DIESEL LONGLIFE COOLANT or equivalent to the recommended concentration P 12 47 CAUTION Never mix FUSO DIESEL LONGLIFE COOLANT with other brands of anti freeze or anti corro sion additives sin...

Page 148: ...the additive in the concentration indi cated by the manufacturer s instructions CAUTION Do not use engine coolant or antifreeze since these would damage the vehicle s paint Occasionally check the unde...

Page 149: ...once a month to maintain its functions even during the cold season when it is not being used Make sure that tire chains are installed properly so that they do not become loose and interfere with othe...

Page 150: ...n the inside chain by pulling cross chains for the inside tire outward NOTE Pull the hook section outward to the possible maxi mum extent 3 Temporarily connect hook of outside chain as shown 4 Pull th...

Page 151: ...ten extra chain links with a metal wire to pre vent them from hitting against other vehicle parts 8 Fit spring band Attach the hooks of spring band on the chain at even intervals with the hook ends fa...

Page 152: ...rakes check 12 57 Air pressure check 12 58 Parking brake check 12 59 Clutch check 12 60 Air drier check 12 61 Air tank check 12 62 Draining sediment from fuel tank 12 62 Tires check 12 63 Tires replac...

Page 153: ...rings and neckties and wear clothing that will not obstruct movement or snag on parts of the vehicle Wear all safety gear necessary for your task for example hard hat or goggles Use the correct tools...

Page 154: ...for the engine to cool down then grip the cap with a cloth and turn it slowly to release the internal pres sure before removing it completely Never crawl under the vehicle when it is supported only by...

Page 155: ...mental harm The DPF contains a catalytic converter Do not kick or knock the DPF since the inside catalyst and ceramic filter could be dam aged Water collecting in the DPF is slightly acidic and should...

Page 156: ...l blowing it off its stay Never operate the wipers when the front panel is open your hands or other items could become trapped in the wiper links WARNING Fit the stay securely into the hole in the fro...

Page 157: ...with chocks In a manual transmission vehicle put the gear shift lever in the neutral position In an automatic transmission vehicle other than FM65F put the range selector lever in the P position For F...

Page 158: ...ab with persons inside The cab can drop suddenly if it has heavy objects inside or is fitted with a roof deck You should be sufficiently aware of this for your safety Do not operate the steering wheel...

Page 159: ...ot pulled down completely the hook may not be engaged when the cab is lowered Raise the cab only gently WARNING Raise the cab only by holding the grip not the lever Otherwise the cab lock mecha nism m...

Page 160: ...le supporting it WARNING When pushing the lever and folding the cab stay take care that your fingers do not get trapped Lower the cab only by holding the grip not the lever Otherwise the cab lock mech...

Page 161: ...perform the cab tilting and lowering procedures over again CAUTION Make sure that the intake air duct and its rubber boot are perfectly aligned WARNING Ensure that the lever key is correctly installe...

Page 162: ...erating it 1 Before starting the engine Open the front panel Pre operational checks Coolant level Check that the coolant level is between the FULL and LOW marks on the reservoir tank P 12 47 Clutch fl...

Page 163: ...level check switch Change the engine oil if its level is above the round hole on the oil level gauge P 12 24 Belt tension and damage Check the fan belt tension by applying a force of 98 N 22 lbs 10 kg...

Page 164: ...ration All models other than FK61F Pull and place the parking control valve in the PARKING position and listen for the sound of air being released P 12 59 Lighting system operation Make sure that each...

Page 165: ...6 Air pressure built up rage 0 to 100 psi pressure build up time FK61F Within 6 minutes Other than FK61F Within 9 minutes P 12 58 Gauge and warning lamp operation Check that gauges and warning indicat...

Page 166: ...hat the brake fluid level is between the H and L marks on the reservoir tank P 12 33 Draining condensate from air tank Pull the ring on the air tank drain cock to remove condensate from the air tank P...

Page 167: ...uneven wear P 12 65 Tire inflation pressure Check that all tires are properly inflated P 12 63 Broken suspension springs Check for broken springs and tilt of vehicle body toward either side Check als...

Page 168: ...nd check that the brakes work effectively and evenly on all wheels P 12 58 Steering wheel operation Check that the steering wheel does not vibrate or pull to one side and that it is not unduly heavy A...

Page 169: ...opriate to your driving conditions Use only the lubricants specified P 14 3 Special lubricants must be used if the vehicle is used at temperatures below 23 C 10 F For details refer to an authorized de...

Page 170: ...ng them Always use the recommended grease CAUTION Wipe away any grease that sticks to wires or rubber hoses and any grease that overflows from the grease nipples Greasing Greasing intervals Every 10 0...

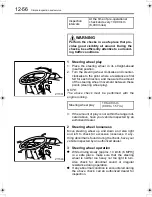
Page 171: ...12 20 Simple inspection and service Other than FM65F FM65F Z12063 Z12065 Z12067 Z11646 Z12064 Z12066 Z12068...

Page 172: ...front ends Front spring rear end two points each for left and right spring rear ends Rear spring front end two points each for left and right spring front ends Rear spring rear end two points each for...

Page 173: ...r left and right sides Manual transmission vehicles The point marked should be greased every 30 000 km 18 000 miles CAUTION Do not over lubricate the clutch shifter Exces sive grease can make the clut...

Page 174: ...h for left and right hinges Apply to rotating and sliding sections Recommended lubricant Chassis grease NLGI No 1 Li soap 3 Cab rear mount cushion two inside points each for left and right cushions Re...

Page 175: ...ine oil Any other oils may contain substances that cause the ceramic filter inside the DPF to be loaded with particulate matter PM prematurely to the capacity and thus shorten the effectively function...

Page 176: ...engine oil may increase due to the fuel that may have mixed with it when the DPF trapped PM is removed by oxidation This does not indicate any abnormality For the same reason the engine oil can smell...

Page 177: ...ne oil immediately Because this is a sign of deteriorated engine oil performance continued use of the same oil will cause engine failure and could even cause uncontrolled revving of the engine 6 After...

Page 178: ...ove drain plug from the oil pan to remove the oil 5 Tighten the oil pan drain plug and the oil filter drain plug 6 Carefully pour fresh engine oil through the oil filler 7 Wait for more than 6 minutes...

Page 179: ...nder heavy loads the engine oil will deteriorate quickly and must be replaced sooner than specified 2 Manual transmission gear oil The first transmission gear oil replacement during the run in period...

Page 180: ...in the trans mission Otherwise malfunction of the trans mission will result 3 Install the inspection plug Model Quantity Other than FM65F Approx 6 7 7 1 Add approx 0 5 0 5 if vehicle has PTO FM65F App...

Page 181: ...ion plug hole until it reaches the bottom of the hole 4 Install the inspection plug 3 Automatic transmission fluid WARNING The gear oil is extremely hot immediately after the vehicle has been operated...

Page 182: ...uid DEXRON III type Quantity required for replacement Liters qts 3 1 Check and replacement Refer to the separate Allison Automatic Transmis sion Operator s Manual In the FM65F model the automatic tran...

Page 183: ...ure is above 10 C 50 F Quantity required guideline Liters qts 4 1 Check 1 Remove inspection plug and make sure that the oil is topped off 2 If insufficient add oil through the inspection plug hole unt...

Page 184: ...nspection plug tightening torque 98 to 115 N m 72 to 87 ft lbs 10 to 12 kgf m WARNING The gear oil is extremely hot immediately after the vehicle has been operated Take care to avoid being scalded whe...

Page 185: ...ake system to swell and could cause brakes to become slug gish or to drag Also do not use contain ers which have been used for mineral oil for brake fluid Because brake fluid is highly hygroscopic it...

Page 186: ...d 1 If the fluid level is lower than the L line clean the surfaces around cap of reservoir tank open the cap and add the recommended brake fluid up to the H line 2 Close the cap firmly WARNING The con...

Page 187: ...ies and could cause a failure 6 1 Checking and adding fluid 1 Stop the engine with the front wheels in the straight ahead position Prevent the vehicle from moving by fully setting the parking brake an...

Page 188: ...the tank cap firmly otherwise power steering fluid will leak and could catch fire Also wipe clean spilled fluid If the fluid level is far below the specified range fluid may be leaking Have your vehi...

Page 189: ...eplace the filter element assembly with a new one The replacement part should be a genuine part 4 Install the filter element assembly using this pro cedure Apply a thin coat of engine oil to the gaske...

Page 190: ...its harness in the special tool separately sold CAUTION When replacing the fuel filter be sure to use the special tool to avoid damaging the filter If you do not have the special tool please contact...

Page 191: ...rfaces of the filter head and fil ter case that will come in contact with the O ring 11 Install the element with the hole of its end facing upward Be sure to use a genuine replacement element CAUTION...

Page 192: ...ging of the ele ment causes a decrease in engine output WARNING If the fuel filter is tightened to an inappro priate torque fuel could leak and the filter itself could become damaged possibly resultin...

Page 193: ...h makes on the case and cover aligned CAUTION Install the element correctly If the packing is broken or the clamps are loose the engine will suck in dust or other foreign mat ter and premature piston...

Page 194: ...hit it against another object If the element is contaminated with oily soot or dust replace it regardless of the sched uled replacement time 1 From the inside of the element blow com pressed air evenl...

Page 195: ...ement CAUTION Do not use a wet air cleaner element or safety element as this will adversely affect the exhaust emission control system 4 Replacement of PCV Positive Crank case Ventilation valve elemen...

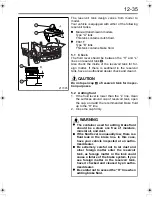
Page 196: ...Lightly coat the new O ring with engine oil before installing it onto the cap CAUTION Be sure to use the O ring supplied with the new valve element 7 Install the new valve element Always use a genuin...

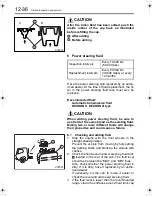
Page 197: ...be kept away from hot objects and open flames owing to he risk of fire or explo sion Wipe up any spilt fuel Keep cigarettes and other sources of heat away from the vehicle while draining water from t...

Page 198: ...ties shown in the fol lowing table Do no use hard water from wells and rivers as it is liable to form scales and cause corro sion 3 Coolant additives To prevent the cooling system freezing up and mini...

Page 199: ...HES IMMEDIATELY FLUSH FUSO LONGLIFE COOLANT WITH WATER AND SOAP DO NOT USE FUSO DIESEL LONGLIFE COOLANT IN A CLOSED OR POORLY VENTILATED SPACE SHOULD YOU INHALE A LARGE AMOUNT OF GAS OF FUSO DIESEL LO...

Page 200: ...on adding coolant P 12 50 Liters qts NOTE Vehicles are shipped with a 50 concentration of FUSO DIESEL LONGLIFE COOLANT and can therefore be used at temperatures down to 30 C 22 F CAUTION Use FUSO DIES...

Page 201: ...level is abnormally low and quickly drops again when coolant has been added coolant may be leaking from the cooling system Have the vehicle inspected by an authorized dealer 4 Close the front panel P...

Page 202: ...e engine when the needle moves to near the center of the scale If the needle is elsewhere other than in the red zone it indicates insufficient coolant Stop the engine and proceed to the next step 2 Ti...

Page 203: ...cooling system Pour soft water preferably after heating moder ately through the radiator cap opening and start the engine Run the engine at a medium range RPM until the water temperature exceeds 85 C...

Page 204: ...neces sary CAUTION If air is not completely removed from the cool ing system this may lead to reduced cooling efficiency and engine parts failure After replac ing the coolant drive the vehicle and the...

Page 205: ...at the same time 1 Check 1 Fully set the parking brake and block the wheels with chocks to prevent the vehicle from moving Then tilt the cab P 12 6 2 Press the belt with an approximately 98 N 22 lbs 1...

Page 206: ...kwise to increase tension After performing the adjust ment fully tighten the pulley mounting nut The steering wheel is a safety critical part of the vehicle If an inspection reveals any abnormality co...

Page 207: ...and left to check for excessive looseness If any thing abnormal is found during the check have your vehicle inspected by an authorized dealer 3 Steering wheel operation While driving slowly approx 10...

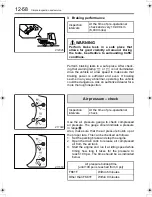
Page 208: ...of discharged air should be heard from the brake valve If anything abnormal is detected during the above check call an authorized dealer 2 Brake pedal play To check the pedal play use your finger to...

Page 209: ...s can be checked as follows 1 Set the parking brake and stop the engine 2 Open the drain cock to release all compressed air from the air tank 3 Start the engine and run it at idling speed while timing...

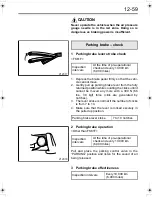
Page 210: ...y notches 3 The lever stroke is normal if the number of clicks is from 7 to 10 4 Make sure that the lever is locked securely in the pulled up position 2 Parking brake operation Other than FK61F Pull a...

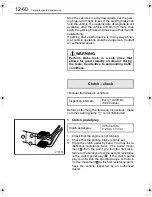
Page 211: ...lutch pedal play 1 Check that the engine is not running 2 Check that the parking brake is firmly set 3 Press the clutch pedal by hand You may feel a distinctive resistance twice The pedal move ment fr...

Page 212: ...s released slowly The air drier contains a desiccant that removes moisture from compressed air As part of pre operational checks open the drain cock of the air tank If a large amount of condensate dra...

Page 213: ...rature drop of more than 16 C 28 8 F This can happen when you open the drain cock in the early morning after you have stopped and parked the vehicle during the day time on the preceding day Remove the...

Page 214: ...check Inspection intervals At the time of pre operational check and every 10 000 km 6 000 miles Tire size Model Pressure kPa psi kgf cm2 225 70R 19 5 FK61F Front 660 95 6 75 Rear 660 95 6 75 10R22 5 1...

Page 215: ...se in air pressure Never fail to install tire valve caps after checking or adjusting the air pressure Unless the valve caps are replaced foreign bodies may interfere with the valves and cause air to l...

Page 216: ...a film of water caus ing the driver to lose control of both steering and braking 3 Checking for cracks damage and objects embedded in tread Check both the tread and the sides of each tire for cracks d...

Page 217: ...lock traffic and acti vate your hazard warning lamps to flash and use a red or white flag or cloth to give warning pass ing vehicles 3 Have all passengers get out of the vehicle 4 Block the tire with...

Page 218: ...and side of the vehicle turn the wheel nuts in the direction of arrow On the left hand side of the vehicle turn the wheel nuts in the direction of arrow WARNING Apply the jack only to designated jacki...

Page 219: ...ng Threads on wheel bolts and nuts Spherical surface of wheel nuts Disc wheel mounting surface Disc wheel mating surface Wheel nut contact surface on disc wheel Disc wheel inside surface 2 Apply a thi...

Page 220: ...t hand threads The bolts and nuts have stamped marks for easy identification an R mark for right hand wheels and an L mark for left hand wheels Wheel nuts wheel bolts outer wheel nuts and inner wheel...

Page 221: ...uter wheel of the dual wheels is replaced retighten the inner wheel nuts to the specified torque before mounting the outer wheel Wheel nut tightening torque FK61F 370 to 410 N m 275 to 304 ft lbs 38 t...

Page 222: ...r intervals Do not paint disc wheel mounting surfaces dual wheel mating surfaces wheel nut seating surfaces and wheel hub mounting surfaces as resulting thicker paint film could cause the wheel nuts t...

Page 223: ...o the specified torque 3 Apply a thin coat of chassis grease wheel bear ing grease or engine oil to the external threads of inner wheel nuts and the spherical surfaces of outer wheel nuts Tighten the...

Page 224: ...e vehicle tends to pull to one side during braking and could cause you to lose directional control of the vehicle Be sure to use the following type of tires FK61F 225 70R 19 5 FK62F FK65F 10R 22 5 14P...

Page 225: ...lade with a new genuine wiper blade CAUTION Do not bring the wiper arms back into posi tion or operate the wipers without wiper blades as this could scratch the windshield Never operate the wipers and...

Page 226: ...evel check hose 3 If the fluid level has dropped to the lower part of the hose or is not visible at all add washer fluid 2 Refilling 1 Open tank cap and add fluid until the level nears the upper part...

Page 227: ...NDS WASH HANDS AFTER HANDLING NEVER TOUCH THE BATTERY FLUID BATTERY FLUID IS DILUTE SULFURIC ACID AND CAN HARM MOST THINGS IT TOUCHES INCLUDING HUMAN SKIN AND CLOTHING IF YOU GET IT ON YOUR SKIN OR CL...

Page 228: ...ll the battery cover Make sure that the cover is held in position securely 2 Removal installation of battery Follow the instructions below when removing and installing the battery for charging or repl...

Page 229: ...e LOWER LEVEL line remove the 6 vent plugs and add distilled water via the vent plug holes until the battery fluid level is between the UPPER LEVEL and LOWER LEVEL lines Replace the vent plugs and the...

Page 230: ...is equipped with a diesel particulate fil ter DPF system This device collects particulate matter PM contained in diesel engine exhaust with a ceramic filter and continuously regenerates the fil ter by...

Page 231: ...ters may cause inefficient heating or air conditioning and even malfunction of the blower motor CAUTION Clean the air filters at shorter intervals if your vehicle is used frequently in dusty areas 1 O...

Page 232: ...filter all the way into position If the front of the intercooler is heavily clogged with dust or mud the engine performance may be affected Clean it from time to time by using a soft brush or somethi...

Page 233: ...cooler s electric cooling fan Do not use a high pressure cleaning equip ment Damage to the oil cooler may result Transmission oil cooler cleaning Cleaning your vehicle WARNING Some cleaning fluids are...

Page 234: ...following Been driven on coastal roads Been driven on roads where road chemicals have been applied Become contaminated by coal tar smoke soot powder dust iron powder lime powder sap bird droppings et...

Page 235: ...weather the key holes and rubber parts of the door sometimes freeze making it hard to open the door After washing remove moisture on and around the doors Applying silicone with antifreeze capabilities...

Page 236: ...ld cause a malfunction and damage to components Connectors on the alternator starter and other electrical components and connectors of electri cal wiring to them ABS devices behind tires and electric...

Page 237: ...2 Rust and corrosion Rust and corrosion developing on the underside and or undercarriage of the vehicle could cause an unexpected failure and even lead to an acci dent Check these areas occasionally...

Page 238: ...lean out all loose dust with a vacuum cleaner or soft brush 2 Dilute the cleaner in water to the specified con centration The best results can usually be obtained with a thinner solution When soap sud...

Page 239: ...se and chili sauce 1 Carefully clean off the contamination then wash the area with water and dry it 2 If any spot remains clean with a fabric cleaning solvent 3 6 Cleaning vinyl surfaces Vinyl can usu...

Page 240: ...p has burned out 13 17 When braking is sluggish 13 22 If parking brake cannot be released normally 13 22 If the engine stalls while the vehicle is in motion 13 24 If a tire goes flat while the vehicle...

Page 241: ...speci fied amperage 13 10 Battery has run down Charge or replace the battery 12 76 Battery cable is disconnected loose or corroded Remove corrosion and connect the cable correctly 13 24 Connection to...

Page 242: ...page The starter switch is faulty Have an authorized dealer perform necessary inspection There is a fault in the fuel injection system Have an authorized dealer perform necessary inspection Possible...

Page 243: ...The air cleaner is clogged Clean or replace the air cleaner ele ment 12 41 Tire pressure is too low Adjust to the adequate inflation pres sure 12 63 The clutch is slipping Manual transmission vehicle...

Page 244: ...radiator is plugged with dust and dirt Clean 12 81 The DPF is blocked Have an authorized dealer perform necessary inspection Possible cause Remedy Ref page Clutch fluid is insufficient Add clutch flu...

Page 245: ...on the front side Load cargo evenly 7 15 Power steering fluid is insufficient Add power steering fluid 12 36 Front tire pressure is insufficient Inflate tires to recommended pres sures 12 4 Possible...

Page 246: ...he battery terminals are loose or corroded Scrape off corrosion and tighten down terminals 12 76 The drive belt is loose Adjust the belt tension 12 54 The battery is short of electrolyte Add battery e...

Page 247: ...r vehicle carries reflective triangles erect them by the side of the road behind the vehicle 2 Repair Check the mechanical failure and if you judge it readily repairable fix it while paying attention...

Page 248: ...rmal idling speed so that the engine will cool down CAUTION Be sure to stop the engine only after letting it run at a speed slightly above the idling RPM until the coolant cools down Turning off the e...

Page 249: ...ntact an authorized dealer for assistance If a lamp fails to illuminate or electrical equip ment does not function a fuse may have blown Check and replace fuses as necessary Before checking or replaci...

Page 250: ...el align the lugs on the panel with the cuts in the dashboard insert the pins in 8 places in the holes and push the panel into position by hand 2 To remove a blown fuse use fuse puller located in the...

Page 251: ...e of a blown fuse cannot be deter mined or the same fuse blows frequently have your vehicle inspected at an authorized dealer Use care not to splash water on or around the glove compartment Should wat...

Page 252: ...B06 30A ABS B07 10A Stop lamps B08 15A Low beam headlamp LH B09 15A High beam headlamps B10 15A Low beam headlamp RH B11 20A Tail lamps B13 20A Accessory power supply optional socket circuit B14 5A T...

Page 253: ...wer supply battery circuit B27 15A Horn B28 5A Daytime running light system B30 15A Automatic transmission B32 15A Tester B33 10A Accessory power supply ACC circuit B34 10A Heated mirrors B36 15A Van...

Page 254: ...zed dealer and have them check your vehicle For high current fuses first remove their mounting nuts and then remove the fuses For other fuses simply pull them off CAUTION Close the cover completely to...

Page 255: ...y and then replace the fuse with a genuine one 127A No Amperage casing color Protected circuit FH1 60A yellow Fuse box A01 A05 M01 M20 S01 FH2 60A yellow Fuse box B01 B06 FH3 60A yellow Fuse box B07 B...

Page 256: ...em Contact with such a substance could discolor or crack the lenses If such a substance gets on a plastic lens immedi ately wipe it off or rinse it off with water Burnt bulbs should be replaced as soo...

Page 257: ...lamp bulb as its high inner pressure increases chance of injury NOTE Inside lenses in lamps such as headlamps tempo rarily fog during driving in the rain or vehicle wash Just as in the case of window...

Page 258: ...wisting and correct it if necessary 4 Fit the cover while aligning its mark with the boss removal position index on the headlamp body then rotate the cover clockwise until the mark points at the other...

Page 259: ...lacing front turn signal lamp 1 Open the front panel P 12 4 2 Remove socket by turning it counterclock wise 3 Push bulb and turn counterclockwise to remove it 4 Install the lamp by reversing the order...

Page 260: ...o the holes in the lamp body and then pushing the bottom of the lens into position 6 Replacing other lamps 1 Loosen the screw that secures the lens then remove the lens 2 Turn the bulb counterclockwis...

Page 261: ...ofessional towing service When braking is sluggish WARNING Activating the parking brake while driving could cause the vehicle to topple over The brake system is of a dual circuit design one circuit fo...

Page 262: ...ive the release bolt 1 4 of a turn clockwise then check that it cannot be pulled out 5 Fit the washer and nut onto the release bolt Then turn the nut down the bolt using a wrench with a face to face d...

Page 263: ...ace the tire select a flat surface where your vehicle will not hinder traffic Perform the following procedure to start your engine by connecting your battery to the well charged bat tery of another ve...

Page 264: ...receiving the boost before attempting to turn over the engine WARNING Check the battery s fluid level before con necting booster cables If the fluid is below the LOWER LEVEL line add battery fluid or...

Page 265: ...of the two air bleeder plugs is the most convenient both plugs provide the same effect 2 Cover the pipe portion of the loosened air bleeder plug with a cloth and operate the prim ing pump to pump out...

Page 266: ...onnect either the propeller shaft or the rear axle shaft whichever is easier If you disconnect the rear axle shaft cover the opening to prevent oil and grease from escaping CAUTION Before towing an au...

Page 267: ...raising the front wheels or towing confirm that the chain will not damage any parts of the vehicle Remove the parts that may be damaged Tow the vehicle only with a specially designed towing truck If...

Page 268: ...14 1 Recommended lubricants hydraulic fluids and quantities 14 2 Service data 14 4 14 Service data...

Page 269: ...uge inspection plug holes and level lines as appropriate Recommended lubricants hydraulic fluids and quantities Item Quantity Engine Oil pan Approx 11 11 6 Oil filter Approx 2 3 2 4 Manual transmissio...

Page 270: ...ing to GL 5 SAE140 or SAE85W 140 if the vehicle is to be driven under heavy load conditions as for example driving up long uphill grades Remember however that this oil is be used only when the tempera...

Page 271: ...up time from 0 to 100 psi with the engine idling FK61F Within 6 minutes Other than FK61F Within 9 minutes Parking brake lever stroke FK61F when pulled with a 295 N 66 lbs 30 kgf force 7 to 10 notches...

Page 272: ...15 1 Maintenance schedule 15 2 Lubrication schedule 15 11 15 Maintenance schedule...

Page 273: ...s see the section entitled Lubrication schedule 1 30 000 km 18 000 miles or 6 months whichever occurs first 2 60 000 km 36 000 miles or 12 months whichever occurs first 3 FK61F FK62F FK65F 4 FK62F FK6...

Page 274: ...e the engine compartment Replace if necessary Belt tension and damage I I Press midpoint of belt firmly with finger to measure deflection and check for belt damage 12 54 Coolant level and leaks from c...

Page 275: ...ent Every 24 months Replace DPF pressure sensor hose Starter function I Operate starter switch and check the switch for proper func tion Alternator function I Check for function with a circuit tester...

Page 276: ...ss I Turn propeller shaft manually to check for loose spline cou pling Check for looseness between spider and needle roller bear ing FRONT AND REAR AXLES Axle shaft torsion and cracks I Remove axle sh...

Page 277: ...spring diaphragm replacement 5 Every 36 months Check diaphragm and replace if necessary Oil leaks and damage of shock absorbers I Check for oil leaks from and damage of cylinders and other parts BRAK...

Page 278: ...drainage 12 61 Check drain from air drier exhaust port I Check to see that oil is not dis charged abnormally from exhaust port of air drier 12 61 Replacement of drying agent in air drier Every 60 000...

Page 279: ...and rubber parts replacement Every 12 months Check check valve packing and rubber parts replace if neces sary Brake valve packing and rubber parts replacement Every 12 months Check brake valve packing...

Page 280: ...ering hoses and pipes for looseness Wheel alignment I Measure toe in camber caster and kingpin inclination angles Right and left turning angles and power steering function I Check that stopper bolt is...

Page 281: ...ery 20 000 km 12 000 miles Check electrolyte level Measure electrolyte specific gravity with hydrometer 12 76 Operation and damage of lighting system and turn signal lamps I I Check operation damage a...

Page 282: ...km 6 000 miles Every 30 000 km 18 000 miles 1 Every 60 000 km 36 000 miles 2 Engine oil contamination and oil level I 12 24 Engine oil replacement R R Clutch reservoir tank fluid level I I 12 33 Clutc...

Page 283: ...l replacement R R Hub bearing grease and oil seal replacement R Brake reservoir tank fluid level 3 I I 12 33 Brake reservoir tank fluid replacement 3 R Power steering fluid level I 12 36 Power steerin...

Page 284: ...16 1 16 Alphabetical index...

Page 285: ...garette lighter 10 2 Cleaning your vehicle 12 82 Clutch 12 60 Clutch fluid 12 33 Clutch pedal 5 14 Coolant 12 47 Cruise control 5 29 Cup holder 10 6 Dimmer switch 5 25 Door pocket 10 5 Door window gla...

Page 286: ...2 Power window switches 3 12 Powerline label 1 2 Pre operational check 1 4 12 11 Refueling 1 6 Reporting safety defects 1 9 Seat belts 4 5 Seats 4 2 Service brakes 12 57 Service data 14 1 Speedometer...

Page 287: ......

Page 288: ...17 MAINTENANCE RECORD NOTE The symbols and prefixed to some check items stand for Exhaust Emission Control item and Noise Control item respectively 17 1...

Page 289: ......

Page 290: ...tification number 1 4 000 km 2 500 miles 4 000 km 2 500 miles Lubrication Engine oil replacement Manual transmission oil replacement Axle housing gear oil replacement Inspection and maintenance Power...

Page 291: ......
Page 292: ...ring fluid level Lubrication of propeller shaft universal joint slip joint center bearing Lubrication of king pins Lubrication of chassis parts Inspection and maintenance Engine Air fuel oil or coolan...

Page 293: ...n Parking brake effectiveness Parking brake lever stroke Steering system Fluid leaks from steering system Steering wheel play Steering operating condition Looseness and play of steering system includi...

Page 294: ...int center bearing Lubrication of king pins Lubrication of chassis parts Inspection and maintenance Engine Air fuel oil or coolant leaks from engine Engine starting performance speed noise and exhaust...

Page 295: ...veness Parking brake lever stroke Steering system Fluid leaks from steering system Steering wheel play Steering operating condition Looseness and play of steering system including hoses and pipes Drag...

Page 296: ...ounting pads Lubrication of king pins Lubrication of chassis parts Inspection and maintenance Engine Air fuel oil or coolant leaks from engine Engine starting performance speed noise and exhaust gas c...

Page 297: ...r drier Check drain from air drier exhaust port Brake shoe clearance Brake lining wear Parking brake operation Parking brake effectiveness Parking brake lever stroke Steering system Fluid leaks from s...

Page 298: ...shaft universal joint slip joint center bearing Lubrication of king pins Lubrication of chassis parts Inspection and maintenance Engine Air fuel oil or coolant leaks from engine Engine starting perfor...

Page 299: ...veness Parking brake lever stroke Steering system Fluid leaks from steering system Steering wheel play Steering operating condition Looseness and play of steering system including hoses and pipes Drag...

Page 300: ...ler shaft universal joint slip joint center bearing Lubrication of king pins Lubrication of chassis parts Inspection and maintenance Engine Air fuel oil or coolant leaks from engine Engine starting pe...

Page 301: ...on Parking brake effectiveness Parking brake lever stroke Steering system Fluid leaks from steering system Steering wheel play Steering operating condition Looseness and play of steering system includ...

Page 302: ...ngine Air fuel oil or coolant leaks from engine Engine starting performance speed noise and exhaust gas conditions Retightening intake and exhaust manifold bolts Valve clearance Oil filter replacement...

Page 303: ...nder piston cup and dust seal replacement Air compressor to air drier hose replacement Brake booster packing cup and rubber parts replacement Brake hose replacement Check valve packing and rubber part...

Page 304: ...oint slip joint center bearing Lubrication of king pins Lubrication of chassis parts Inspection and maintenance Engine Air fuel oil or coolant leaks from engine Engine starting performance speed noise...

Page 305: ...on Parking brake effectiveness Parking brake lever stroke Steering system Fluid leaks from steering system Steering wheel play Steering operating condition Looseness and play of steering system includ...

Page 306: ...on of propeller shaft universal joint slip joint center bearing Lubrication of king pins Lubrication of chassis parts Inspection and maintenance Engine Air fuel oil or coolant leaks from engine Engine...

Page 307: ...ion Parking brake effectiveness Parking brake lever stroke Steering system Fluid leaks from steering system Steering wheel play Steering operating condition Looseness and play of steering system inclu...

Page 308: ...nance Engine Air fuel oil or coolant leaks from engine Engine starting performance speed noise and exhaust gas conditions Fuel filter replacement Retightening the fuel tank bracket bolts Belt tension...

Page 309: ...king brake operation Parking brake effectiveness Parking brake lever stroke Steering system Fluid leaks from steering system Steering wheel play Steering operating condition Looseness and play of stee...

Page 310: ...niversal joint slip joint center bearing Lubrication of king pins Lubrication of chassis parts Inspection and maintenance Engine Air fuel oil or coolant leaks from engine Engine starting performance s...

Page 311: ...veness Parking brake lever stroke Steering system Fluid leaks from steering system Steering wheel play Steering operating condition Looseness and play of steering system including hoses and pipes Drag...

Page 312: ...Lubrication of king pins Lubrication of chassis parts Inspection and maintenance Engine Air fuel oil or coolant leaks from engine Engine starting performance speed noise and exhaust gas conditions Ret...

Page 313: ...arking brake lever stroke Steering system Fluid leaks from steering system Steering wheel play Steering operating condition Looseness and play of steering system including hoses and pipes Drag link ba...

Page 314: ...aintenance Engine Air fuel oil or coolant leaks from engine Engine starting performance speed noise and exhaust gas conditions Retightening intake and exhaust manifold bolts Valve clearance Oil filter...

Page 315: ...packing cup and rubber parts replacement Brake hose replacement Check valve packing and rubber parts replacement Brake valve packing and rubber parts replacement Air compressor to air drier hose repl...

Page 316: ...Lubrication of king pins Lubrication of chassis parts Inspection and maintenance Engine Air fuel oil or coolant leaks from engine Engine starting performance speed noise and exhaust gas conditions Ret...

Page 317: ...arking brake lever stroke Steering system Fluid leaks from steering system Steering wheel play Steering operating condition Looseness and play of steering system including hoses and pipes Drag link ba...

Page 318: ...oint center bearing Lubrication of king pins Lubrication of chassis parts Inspection and maintenance Engine Air fuel oil or coolant leaks from engine Engine starting performance speed noise and exhaus...

Page 319: ...veness Parking brake lever stroke Steering system Fluid leaks from steering system Steering wheel play Steering operating condition Looseness and play of steering system including hoses and pipes Drag...

Page 320: ...ubrication of cab rear mounting pads Lubrication of king pins Lubrication of chassis parts Inspection and maintenance Engine Air fuel oil or coolant leaks from engine Engine starting performance speed...

Page 321: ...ir drier Check drain from air drier exhaust port Brake shoe clearance Brake lining wear Parking brake operation Parking brake effectiveness Parking brake lever stroke Steering system Fluid leaks from...

Page 322: ...ion of propeller shaft universal joint slip joint center bearing Lubrication of king pins Lubrication of chassis parts Inspection and maintenance Engine Air fuel oil or coolant leaks from engine Engin...

Page 323: ...ion Parking brake effectiveness Parking brake lever stroke Steering system Fluid leaks from steering system Steering wheel play Steering operating condition Looseness and play of steering system inclu...

Page 324: ...Lubrication of king pins Lubrication of chassis parts Inspection and maintenance Engine Air fuel oil or coolant leaks from engine Engine starting performance speed noise and exhaust gas conditions Re...

Page 325: ...arking brake lever stroke Steering system Fluid leaks from steering system Steering wheel play Steering operating condition Looseness and play of steering system including hoses and pipes Drag link ba...

Page 326: ...Engine Air fuel oil or coolant leaks from engine Engine starting performance speed noise and exhaust gas conditions Retightening of intake and exhaust manifold bolts Valve clearance Oil filter replace...

Page 327: ...al replacement Air compressor to air drier hose replacement Brake booster packing cup and rubber parts replacement Brake hose replacement Check valve packing and rubber parts replacement Brake valve p...

Page 328: ...Lubrication of king pins Lubrication of chassis parts Inspection and maintenance Engine Air fuel oil or coolant leaks from engine Engine starting performance speed noise and exhaust gas conditions Re...

Page 329: ...arking brake lever stroke Steering system Fluid leaks from steering system Steering wheel play Steering operating condition Looseness and play of steering system including hoses and pipes Drag link ba...

Page 330: ...eller shaft universal joint slip joint center bearing Lubrication of king pins Lubrication of chassis parts Inspection and maintenance Engine Air fuel oil or coolant leaks from engine Engine starting...

Page 331: ...veness Parking brake lever stroke Steering system Fluid leaks from steering system Steering wheel play Steering operating condition Looseness and play of steering system including hoses and pipes Drag...

Page 332: ...ar mounting pads Lubrication of king pins Lubrication of chassis parts Inspection and maintenance Engine Air fuel oil or coolant leaks from engine Engine starting performance speed noise and exhaust g...

Page 333: ...ir drier Check drain from air drier exhaust port Brake shoe clearance Brake lining wear Parking brake operation Parking brake effectiveness Parking brake lever stroke Steering system Fluid leaks from...

Page 334: ...joint center bearing Lubrication of king pins Lubrication of chassis parts Inspection and maintenance Engine Air fuel oil or coolant leaks from engine Engine starting performance speed noise and exhau...

Page 335: ...veness Parking brake lever stroke Steering system Fluid leaks from steering system Steering wheel play Steering operating condition Looseness and play of steering system including hoses and pipes Drag...

Page 336: ...Lubrication of king pins Lubrication of chassis parts Inspection and maintenance Engine Air fuel oil or coolant leaks from engine Engine starting performance speed noise and exhaust gas conditions Re...

Page 337: ...arking brake lever stroke Steering system Fluid leaks from steering system Steering wheel play Steering operating condition Looseness and play of steering system including hoses and pipes Drag link ba...

Page 338: ...e Engine Air fuel oil or coolant leaks from engine Engine starting performance speed noise and exhaust gas conditions Retightening intake and exhaust manifold bolts Valve clearance Oil filter replacem...

Page 339: ...packing cup and rubber parts replacement Brake hose replacement Check valve packing and rubber parts replacement Brake valve packing and rubber parts replacement Air compressor to air drier hose repl...

Page 340: ...universal joint slip joint center bearing Lubrication of king pins Lubrication of chassis parts Inspection and maintenance Engine Air fuel oil or coolant leaks from engine Engine starting performance...

Page 341: ...on Parking brake effectiveness Parking brake lever stroke Steering system Fluid leaks from steering system Steering wheel play Steering operating condition Looseness and play of steering system includ...

Page 342: ...joint center bearing Lubrication of king pins Lubrication of chassis parts Inspection and maintenance Engine Air fuel oil or coolant leaks from engine Engine starting performance speed noise and exhau...

Page 343: ...veness Parking brake lever stroke Steering system Fluid leaks from steering system Steering wheel play Steering operating condition Looseness and play of steering system including hoses and pipes Drag...

Page 344: ...ar mounting pads Lubrication of king pins Lubrication of chassis parts Inspection and maintenance Engine Air fuel oil or coolant leaks from engine Engine starting performance speed noise and exhaust g...

Page 345: ...of air drier Check drain from air drier exhaust port Brake shoe clearance Brake lining wear Parking brake operation Parking brake effectiveness Parking brake lever stroke Steering system Fluid leaks f...

Page 346: ...er shaft universal joint slip joint center bearing Lubrication of king pins Lubrication of chassis parts Inspection and maintenance Engine Air fuel oil or coolant leaks from engine Engine starting per...

Page 347: ...veness Parking brake lever stroke Steering system Fluid leaks from steering system Steering wheel play Steering operating condition Looseness and play of steering system including hoses and pipes Drag...

Page 348: ...Lubrication of king pins Lubrication of chassis parts Inspection and maintenance Engine Air fuel oil or coolant leaks from engine Engine starting performance speed noise and exhaust gas conditions Re...

Page 349: ...arking brake lever stroke Steering system Fluid leaks from steering system Steering wheel play Steering operating condition Looseness and play of steering system including hoses and pipes Drag link ba...

Page 350: ...nting pads Lubrication of king pins Lubrication of chassis parts Inspection and maintenance Engine Air fuel oil or coolant leaks from engine Engine starting performance speed noise and exhaust gas con...

Page 351: ...m and lining wear Damage on boot of brake chamber expander Wheel cylinder piston cup and dust seal replacement Air compressor to air drier hose replacement Brake booster packing cup and rubber parts r...

Page 352: ...tion of king pins Lubrication of chassis parts Inspection and maintenance Engine Air fuel oil or coolant leaks from engine Engine starting performance speed noise and exhaust gas conditions Retighteni...

Page 353: ...iveness Parking brake lever stroke Steering system Fluid leaks from steering system Steering wheel play Steering operating condition Looseness and play of steering system including hoses and pipes Dra...

Page 354: ...of chassis parts Inspection and maintenance Engine Air fuel oil or coolant leaks from engine Engine starting performance speed noise and exhaust gas conditions Oil filter replacement Retightening the...

Page 355: ...ke Steering system Fluid leaks from steering system Steering wheel play Steering operating condition Looseness and play of steering system including hoses and pipes Drag link ball joint dust boots Cab...

Reviews: