background image

Prepare the 

Fuser Unit

QMS magicolor 2 Op

eration

9-6

3

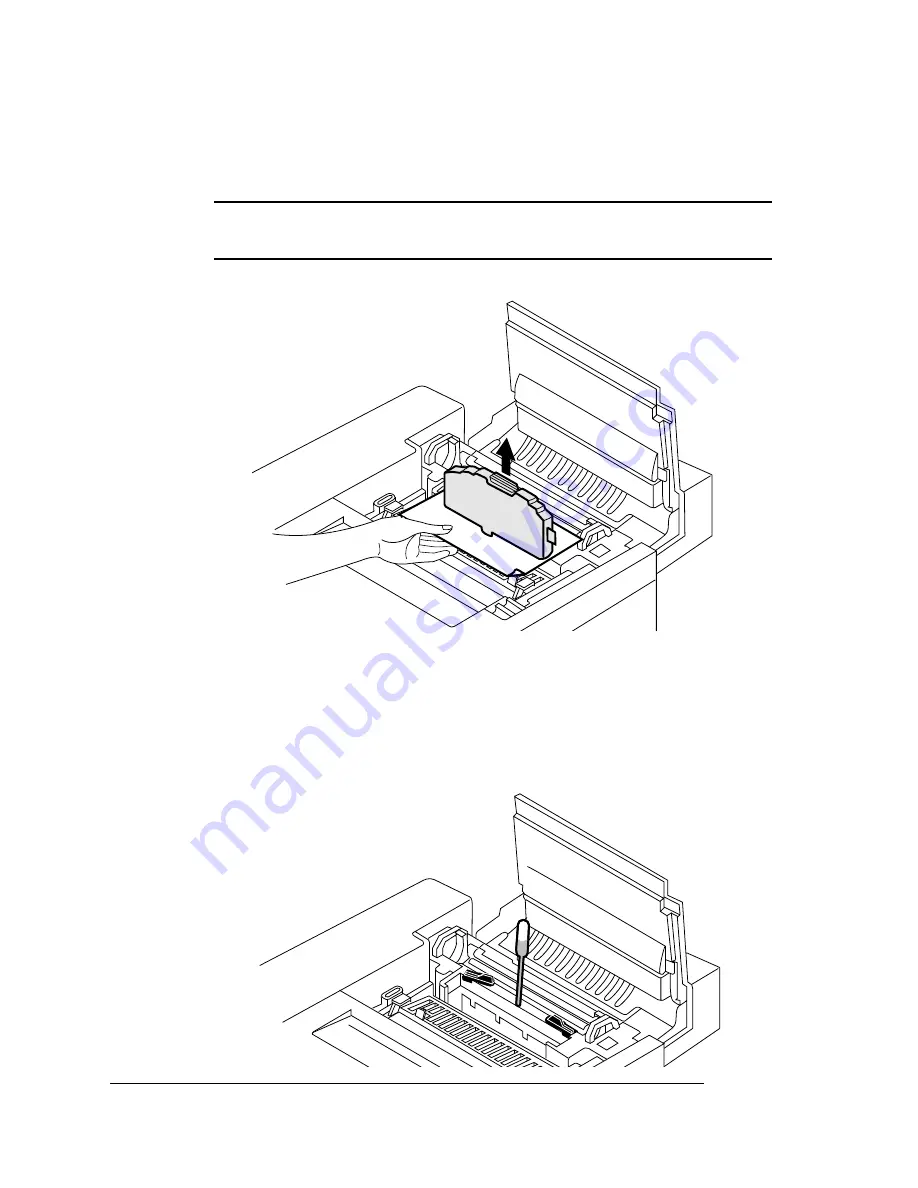
Remove the oil bottle.

s

Caution: 

Hold a sheet of paper under the oil bottle as you remove 

it, so no oil drips into the printer.

4

Place the oil bottle in an oil-proof container, such as a plastic 
bag, until you’re ready to reinstall it.

5

Use an eye-dropper to remove any excess oil from the fuser.

Dispose of the oil following local safety laws and regulations.

Summary of Contents for MAGICOLOR 2

Page 1: ...QMS magicolor 2 Print System Operation 1800482 001B...

Page 2: ...r LocalTalk Macintosh TrueType Apple Computer Inc VINES Banyan Centronics Centronics Color Solutions ColorBlind Color Solutions DEC DECnet LN03 LN03 Plus VMS Digital Equipment Corporation PhoneNET Far...

Page 3: ...ypographic Conventions 1 4 2 Consumables Introduction 2 2 Loading the Media Cassette 2 2 Prepare the Paper 2 2 Load the Cassette 2 2 Using Media Other than Paper 2 4 Using Envelopes 2 4 Using Labels 2...

Page 4: ...nabling Disabling Cassette Chaining 3 5 Collating Output 3 6 Enabling Disabling Collation 3 6 Working with Chunk Collation 3 7 Improving Collation Performance 3 8 2 Sided Printing 3 9 Printing on Stan...

Page 5: ...the Paper Exit Rollers 5 7 Cleaning the OPC Belt Cartridge 5 8 Cleaning the Laser Lens 5 10 Cleaning the Exterior of The Printer 5 11 Maintenance Schedule 5 12 Replacing the Fuser Oil Bottle and Clean...

Page 6: ...erstanding Media Jam Status Messages 7 4 Removing Media Jams 7 5 Misfeed Jams 7 5 Inner Jams Outer and Drum Jams 7 6 8 Troubleshooting Printer Problems Introduction 8 3 Status and Service Messages 8 3...

Page 7: ...0 2400x600 dpi Printing Unavailable 8 25 Blank Pages 8 26 Not All Pages Print 8 26 Kanji Option Kit Problems 8 27 Can t Download Kanji Fonts 8 27 Can t Access Kanji Fonts 8 28 Can t Access the Kanji F...

Page 8: ...rces of Support A 2 Your QMS Vendor A 2 Your Application Vendor A 2 Q FAX A 2 CompuServe A 3 Internet A 3 QMS Customer Response Center CRC A 4 QMS World wide Offices A 5 B Configuration Menu Introduct...

Page 9: ...1 Introduction In This Chapter n Introduction on page 1 2 n About This Manual on page 1 2...

Page 10: ...Describes the media that s best suited for your printer how to load paper labels transparencies envelopes and how to replace the toner cartridges OPC belt cartridge fuser oil bottle cleaning roller a...

Page 11: ...a service call 9 Repacking the Printer Explains how to repack the printer in case you need to relocate or ship your printer after it s been installed A QMS Customer Support Provides product sales and...

Page 12: ...sich exakt an die im Handbuch beschriebene Vorgehensweise da sonst Verletzungsgefahr bestehen k nnte v Mixed Case Courier Text you type and messages and information displayed on the screen Mixed Case...

Page 13: ...les In This Chapter n Introduction on page 2 2 n Loading the Media Cassette on page 2 2 n Using Media Other than Paper on page 2 4 n Using Toner Cartridges on page 2 9 n Replacing a Toner Cartridge on...

Page 14: ...fall into the printer 2 Holding the stack with one hand fan the paper with the other This gets air through the sheets and prevents static buildup 3 Take off the top and bottom sheets Residual glue bu...

Page 15: ...vided on the inside left side of the cassette The media cassette holds 250 sheets of 20 lb 75g m2 paper Paper is packed in reams of 500 sheets Do not overfill the cassette n The printing side of the p...

Page 16: ...ast a 0 16 4 06 mm margin from the edges of the envelope n Print on the front side only Some parts of the envelope consist of three layers of paper the front back and flap Anything printed in these la...

Page 17: ...the corners 2 Flex the envelope stack including the edges to remove any stiffness 3 Correct any dog eared corners and then tap the envelopes on a flat surface to align them 4 Remove the media cassette...

Page 18: ...stack into the cassette with the printing side up Note Check your application documentation to determine if the flap should be placed on the left or on the right You can also print a single envelope...

Page 19: ...els Type Refer to the specifications in chapter 2 Print Media in the Reference Notes n Avoid using labels with exposed adhesive it may stick to the toner cartridge or the fixing roller causing labels...

Page 20: ...n sheet of paper first to check placement Input Source Upper cassette Capacity Up to 50 sheets depending on the thickness of the transparencies Note If you have problems feeding 50 sheets try loading...

Page 21: ...ute the toner by gently rocking the cartridge side to side Then reinstall the cartridge If the TONER LOW message remains in the message window after you redistribute the toner replace the cartridge Th...

Page 22: ...is 95 F 35 C and the maximum storage humidity is 80 without condensation n Keep toner cartridges level during storage Do not stand or store cartridge on their ends or turn upside down the toner inside...

Page 23: ...rd the empty toner cartridge s Caution Put the old toner cartridge in a trash receptacle Do not dispose of it by burning 3 Remove the toner cartridge from its shipping carton 4 Distribute the toner in...

Page 24: ...rtridge and your prints may be smudged Pull the toner cartridge out so that it s firmly seated but not locked into place While the cartridges may appear not to be fully inserted closing the front cove...

Page 25: ...High Resolution Printing on page 3 2 n Cassette Chaining on page 3 5 n Collating Output on page 3 6 n 2 Sided Printing on page 3 8 n Printing on Standard and Custom Media Sizes on page 3 9 n Working w...

Page 26: ...n for business documents 600x600 dpi resolution provides excellent print quality for most business applications such as letters proposals and presentations With 600 dpi in both horizontal and vertical...

Page 27: ...tem Memory Requirements You may also need additional memory SIMMs for the following n To print complex graphics or complex PostScript documents n For increased collation performance n For increased sp...

Page 28: ...printer driver or QMS Document Option Commands DOCs If you want the printer to use a lower default resolution when you restore defaults set this option to your choice and make any other necessary conf...

Page 29: ...procedure for using a dual cassette printer n Select an alternate cassette for chaining in the QMS Level 2 Windows printer driver n On a network use CrownAdmin 3 to select the media cassettes and or t...

Page 30: ...aving to separate and sort individual copies of a document Each copy of the document exists as a whole unless chunk collation has occurred Enabling Disabling Collation There are three ways to enable d...

Page 31: ...rced after the last compiled page of the collation range Chunk Collation This mechanism of introducing a forced boundary or breaking a document down into several smaller more manageable sets is known...

Page 32: ...st client s memory settings n Take any memory not being used by other clients and add it to the Administration Memory K Mem Display memory setting s Caution Use this option only if you re familiar wit...

Page 33: ...B5 JIS Com 10 Executive Foolscap Legal and Letter To print on these media sizes you need to do no more than load the media in the cassette n Standard non sensed media sizes The printer can print on f...

Page 34: ...e Type Standard This one page document provides n Printer identification the printer s name firmware information and number of sheets faces printed during the life of the printer Note The number of sh...

Page 35: ...figuration menu settings n A full list of fonts and downloaded emulations Printing a Status Page Cancelling Ending Print Jobs The Cancel key has three functions n It cancels the oldest print job in th...

Page 36: ...el the oldest job in the queue CANCEL JOB IS SELECTED Press this key to The message window reads Cancel Access the Job Cancel menu JOB CANCEL CANCEL JOB Next twice Advances to the Cancel All Jobs mode...

Page 37: ...rint job that does not have one You can identify an end of job indicator in the Administration Communications Parallel and Administration Communications Serial menu Refer to chapter 5 Additional Techn...

Page 38: ......

Page 39: ...4 Color Printing In This Chapter n Introduction on page 4 2 n QCOLOR Color Control on page 4 2 n Other Methods of Color Control on page 4 4 n Color Density on page 4 9...

Page 40: ...ching capabilities include CIE based color matching PANTONE Color simulation and ICM 2 0 and ColorSync 2 1 support by means of ICC 3 2 compliant printer profiles QCOLOR automatic color control is acce...

Page 41: ...Color if you re printing text or spot colors n Third Party Color Management if you want to allow your application to control color settings n Color All Black if you want to print monochrome n Customi...

Page 42: ...e computer then converts the data into another RGB format to display it on the monitor When the image data is sent to the printer it is converted into CMYK Cyan Magenta Yellow blacK format by the prin...

Page 43: ...ve and they do consume processing time and power at the host A few well known color management systems include Kodak Color Flow Agfa ColorTune Pantone POCE Apple ColorSync Microsoft ICM Color Solution...

Page 44: ...Aldus FreeHand or Adobe Illustrator you can choose a PANTONE Color number and the corresponding CMYK simulation is printed Pantone tables for sup porting applications are shipped on the QMS Software...

Page 45: ...ng Dictionary can be changed through the QMS developed Macintosh and Windows drivers or if your application requires you to use a non QMS driver you can change the CRD at the printer s control panel A...

Page 46: ...nted image may have a smaller range of colors than the original image since several image colors may be mapped to a single printer color We recommend that you use this CRD for printing spot colors Bus...

Page 47: ...lor of the paper could affect the results 1 Set the density of each color to 0 a Access the printer s Administration Engine Density Cyan menu b Set the cyan color density to 0 Press the Previous key t...

Page 48: ...ard over the cyan column on the calibration page c Decide which block on the calibration page most closely matches the cyan color calibration card Note It may be easier to decide which colors match if...

Page 49: ...Next key to increase the setting 7 Repeat steps 5 and 6 for the magenta yellow and black color densities 8 Save your changes 9 Print a new calibration page Administration Special Pages Calibration Pag...

Page 50: ......

Page 51: ...page 5 2 n Cleaning the Printer on page 5 3 n Maintenance Schedule on page 5 12 n Replacing the Fuser Oil Bottle and Cleaning Roller on page 5 14 n Replacing the OPC Belt Cartridge on page 5 17 n Rep...

Page 52: ...ctly on the printer s surface the spray could penetrate through the air vents of the printer and damage the internal circuits n Be careful when cleaning the inside or removing paper jams as the fuser...

Page 53: ...artridges from inside the printer After removing the cartridges return them to their original packaging If the original packaging is not available protect the toner cartridges from spilling toner and...

Page 54: ...to fol low any instructions contained in them These labels are located on the inside of the printer s covers and the interior of the printer body n Use only dry lint free cotton cloths or swabs n Mak...

Page 55: ...rear cover 3 Using a dry cotton cloth clean any paper dust and toner buildup from the registration rollers You can manually rotate the rollers while cleaning them by turning the white gear on the lef...

Page 56: ...st and toner buildup from the transfer roller Note Manually rotate the roller while cleaning it c Reinstall the transfer roller in the transfer unit 5 Clean the paper discharger a Remove the paper dis...

Page 57: ...in the transfer unit and then push it down and to the left to lock it in place 6 Clean any paper dust and toner buildup found on the transfer unit itself 7 Close the printer s rear cover 1 Turn off an...

Page 58: ...two minutes If you suspect the belt is damaged due to exposure to light put the belt in a dark place to recover Depending on the amount of exposure recovery may take up to two hours Recovery time is d...

Page 59: ...the handle is facing away from you 7 Use the brush to clean the corona wire inside end of the OPC belt cartridge s Caution The corona wire is very delicate Do not press hard on the wire 8 Reinstall t...

Page 60: ...ors on your printouts Note A dry cotton cloth or dry cotton swab is required for this procedure 1 Open the printer s front cover 2 Remove the four toner cartridges 3 Remove the laser lens Use the two...

Page 61: ...efahr eines elektrischen Schlages besteht To protect your printer and maintain its appearance clean the exterior regularly Use the following guidelines n Use only a dry or slightly damp lint free soft...

Page 62: ...S National Service 120 000 page preven tive maintenance 120 000 pages QMS National Service AC paper discharger 120 000 pages QMS National Service Cleaning roller CHECK CLEANING ROLLER displays in the...

Page 63: ...e Filter on page 5 20 Transfer roller 120 000 pages QMS National Service Waste toner pack WASTE TONER FULL displays in the message window after 12 000 pages at 5 coverage of each color User See Replac...

Page 64: ...d cleaning roller are not changed when needed and installed properly This type of damage is not covered under warranty or service contract M WARNING The fuser unit can become extremely hot and cause s...

Page 65: ...e 4 Remove the old oil bottle s Caution Hold a sheet of paper under the oil bottle while removing it so oil doesn t drip into the printer 5 Remove the old cleaning roller 6 Lower the new oil bottle in...

Page 66: ...Item Replaced Fuser Oil menu choose Yes b In the Operator Control Consumables Item Replaced Cleaning Roller menu choose Yes Note When you replace the fuser oil bottle and cleaning roller after a FUSER...

Page 67: ...arefully The belt is also extremely sensitive to hand oils and scratches both of which reduce print quality 1 Turn off the printer 2 Open the printer s front cover s Caution This is necessary as it pu...

Page 68: ...on release pins one on each side of the cartridge s Caution Don t touch the green material on the cartridge It scratches easily 7 Holding the cartridge above the printer align the guide pins on the ca...

Page 69: ...artridge menu choose Yes to reset the consumables moni toring system Note When you replace the OPC belt cartridge after a REPLACE BELT message displays in the message window the engine automatically r...

Page 70: ...he Ozone Filter The ozone filter reduces exhausted ozone gas 1 Remove the ozone filter case on the left rear of the printer 2 Remove the ozone filter from the case 3 Install a new ozone filter in the...

Page 71: ...so you can conveniently throw it away 1 Open the printer s front cover 2 Remove the waste toner pack 3 Use the label on the side of the old waste toner pack to seal the opening and then dispose of th...

Page 72: ...m Note When you replace the waste toner pack after a CHECK WASTE TONER message displays in the message window the engine automatically recovers However you must manually reset the consumables usage mo...

Page 73: ...6 CrownView Printer Web Page In This Chapter n Introduction on page 6 2 n Setting up the Printer Web Page on page 6 3 n Printer Home Page on page 6 8 n Web Page Help System on page 6 29...

Page 74: ...most com mon web browser software Netscape Navigator and Microsoft Explorer This web page gives you access to the most frequently accessed printer configurations and gives you instant access to print...

Page 75: ...ssigned name of the printer or the IP address It is more convenient for you to use a name than the address The default name for the printer is usu ally the model number of the printer for example QMS...

Page 76: ...the proper preferences in your browser software Your printer name or IP address must be added to the no proxy list in the preferences dialog box of the browser Note You need to do this procedure only...

Page 77: ...of your QMS magicolor 2 Note The printer name is entered in the network protocol menu that you are using The default name is the model number of the printer See Assigning a Printer Name on 6 3 for mor...

Page 78: ...MS magicolor 2 Operation 6 6 For Internet Explorer 1 Start your web browser 2 Access the View menu and choose Options 3 Select the Connection tab on the dialog box 4 Click the Settings button to displ...

Page 79: ...Note The printer name is entered in the network protocol menu that you re using The default name is the model number of the printer See the QMS CrownNet System Adminstrator s Manual for information on...

Page 80: ...s to all of the supporting web pages for your printer The printer home page provides the following information Product Name Identifies the particular printer that you are brows ing This printer is pic...

Page 81: ...nput cassette or tray the media size and the percent filled with media Configuration Menu Operator Control Inputbin Sheets Printed Lists the number of sheets of media printed to date during the curren...

Page 82: ...e The Home hotlink simply returns you to the printer home page when it is selected Hotlinks Take you to other pages of status configurations or help information Each of these hotlinks is fully explain...

Page 83: ...config ure settings in your printer After you make your choices choose the Submit button to make them take effect The Operator Control page contains the following options For com plete information on...

Page 84: ...Control Orientation Inputbin Allows you to choose Upper or Optional as the input source Configuration Menu Operator Control Inputbin Chain Inputbins Allows you to set input bin chaining to Off On or...

Page 85: ...tte if it s something other than A4 Legal or Letter the typical sizes the cassettes expect Configuration Menu Operator Control Custom Bin Upper Optional Custom Tray Specifies the media size in the opt...

Page 86: ...it only by accessing the printer s configuration menu through the printer control panel a remote or local console or CrownAdmin 3 Printer Setting This table provides you with data relative to the set...

Page 87: ...dependent on the choice selected automatically when the first input source empties Configuration Menu Operator Control Chain Inputbins Default Paper Tray Tells you which input source is the default C...

Page 88: ...tional Network1 interface Configuration Menu Administration Communications Network1 IF 2 Identifies the settings for the Network2 CrownNet Ethernet interface Configuration Menu Administration Communic...

Page 89: ...ows the size in KB of the Host Input field also known as K Mem for Spool This memory client stores incoming data from all the interfaces until the emulation can process the print job Configuration Men...

Page 90: ...uff Emulation Shows the size in KB of the Emulation client also known as K Mem Emulation This client is used to store any optional emulations such as LN03 Plus Configuration Menu Administration Memory...

Page 91: ...tion Menu No equivalent Printer Memory Shows the size in KB of the total amount of RAM that your printer has Configuration Menu Administration Memory Manual Config MB Printer Mem Disk s Provides the n...

Page 92: ...than PostScript wait for incoming data Configuration Menu Administration Communications Timeouts Emulation Timeout ESP Shows the maximum number of seconds the printer uses to match an emulation before...

Page 93: ...inter Jobs The Printer Jobs hotlink on the home page jumps to the Printer Jobs page This page contains information about the current jobs the printer is processing and information on the previous five...

Page 94: ...priority of each job Configuration Menu No equivalent Owner Shows the name of the owner of each current job Configuration Menu No equivalent Title Shows the title of each job Configuration Menu No equ...

Page 95: ...as a percentage and do not indicate the exact amount of consumables used In addition the life expectancy of each consumable is based on printing under specific operating conditions such as media type...

Page 96: ...tion Consumables Consumable Max Number Shows the maximum capacity of the consumable for example 10000 planes or 120000 sheets Configuration Menus Operator Control Consumables and Administration Consum...

Page 97: ...ounting page which contains information about accounting configuration settings Mode Shows whether accounting is enabled or disabled Configuration Menu Operator Control Accounting Mode Disk Space Show...

Page 98: ...o the System Support page This page can be used to set up internal support for the printer as well as to link to the QMS web site File Segment Shows whether accounting information is stored in the pri...

Page 99: ...ou need assistance contact A text box for entering the name of a local expert Configuration Menu No equivalent Contact Number A text box for entering a local or QMS contact number Configuration Menu N...

Page 100: ...bout other QMS print ers contact information a FAQ database printer manuals and online performance support Online Help Page The Online Help hotlink on the home page jumps to any help informa tion that...

Page 101: ...QMS online perfor mance support address on the System Support page Printer Help URL when you click on the Online Help button on the printer home page you ll be linked to an HTML page located at the Q...

Page 102: ......

Page 103: ...Introduction on page 7 2 n Automatic Jam Recovery on page 7 2 n Preventing Media Jams on page 7 2 n Understanding the Media Path on page 7 3 n Understanding Media Jam Status Messages on page 7 4 n Re...

Page 104: ...he printer turned on when you remove the jammed media After the jam is cleared open and close the top door before printing Printing will not resume until you do this Preventing Media Jams There are se...

Page 105: ...back in the cassette Understanding the Media Path Understanding the printer s media path will help you locate media jams The media cassette is located at the bottom front of the printer The media is p...

Page 106: ...er A misfeed jam may be as simple as a sheet of media not being picked or it may be that the media was picked but not fed properly Access to this area is through the cassette slot n Inner jams occur i...

Page 107: ...trol panel window persists open and close the printer s top cover This should clear the jam message If the automatic jam recovery is enabled Administration Engine Page Recovery menu once the jammed me...

Page 108: ...gen s Caution Media that hasn t fully passed through the fuser contains unfused toner that can dirty your hands clothes or any thing else it gets on If you accidentally get toner on your hands wash th...

Page 109: ...f the fuser 4 Remove the jammed media by pulling it from the bottom of the fuser through the printer s rear cover not from the top of the fuser This prevents any unfused toner from dirtying the fuser...

Page 110: ......

Page 111: ...3 n HP GL Error Codes and PCL Error Codes on page 8 13 n Testing PC Printer Communication on page 8 14 n Testing Macintosh Printer Communication on page 8 18 n Printer Problem Checklist on page 8 19 n...

Page 112: ...t Problems on page 8 24 n Output Problems on page 8 25 n Kanji Option Kit Problems on page 8 27 n Print Quality Problems on page 8 29 n Color Density Problems on page 8 30 n Image Defects on page 8 32...

Page 113: ...efore placing a service call if one becomes necessary Status and Service Messages Status and service messages are displayed in the control panel mes sage window They provide information about your pri...

Page 114: ...s or transfer them to your host computer using ftp if available Then reset the account ing files so that new jobs can be accepted If you don t want to use accounting you can disable it ACC FILE 95 FU...

Page 115: ...nt jobs in the print queue are being canceled Press Select and the oldest job in the print queue will be canceled CANCEL ALL JOBS The Cancel key has been pressed and one or more of the print jobs in t...

Page 116: ...hese files are created following a Reset Accounting XXXXXXXXXXXX represents the Job Accounting or Paper Accounting file Wait No other action needed END JOB The Cancel key has been pressed Press Select...

Page 117: ...rs IDLE The printer is on line but no jobs are in process No action needed INITIALIZING The printer is warming up and getting ready to go on line Wait No other action needed INNER JAM Media has jammed...

Page 118: ...ER IN ANY BIN Operator Control Chain Inputbins is set to On and a chained cassette is empty Refill the cassette with the specified size media REPLACE BELT The OPC belt cartridge need replacing Install...

Page 119: ...stalled Install a toner cartridge x TONER EMPTY The x color toner cartridge is empty Replace the toner cartridge x TONER LOW The x color toner is low There is enough toner left to print 330 pages befo...

Page 120: ...ler is waiting on incoming data for the first job in the queue The job may not have an end of job indicator and therefore cannot end The message clears if more input arrives from the port or if you pr...

Page 121: ...ry this before making a service call Service calls should be placed to the vendor from whom you purchased the printer If you cannot get service from your vendor see appendix A QMS Customer Support for...

Page 122: ...on the previous page CALL FOR SERVICE F5 CHRG HV UNIT CALL FOR SERVICE H0 FUSER THERM CALL FOR SERVICE H2 FUSER TEMP 2 CALL FOR SERVICE H3 FUSER TEMP 3 CALL FOR SERVICE H4 FUSER TEMP 4 CALL FOR SERVIC...

Page 123: ...e Description Error Code Description 0 Not enough memory for job 0 Not enough memory for job 1 Too many transformations 1 State lost 2 Math error 2 Math error 3 Job aborted 3 Job aborted 4 Instruction...

Page 124: ...sen sitive and must be typed exactly as shown Showpage is a PostScript command that prints a blank page The symbol means to press the Enter key To produce the D and Z press and hold down the Ctrl key...

Page 125: ...AT file contains the line MODE LPT1 COM1 delete it b Then type MODE LPT1 P The P represents infinite retry and it tells the PC to send print jobs until the printer accepts them c Restart the PC and re...

Page 126: ...tement to your AUTOEXEC BAT file b Restart the PC and then check the start up page which prints when you turn on the printer unless you disabled it This tells you the current serial port settings for...

Page 127: ...he Communications menu COMMUNICATIONS TIMEOUTS Next Advance to the Serial menu COMMUNICATIONS SERIAL Select Access the Serial menu SERIAL MODE Next one or more times Advance to the Baud Rate menu SERI...

Page 128: ...r to your DOS documentation for more information Testing Macintosh Printer Communication Testing Macintosh Communication You can check communication between the printer selected in the Chooser and the...

Page 129: ...e followed the steps in chapter 2 Setting Up Your Printer in the Getting Started manual If there is no status message in the control panel message window use the following steps to identify the source...

Page 130: ...edia jam 3 Is the printer receiving data from the computer If the Data indicator blinks after a file is sent the printer is receiv ing the data If not check the following n Is the printer on line The...

Page 131: ...in the Reference man ual for instructions n If you continue to have problems with the ESP mode selecting the appropriate printer emulation contact your QMS vendor OPC Belt Cartridge Problems The OPC b...

Page 132: ...ter prints a standard status page even though you ve con figured the printer in the Administration Special Pages Status Page Type menu to print an advanced status page your printer probably doesn t ha...

Page 133: ...tosh applications interfere with each other Appli cations send a printer prep file to the printer at the beginning of each document Other prep files cannot be sent without resetting the printer Monito...

Page 134: ...ouble installing and setting up your QMS CrownNet inter face check the following n If the printer requires a network interface card is it correctly installed in the printer n Is the printer connected...

Page 135: ...i resolution on all media sizes 88 MB RAM you can print at 2400x600 dpi resolution on all media sizes Check the start up page to make sure the printer has enough RAM installed See chapter 2 Memory and...

Page 136: ...out rock it from side to side and reinstall it in the printer 3 If these solutions do not work contact your QMS vendor to purchase another toner cartridge Not All Pages Print If the printer stops prin...

Page 137: ...ng Kanji fonts If you experience memory problems when downloading Kanji fonts then you can do one of the following to increase printer memory n Add 4 MB more printer memory n Decrease the number of fo...

Page 138: ...for product sales and service information n Did you correctly configure the printer See the Options manual for complete printer configuration infor mation Can t Access the Kanji File Through Your Appl...

Page 139: ...printed pages try this quick check procedure 1 Check that you are using the correct type media See appendix B Technical Specifications in the Reference for media specifications 2 Check that there is e...

Page 140: ...e it to the calibration cards that were provided with your printer Complete instructions are included in the Color Density section of chapter 4 Color Printing Note The Administration Special Pages Cal...

Page 141: ...as the 1 3 engine ROM and the color density feature the letter A and the number 3 are blocked in n If these characters aren t blocked in then your printer doesn t have the 1 3 engine ROM To find out h...

Page 142: ...ons If you have problems with the quality of your printed pages try the fol lowing n If the TONER OUT message is on and the printer continues to print try distributing the toner to improve print quali...

Page 143: ...ng Printer Problems Solid Color Image Printout Too Dark 1 A toner cartridge may be defective Remove it and install a new toner cartridge 2 Your printer may need a service check Contact your QMS vendor...

Page 144: ...so that it s firmly seated but not locked into place 2 Distribute the toner 3 Check to make sure the toner cartridge is not defective 4 If steps 1 2 and 3 do not solve the problem install a new toner...

Page 145: ...toner cartridge may be defective Install a new toner cartridge if needed 1 Remove the toner cartridge and rock it as you do before installing a new cartridge This redistributes toner inside the cartr...

Page 146: ...the positions where it has become wet Replace the paper in the tray or cassette with dry paper and retest for irregu lar print 1 The laser lens may be dirty Clean the lens as described in chapter 5 Pr...

Page 147: ...Image Defects 8 37 Troubleshooting Printer Problems Colored Bands 1 One or more toner cartridges may be defective Install new toner cartridges...

Page 148: ...f the US National and international contacts are listed in appendix A QMS Customer Support Before calling be sure you have the answers to these questions handy to help our technicians serve you more q...

Page 149: ...ables and Cassette s on page 9 3 n Remove the Toner Cartridges on page 9 3 n Remove the OPC Belt Cartridge on page 9 3 n Prepare the Fuser Unit on page 9 5 n Change the Waste Toner Pack on page 9 9 n...

Page 150: ...placement packaging in the US call QMS National Service at 1 334 633 4300 x 2530 and request catalog number 2600439 200 If you need to return the printer for service in the US call QMS Customer Servic...

Page 151: ...c rollers and repackage them in their original packaging Remove the OPC Belt Cartridge s Caution The OPC belt is extremely sensitive to bright light and direct sunlight Limit exposure to 2 minutes Whi...

Page 152: ...nd lift the cartridge out of the printer 2 Replace the protective sheet around the OPC belt cartridge and the tension release pin on each side Insert the pin until you feel some resistance move it for...

Page 153: ...the lock levers at each end of the OPC belt car tridge slot Prepare the Fuser Unit M WARNING The fuser unit can become extremely hot and cause severe burns Make sure the unit is cool before handling...

Page 154: ...per under the oil bottle as you remove it so no oil drips into the printer 4 Place the oil bottle in an oil proof container such as a plastic bag until you re ready to reinstall it 5 Use an eye droppe...

Page 155: ...in but make sure there are enough to fill the space 7 Close the lock levers to secure the cleaning roller 8 Install the fuser roller shipping restraints These restraints protect the fuser rollers fro...

Page 156: ...b Insert the fuser roller shipping restraints between the fuser rollers one at each end of the fuser s Caution Be sure to insert the shipping restraints at the ends of the rollers not in the middle I...

Page 157: ...sure release levers one at each end of the fuser When correctly positioned the fuser roller shipping restraints fit snugly between the rollers Change the Waste Toner Pack 1 With the printer s front co...

Page 158: ...waste toner pack to seal the opening and then dispose of the pack in accordance with safety laws and regulations in your area 3 Install a new waste toner pack This ensures that no waste toner is shak...

Page 159: ...r Input Feeder Note If you don t have a lower input feeder installed skip to the next section 1 Remove the plastic side covers from the sides of the input feeder 2 Locate the cable at the left rear of...

Page 160: ...inter 5 With the help of another person pick up the printer by its four corners lift it from the lower input feeder and place the printer on a table M WARNING Your printer weighs approximately 64 lbs...

Page 161: ...erson s help put the printer into the plastic bag and place the printer into the base tray of the shipping carton 2 Pack the printer for shipment as shown in the illustration 3 If you re also shipping...

Page 162: ......

Page 163: ...A QMS Customer Support In This Appendix n Sources of Support on page A 2 n QMS World wide Offices on page A 5...

Page 164: ...nufacturer is the best source of help Q FAX Q FAX a QMS information retrieval service provides application notes technical support notes on common printing problems and information about printer speci...

Page 165: ...rectly to the forum where QMS is located The QMS library sec tion contains application notes printer drivers utilities technical infor mation and announcement files Internet The QMS server provides ac...

Page 166: ...ption of the problem The printer model The type of host computer you re using The type and version of operating system you re using The interface you re using and if serial the protocol for example XO...

Page 167: ...1 334 633 3716 Internet http www qms com Latin America Fax 1 334 639 3347 National Service Service Information Installation and Maintenance Pricing 1 800 762 8894 On Site Service and Depot Repair Info...

Page 168: ...ess Tech Centre 52 2 Railway Parade 2141 Lidcombe NSW Australia 61 2 9901 3235 Fax 61 2 9901 3273 QMS Benelux Belgium Nether lands and all unlisted countries Planetenbaan 60 Corner Plaza 3606 AK Maars...

Page 169: ...Arenav gen 41 6th floor 121 77 Johanneshov Sweden 46 8 600 01 30 Fax 46 8 600 01 33 QMS South Africa Saskay House Unit 24 Sunninghill Business Park Peltier Road Sunninghill Johannesburg Republic of So...

Page 170: ......

Page 171: ...Configuration Menu In This Chapter n Introduction on page B 2 n Menu Chart Conventions on page B 2 n Administration Menu on page B 3 n Installation Menu on page B 9 n Operator Control Menu on page B 1...

Page 172: ...or Control menu on page B 9 Note The Copier Menu is displayed in chapter 7 CrownCopy of the Options manual Menu Chart Conventions The following conventions are used in the menu charts n Some menu choi...

Page 173: ...putbin Trailer Inputbin Status Page Type Calibration Page Do Start Page Do Sys Start Do Error Handler Quick Config Manual Config Toner Low Act Energy Saver Def Resolution Maintenance Image Alignment D...

Page 174: ...Talk LAN Manager NetWare TCP IP Idle Administration Communications Network1 Emulation Network2 CrownNet Mode Min K Spool Def Job Prio PS Protocol Spooling HW Config Factory Soft On On Idle On Input Id...

Page 175: ...EtherTalk LAN Manager NetWare TCP IP Protocol Network Ident Connection Zone Name Disabled LaserWriter QMS RC Res Conventional Spooling Zone Part 1 Zone Part 2 Enabled HP Zoner Res Both Default Idle A...

Page 176: ...u QMS magicolor 2 Operation B 6 LAN Manager Menu Common EtherTalk LAN Manager NetWare TCP IP Protocol Printer Name Default Disabled Yes No Enabled Idle Administration Communications Network2 CrownNet...

Page 177: ...rinter Name 1 Printer Name 2 Enabled File Srv Name 3 PServer Name 2 Printer Name 3 Frame Type 802 3 IPX Addr Ether 2 IPX Addr 802 2 IPX Addr Default PServer Name 1 PServer Name 2 PServer Name 3 Job Ch...

Page 178: ...rt Write Trap Read Trap Idle Administration Communications Network2 CrownNet Internet Default Secure Accnting LPD SNMP Mask Chan Assignment NMS 1 5 Router Address Files Timeout Banner None Community I...

Page 179: ...Menu B 9 Configuration Menu Installation Menu Operator Control Idle Administration Installation Enter password Use Operator Pwd Off On Admin Password Enter password Use Admin Pwd Off On Operator Pass...

Page 180: ...999 Collation Off On Orientation Portrait Landscape Inputbin Upper Optional Chain Inputbins Off On On Any Color Separation Off On Color Model Full Color Monochrome Media Accounting Mode Disk Space Res...

Page 181: ...ctive jobs message 8 4 Adjust x bin message 8 5 Advanced printing features Memory 3 3 Agfa FotoFlow 4 5 Apple ColorSync 4 5 AppleTalk Testing communication 8 18 Automatic Color Control 4 3 B Back pane...

Page 182: ...management system 4 4 Color matching 4 4 Color density Adjusting 4 9 Problems 8 30 Troubleshooting 8 30 Color rendering dictionary 4 7 Business 4 8 Colorimetric 4 8 Photographic 4 8 Colorimetric 4 8...

Page 183: ...5 Fuser oil bottle Removing 9 5 Replacing 5 14 Fuser oil empty message 8 6 Fuser oil low message 8 7 Fuser unit Draining 9 6 Preparing for moving 9 5 Removing 9 5 G Gamut 4 8 General settings Hotlink...

Page 184: ...abels Loading 2 7 Printing 2 7 LAN Manager Menu B 6 Laser lens Cleaning 5 10 Light image 8 34 Lower input feeder Removing 9 11 M Macintosh Testing communication 8 18 Maintenance Cleaning roller 5 14 F...

Page 185: ...ge defects 8 32 Print quality problems 8 29 Blurred background 8 35 Distortions 8 32 Irregular print 8 36 Printout too dark 8 33 Printout too light 8 34 Solid color image 8 33 Specific 8 32 Toner smud...

Page 186: ...eters changing 8 16 Testing communication 8 15 Service Calling for service 8 38 Messages 8 3 Printer 9 2 RMA number 9 2 United States A 4 Setup Browser software 6 4 Printer web page 6 3 Shipping print...

Page 187: ...Status page Printing 3 10 Selecting the status page type 3 10 Will not print 8 20 Support QMS Customer A 2 Internet A 3 Technical A 4 World wide A 5 System Support hotlink 6 26 T TCP IP Menu B 8 Tech...

Page 188: ...or idle status message 8 10 Waiting on input end job message 8 10 Warming up message 8 10 Waste toner pack Removing 9 9 Replacing 5 21 9 9 Web page help system 6 29 Web page printer 6 2 Weight 9 12 Wh...

Reviews: