background image

MacroVIEW  

MM179-001 - Operator Manual 


25 


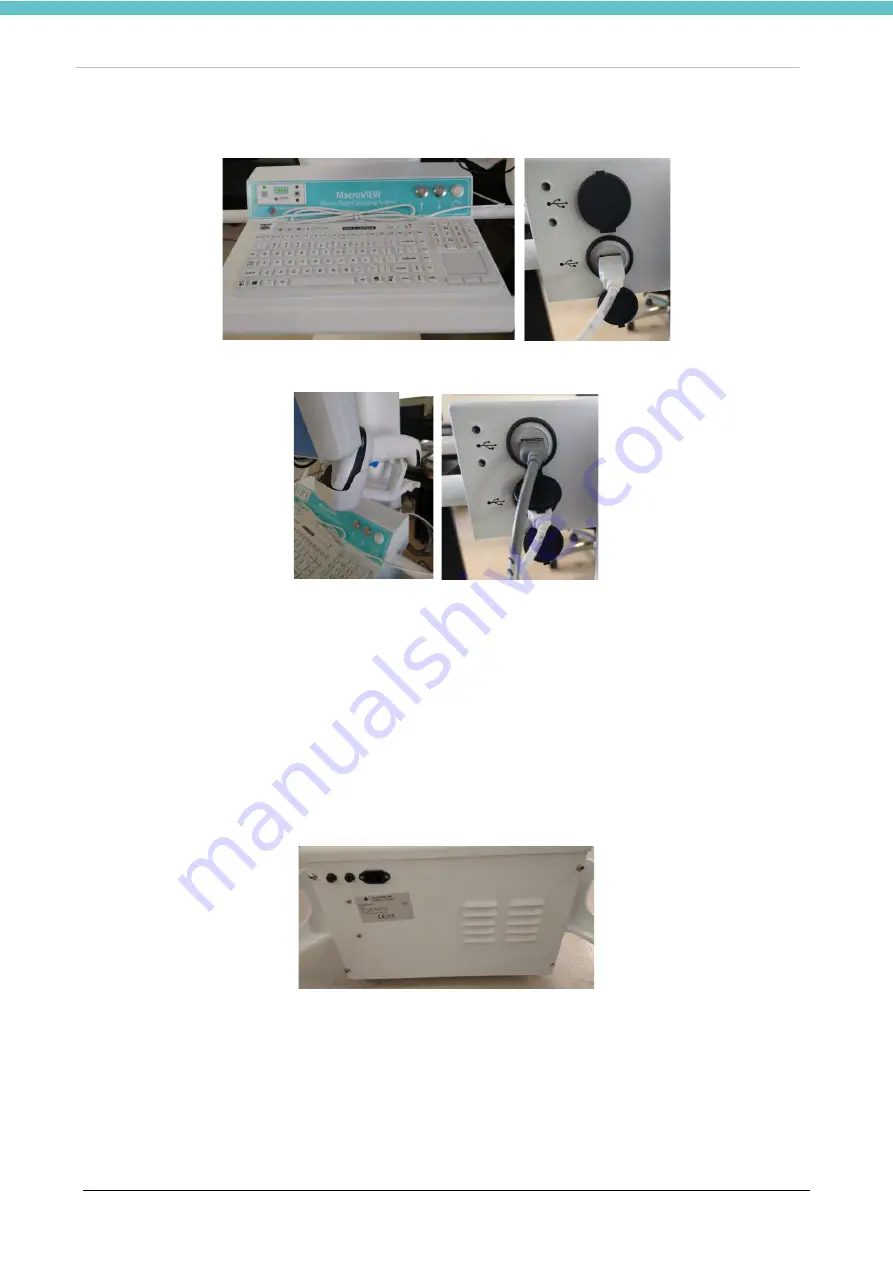
Place the keyboard on the unit and connect it into the USB port found  at  the back of  the unit, as shown 

below. 


Place the 2D barcode reader on the support and connect it into the USB port found at the back of the unit, as 

shown below. 


The monitor support permits a vertical tilt of ±15° and horizontal rotation of ±20°. 


2.3.2. Connecting the battery 


The power supply line needs to be grounded (Class I device). 

115V

: Power supply line protection: C curve residual current circuit breaker, 15A, residual current: 30mA. 

230V

: Power supply line protection: C curve residual current circuit breaker, 10A, residual current: 30mA. 


The  battery  connector  is  left  disconnected  during  transport.  Connect  the  yellow  connector  of  the  battery 

when installing the unit, as described below. 


Open the battery cover. 


Summary of Contents for 372700

Page 1: ...MacroVIEW Macro Imaging System for anatomy forensic studies OperatorManual MM179 MILESTONE H E L P I N G P A T I E N T S...

Page 2: ......

Page 3: ...rator manual carefully and always keep it within reach for convenient and quick referencing For any clarification or request for assistance please contact our representative in your country You can al...

Page 4: ...2 3 3 1 Create a case 32 3 3 2 Edit a case 33 3 4 Overview of the main functions 34 3 4 1 Shortcut Keys 35 3 4 2 Multifunctional buttons 36 3 5 Saved files area functions 37 3 6 LIVE functions 41 3 6...

Page 5: ...rd and mouse 85 6 2 2 Touch Pen 85 6 2 3 Operating procedure 85 6 3 Battery replacement 86 7 TROUBLESHOOTING THE MacroVIEW 87 7 1 Camera malfunctions 87 7 2 The Touch Pen is not working 87 7 3 Touch P...

Page 6: ...symbol take great care as there is the risk of an electric shock Carefully follow the instruction in order to avoid this kind of accident Biological hazard pay attention when performing a procedure m...

Page 7: ...icians and pathologists Read this manual carefully before using MacroVIEW A camera is installed on the unit with MacroVIEW software which is designed to capture images of the whole body and to have a...

Page 8: ...Fi 802 11 A B G with Bluetooth v4 1 subject to restrictions of use according to local radio frequency regulations to be checked before enabling this function Available I O 2x RS 232 422 485 Serial por...

Page 9: ...isplay monitor 5 LCD Resolution 800x480 Mobile support for imaging unit trolley Wheeled trolley with battery for up to 8 hours of autonomous operation depending on the conditions of use 2xUSB 2 0 Spri...

Page 10: ...tive or the manufacturer always provide the serial number of the unit see label at the back of the unit All parts of the equipment and all the optional parts shall be exclusively supplied by the manuf...

Page 11: ...hat such additional information is kept separately and is subject to technical and organizational measures to ensure that the personal data are not attributed to an identified or identifiable natural...

Page 12: ...the Customer Service at the following e mail address customersupport milestonemedsrl com and communicate the ID and password that appear in the previous window The connection can only be established i...

Page 13: ...MacroVIEW MM179 001 Operator Manual 13 Click Next Click Next Click Install...

Page 14: ...MacroVIEW MM179 001 Operator Manual 14 Click Next Select Personal Non commercial use then click Next Select the two boxes in the picture then click Next Click Finish...

Page 15: ...MacroVIEW MM179 001 Operator Manual 15 Click Cancel Click Allow and finish The Milestone Remote Connection will launch automatically...

Page 16: ...button this actually does not exist it disappears when the desktop is first refreshed or when the PC is first restarted Should you wish to uninstall it two programs must be uninstalled from the Contro...

Page 17: ...ically every time the PC is turned on as follows With Remote connection enabled right click the TeamViewer icon on the status bar at the bottom right Select Exit TeamViewer Open the start menu of Wind...

Page 18: ...MacroVIEW MM179 001 Operator Manual 18 1 9 Labelling for MacroVIEW For explanation of symbols see chapter 1 1...

Page 19: ...quirements MacroVIEW is shipped in a wooden crate with an overall weight of 360kg 793 7lb with the following dimensions Width 920mm 36 2 Depth 1180mm 46 4 Height 2110mm 83 1 The following figure depic...

Page 20: ...gh temperature variations When the instrument is in its final position the trolley can be blocked by using the wheel brakes When the manipulator arm is fully extended and the trolley wheel brakes are...

Page 21: ...C 3x 15cm 6 sizing ruler 372441 D Imaging unit manipulator 372600 E Mobile support for imaging unit trolley 372701 F 2D barcode reader with support The barcode reader is set by default in country mod...

Page 22: ...MacroVIEW MM179 001 Operator Manual 22 For the optional parts see Chapter 5 The images shown are only an example H F E G I...

Page 23: ...acroVIEW stand is lowered completely during shipment The following two buttons top and bottom arrows on the front of the unit can always be pressed when the trolley is ON and the unit is used to adjus...

Page 24: ...the PC on the support aligned with the appropriate holes and tighten the screws as shown in the picture below Open the PC cover to connect the cables that come out from the MacroVIEW stand Connect the...

Page 25: ...cal tilt of 15 and horizontal rotation of 20 2 3 2 Connecting the battery The power supply line needs to be grounded Class I device 115V Power supply line protection C curve residual current circuit b...

Page 26: ...ou receive the unit it is required to leave the battery charging for at least 12 hours before using the unit Refer to chapter 3 8 for more information on the battery When using the MacroVIEW and the p...

Page 27: ...ls hence two different frames of the photographed areas HOW TO CHOOSE THE TYPE OF ZOOM AND THE TYPE OF LENS You can work in Standard zoom configuration without a lens neutral lens and manage to focus...

Page 28: ...the environmental conditions The values set out above are experimental results from tests performed at the Milestone histopathology laboratory You can use the manipulator to take pictures audio and v...

Page 29: ...ow the instructions in this chapter ONLY IF you wish to change the language Follow these instructions to change the language of the Operating System enter Windows Settings and click Time Language on t...

Page 30: ...e will be set in the operating system Follow these instructions to change the language on the Keypad Spanish is chosen in this example The status bar on the bottom left shows the default keypad langua...

Page 31: ...ng the button on the front panel as indicated in the figure below Turn on the camera with the appropriate button found at the back of the unit indicated by the arrow in the following picture The camer...

Page 32: ...3 3 1 Create a case Enter the case ID using the barcode reader or manually with the keyboard to create or retrieve a case When performing a manual entry click the enter key The picture can be taken wi...

Page 33: ...3 3 2 Edit a case The images audios and videos are previewed on the right column Double click a thumbnail or select the EDIT icon on the top right of the screen to enter EDIT mode Edit the images usin...

Page 34: ...EXIT To exit from MacroVIEW application and go back to the PC operating system D CASE NAME Shows the name of the current case E LIVE Allows returning to live camera image of sample F THUMBNAIL FILTER...

Page 35: ...n Shortcut Key Function Always available CTRL left ALT left 1 Files 2 Live 3 Edit 4 Settings 5 Exit 6 Logout FILES Q Show case W Reset search E Print case R Present case T Add tag LIVE A Snapshot S Vi...

Page 36: ...xample is shown below To select a function just press its button To view multiple functions press and hold a tool icon for at least 3 seconds A secondary menu will appear Make the desired selection Th...

Page 37: ...e of the page SEARCH RESET SEARCH LOAD ALL DATA SEARCH press this button to search for the concerned case after having filled in the fields at the top of the page a case can be found by entering the n...

Page 38: ...he case report Select the template and then the images to print and then press Print selected Instead of selecting the images that can be included in the report you can press the buttons indicated by...

Page 39: ...f creation images audios and videos The display disappears after 5 seconds by default See chapter 3 9 10 to modify this parameter Add tag press this button to add a note to the case The following box...

Page 40: ...SEARCH section you may also search for a case by the inserted TAG It is also possible to tag a case from the LIVE screen When the case is open live press the icon Add tag as shown in the image below...

Page 41: ...its icon as shown below 3 6 1 Create retrieve a case Enter the case s identifier by barcode reader or manually with keyboard to create or retrieve a case When a case code is entered manually press th...

Page 42: ...st the field of view The picture below on the left shows the Support for the camera CODE 372752V The picture below on the right shows how to use it attach it to the manipulator handle and adjust the c...

Page 43: ...function keypad of the manipulator which you must talk into if you are recording audio from a PC or if you are recording from the manipulator The operator s mouth must be close to the microphone inclu...

Page 44: ...MacroVIEW MM179 001 Operator Manual 44 3 6 3 Thumbnails Saved images videos and audios appear on the right of the screen The thumbnails can be filtered by pressing the following keys above them...

Page 45: ...ollows 1 Compression quality the level of compression applied to the image you can change it in Settings Storage as explained in chapter 3 9 4 Normal is the default setting 2 Capture quality image siz...

Page 46: ...a specific automatic white balance for outdoors These changes take place when the user clicks Save and Close It is not necessary to restart the software At the top right of this page authorized techni...

Page 47: ...you can choose whether to work with a Standard or Extended zoom configuration Refer to chapter 2 3 3 to understand when to use the Standard and Extended zoom and the corresponding type of lens Load de...

Page 48: ...audios and videos and print directly using the buttons in the left side bar indicated by the arrow in the previous figure When the image has been edited click Save in the bottom part of the image to s...

Page 49: ...the button and hold it for a few seconds with the mouse or directly on the touch screen you may select which type of sizing to carry out as explained below Click the Sizing line icon to draw lines the...

Page 50: ...wn below The following image includes a ruler bottom of the image Press Sizing Line to measure the line Then press two precise points on the ruler between which the distance is known and a box appears...

Page 51: ...y type of measurement you want 3 7 3 Line Tool Line Press the button and hold it for a few seconds with the mouse or directly on the touch screen the list of lines that can be added to the image appea...

Page 52: ...lumn and then the desired text right column click the area of the image you want to put it and the text will be added automatically to the image For example select text1 press the image and text1 will...

Page 53: ...7 7 Cassettes Tool Cassette Press the button and hold it for a few seconds with the mouse or directly on the touch screen you may select the type of cassette standard or supermega as shown below Sele...

Page 54: ...cture The digital zoom is useful when the sample is no longer available to be photographed LIVE Cassettes multifunction keypad Cassettes Settings multifunction keypad Select the concerned area on the...

Page 55: ...The user can easily view case assets in the library by using the following controls 1 Scroll arrows up down at the top and bottom of the library allow for movement through the case 2 Images Audio Vide...

Page 56: ...ted The Viewer screen appears and the video starts At the end it is necessary to close the window to go back to the main screen Play the Audio Click an audio thumbnail in the library to listen to file...

Page 57: ...edit object has been added and when the image is already saved Delete This button deletes one or more case assets in multiple ways It is possible to select an edit element previously added to an imag...

Page 58: ...in photo editing mode Save When all the necessary changes have been made press this button to save the image among the thumbnails The manipulator can be used to save the image If you want to go back t...

Page 59: ...beeps once per second when the battery charge drops below 5 it beeps twice per second You can silence the beeper by pressing this button F Contact customer support if this LED lights up red or yellow...

Page 60: ...d completely restart the software to make them effective Settings Click the button at the top right to access the settings screen The different Settings pages are described below 3 9 1 General setting...

Page 61: ...tings made for the administrator user regarding the screens circled in the figure below will be the same for all previously created users 3 9 2 User settings Click Users to create modify or eliminate...

Page 62: ...ers Possibility to operate in Settings User screen Can edit app settings Possibility of editing settings in the blue fields Storage Camera Third Party and Streaming function unavailable Can calibrate...

Page 63: ...e indicated by the circle in the figure above Press Copy to Clipboard button to copy the unit ID indicated by the circle in the figure above Paste in a text file or directly in the email message Descr...

Page 64: ...port and must always be available therefore it must be the shared folder present on the server This folder must provide full control for each account and for each PC running on the MacroView software...

Page 65: ...ample It is only possible to activate and use this function if saved online Before using this function contact our technical department atcustomersupport milestonemedsrl com If you decide to save the...

Page 66: ...page Select Trust external calibration MacroVIEW can use calibration factors of previous files and not those of the software this checkbox is enabled by default Force calibration MacroVIEW will requi...

Page 67: ...is case Notepad which appears on the icon created By clicking Shutdown MacroVIEW after launch on launching the external application MacroVIEW closes down By clicking Disable MacroVIEW after launch whe...

Page 68: ...will not be saved only the images of the open case will be temporarily saved in a Twain folder Furthermore MacroVIEW will be kept active minimized after importing images Permanent Shutdown The case d...

Page 69: ...case must be open to use the Acquisition from Twain button An image will be imported in the case Measurements will not be possible on this image by using the calibration of the camera if present You c...

Page 70: ...well as the time and date format Select the desired Language from the drop down menu then press Set Default and reboot the system to enable the modification Pre set custom text allows insertion of up...

Page 71: ...heckbox to disable the title bar as shown in the images below If you want to fill the title bar with your laboratory name for example the full screen checkbox should be unchecked and the desired name...

Page 72: ...hows Easy interface enabled the one to the right disabled default option Select Fine Tuning Mode to modify the dimensions the icons their name and preview in the image library The Watermark settings c...

Page 73: ...ottom of the image that contains the name of the case the date the time and the calibration factor In Simple mode a box with the name of the case is positioned over the image and covers part of it whi...

Page 74: ...et font colour font size etc Select this field to change the type of line of the drawing system If enabled to trace a line press the initial and final points of the line and it will be traced automati...

Page 75: ...Edit area after the image acquisition C Shutdown camera entering Edit mode Switches off the camera during editing This feature increases the camera s lifetime D Force double entry By checking this bo...

Page 76: ...andby after It is the time in seconds after which the camera goes to standby mode This feature increases the camera s lifetime By default it is set to 1 hour and you can set it to 1 minute but you can...

Page 77: ...be installed on every computer use the key provided with the unit chapter 2 2 1 Enter into the software folder 2 Run the SETUP BAT file as Administrator highlight the file right click and select Run...

Page 78: ...ion to the MacroView software and the patient identification code ID For example MacroView software can run from the default installation directory C Program Files x86 Milestone Srl MacroView5 MacroVi...

Page 79: ...ceive the case name number directly from the LIMS system Image acquisition Refer to chapter 3 6 Where and how images are saved MacroView files are saved by default in the path directory C Users Public...

Page 80: ...ically saves the images with the ID name file name as shown below ABC_0001 JPG ABC _0002 JPG ABC _0003 JPG ABC _0004 JPG ABC _0005 JPG All the images are then available to be recovered and displayed b...

Page 81: ...ientID_001 mp3 PatientID_002 mp3 PatientID_003 mp3 Video PatientID_001 avi PatientID_002 avi PatientID_003 avi thumbs PatientID_001 jpg PatientID_002 jpg PatientID_003 jpg High resolution file images...

Page 82: ...s that are not supplied by Milestone The pictures are only an example 5 1 Mouse wireless optical in silicone CODE DESCRIPTION IMAGE 372363 Mouse wireless optical in silicone USB 2 AAA batteries are re...

Page 83: ...MacroVIEW version 5 extra licence FULL complete on USB key which includes digital imaging acquisition in jpg format only with Milestone camera connected video acquisition in AVI format only with Miles...

Page 84: ...erating theatre use and white coat Personal protection device compliant with the EN 149 standard Grade FFP3D and the 89 686 EEC Directive 6 2 Cleaning MacroVIEW Turn the camera off Turn off the PC Tur...

Page 85: ...temperatures or pressures polishing or abrasive sponges 6 2 2 Touch Pen 1 Use 99 5 denatured alcohol and alcohol based decontaminating disinfectants 2 Clean the Touch pen with a clean cloth that has...

Page 86: ...lean after each use Do not use abrasive or sharp tools which can damage its surfaces FOR CLEANING DO NOT USE PROCEDURES OTHER THAN THOSE EXPLAINED IN THIS MANUAL An improper procedure could ruin the t...

Page 87: ...ch off the PC Wait at least 5 seconds Turn on the PC Wait a few seconds and switch the camera back on Wait a few seconds when the camera is turned on look in the monitor where you will see what the ca...

Page 88: ...er does not move correctly when touching the screen or it does not go to the selected point recalibrate the touch screen or the touch pen as follows Select the Touchscreen calibration icon on the desk...

Page 89: ...te the screen for pen or touch input The following window will open click Calibrate Select PEN INPUT to calibrate the touch pen and or TOUCH INPUT to calibrate the screen Select PEN INPUT and follow t...

Page 90: ...MacroVIEW MM179 001 Operator Manual 90 At the end of the procedure this final screen will appear select YES to save the data...

Page 91: ...9 001 Operator Manual 91 Select TOUCH INPUT and follow the instructions that appear on the screen until the end of the procedure At the end of the procedure this final screen will appear select YES to...

Page 92: ...MacroVIEW MM179 001 Operator Manual 92 If an incorrect calibration was saved click RESET with the mouse to restore the default calibration...

Page 93: ...ff IT Manager This procedure uses Clonezilla Software Clonezilla is licensed under the GNU General Public License GPL Version 2 Clonezilla is provided without any warranty For all the other languages...

Page 94: ...croVIEW MM179 001 Operator Manual 94 Set key startup as the first 1 Boot Option 1 Select the USB key with the Clonezilla Software Press F4 and confirm Start Clonezilla by pressing Enter on the keyboar...

Page 95: ...MacroVIEW MM179 001 Operator Manual 95 Select English Select Do not change keyboard mapping Select start Clonezilla Select device image Select local dev...

Page 96: ...MacroVIEW MM179 001 Operator Manual 96 Press enter Press Ctrl C...

Page 97: ...MacroVIEW MM179 001 Operator Manual 97 Select sdb1 or sdd1 make sure that it is the name of the key containing the image to be restored Select Done Press Enter on the keyboard Select beginner mode...

Page 98: ...MacroVIEW MM179 001 Operator Manual 98 Select restore disk Select PCAdvantech Multilanguage the image required based on the machine Select the 500GB hard disk...

Page 99: ...MacroVIEW MM179 001 Operator Manual 99 Select Yes check the image Select choose Press Enter on the keyboard...

Page 100: ...001 Operator Manual 100 Wait for completion Press Y and Enter on the keyboard Press Y and Enter on the keyboard Press Enter Select Poweroff and enter Wait for switch off 7 sec Remove the two USB keys...

Page 101: ...g in contact with it and wear gloves when using this instrument If the unit needs to be returned to MILESTONE SRL for repairs the device must be cleaned and disinfected prior to shipment Any units tha...

Page 102: ...ory It is necessary to return the used equipment to the distributor or to inquire about the presence of a local empowered system for collection and disposal of WEEE The in observance of Directive 2012...

Page 103: ......

Page 104: ......

Page 105: ......

Page 106: ......

Page 107: ......

Page 108: ...marketing milestonemedsrl com www milestonemed com Via Fatebenefratelli 1 5 24010 Sorisole BG Italy Tel 39 035 4128264 Fax 39 035 575498 Milestone Srl...

Reviews: