background image

−1−

PORTUGUÊS

ESP

AÑOL

ENGLISH

FOREWORD

This Owner’s/ Operator’s Manual is designed to familiarize the operator with the various features and component parts of the equipment and to assist you with the assembly, 

operation and maintenance of your new Brushcutter/Grass Trimmer.

It is essential that any operator of this Brushcutter/Grass Trimmer reads and understands the contents this manual before using the Brushcutter/ Grass Trimmer.

For additional assistance, contact any local authorized MARUYAMA dealer.

PREÁMBULO

Este Manual se ha elaborado para que el usuario se familiarice con las diferentes funciones y componentes del equipo y para ayudarle en el montaje, funcionamiento y 

mantenimiento de su nueva bordeadora de césped/ Desbrozadora.

Antes de utilizar la Bordeadora/ Desbrozadora, es esencial leer y entender el contenido de este manual. Si necesita más ayuda, contacte con el distribuidor local autorizado de 

MARUYAMA.

PREÂMBULO

Este Manual do Proprietário/ Operador é concebido para familiarizar o operador com as diversas funcionalidades e componentes do equipamento e ajudá-lo com o 

funcionamento e manutenção da sua nova Roçadora/ Aparador de Relva.

É fundamental que qualquer operador desta Roçadora/ Aparador de Relva leia e compreenda o conteúdo deste manual antes da utilização da Roçadora/ Aparador de Relva.

Para assistência adicional, contacte qualquer revendedor local autorizado da MARUYAMA.

FOREWORD/ PREÁMBULO/ PREÂMBULO 

1

CONTENTS/ CONTENIDOS/ ÍNDICE  

1

SAFETY DECALS/ETIQUETAS DE SEGURIDAD/

AUTOCOLANTES DE SEGURANÇA  

2

SYMBOL EXPLANATION/ EXPLICACIÓN DE LOS SÍMBOLOS/ 

EXPLICAÇÃO DOS SÍMBOLOS  

3

SAFETY INSTRUCTIONS/ INSTRUCCIONES DE SEGURIDAD/ 

INSTRUÇÕES DE SEGURANÇA  

4

OPERATOR SAFETY/ SEGURIDAD DEL USUARIO/ SEGURANÇA DO OPERADOR   4

BRUSHCUTTER/ GRASS TRIMMER SAFETY

SEGURIDAD DE LA BORDEADORA DE CÉSPED/ DESBROZADORA

SEGURANÇA DA ROÇADORA/ APARADOR DE RELVA  

5

FUEL SAFETY/ SEGURIDAD DEL COMBUSTIBLE/ SEGURANÇA DO COMBUSTÍVEL   5

BRUSHCUTTER/ GRASS TRIMMER OPERATING SAFETY

SEGURIDAD AL UTILIZAR LA BORDEADORA DE CÉSPED/ DESBROZADORA 

SEGURANÇA DE FUNCIONAMENTO DA ROÇADORA/ APARADOR DE RELVA 

5

PRODUCT DESCRIPTION/ DESCRIPCIÓN DEL PRODUCTO/ DESCRIÇÃO DO PRODUTO 

 6

ASSEMBLY/ MONTAJE/ MONTAGEM 

 7

CONNECTING THROTTLE CABLE AND STOP SWITCH WIRES

CÓMO CONECTAR EL CABLE DEL ACELERADOR Y LOS CABLES DEL INTERRUPTOR “STOP”

LIGAR O CABO DO ESTRANGULADOR E OS FIOS DO INTERRUPTOR DE PARAGEM   7

LOOP HANDLE INSTALLATION/ INSTALACIÓN DE LA EMPUÑADURA CIRCULAR/ 

INSTALAÇÃO DA PEGA REDONDA  

8

INSTALLING GUARD/ CÓMO INSTALAR LA PROTECCIÓN/ INSTALAR O RESGUARDO   9

INSTALLING CUTTING ATTACHMENT/ 

CÓMO INSTALAR EL ACCESORIO DE CORTE/ INSTALAR A PEÇA DE CORTE  

10

INSTALLING BLADE COVER/ CÓMO INSTALAR EL PROTECTOR DE LA CUCHILLA/ 

INSTALAR A COBERTURA DA LÂMINA 


12

BEFORE OPERATION/ PRIMEROS PASOS/ ANTES DO FUNCIONAMENTO  

13

OIL AND FUEL/ ACEITE Y COMBUSTIBLE/ ÓLEO E COMBUSTÍVEL  

13

MIXING PETROL AND OIL/ CÓMO HACER LA MEZCLA DE GASOLINA Y ACEITE/

MISTURA DE GASOLINA E ÓLEO  

14

STARTING AND STOPPING/ CÓMO ARRANCAR Y PARAR/ 

PROCEDIMENTO DE ARRANQUE E PARAGEM  

15

IDLE SPEED ADJUSTMENT/ AJUSTE DE LA VELOCIDAD MÍNIMA/ 

AJUSTE DA VELOCIDADE AO RALENTI 

 17

OPERATION/ FUNCIONAMIENTO/ FUNCIONAMENTO 

 18

BRUSHCUTTER/ GRASS TRIMMER OPERATING POSITION/ 

POSICIÓN DE TRABAJO DE LA BORDEADORA/ DESBROZADORA/ 

POSIÇÃO DE FUNCIONAMENTO DA ROÇADORA/ APARADOR DE RELVA  

18

CUTTING WITH TRIMMER HEAD/ CORTE CON CABEZAL DE CORTE/ 

CORTAR COM CABEÇA DE APARADOR  

20

CUTTING DIRECTION OF BRUSHCUTTER BLADE/ 

DIRECCIÓN DE CORTE DE LA CUCHILLA  DE LA DESBROZADORA/ 

DIRECÇÃO DE CORTE DA LÂMINA DA ROÇADORA  

21

CUTTING BLADES/ CUCHILLAS/ LÂMINAS DE CORTE  

21

MAINTENANCE/ MANTENIMIENTO/ MANUTENÇÃO  

22

AIR FILTER/ FILTRO DE AIRE/ FILTRO DO AR  

22

FUEL FILTER/ FILTRO DE COMBUSTIBLE/ FILTRO DE COMBUSTÍVEL  

22

SPARK PLUG/ BUJÍA/ VELA DE IGNIÇÃO  

23

FLEXIBLE SHAFT/ EJE FLEXIBLE/ EIXO FLEXÍVEL  

23

GEARCASE/ CÁRTER/ CÁRTER DE ENGRENAGENS  

24

GENERAL CLEANING AND TIGHTENING/ LIMPIEZA GENERAL Y AJUSTE/ 

LIMPEZA E APERTO GERAIS  

25

STORAGE/ ALMACENAMIENTO/ ARMAZENAMENTO 

 25

TROUBLESHOOTING/ SOLUCIÓN DE PROBLEMAS/ RESOLUÇÃO DE PROBLEMAS   26

SPECIFICATIONS/ ESPECIFICACIONES/  ESPECIFICAÇÕES 

26

TECHNICAL DATA/ DATOS TÉCNICOS/ CARACTERÍSTICAS TÉCNICAS 

27

EC DECLARATION OF CONFORMITY/DECLARACIÓN CE DE CONFORMIDAD/

DECLARAÇÃO DE CONFORMIDADE DA CE


28-30

CONTENTS/ CONTENIDOS/ ÍNDICE

Summary of Contents for BKC4321RS

Page 1: ...o Proprietario Operador Completelty read and understand this manual before using this product Antes de utilizar este producto lea atentamente este Manual de usuario propietario Leia e compreenda este...

Page 2: ...SEGURAN A DE FUNCIONAMENTO DA RO ADORA APARADOR DE RELVA 5 PRODUCT DESCRIPTION DESCRIPCI N DEL PRODUCTO DESCRI O DO PRODUTO 6 ASSEMBLY MONTAJE MONTAGEM 7 CONNECTING THROTTLE CABLE AND STOP SWITCH WIR...

Page 3: ...e located near any area of potential danger Replace any decal that is damaged or lost Los adhesivos de seguridad son f cilmente visibles para el usuario y est n colocados junto a cualquier zona de pos...

Page 4: ...ar los gases de escape provocan la muerte Nunca arranque ni utilice el motor dentro de un edificio o espacio cerrado Perigo de inc ndio a gasolina altamente inflam vel Nunca adicione combust vel Ro ad...

Page 5: ...rtante llama la atenci n sobre la informaci n mec nica especial y Nota subraya a informaci n general merecedora de especial atenci n SEGURIDAD DEL USUARIO 1 Antes de utilizar la bordeadora de c sped D...

Page 6: ...ora justo despu s de haber parado el motor 8 Antes de volver a llenar el dep sito deje que se enfr e el motor 9 Antes de guardar la unidad vac e el dep sito y haga funcionar el motor hasta que no qued...

Page 7: ...o de combustible 9 Empu adura circular 10 Nombre del modelo 11 C rter 12 Cuchilla de la Desbrozadora 13 Protecci n de accesorio de corte 14 Eje 15 Gatillo del acelerador e interruptor Stop 16 Empu adu...

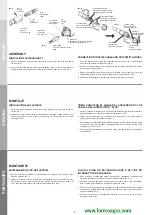
Page 8: ...o asegur ndose de que el cabezal del cable est colocado en el orificio 7 4 4 Pulse el gatillo del acelerador unas cuantas veces para asegurarse de que funciona correctamente MONTAGEM MONTAGEM DO EIXO...

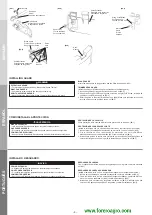
Page 9: ...ir paralelo al eje flexible Si se girasen deber volver a colocarlos en paralelo El cable del acelerador se debe ajustar debajo del eje flexible doblado como se indica 8 4 1 Ajuste el manguito ajustado...

Page 10: ...on la placa como se indica en 9 1 PROTECCI N DEL CABEZAL DE CORTE Instale la cuchilla de hilo y la extensi n de protecci n en la protecci n de la cuchilla 1 Inserte la tuerca cuadrada en la extensi n...

Page 11: ...la agujero en el adaptador de buje con la agujero gu a en la c rter 3 Inserte la clavija de 6mm en el agujero del adaptador de buje y la agujero gu a en la carter para fijar el eje de fijaci n 4 Inse...

Page 12: ...ut has left hand thread 2 Install the Brushcutter blade onto the boss adapter then reinstall the clamping washer stabilizer and blade nut 3 Align the hole in the boss adapter with the guide hole in th...

Page 13: ...ARD Keep the blade cover on the blade when the Brushcutter is not use This will protect persons from injury from blade contact and will protect the blade from damage 1 Insert the tips of the blade int...

Page 14: ...6 Wipe up any spilled fuel before starting the engine 7 Move the Brushcutter at least 3m away from the fueling location and fuel storage container before starting the engine DANGER POTENTIAL HAZARD I...

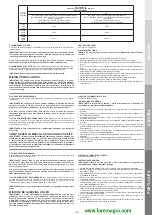
Page 15: ...etrol 2 Mark the container to identify it as fuel mix for the Brushcutter Grass Trimmer 3 Use regular unleaded petrol and fill the container with half the required amount of petrol 4 Pour the correct...

Page 16: ...owing fuel should be almost clear not foamy or full of bubbles 2 Turn the choke lever to the Close position 3 With the stop switch START ON and the throttle trigger positioned at Fast idle start posit...

Page 17: ...Fast idle start position 15 2 HOT RESTART To start the engine that is already warmed up hot restart 1 Pump the primer bulb until fuel can be seen flowing through the fuel return line to the fuel tank...

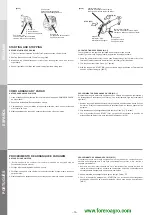
Page 18: ...del accesorio Cuando se suelta el gatillo del acelerador el motor deber a volver a una velocidad de ralent La velocidad correcta es 2400 2800min 1 o justo por debajo de la velocidad de embrague Para a...

Page 19: ...t installing and using the shoulder harness strap Always operate the Brushcutter Grass Trimmer with the unit on your right side 1 The operator must be set the knapsack belt and the Brushcutter Grass T...

Page 20: ...la cinta roja indicada en la ilustraci n para que el arn s y la unidad del motor caigan al suelo Quick Release In case of emergency pull the red strap shown in illustration then harness and engine uni...

Page 21: ...ntrario el hilo golpear el material aumentando su propio desgaste y obteniendo un p simo resultado de corte 20 2 RECORTE Mantenga la parte inferior del cabezal de corte a unos 5 10 cm del suelo y en n...

Page 22: ...1 Utilice s lo la cuchilla adecuada pieza original de MARUYAMA aprobada para la aplicaci n y modelo de Desbrozadora 2 Revise cuidadosamente el estado de las cuchillas antes y despu s de su utilizaci n...

Page 23: ...IBLE El filtro de combustible est fijado al extremo del tubo de captaci n de combustible en el interior del dep sito Para cambiar el filtro de combustible 1 Aseg rese de que el dep sito est vac o 2 Af...

Page 24: ...apriete es 10 7 16 6 N m EJE FLEXIBLE PERIODOS EN LOS QUE ES NECESARIO VERIFICAR La eje flexible de ser lubricado tras cada 20 hrs de operaci n LUBRICACI N DE EJE FLEXIBLE 1 Tire de la pieza de conexi...

Page 25: ...r de buje y el c rter Retire el tap n del lubricante del lado del c rter Mientras gire el eje de fijaci n inyecte lubricante de litio para cojinetes N Ref 211337 por el orificio del tap n hasta llenar...

Page 26: ...ance on it STORAGE For long term storage of the Brushcutter Grass Trimmer 1 Empty the fuel tank into a suitable fuel storage container 2 Run the engine to remove any fuel that may remain in the carbur...

Page 27: ...eixo de sa da min 1 8000 Measured maximum engine power according to ISO 8893 kW Potencia m xima medida del motor seg n ISO 8893 kW Pot ncia m xima medida do motor de acordo com a norma ISO 8893 kW 1...

Page 28: ...o ISO 3744 22868 dB A Nivel de potencia sonora equivalente LWA medido seg n ISO 3744 22868 dB A N vel de pot ncia ac stica equivalente LWA medido de acordo com as normas ISO 3744 22868 dB A 115 113 11...

Page 29: ...es comply with the provisions of the Machinery Directive 2006 42 EC Annex II A Does comply with the provisions of the Electromagnetic compatibility 2004 108 EC amended 2014 30 EU and applicable supple...

Page 30: ...s de Maquinarias directiva 2006 42 CE Anexo II A Cumple con las cl usulas de Compatibilidad electromagn tica directiva 2004 108 CE 2014 30 UE enmendado as tambi n los accesorios afines Cumple con las...

Page 31: ...S Cumpre com as disposi es na directiva de Maquinaria 2006 42 CE Anexo II A Cumpre com as disposi es na directiva de Compatibilidade Electromagn tica 2004 108 CE 2014 30 UE alterado e suplementos apl...

Page 32: ...Chiyoda ku Tokyo 101 0047 Japan Name and address of the european authorized representative Nombre y direcci n del representante autor izado europeo Nome e morada do representante europeu autorizado O...

Reviews: