53
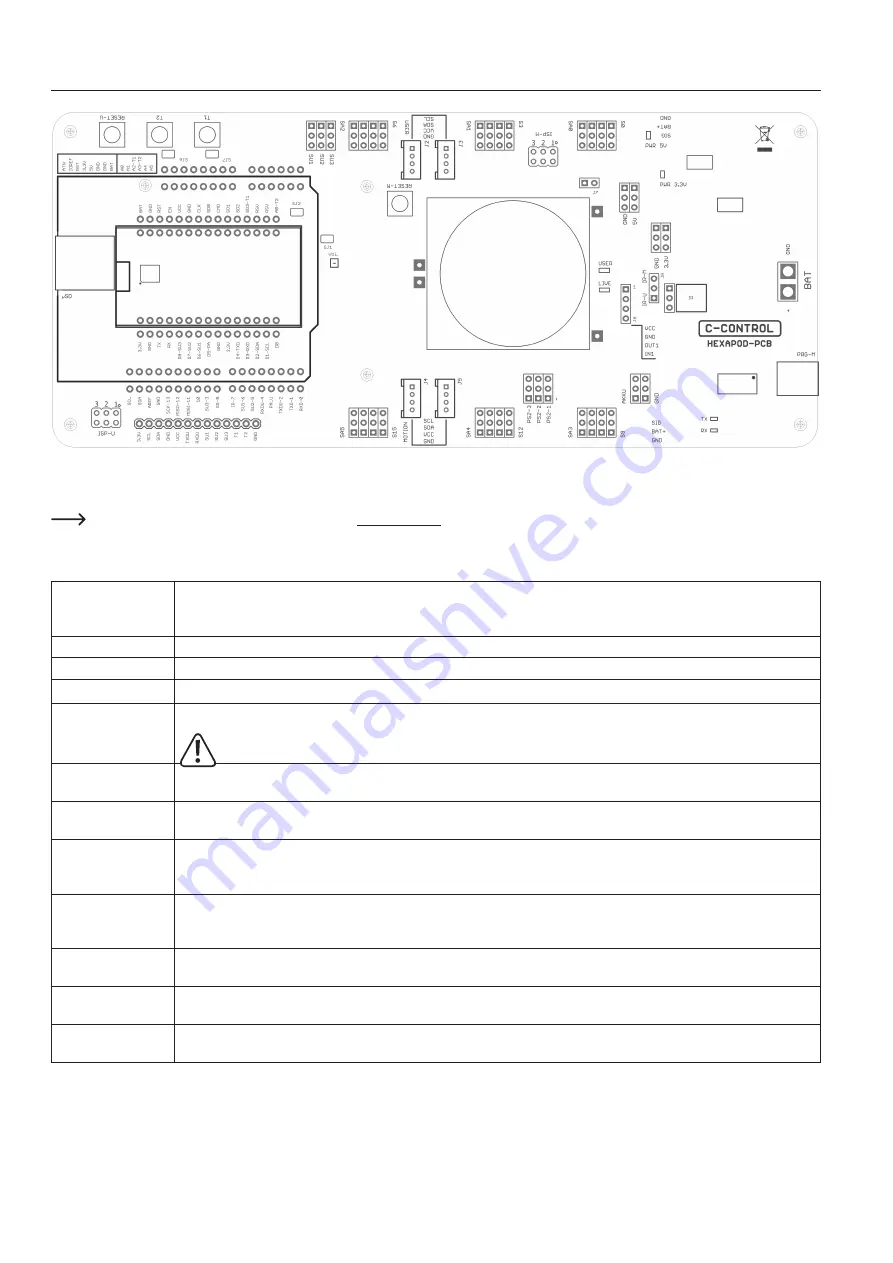
19. Overview of the connections and components of the robot board
Figure 79
Lay down the robot board as shown in the illustration to get an overview of the connector options.
You can also find the circuit diagram for the board at www.conrad.com on the product website.
The Hexpod robot board has the following connectors and components:
BAT
XT30 connector for connecting the battery that powers the board. Operating voltage 4.5 to 10 V/DC ("+" = positive pole; "GND" =
negative pole). Depending on the servos used, a NiMH battery with 5 cells (nominal voltage 6.0 V) and a capacity of at least 2000
mAh should be used as power supply.
PRG-M
USB connection for programming the locomotion controller.
TX-LED
Indicates the transmission line when a programme is transmitted to the locomotion controller (fast flashing during transmission).
Signals the receiving line when a programme is transferred to the locomotion controller (fast flashing during transfer).
AKKU & GND
The battery voltage can be tapped at these pins ("BAT" = positive pole, "GND" = negative pole).
The pins are not protected against short circuits! Work carefully here and do not cause a short circuit! This can lead to the
destruction of the pins and the Hexapod Robot Board! This connection is available for proper extensions and experiments.
J6
Here stabilised 5 V/DC/1000 mA at the pins "VCC" and "GND" are available. This connector is used for proper extensions and
experiments ("VCC" = positive pole, "GND" = negative pole).
OUT1
This is a digital output of the locomotion controller. It can be switched to HIGH (+5 V/DC) or LOW (0 V/DC) by a command from the
user board. The maximum current carrying capacity is 20 mA. This connection is available for proper extensions and experiments.
IN1
This is a digital input of the locomotion controller. It can read a digital state via a command from the user board. A logical 1 is de-
tected between 3.5 and 5 V/DC; a logical 0 at a voltage lower than 3.3 V/DC. The maximum input voltage of 5 V/DC must not be
exceeded! This connection is available for proper extensions and experiments.
IR
The infrared receiver "IR" can either be connected with the jumper "J8" with the locomotion controller (jumper position "IR-M") or
with the user board (jumper position "IR-U"). The receiver makes it possible to receive a 38 kHz infrared signal, e.g., from a univer-
sal remote control or a self-made IR transmitter.
LIVE-LED
The blue "LIVE-LED" indicates the status of the locomotion controller. If the locomotion controller is active, this LED flashes in
different states.
USER-LED
The red "USER LED" indicates that the PS2-compatible gamepad is activated, and the control commands are now ignored by the
user board.
3.3V & GND
Stabilised 3.3 V/DC/400 mA are available at these pins. This connector is available for proper extensions and experiments ("3.3V"
= positive pole, "GND" = negative pole).
Summary of Contents for MF-4992453
Page 1: ...Operating Instructions Hexapod Robobug Complete Set Item no 1664151...
Page 23: ...23 The femur servo mount must be mounted a total of 6 times Figure 31 Figure 32...
Page 26: ...26 Figure 37...
Page 36: ...36 Figure 58 Figure 59...
Page 37: ...37 Figure 60 Illustration_61 Figure 61...
Page 38: ...38 Figure 62...
Page 66: ...66...
Page 67: ...67...


