TEO-540-C1A Engine Maintenance Manual
© 2018 Avco Corporation. All Rights Reserved
72-20
November 2018
Page 151
TEO-540-C1A Engine Maintenance Manual
E.
Alignment Dowel Inspection
(1)
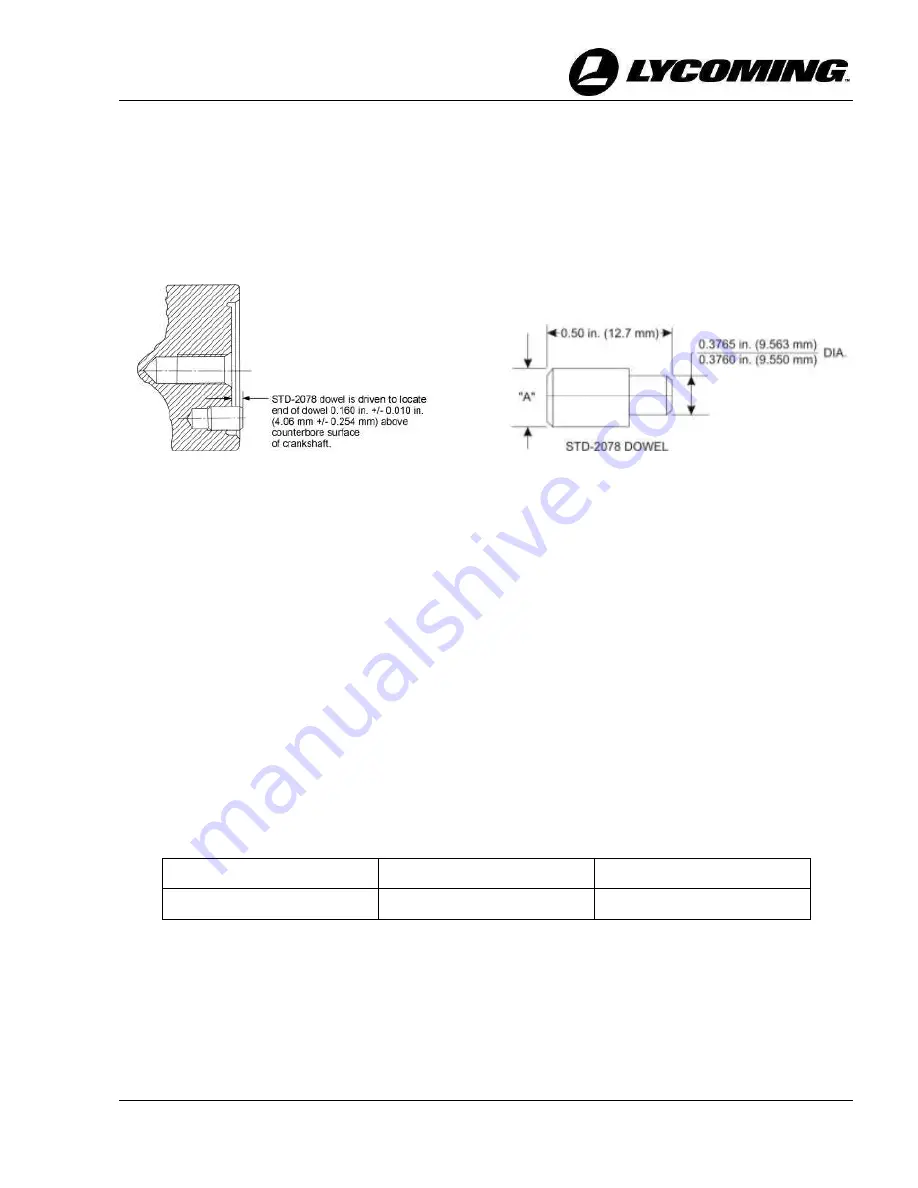
Examine the alignment dowel installed in the end of the crankshaft.
(2)
Make sure the alignment dowel is perfectly smooth and round, without nicks, cracks, or
deformation.
(3)
Make sure that the end of the dowel is 0.160 in. +/- 0.010 in. (4.06 mm +/- 0.254 mm)
above the counterbore surface of the crankshaft as shown in Figure 29.
(4)
Make sure the alignment dowel fits tightly in the crankshaft. It must not spin or be loose.
Figure 29
Section Through Counterbore End of Crankshaft
Showing Driven Height of Dowel
Figure 30
Details of Crankshaft Dowel
(5)
Measure the diameter of the alignment dowel (Dimension A) shown in Figure 30 and
determine if the measurement conforms to the values for the different alignment dowel
part numbers in the latest revision of Service Bulletin No. SB-475.
(6)
If the alignment dowel is out of tolerance or out of round, replace the dowel with a new
one per the “Alignment Dowel Replacement” procedure in this chapter.
7.
Crankshaft Bearing Surface Inspection
A.
Examine all bearing surfaces for scoring, galling, gouges, and wear. If a bearing surface is
scored, galled, or worn and polishing to either 0.003 in. or 0.006 in. undersize does not
remove the condition, replace the crankshaft.
B.
Refer to the latest revision of the
Service Table of Limits - SSP-1776
to identify the nominal
manufactured specifications of the bearing journals. Undersize crankshaft bearing journals in
Table 1 are identified by a code symbol stamped on the front of the flange as a suffix to the
part number.
Table 1
Crankshaft Undersize Codes
Journals
0.003 in.
0.006 in.
Main Bearing Journals
M03M
M06M
C.
Using a micrometer, measure and record the dimensions.
D.
If the actual undersize is between the service limit (0.0015 in. and 0.003 in.), complete the
following:
(1)
Polish to 0.003 in. undersize.
(2)
Fit with 0.003 in. bearing insert.
(3)
Repeat for all bearings.


