Luma Recorders
|
Local UI Wizard
Set Up Recording
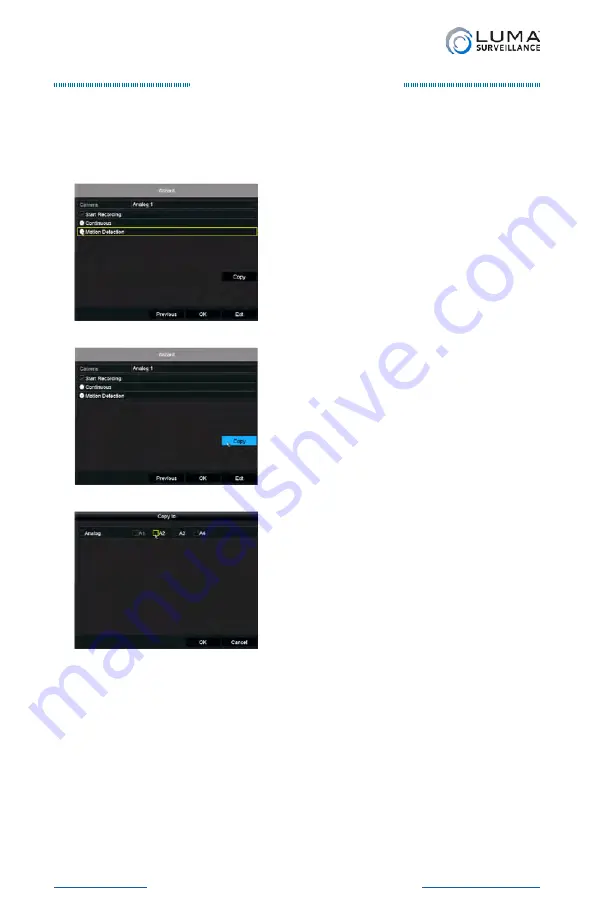
Finally, you choose the recording settings for the various cameras on
your system. Select the camera you want to set using the dropdown
menu at the top of the dialog.
If you want the camera only to
record when manually controlled,
deselect
Start Recording
. If you want
to activate the camera, select
Start
Recording
, then choose whether
you want the camera to record
continuously or only when it detects
motion within its field of view.
Once you have made the choices for
the selected camera, you have two
options for how to continue. You can
either select a new camera using the
dropdown menu at the top of the
dialog box and make choices for it
manually, or else you can press the
Copy
button.
When you press
Copy
, a new dialog
box opens. You can copy the current
camera’s settings to any or all of the
other cameras in the system. Selecting
the
Analog/Digital
button at the left
automatically selects all analog or
digital cameras on the system. You
can also select or deselect the cameras
individually by clicking their boxes.
Once you click
OK
, the current camera’s settings are copied to all
selected cameras. Pressing
Cancel
returns you to the previous dialog
without copying any settings.
Once you have made your selections and pressed
OK
, the setup
wizard ends.
Summary of Contents for LUM-500-DVR-16CH
Page 3: ...LUM 500 501 Series Surveillance Recorders Additional Installation...
Page 23: ...LUM 500 501 Series Surveillance Recorders FAQ...
Page 59: ...LUM 500 501 Series Surveillance Recorders Live View Screen...
Page 76: ...LUM 500 501 Series Surveillance Recorders Remote Control...
Page 88: ...LUM 500 501 Series Surveillance Recorders Web Interface...
Page 149: ...LUM 500 501 Series Surveillance Recorders Local Interface...
Page 204: ...LUM 500 501 Series Surveillance Recorders Installing Network Cameras on an NVR...
Page 210: ...LUM 500 501 Series Surveillance Recorders Installing with the Local UI Wizard...


